Comments / Questions (13)
![]() Silvia Bellatio wrote:
Silvia Bellatio wrote:
Mi sembra che la parte della spiegazione dello scalvo della barchetta sia errato. grazie
27.09.2024 - 10:33DROPS Design answered:
Buonasera Silvia, quale parte le sembra errata? Buon lavoro!
28.10.2024 - 00:06
![]() EK wrote:
EK wrote:
Hej! Lige såvel som ryg- og forstykke starter med en pind (omg) ret, mener jeg også at ærmerne burde starte med en omgang ret , så opslagskanten bliver ens på både ærmer og ryg- og forstykke. Hvad mener I? Bedste hilsner, Else
10.08.2023 - 10:23DROPS Design answered:
Hej, vi har ikke gjort det, men det må du naturligvis meget gerne gøre :)
11.08.2023 - 10:19
![]() Simply Susan wrote:
Simply Susan wrote:
Kan jeg strikke bare med 1 tråd i denne oppskriften (199-29)
02.11.2022 - 11:47DROPS Design answered:
Hej Simply Susan, ja det kan du men da skal du strikke med et tykkere garn som DROPS Snow eller DROPS Wish - Brug vår garnkalkulator :)
02.11.2022 - 13:47
![]() Amanda Marginson wrote:
Amanda Marginson wrote:
Thank you so much for the free pattern which was chosen by my mum... easy to follow and 8 purchased my Drops Air wool which worked perfectly xx
28.07.2022 - 22:59
![]() Amanda Marginson wrote:
Amanda Marginson wrote:
Hi, I'm making this for my Mum...how many balls of Drops "air" yarn are needed to make the large size and the medium size... not sure which she is, but large should cover it. Thank you
28.05.2022 - 08:57DROPS Design answered:
Dear Amanda, for the L size you need 450 g = 9 balls of DROPS Air. For size M you need one ball less. Happy knitting!
28.05.2022 - 17:08
![]() Vacelet wrote:
Vacelet wrote:
Les explications ne semblent pas correspondre au modèle pour le dos et le devant. Le schéma montre un dos et un devant avec la même largeur sur toute la hauteur, je ne comprends pas pourquoi les explications indiquent des augmentations et la fin avec des aiguilles circulaires de 7
24.08.2021 - 11:16DROPS Design answered:
Bonjour Mme Varcelet, les côtes sont tricotes sur les aiguilles no 7 (A.1). Je ne vois pas d’augmentations. Par contre on diminue les mailles apres le cotes parce que la bordure en côtes est plus élastique et contracte légèrement l'ouvrage en largeur par rapport au jersey par exemple. On diminue apres la bordure en côtes pour que la différence entre la bordure côtes et le reste de l'ouvrage soit moins visible. Bon tricot!
07.10.2021 - 09:30
![]() Brit Slotboom wrote:
Brit Slotboom wrote:
Tel patroon Drops 199-29 Simply Susan Volgens de omschrijving van dit patroon wordt gebreid in tricotsteek en gerstekorrel: dat zie je ook in de boord op de foto. De omschrijving van die boordsteek in het telpatroon klopt echter niet. Het kan zo niet worden als op de foto. Wat het moet zijn is: Na de eerste toer (na opzet) geheel recht: Tweede toer: *3 av, 1r-1av-1r* herhaal Derde toer: brei tricotsteek boven 3 av en dan 3 st gerstekorrel , dus: *3r, 1 av-1r-1av* herhaal
07.05.2020 - 14:24
![]() Annalisa wrote:
Annalisa wrote:
Sto lavorando seguendo il modello per la taglia XXXL quindi sul davanti a 57cm ho 75 magli e devo proseguire lavorando 54 maglie a rovescio,mettere su ferma maglie 33 lavorate per lo scollo(?) ele rimanenti 21 maglie come prima. Se ne ho in tutto 75,dove sono le 33 dello scollo?
08.11.2019 - 10:59DROPS Design answered:
Buongiorno Annalisa. Deve mettere in attesa le 33 maglie centrali del davanti. Le rimarranno 21 maglie per ognuna delle due spalle. Per evitare di tagliare il filo, lavora in questo modo: lavora 54 maglie, mette in attesa le ultime 33 maglie di queste 54 m che sono sul ferro destro (e quindi le rimangono sul ferro 21 maglie lavorate per la spalla) e poi lavora le ultime 21 maglie che sono ancora sul ferro di sinistra. Buon lavoro!
08.11.2019 - 12:16
![]() Annalisa wrote:
Annalisa wrote:
Sto lavorando seguendo il modello per la taglia XXXL quindi sul davanti a 57cm ho 75 magli e devo proseguire lavorando 54 maglie a rovescio,mettere su ferma maglie 33 lavorate per lo scollo(?) ele rimanenti 21 maglie come prima. Se ne ho in tutto 75,dove sono le 33 dello scollo?
08.11.2019 - 10:58
![]() Sylvia wrote:
Sylvia wrote:
Für mich als Anfänger war er sehr einfach zu stricken und bin sehr begeistert von dem Resultat. Ein super schicker Pulli!
18.07.2019 - 00:23
Simply Susan#simplysusansweater |
|||||||
 |
 |
||||||
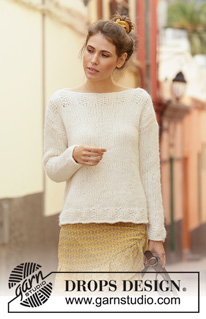
Knitted sweater in 2 strands DROPS Air. Piece is knitted in stockinette stitch and moss stitch. Size: S - XXXL
DROPS 199-29 |
|||||||
|
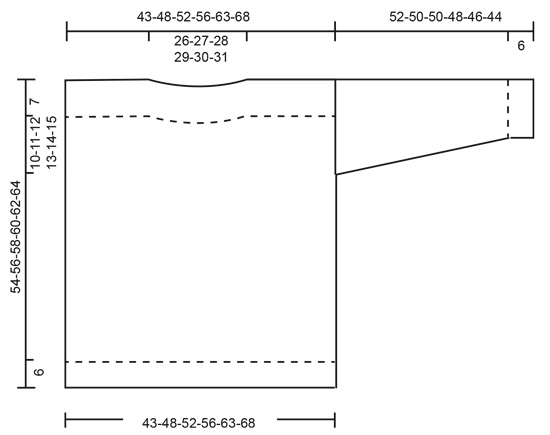
---------------------------------------------------------- EXPLANATION FOR THE PATTERN: ---------------------------------------------------------- PATTERN: See diagram A.1. DECREASE/INCREASE TIP (evenly): To calculate how to decrease/increase evenly, use the total number of stitches on row (e.g. 114 stitches) and divide stitches by number of decreased/increases to be done (e.g. 20) = 5.7. In this example decrease by working approx. every 5th and 6th stitch together. When increasing make 1 yarn over (in this example) after approx. every 6th stitch. On next round/row work yarn over twisted to avoid hole. INCREASE TIP (applies to sleeves): Work until 1 stitch remains before marker thread, 1 yarn over, knit 2 (marker thread is in the middle of these 2 stitches), 1 yarn over. On next round knit yarn overs twisted to avoid holes. Then work the new stitches in stockinette stitch. ---------------------------------------------------------- START THE PIECE HERE: ---------------------------------------------------------- SWEATER - SHORT OVERVIEW OF THE PIECE: Worked in the round on circular needle up to armhole, then work front and back piece back and forth separately. Sleeves are worked in the round on double pointed needles and sewn into armholes when finished. BODY: Cast on 114-126-138-144-162-180 stitches on circular needle size 7 mm = US 10,75 with 2 strands Air. Knit 1 round. Then work rib as follows: * Knit 3, A.1 (= 3 stitches) *, repeat from *-* the entire round. Work rib like this for 6 cm = 2⅜". Switch to circular needle size 8 mm = US 11, knit 1 round while decreasing 20-20-24-22-24-30 stitches evenly - read INCREASE/DECREASE TIP = 94-106-114-122-138-150 stitches. Insert 1 marker thread at the beginning of round and 1 marker thread after the next 47-53-57-61-69-75 stitches, there are now 47-53-57-61-69-75 stitches until the beginning of round. Marker threads mark the sides, move the marker threads upwards when working. Work in stockinette stitch. REMEMBER THE KNITTING GAUGE! When piece measures 37-38-39-40-41-42 cm = 14½"-15"-15¼"-15¾"-16⅛"-16½", divide the piece at the markers and finish each part separately. FRONT PIECE: = 47-53-57-61-69-75 stitches. Begin in the side and work back and forth in stockinette stitch. When piece measures 47-49-51-53-55-57 cm = 18½"-19¼"-20"-21"-21⅝"-22½", work next row from wrong side as follows: Work 38-41-44-46-51-54 stitches as before, and slip the last 29-29-31-31-33-33 stitches worked on 1 stitch holder for neck, work the remaining 9-12-13-15-18-21 stitches as before. Work 1 row from right side over the first 9-12-13-15-18-21 stitches as before, turn, tighten yarn and work 1 row from wrong side. Cut the yarn. Slip stitches on 1 stitch holder. Work 1 row from right side over the last 9-12-13-15-18-21 stitches on needle as before, turn, tighten yarn and work 1 row from wrong side. Cut the yarn. Slip all stitches on to circular needle size 8 mm = US 11 = 47-53-57-61-69-75 stitches. Work 1 row in stockinette stitch while increasing 4-4-0-2-0-0 stitches evenly - remember DECREASE/INCREASE TIP = 51-57-57-63-69-75 stitches. Switch to circular needle size 7 mm = US 10,75. Work rib as follows from right side: * A.1 (= 3 stitches), 3 stitches in stockinette stitch *, work from *-* until 3 stitches remain, finish with A.1 (= 3 stitches). Continue with rib for 7 cm = 2¾". Bind off stitches with knit over knit and purl over purl - make sure to avoid a tight bind-off edge (bind off on a larger needle size if needed). Piece measures approx. 54-56-58-60-62-64 cm 21¼"-22"-22¾"-23⅝"-24⅜"-25¼". BACK PIECE: Work as front piece. SLEEVE: Cast on 24-24-24-30-30-30 stitches on double pointed needles size 7 mm = US 10,75 with 2 strands Air. * Knit 3, A.1 (= 3 stitches) *, repeat from *-* the entire round. Work rib like this for 6 cm = 2⅜". Knit 1 round while increasing 0-2-2-0-0-0 stitches evenly = 24-26-26-30-30-30 stitches. Insert 1 marker at beginning of round and move the marker thread upwards when working. Use marker thread later when increasing mid under sleeve. Switch to double pointed needles size 8 mm = US 11. Then work in stockinette stitch. When piece measures 9 cm = 3½", increase 1 stitch on each side of marker thread mid under sleeve - read INCREASE TIP. Increase like this every 6½-6½-5½-6-5-4 cm = 2½"-2½"-2⅛"-2⅜"-2"-1½" 7-7-8-7-8-9 times in total = 38-40-42-44-46-48 stitches. Continue until piece measures 52-50-50-48-46-44 cm = 20½"-19¾"-19¾"-19"-18"-17¼" (shorter measurements in the larger sizes because of wider shoulders). Bind off but make sure to avoid a tight bind-off edge (switch to a larger needle size if needed). Work the other sleeve the same way. ASSEMBLY: Sew shoulder seams, leave approx. 26-27-28-29-30-31 cm = 10¼"-10⅝"-11"-11⅜"-11¾"-12¼" for neck. Sew in sleeves. |
|||||||
Diagram explanations |
|||||||
|
|||||||
 |
|||||||
 |
|||||||
Have you finished this pattern?Tag your pictures with #dropspattern #simplysusansweater or submit them to the #dropsfan gallery. Do you need help with this pattern?You'll find 24 tutorial videos, a Comments/Questions area and more by visiting the pattern on garnstudio.com. © 1982-2026 DROPS Design A/S. We reserve all rights. This document, including all its sub-sections, has copyrights. Read more about what you can do with our patterns at the bottom of each pattern on our site. |
|||||||


Post a comment to pattern DROPS 199-29
We would love to hear what you have to say about this pattern!
If you want to leave a question, please make sure you select the correct category in the form below, to speed up the answering process. Required fields are marked *.