
Popular categories
Looking for a yarn?


Comments / Questions (13)
![]() Silvia wrote:
Silvia wrote:
Ciao, sono Silvia, questo modello mi piace tantissimo,come fare lo scollo a V? È possibile? Se gentilmente mi date le istruzioni vi ringrazio anticipatamente
17.04.2024 - 12:19DROPS Design answered:
Buongiorno Silvia, in questa sede non ci è possibile adattare il modello a tutte le esigenze, ma per un'assistenza più personalizzata può rivolgersi al suo rivenditore DROPS di fiducia. Buon lavoro!
17.04.2024 - 16:56
![]() Gumby100 wrote:
Gumby100 wrote:
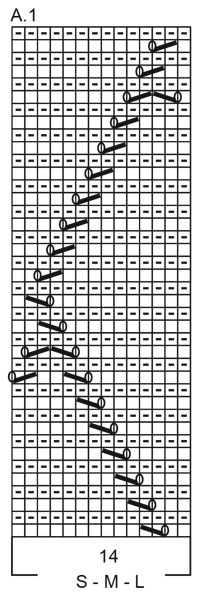
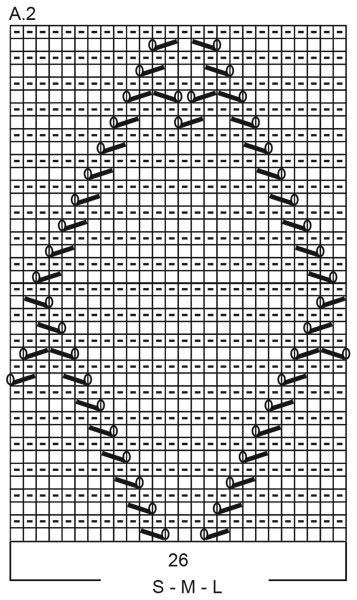
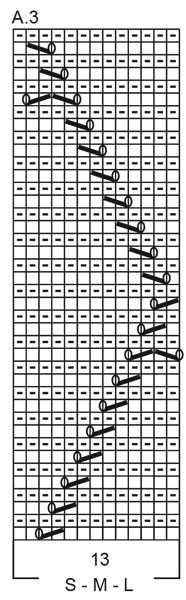
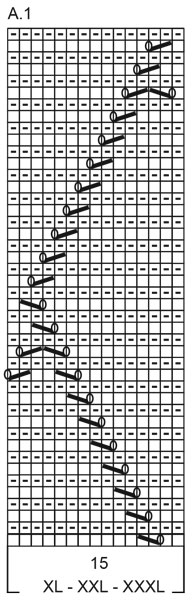
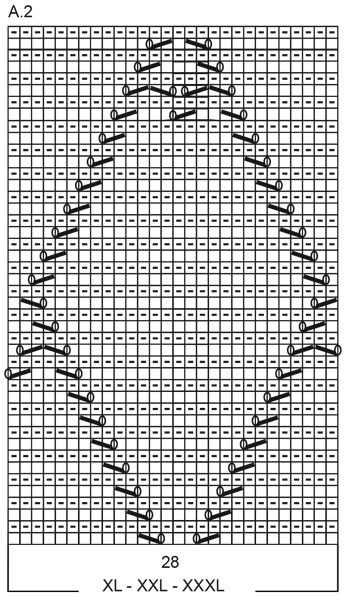
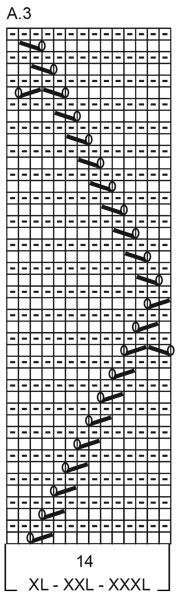
The description says to knit A1 then A2 then A3, but to achieve the diamonds in the image, shouldn't it be knit in the order of A.3 then A.2 then A.1?
05.02.2021 - 06:09DROPS Design answered:
Dear Gymby100, in order to get the diamonds working you have to start row from RS with A.1, then repeat A.2 and finish with A.3 - from wrong side work A.3, repeat A.2 and finish with A.1 (reading now from the left towards the right). Happy knitting!
05.02.2021 - 08:59
![]() Pirjo Björk wrote:
Pirjo Björk wrote:
Står i beskrivningen vid avmaskning för ärmhål ( Bakstycket) för storlek M, att man ska maska av 5 maskor i början av de nästa två varven till ärmhål. Enligt minskningstipset görs alla minskningar från rätsidan. Minskar man genom att sticka två maskor räta tillsammans gånger fem i början på arbetet ? Gör man likadant på slutet av samma varv? Tycker det står så dumt !!!!!
24.08.2020 - 14:39
![]() Bruna Guareschi wrote:
Bruna Guareschi wrote:
Buongiorno non riesco a capire i diagrammi forse devo metterli in ordine 3-2-1 anziché 1-2-3? Grazie
17.04.2020 - 12:42DROPS Design answered:
Buongiorno Bruna. I diagrammi sono disposti nell'ordine corretto e vanno eseguiti dal basso verso l'alto e da destra verso sinistra (sui ferri di andata), da sinistra verso destra sui ferri di ritorno. Segua il diagramma corretto per la taglia che sta lavorando. Buon lavoro!
17.04.2020 - 13:08
![]() Chiara wrote:
Chiara wrote:
Sono confusa. Nele spiegazioni dite di lavorare a punto legaccio prima dei motivi e infatti la foto mostra che tra i rombi del disegno i punti sono legaccio però poi negli schemi dei 3 motivi fate lavorare a maglia rasata.... potete essermi più precisi ? Grazie
19.03.2020 - 19:23DROPS Design answered:
Buongiorno Chiara. Le indicazioni dello schema sono di lavorare a diritto sia sui ferri di andata che su quelli di ritorno così da ottenere il punto legaccio tra i rombi. Buon lavoro!
19.03.2020 - 23:18
![]() Chiara wrote:
Chiara wrote:
Ma perchè dite di lavorare coni ferri circolari se poi spiegate il diritto e il rovscio e di cucire insieme le due parti??? grazie
16.03.2020 - 15:10DROPS Design answered:
Buongiorno Chiara. Quando si lavora avanti e indietro, può sostituire i ferri circolari con i ferri dritti. L'uso dei ferri circolari è molto diffuso soprattutto nel nord dell'Europa, ma in modelli come questo può usare i ferri con cui si trova più a suo agio. Buon lavoro!
16.03.2020 - 15:34
![]() Mary wrote:
Mary wrote:
What does a knit from wrong side mean? How do I do it?
20.07.2019 - 12:53DROPS Design answered:
Dear Mary, when you knit in rowe back and forth you have one side of piece right (front) and the second side wrong (inside of the future top). This top we knit in garter stitch, thats mean both sides (right and wrong as well) are knit. Happy knitting!
20.07.2019 - 17:36
![]() Mariadomenica wrote:
Mariadomenica wrote:
Non riesco a capire scusa la mia cocciutaggine (ho iniziato con 126 maglie e per 4 cm a maglia legaccio) ma non riesco ad andare avanti se gentilmente mi puoi mettere il.numero esatto di maglie solo per il primo ferro .la mia taglia è XXXL.scusami e ti ringrazio
31.05.2019 - 21:48DROPS Design answered:
Buonasera Mariadomenica, dopo i 4 cm a legaccio deve lavorare 34 maglie a legaccio, 15 maglie con il diagramma A.1, 28 maglie con il diagramma A.2, 14 maglie con il diagramma A.3 e 35 maglie a legaccio. I diagrammi si leggono dal basso verso l'alto, da destra verso sinistra. Buon lavoro!
31.05.2019 - 22:10
![]() Mariadomenica wrote:
Mariadomenica wrote:
Gentilmente mi potete rispondere il più presto possibile sono impaziente grazie
31.05.2019 - 21:28DROPS Design answered:
Buonasera Mariadomenica, cerchiamo di rispondere il prima possibile. Buon lavoro!
31.05.2019 - 21:41
![]() Mariadomenica wrote:
Mariadomenica wrote:
Non riesco a capire il numero di maglie del primo ferro( taglia XXXL)che bisogna fare.gentilmente mi puoi scrivere esattamente come bisogna fare solo il primo mi faccio il conto ma non mi trovo.graxie
31.05.2019 - 21:26DROPS Design answered:
Buonasera Mariadomenica, per la taglia XXXL deve avviare 126 maglie e lavorare a maglia legaccio per 4 cm. Poi deve lavorare come segue seguendo il diagramma della sua taglia: 34 maglie a legaccio, diagramma A.1 su 15 maglie, diagramma A.2 su 28 maglie, diagramma A.3 su 14 maglie, 35 maglie a legaccio. Buon lavoro!
31.05.2019 - 21:39
|
||||||||||||||||
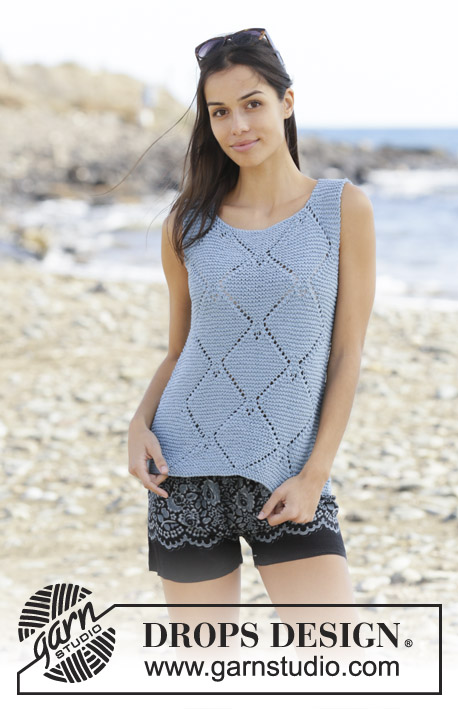
Sunny Island#sunnyislandtop |
||||||||||||||||
 |
 |
|||||||||||||||
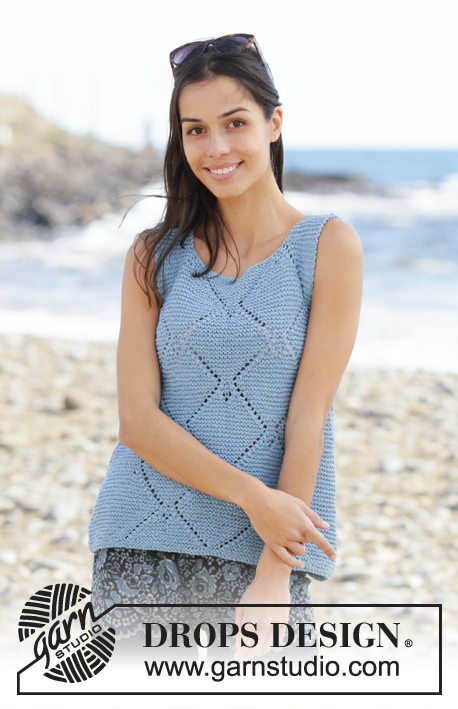
Knitted top in DROPS Paris. Piece is knitted in garter stitch and lace pattern. Size: S - XXXL
DROPS 199-51 |
||||||||||||||||
|
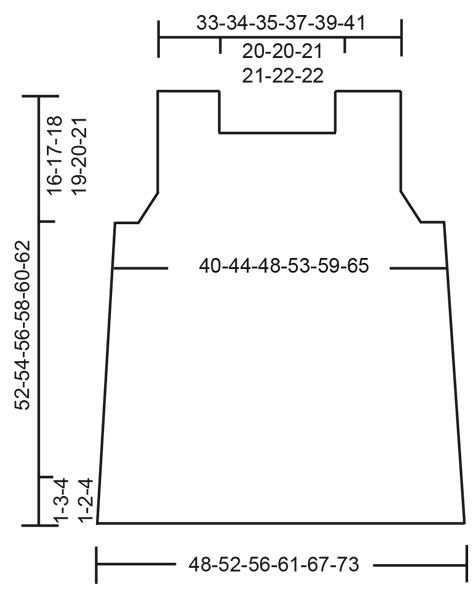
---------------------------------------------------------- EXPLANATION FOR THE PATTERN: ---------------------------------------------------------- GARTER STITCH (back and forth): Knit all rows. 1 ridge vertically = knit 2 rows. PATTERN: See diagrams A.1 to A.3. Choose diagram for your size. Diagrams show all rows in pattern seen from the right side! DECREASE TIP-1 (applies to sides of body): Decrease as follows inside 1 edge stitch in garter stitch at the beginning of row: Knit 2 together. Decrease as follows inside 1 edge stitch in garter stitch at the end of row: Work until 3 stitches remain on needle, slip 1 stitch knitwise, knit 1, pass slipped stitch over. DECREASE TIP-2 (applies to armhole): All decreases are done from the right side! Decrease as follows at the beginning of row from right side (= left armhole): Work 2 stitches in garter stitch, knit 2 together (= 1 stitch decreased). Decrease as follows at the end of row from right side (= right armhole): Work until 4 stitches remain on needle, knit 2 together (= 1 stitch decreased), work the last 2 stitches on needle. DECREASE TIP-3 (applies to neck): All decreases are done from the right side! Decrease as follows on every row towards the neck: Work until 4 stitches remain, knit 2 together (= 1 stitch decreased), work the last 2 stitches before the neck. Decrease as follows on every row from the neck: Work 2 stitches in garter stitch, knit 2 together (= 1 stitch decreased). ---------------------------------------------------------- START THE PIECE HERE: ---------------------------------------------------------- TOP - SHORT OVERVIEW OF THE PIECE: Piece is worked back and forth in 2 parts and sewn together when finished. Work in garter stitch and lace pattern and work bottom up. FRONT PIECE: Cast on 84-90-98-106-116-126 stitches on circular needle size 4.5 mm = US 7 with Paris. Work ridges in GARTER STITCH - read explanation above, for 1-3-4-1-2-4 cm = ⅜"-1⅛"-1½"-⅜"-¾"-1½". Now work pattern - choose diagram for your size, as follows: Work 15-18-22-24-29-34 stitches in garter stitch, A.1 over the next 14-14-14-15-15-15 stitches, A.2 over the next 26-26-26-28-28-28 stitches, A.3 over the next 13-13-13-14-14-14 stitches, 16-19-23-25-30-35 stitches in garter stitch. REMEMBER THE KNITTING GAUGE! When piece measures 8-9-10-5-6-7 cm = 3⅛"-3½"-4"-2"-2⅜"-2¾", begin decrease in each side – read DECREASE TIP-1. Decrease like this approx. every 4-4-4-5-5-5 cm = 1½"-1½"-1½"-2"-2"-2" 7 times in total = 70-76-84-92-102-112 stitches. Continue pattern A.1 to A.3 until they have been worked a total of 3 times vertically. AT THE SAME TIME when piece measures 36-37-38-39-40-41 cm = 14¼"-14½"-15"-15¼"-15¾"-16⅛", bind off 4-5-6-7-8-9 stitches at the beginning of the next 2 rows for armholes. Then decrease 1 stitch inside 2 stitches in garter stitch in each side - read DECREASE TIP-2 (applies to armhole). Decrease like this on every row from right side 3-4-6-8-10-12 times in total = 56-58-60-62-66-70 stitches. When A.1 to A.3 have been worked 3 times in total vertically, work the first 20-20-20-22-22-22 rows in diagrams, then work 2 ridges over all stitches on needle. Now work as follows: Work the first 12-13-13-14-15-17 stitches, bind off the next 32-32-34-34-36-36 stitches for neck and work the remaining 12-13-13-14-15-17 stitches. Now finish each shoulder separately. Continue back and forth in garter stitch but on next row from right side decrease 1 stitch for neck by knitting 2 stitches together inside 2 stitches in garter stitch towards/from the neck – read DECREASE TIP-3 = 11-12-12-13-14-16 stitches for shoulder. When piece measures 8-8-9-9-10-10 cm = 3⅛"-3⅛"-3½"-3 1/2-4"-4" from where stitches were bind off for neck, bind off. Piece measures approx. 52-54-56-58-60-62 cm = 20½"-21¼"-22"-22¾"-23⅝"-24⅜" from shoulder and down. Work the other shoulder the same way. BACK PIECE: Cast on as on front piece and follows explanation for front piece until pattern A.1 to A.3 have been completed. I.e. work 3 repetitions vertically + the first 20-20-20-22-22-22 rows in diagrams (at the same time bind off for armholes the same way as on front piece = 56-58-60-62-66-70 stitches on needle when bind off for armholes is done). Now work 2 ridges over all stitches on needle, then bind off for neck as follows: Work the first 17-18-18-19-20-22 stitches, bind off the next 22-22-24-24-26-26 stitches for neck and work the remaining 17-18-18-19-20-22 stitches. Now finish each shoulder separately. Continue back and forth with garter stitch, but on every row from right side decrease for neck inside 2 stitches in garter stitch towards/from neck – remember DECREASE TIP-3. Decrease like this on every row from right side 6 times in total = 11-12-12-13-14-16 stitches for shoulder. When piece measures 8-8-9-9-10-10 cm = 3⅛"-3⅛"-3½"-3½"-4"-4" from where stitches were bind off for neck - adjust according to front piece, bind off. Piece measures approx. 52-54-56-58-60-62 cm = 20½"-21¼"-22"-22¾"-23⅝"-24⅜" from shoulder and down. Work the other shoulder the same way. ASSEMBLY: Sew shoulder seams inside bind-off edge. Sew side seams from armhole and down. |
||||||||||||||||
Diagram explanations |
||||||||||||||||
|
||||||||||||||||
|
||||||||||||||||
|
||||||||||||||||
|
||||||||||||||||
|
||||||||||||||||
|
||||||||||||||||
|
||||||||||||||||
|
||||||||||||||||
Have you finished this pattern?Tag your pictures with #dropspattern #sunnyislandtop or submit them to the #dropsfan gallery. Do you need help with this pattern?You'll find 17 tutorial videos, a Comments/Questions area and more by visiting the pattern on garnstudio.com. © 1982-2025 DROPS Design A/S. We reserve all rights. This document, including all its sub-sections, has copyrights. Read more about what you can do with our patterns at the bottom of each pattern on our site. |
||||||||||||||||


With over 40 years in knitting and crochet design, DROPS Design offers one of the most extensive collections of free patterns on the internet - translated to 17 languages. As of today we count 314 catalogs and 11822 patterns - 11812 of which are translated into English (US/in).
We work hard to bring you the best knitting and crochet have to offer, inspiration and advice as well as great quality yarns at incredible prices! Would you like to use our patterns for other than personal use? You can read what you are allowed to do in the Copyright text at the bottom of all our patterns. Happy crafting!
Post a comment to pattern DROPS 199-51
We would love to hear what you have to say about this pattern!
If you want to leave a question, please make sure you select the correct category in the form below, to speed up the answering process. Required fields are marked *.