
Looking for a yarn?


Comments / Questions (8)
![]() Helinä Kekki wrote:
Helinä Kekki wrote:
Onnistuin jo kuvion tekemisessä. En tarvitse enää vastausta.
25.09.2022 - 21:44
![]() Helinä Kekki wrote:
Helinä Kekki wrote:
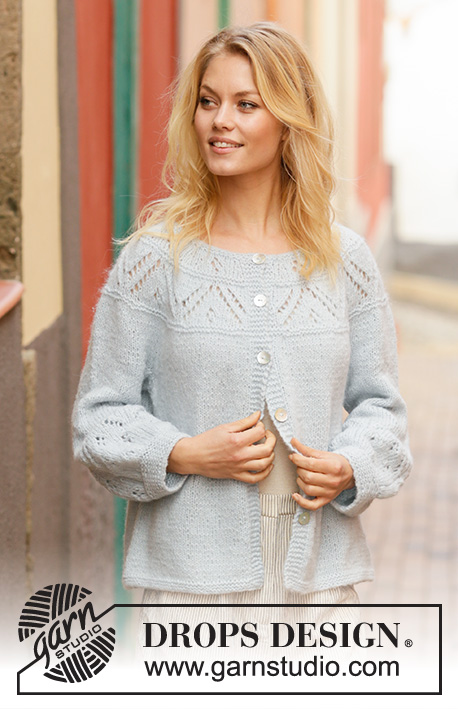
Ihmettelen, miten menettelen kuviossa, jossa on rivin alussa tyhjä ruutu. Tässä mallissa on tällainen kuviossa. Riville ei voi jättää tyhjää kutoessa. Keskellä olevan kohdan ymmärrän, mutta kappaleen sivua en.
21.09.2022 - 21:21DROPS Design answered:
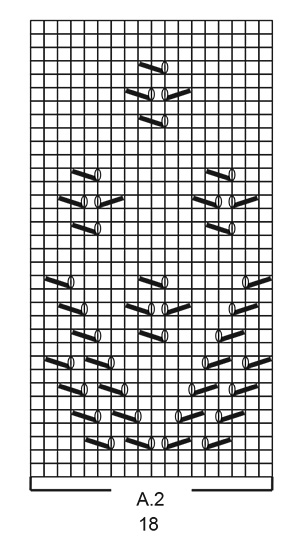
Hei, rivin alussa on tyhjä ruutu, koska kerroksen lopussa tehtävä kavennus tehdään myös tämän silmukan kohdalla. Neulo tämän ruudun kohdalla oikea silmukka, ja tee kerroksen lopussa kavennus ja langankierto piirroksen mukaisesti.
27.09.2022 - 18:51
![]() Stefanie Schl wrote:
Stefanie Schl wrote:
Hallo kann ich den mittleren Teil auch einfach länger stricken das es eine Longjacke wird? Liebe Grüße Steffi
18.05.2022 - 13:11DROPS Design answered:
Liebe Steffi, wenn Sie eine längere Jacke möchten, dann können den RUMPFTEIL länger als 30 cm stricken (dann auch mit 3 Krausrippen fertig stricken dh + 2 cm), beachten Sie nur, daß Sie dann mehr Garn benötigen. Viel Spaß beim stricken!
18.05.2022 - 14:15
![]() Linda wrote:
Linda wrote:
Voisiko jakun neuloa myös lyhyemmällä kaarrokkeella? Jos jakaisin työn etu-, takakappaletta ja hihoja varten heti kainalon alapuolella. Voisiko tämä toimia?
06.06.2020 - 11:20DROPS Design answered:
Mikäli jaat työn aikaisemmin, kaarrokkeesta voi tulla liian lyhyt (vartalostasi riippuen). Sinun tulee myös ottaa huomioon, että puseron alaosan ja hihojen pituusmitat eivät enää täsmää ohjeessa annettuihin mittoihin.
09.06.2020 - 18:20
![]() Chantal Demol wrote:
Chantal Demol wrote:
Bonsoir , mon motif A1 terminé j ai 13 cm au lieu de 18 cm . Je peux continuer en jersey endroit pour arriver au 20 cm pour l augmentation des 12 mailles (taille M). Merci d avance
24.04.2020 - 23:51DROPS Design answered:
Bonjour Mme Demol, votre échantillon était-il juste en largeur et en hauteur? Vous trouverez plus d'infos ici à ce sujet. Bon tricot!
27.04.2020 - 10:08
![]() Magdalena wrote:
Magdalena wrote:
Ska man inte öka för raglan i storlek s m l?
23.11.2019 - 19:27DROPS Design answered:
Hei Magdalena. Nei, det er ikke raglan økninger i de minste størrelsene, kun økninger i hulldiagrammet. God Fornøyelse!
25.11.2019 - 10:20
![]() Younes_st wrote:
Younes_st wrote:
Mrc pour l\'article
23.04.2019 - 14:13
![]() Birgitte Larsen wrote:
Birgitte Larsen wrote:
Mangler der ikke diagram og målskitse til denne opskrift?
07.04.2019 - 12:15DROPS Design answered:
Hej Birgitte, Nu ligger diagrammerne nederst i opskriften. God fornøjelse!
08.04.2019 - 08:41
|
||||||||||||||||||||||
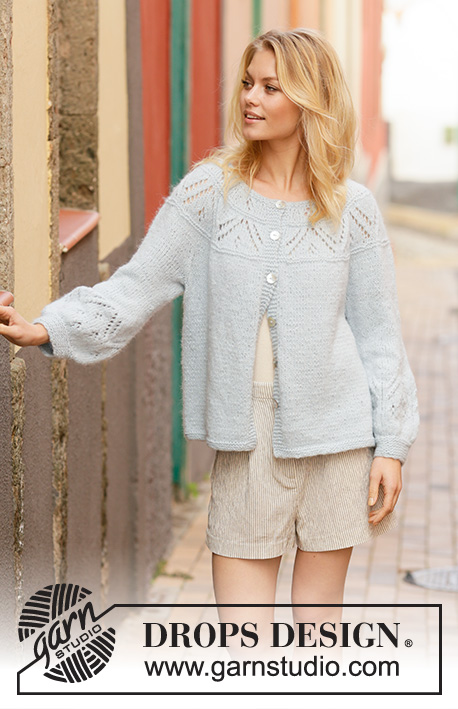
September Skies Jacket#septemberskiesjacket |
||||||||||||||||||||||
 |
 |
|||||||||||||||||||||
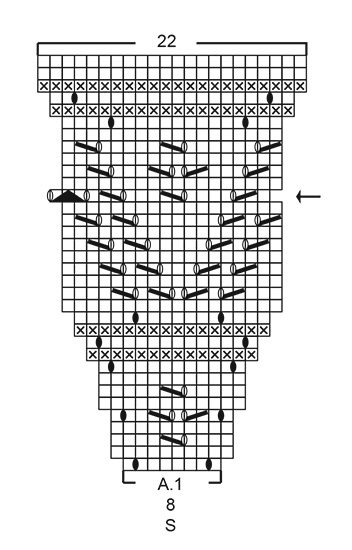
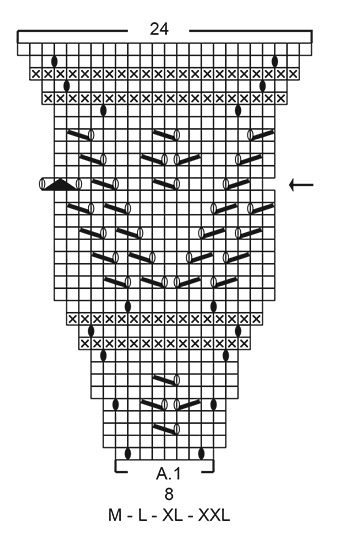
Knitted jacket with round yoke in DROPS Air. Piece is knitted top down with lace pattern and balloon sleeves. Size: S - XXXL
DROPS 199-28 |
||||||||||||||||||||||
|
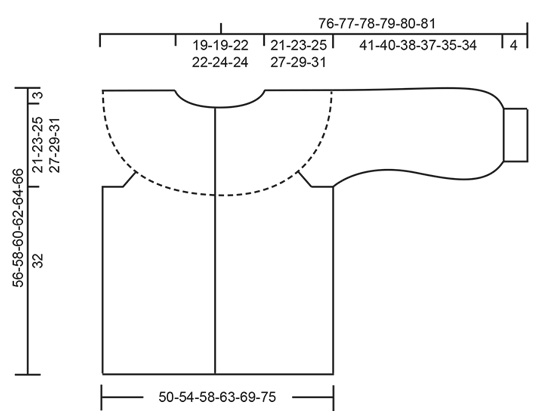
---------------------------------------------------------- EXPLANATION FOR THE PATTERN: ---------------------------------------------------------- GARTER STITCH (worked in the round): 1 ridge vertically = 2 rounds, i.e. knit 1 round and purl 1 round. GARTER STITCH (back and forth): Knit all rows. 1 ridge vertically = knit 2 rows. BUTTONHOLES: Decrease for buttonholes on right band (when garment is worn). Decrease from right side when 3 stitches remain on row as follows: Make 1 yarn over, knit the next 2 stitches together, knit last stitch. On next row knit yarn over to make holes. Decrease first buttonhole when piece measures approx. 1½-2 cm = ½"-¾". Then decrease the next 5-5-5-6-6-6 buttonholes, approx. 7 cm = 2¾" between each. PATTERN: See diagrams A.1 and A.2. Choose diagram for your size (applies to A.1). INCREASE TIP (evenly): To calculate how to increase evenly, use the total number of stitches on row (e.g. 250 stitches), minus bands (e.g. 10 stitches) and divide the remaining stitches by number of increases to be done (e.g. 12) = 20. In this example increase after every 20th stitch by making 1 yarn over and do not increase over bands. On next row purl yarn overs twisted to avoid holes. RAGLAN (applies to XL, XXL and XXXL): Increase for raglan on each side of the 4 marker threads in every transition between back/front piece and sleeves as follows: Begin 1 stitch before marker thread, make 1 yarn over, knit 2 (marker thread is between these 2 stitches), make 1 yarn over (= 2 stitches increased at the marker thread and 8 stitches increased in total on row) On next row purl yarn overs twisted to avoid holes. DECREASE TIP (applies to mid under sleeves): Decrease 1 stitch on each side of marker thread as follows: Work until 3 stitches remain before marker thread and knit 2 together, knit 2 (marker thread is between these 2 stitches), slip 1 stitch knitwise, knit 1, pass slipped stitch over stitch worked. ---------------------------------------------------------- START THE PIECE HERE: ---------------------------------------------------------- JACKET - SHORT OVERVIEW OF THE PIECE: Work yoke back and forth on circular needle, top down. Now divide yoke for body and sleeves. Continue body back and forth on circular needle, top down. Work sleeves in the round on double pointed needles, top down. YOKE: Cast on 90-90-98-98-106-106 stitches on circular needle size 4.5 mm = US 7 with Air. Work 2 ridges in GARTER STITCH back and forth - read explanation above! Decrease for BUTTONHOLES on right band - read explanation above. Switch to circular needle size 5.5 mm = US 9. Work 5 band stitches in garter stitch, A.1 (= 10-10-11-11-12-12 repetitions of 8 stitches) and finish with 5 band stitches in garter stitch. REMEMBER THE KNITTING GAUGE! NOTE: On row with arrow work as follows: Work 5 band stitches in garter stitch, knit 1, work 10-10-11-11-12-12 repetitions of A.1, but the last time A.1 is worked, work stockinette stitch over the last 3 stitches, finish with 5 band stitches in garter stitch. When A.1 has been worked, there are 230-250-274-274-298-322 stitches on row and piece measures approx. 18-18-18-18-18-20 cm = 7"-7"-7"-7"-7"-8" from cast-on edge. Then work as explained below. SIZE S, M and L: Work in stockinette stitch back and forth, continue with band stitches in garter stitch. At the same time when piece measures 19-20-21 cm = 7½"-8"-8¼" from cast-on edge, increase 8-12-8 stitches evenly = 238-262-282 stitches. Work in stockinette stitch and in garter stitch without increase until piece measures 21-23-25 cm = 8¼"-9"-9¾" from cast-on edge. Now divide yoke for body and sleeves as explained under ALL SIZES. SIZE XL, XXL and XXXL: Insert 4 marker threads in piece as explained below (without working the stitches). Use marker threads when increasing for raglan. Count 47-51-56 stitches (= left front piece), insert 1 marker thread before next stitch, count 48-52-54 stitches (= sleeve), insert 1 marker thread before next stitch, count 84-92-102 stitches (= back piece), insert 1 marker thread before next stitch, count 48-52-54 stitches (= sleeve), insert 1 marker thread before next stitch. There are 47-51-56 stitches after last marker thread (= right front piece). Work in stockinette stitch back and forth, continue with band stitches in garter stitch. At the same time on first row from right side increase for RAGLAN on each side of the 4 marker threads – see explanation above. Increase for raglan every 4th row 4-5-5 times in total. After last increase there are 306-338-362 stitches on row. Work in stockinette stitch and in garter stitch without increase until piece measures 27-29-31 cm = 10⅝"-11⅜"-12¼" from cast-on edge. Now divide yoke for body and sleeves as explained under ALL SIZES. ALL SIZES: Now divide yoke for body and sleeves as follows: Knit 42-45-47-51-56-61 (= left front piece), slip the next 40-46-52-56-62-64 stitches on 1 stitch holder for sleeve, cast on 6-6-8-8-8-8 new stitches on row (= in the side under sleeve), knit 74-80-84-92-102-112 (= back piece), slip the next 40-46-52-56-62-64 stitches on 1 stitch holder for sleeve, cast on 6-6-8-8-8-8 new stitches on row (= in the side under sleeve) and knit the remaining 42-45-47-51-56-61 stitches (= right front piece). Finish body and sleeves separately. NOW MEASURE THE PIECE FROM HERE! BODY: = 170-182-194-210-230-250 stitches. Work in stockinette stitch and garter stitch back and forth until piece measures 30 cm = 11¾" from division (or desired length, approx. 2 cm = ¾" remain until finished measurements). Switch to circular needle size 4.5 mm = US 7. Work 3 ridges back and forth. Loosely bind off by knitting. Jacket measures approx. 56-58-60-62-64-66 cm = 22"-22¾"-23⅝"-24⅜"-25¼"-26" from shoulder and down. SLEEVE: Slip the 40-46-52-56-62-64 stitches from stitch holder in one side of piece on double pointed needles size 5.5 mm = US 9 and pick in addition up 1 stitch in each of the 6-6-8-8-8-8 new stitches cast on under sleeve = 46-52-60-64-70-72 stitches. Insert 1 marker thread in the middle of the 6-6-8-8-8-8 stitches under sleeve and move the marker thread upwards when working. Begin round at the marker thread and work stockinette stitch in the round. When sleeve measures 3 cm = 1⅛" from division, decrease 2 stitches mid under sleeve - read DECREASE TIP! Repeat decrease when sleeve measures 6 cm = 2⅜" from division = 42-48-56-60-66-68 stitches. When sleeve measures 14-13-11-10-8-8 cm = 5½"-5⅛"-4⅜"-4"-3⅛"-3⅛" from division, increase 10-8-5-10-8-7 stitches evenly = 52-56-61-70-74-75 stitches. When sleeve measures 17-16-14-13-11-11 cm = 6¾"-6¼"-5½"-5⅛"-4⅜"-4⅜" from division, increase 10-8-5-10-8-7 stitches evenly = 62-64-66-80-82-82 stitches. When sleeve measures 20-19-17-16-14-14 cm = 8"-7½"-6¾"-6¼"-5½"-5½" from division, increase 10-8-6-10-8-8 stitches evenly = 72-72-72-90-90-90 stitches. Continue without increases until piece measures 23-22-20-19-17-16 cm = 9"-8¾"-8"-7½"-6¾"-6¼" from division (shorter measurements in the larger sizes because of wider neck and longer yoke). Work A.2 in the round (= 4-4-4-5-5-5 repetitions of 18 stitches). When A.2 has been worked, sleeve measures approx. 40-39-37-36-34-33 cm = 15¾"-15¼"-14½"-14¼"-13⅜"-13" from division. Knit 1 round while decreasing 6-6-6-10-10-10 stitches evenly = 66-66-66-80-80-80 stitches. Knit 1 round while decreasing 30-28-26-38-36-34 stitches evenly = 36-38-40-42-44-46 stitches. Switch to double pointed needles size 4.5 mm = US 7. Work in garter stitch in the round for 4 cm = 1½" - read explanation above. Bind off by knitting. Sleeve measures approx. 45-44-42-41-39-38 cm = 17¾"-17¼"-16½"-16⅛"-15¼"-15" from division. Work the other sleeve the same way. |
||||||||||||||||||||||
Diagram explanations |
||||||||||||||||||||||
|
||||||||||||||||||||||
|
||||||||||||||||||||||
|
||||||||||||||||||||||
|
||||||||||||||||||||||
|
||||||||||||||||||||||
|
||||||||||||||||||||||
Have you finished this pattern?Tag your pictures with #dropspattern #septemberskiesjacket or submit them to the #dropsfan gallery. Do you need help with this pattern?You'll find 24 tutorial videos, a Comments/Questions area and more by visiting the pattern on garnstudio.com. © 1982-2025 DROPS Design A/S. We reserve all rights. This document, including all its sub-sections, has copyrights. Read more about what you can do with our patterns at the bottom of each pattern on our site. |
||||||||||||||||||||||


With over 40 years in knitting and crochet design, DROPS Design offers one of the most extensive collections of free patterns on the internet - translated to 17 languages. As of today we count 314 catalogs and 11821 patterns - 11811 of which are translated into English (US/in).
We work hard to bring you the best knitting and crochet have to offer, inspiration and advice as well as great quality yarns at incredible prices! Would you like to use our patterns for other than personal use? You can read what you are allowed to do in the Copyright text at the bottom of all our patterns. Happy crafting!
Post a comment to pattern DROPS 199-28
We would love to hear what you have to say about this pattern!
If you want to leave a question, please make sure you select the correct category in the form below, to speed up the answering process. Required fields are marked *.