
Popular categories
Looking for a yarn?


Comments / Questions (32)
![]() Chantal wrote:
Chantal wrote:
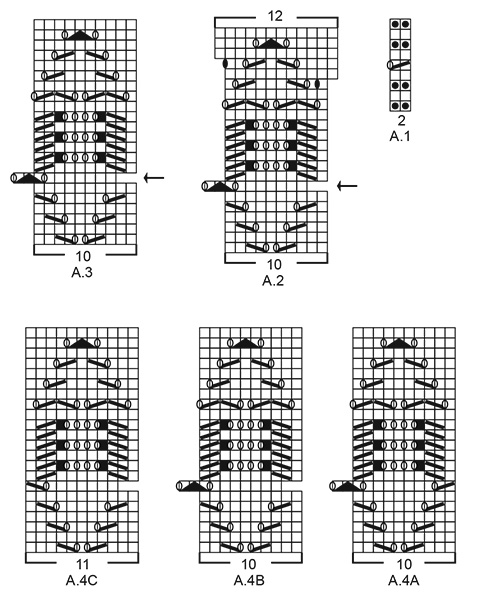
Bonjour entre le huitième et le neuvième rang du diagramme A2 N’y a-t-il pas un autre tour ?Merci pour votre réponse cordialement
27.02.2021 - 13:19DROPS Design answered:
Bonjour Chantal, les diagrammes sont justes ainsi, autrement dit, aux tours 7 à 13, on va tricoter un motif tous les tours (on diminue aux tours 8, 10 et 12 et on va augmenter aux tours 9, 11 et 13). Bon tricot!
01.03.2021 - 10:40
![]() Chantal wrote:
Chantal wrote:
Que veut dire le rond noir sur le diagramme A1Merci pour votre retour cordialement
25.02.2021 - 11:59DROPS Design answered:
Bonjour Chantal, il s'agit du 2ème symbole dans la légende, autrement dit, une maille à tricoter à l'envers (= sur l'endroit car on tricote en rond). Bon tricot!
25.02.2021 - 12:03
![]() Raili wrote:
Raili wrote:
Nuolen jälkeisellä kierroksella vähenee silmukat kuviosta kahdella, miten seuraavan kierroksen saa täsmäämään?!?
17.05.2020 - 16:55DROPS Design answered:
Kyseisellä kerroksella ei tehdä kavennuksia, joten silmukkaluku pysyy samana.
17.11.2020 - 16:32
![]() Germana wrote:
Germana wrote:
Buongiorno non riesci a capire come proseguire il motivo A2 dopo il rigo con la freccia..cioè devo lavorare il giro successivo senza considerare le 2 maglie spostate? Grazie
22.03.2020 - 14:25
![]() Emma wrote:
Emma wrote:
Can you please explain the instructions for A2 where there is an arrow? It says to displace two stitches and then work A2 in the round. The 2 stitches that were slipped onto the right needle are worked in the last repeat of A2. When it says the next round starts as usual does it mean that in effect the next round starts 2 stitches along? Thanks!
09.03.2020 - 21:27DROPS Design answered:
Dear Emma, at the beg of this round slip the first 2 stitches of the round onto right needles without working them, then work A.2 as before: the last stitch in each A.2 will be worked with the first 2 stitches next A.2/A.3, when you will will work last repeat on the round, work the last st last repeat together with the first 2 stitches first repeat of the round (the 2 sts you slipped without working). Happy knitting!
10.03.2020 - 10:22
![]() Reme wrote:
Reme wrote:
Ya me di cuenta del error. En la vuelta siguiente se menguan los otros 2. Gracias
06.03.2020 - 22:13
![]() Reme wrote:
Reme wrote:
Cuando se acaba el A3 no hay los mismos puntos, porque hay una parte del dibujo donde se aumenta y no se mengua. Es en la parte de lazada, derecho (4 veces), si hay 4 aumentos y 2 menguados en cada repetición hay 2 aumentos. Me podrían ayudar,?porque claro me sale enorme
06.03.2020 - 22:08
![]() Caroline wrote:
Caroline wrote:
Dans A.2 et A.3 à la fin du tour avec la flèche (décalage de 2 mailles), est-ce que je commence le motif (1 m end’, 1m. Glisser, 1 m endroit, passer m. Glisser par dessus m. Tricoter) dès la prochaine maille qui se présente sur l’aiguille de gauche ( ce qui était la 3ieme maille au tour précédent) ? Donc que le début des tours suivants commencent 2 mailles plus loin.
26.09.2019 - 00:02DROPS Design answered:
Bonjour Caroline, glissez les 2 premières mailles du début du tour sans les tricoter, et tricotez le 1er A.2: la dernière maille du 1er A.2 se tricote avec les 2 premières mailles du A.2 suivant, continuez ainsi jusqu'à la fin du tour, la dernière maille du dernier A.2 se tricotera avec les 2 premières mailles glissées au début du tour (le jeté = première maille du tour). Ce sera la même chose dans A.3, et dans A.4 (la dernière m de A.4A se tricote avec les 2 premières m de A.4B, puis la dernière m de A.4B se tricote avec les 2 premières m du A.4B suivant/et de A.4C à la fin du tour). Bon tricot!
26.09.2019 - 10:43
![]() Marie-Line wrote:
Marie-Line wrote:
Bonjour MERCI pour la rapidité de votre réponse....effectivement il me manquait 1 jeté dans chaque section du rang 13...J'ai défait et recommencé...c'est parfait du coup...MERCI à vous pour votre aide.
16.08.2019 - 10:11
![]() Marie-Line wrote:
Marie-Line wrote:
Bonjour je réalise ce modèle et j ai un souci dans la diagramme A2 après le 14ème rang... je ne tombe pas juste pour faire le 15ème rang...et je ne vois vraiment pas d'où vient le problème..
15.08.2019 - 17:14DROPS Design answered:
Bonjour Marie-Line, avez-vous bien tricoté le rang 13 comme les rangs 11 et 9? on diminue 2 m aux rangs 8, 10 et 12 = il doit rester 8 m + on doit avoir 4 jetés aux rangs 9, 11 et 13 + 2 diminutions = le nombre de mailles est de nouveau à 10. Bon tricot!
16.08.2019 - 08:53
|
|||||||||||||||||||||||||
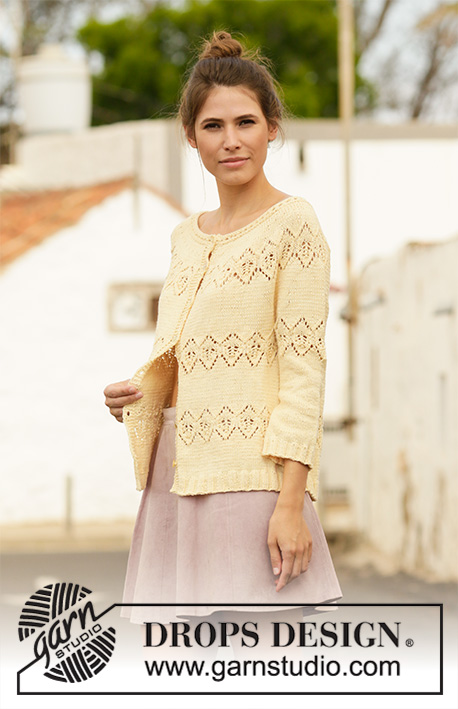
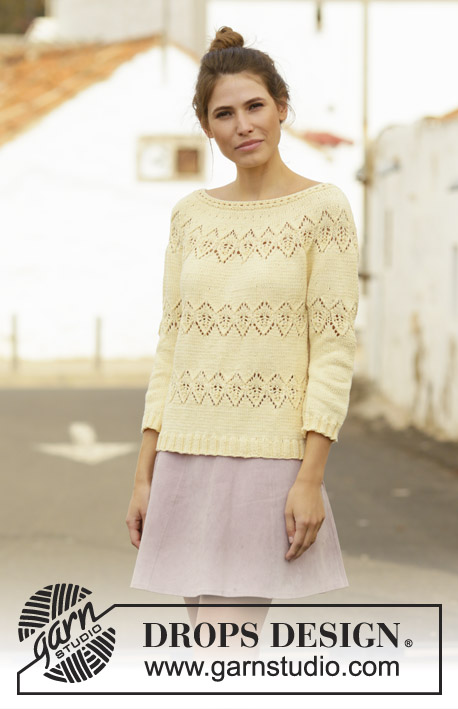
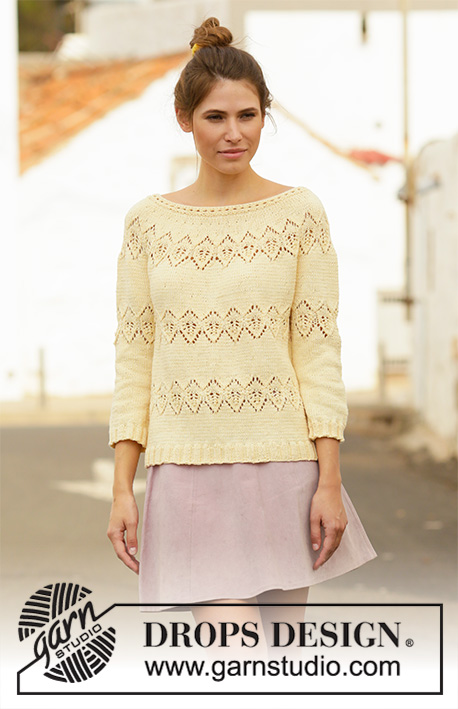
Spring Symmetry#springsymmetrysweater |
|||||||||||||||||||||||||
 |
 |
||||||||||||||||||||||||
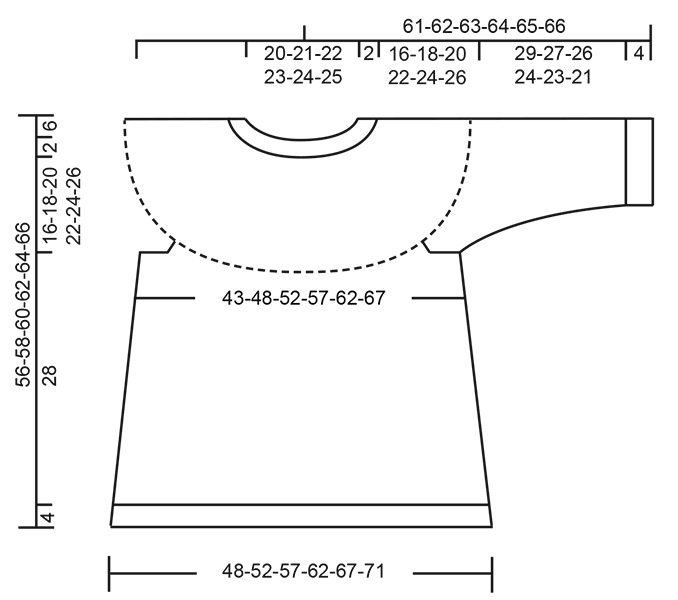
Knitted sweater in DROPS Muskat. The piece is worked top down with round yoke, lace pattern and ¾-length sleeves. Sizes S - XXXL.
DROPS 200-26 |
|||||||||||||||||||||||||
|
------------------------------------------------------- EXPLANATIONS FOR THE PATTERN: ------------------------------------------------------- PATTERN: See diagrams A.1 to A.4 (note that sometimes the pattern is worked on all rounds). INCREASE TIP-1 (evenly spaced): To work out how to increase evenly, count the total number of stitches on needle (e.g. 108 stitches) and divide by the number of increases to be made.(e.g. 36) = 3. In this example, increase by making 1 yarn over after each 3rd stitch. On the next round knit the yarn overs twisted to avoid holes. DECREASE TIP (for mid under sleeves): Decrease 1 stitch on each side of the marker thread as follows: Work until there are 2 stitches left before the marker thread, knit 2 together, marker thread, slip 1 stitch as if to knit, knit 1 and pass the slipped stitch over the knitted stitch (= 2 stitches decreased). ------------------------------------------------------- START THE PIECE HERE: ------------------------------------------------------- SWEATER - SHORT OVERVIEW OF THE PIECE: The neck and body are worked in the round with circular needle, top down. The yoke is divided for body and sleeves. The body is continued in the round with circular needle, top down. The sleeves are worked in the round with short circular needle/double pointed needles, top down. NECK: Cast on 108-112-116-120-124-128 stitches with short circular needle size 3 mm = US 2,5 and Muskat. Work A.1 in the round. Continue this pattern until A.1 has been worked 1 time in height. Knit 1 round where you increase 36-36-38-40-40-42 stitches evenly spaced – read INCREASE TIP-1 = 144-148-154-160-164-170 stitches. Then work yoke as described below. YOKE: Change to circular needle size 4 mm = US 6 and work stockinette stitch in the round. AT THE SAME TIME increase as described below. REMEMBER THE KNITTING GAUGE! When the piece measures 4-5-5-5-6-6 cm = 1½"-2"-2"-2"-2⅜"-2⅜" from the cast-on edge increase 30-44-50-58-60-62 stitches evenly spaced = 174-192-204-218-224-232 stitches. Continue with stockinette stitch. When the piece measures 6-7-8-9-10-11 cm = 2⅜"-2¾"-3⅛"-3½"-4"-4⅜" from the cast-on edge increase 26-38-46-52-56-58 stitches evenly spaced = 200-230-250-270-280-290 stitches. Work 1 round with stockinette stitch. Then work A.2 in the round (= 20-23-25-27-28-29 repeats of 10 stitches). Continue this pattern, but on the round marked with an arrow in A.2, displace the start of the round 2 stitches to the left; i.e. slip the first 2 stitches onto the right needle without working them, then work A.2 in the round. The 2 stitches which were slipped onto the right needle are worked in the last repeat of A.2. The next round starts as usual. When A.2 has been completed there are 240-276-300-324-336-348 stitches on the needle. Continue in the round with stockinette stitch. AT THE SAME TIME increase as described below. When the piece measures 15-16-17-18-20-21 cm = 6"-6¼"-6¾"-7"-8"-8¼" from the cast-on edge increase 20-20-22-24-28-30 stitches evenly spaced = 260-296-322-348-364-378 stitches. Continue with stockinette stitch. When the piece measures 17-18-19-21-23-25 cm = 6¾"-7"-7½"-8¼"-9"-9¾" from the cast-on edge increase 10-14-20-22-26-28 stitches evenly spaced = 270-310-342-370-390-406 stitches. Continue in the round with stockinette stitch until the piece measures 18-20-22-24-26-28 cm = 7"-8"-8¾"-9½"-10¼"-11" from the cast-on edge mid front. Now divide the yoke for body and sleeves as follows: Work 41-46-50-55-59-63 stitches in stockinette stitch (= ½ back piece), place the next 53-63-71-75-77-77 stitches on 1 thread for sleeve, cast on 8-8-10-10-12-14 new stitches on the needle (= in side under sleeve), work 82-92-100-110-118-126 stitches in stockinette stitch (= front piece), place the next 53-63-71-75-77-77 stitches on 1 thread for sleeve, cast on 8-8-10-10-12-14 new stitches on the needle (= in side under sleeve) and work the remaining 41-46-50-55-59-63 stitches in stockinette stitch (= ½ back piece). Cut the strand. Body and sleeves are finished separately. THE PIECE IS NOW MEASURED FROM HERE! BODY: = 180-200-220-240-260-280 stitches. Start the round on the one side of the piece, in the middle of the 8-8-10-10-12-14 stitches under the sleeve. Work A.3 in the round (= 18-20-22-24-26-28 repeats of 10 stitches). Continue this pattern, but on the round marked with an arrow in A.3, displace the start of the round 2 stitches to the left in the same way as in A.2. When A.3 has been completed, work 1 round of stockinette stitch where you increase 10 stitches evenly spaced in all sizes = 190-210-230-250-270-290 stitches. Continue in the round with stockinette stitch and repeat the increase when the piece measures 14-14-14-14-16-16 cm = 5½"-5½"-5½"-5½"-6¼"-6¼" from the division = 200-220-240-260-280-300 stitches. Now work A.3 in the round again (= 20-22-24-26-28-30 repeats of 10 stitches). When A.3 has been completed work stockinette stitch until the piece measures 28 cm = 11" from the division in all sizes (or to desired length; there is approx. 4 cm = 1½" to finished length). Knit 1 round where you increase 64-74-78-88-92-96 stitches evenly spaced = 264-294-318-348-372-396 stitches. This is done to avoid the rib being tight. Change to circular needle size 3 mm = US 2,5 and work rib in the round (= knit 3 / purl 3) for 4 cm = 1½". Change to circular needle size 4 mm = US 6 and loosely bind off with knit over knit and purl over purl. The sweater measures approx. 56-58-60-62-64-66 cm = 22"-22¾"-23⅝"-24⅜"-25¼"-26" from the shoulder down. SLEEVE: Place the 53-63-71-75-77-77 stitches from the thread on the one side of the piece on short circular needle or double pointed needles size 4 mm = US 6 and knit up 1 stitch in each of the 8-8-10-10-12-14 stitches cast on under sleeve = 61-71-81-85-89-91 stitches. Insert 1 marker thread in the middle of the 8-8-10-10-12-14 stitches under the sleeve. Allow the marker thread to follow your work onwards – it will be used when decreasing mid under sleeve. Start the round by the marker thread and work the first round as follows: Work 0-0-0-2-4-0 stitches in stockinette stitch, work A.4A (= 10 stitches), A.4B over the next 40-50-60-60-60-70 stitches (= 4-5-6-6-6-7 repeats of 10 stitches), A.4C (= 11 stitches) and finish with 0-0-0-2-4-0 stitches in stockinette stitch. Continue this pattern until A.4 has been worked 1 time in height, then work stockinette stitch in the round. AT THE SAME TIME when the piece measures 3-3-2-2-2-2 cm = 1⅛"-1⅛"-¾"-¾"-¾"-¾" from the division, decrease 2 stitches mid under sleeve – read DECREASE TIP. Decrease like this every 6-2½-1½-1½-1½-1 cm = 2⅜"-1"-½"-½"-½"-⅜" a total of 5-9-13-13-14-14 times = 51-53-55-59-61-63 stitches (stitches which do not fit into A.4 when decreasing are worked in stockinette stitch). Work until the sleeve measures 29-27-26-24-23-21 cm = 11⅜"-10⅝"-10¼"-9½"-9"-8¼" from the division (or to desired length; there is approx. 4 cm = 1½" left to finished length. NOTE: Shorter measurements in larger sizes due to wider neck and longer yoke). Knit 1 round where you increase 3-1-5-1-5-3 stitches evenly spaced = 54-54-60-60-66-66 stitches. Change to double pointed needles size 3 mm = US 2,5 and work rib in the round (= knit 3 / purl 3) for 4 cm = 1½". Change back to double pointed needles size 4 mm = US 6. Loosely bind off with knit over knit and purl over purl. The sleeve measures approx. 33-31-30-28-27-25 cm = 13"-12¼"-11¾"-11"-10⅝"-9¾" from the division. Work the other sleeve in the same |
|||||||||||||||||||||||||
Diagram explanations |
|||||||||||||||||||||||||
|
|||||||||||||||||||||||||
 |
|||||||||||||||||||||||||
 |
|||||||||||||||||||||||||
Have you finished this pattern?Tag your pictures with #dropspattern #springsymmetrysweater or submit them to the #dropsfan gallery. Do you need help with this pattern?You'll find 23 tutorial videos, a Comments/Questions area and more by visiting the pattern on garnstudio.com. © 1982-2026 DROPS Design A/S. We reserve all rights. This document, including all its sub-sections, has copyrights. Read more about what you can do with our patterns at the bottom of each pattern on our site. |
|||||||||||||||||||||||||


With over 40 years in knitting and crochet design, DROPS Design offers one of the most extensive collections of free patterns on the internet - translated to 17 languages. As of today we count 324 catalogs and 12290 patterns - 12280 of which are translated into English (US/in).
We work hard to bring you the best knitting and crochet have to offer, inspiration and advice as well as great quality yarns at incredible prices! Would you like to use our patterns for other than personal use? You can read what you are allowed to do in the Copyright text at the bottom of all our patterns. Happy crafting!
Post a comment to pattern DROPS 200-26
We would love to hear what you have to say about this pattern!
If you want to leave a question, please make sure you select the correct category in the form below, to speed up the answering process. Required fields are marked *.