Comments / Questions (97)
![]() Vicky Badillo wrote:
Vicky Badillo wrote:
Hola, he realizado esta rebeca con solo punto calado en los delanteros y estoy encantada. Comentar que dudé entre escoger la talla S o M, y como es lógico escogí la mayor. Las medidas a lo ancho perfectas pero a lo largo demasiado cortas en mi caso, y eso que no soy muy alta, por lo que he tenido que adaptarlas. Gracias por estos patrones maravillosos. Un saludo
11.12.2019 - 12:12
![]() Nancy wrote:
Nancy wrote:
Beste Dropsmensen, Ik ben begonnen aan het vest in maat m en loop al vast bij de telpatronen. Er staat dat je na iedere keer raglanmeerderingen 8 steken heb gemeerderd. Kijk ik echter op de telpatronen, dan tel ik maar 4 meerderingen per toer (1 bij A1, 1 bij A2, 1 bij A3 en 1 bij A5 = 4) Wat doe ik fout?
27.11.2019 - 14:15DROPS Design answered:
Dag Nancy,
Je meerdert meerdert zowel op de panden als op de mouwen. 4 steken in totaal op de panden en 4 steken op de mouwen. De mouwen worden in tricotsteek gebreid en niet in een telpatroon...
02.12.2019 - 08:59
![]() Paula Boon wrote:
Paula Boon wrote:
Ik ben bezig met dit patroon, maar ik loop vast met de "knoop" die in het patroon staat, kan iemand mij uitleggen hoe ik die maken moet? Dank alvast! Paula
21.07.2019 - 21:32DROPS Design answered:
Dag Paula,
Aan de linkerkant naast het patroon staan gerelateerde video's. Hier staat ook een video bij hoe je een knoop maakt. In de vide wordt er afwisselend averecht en recht gebreid, maar in het patroon brei je de steken van de knoop recht.
Hier is de link naar de video.
23.07.2019 - 12:02
![]() Diana wrote:
Diana wrote:
The pattern mentions “When diagrams have been worked 1 time vertically, continue pattern the same way.” Please clarify how to continue in the same way... For example A1 now has 14 additional stitches, how would I continue on the same way?
20.07.2019 - 11:17DROPS Design answered:
Dear Diana, when you add stitches, you also add pattern repeat in row - that means: you knit tha pattern the same way as before, but after every whole pattern repeat you will have enough new stitches for more pattern repeat in row. If not, you simply work additional sts in stocking st till there will be enough for another repeat. Happy knitting!
20.07.2019 - 17:49
![]() Marion wrote:
Marion wrote:
Bonjour, si je comprends bien le diagramme se lit en allers-retours, mais si je suis cela le motif se forme sur l'envers ce qui est contraire aux consignes. Pourtant le premier motif se forme au rang 7 (impair) donc logiquement à l'endroit. Si ce n'est pas en allers-retours je ne comprends pas comment on peut avoir deux rangs de suite le même nombre de mailles alors qu'on augmente tous les deux rangs sur l'endroit. Merci pour votre aide!
14.07.2019 - 21:59DROPS Design answered:
Bonjour Marion, cf réponse ci-dessous en complément. Vous allez augmenter dans les diagrammes A.1 et A.5 (devants) ainsi que dans les diagrammes A.2 et A.4, mais le nombre de mailles dans A.3a va rester le même. N'hésitez pas à mettre des marqueurs pour délimiter vos différents diagrammes si besoin. Bon tricot!
15.07.2019 - 11:14
![]() Marion wrote:
Marion wrote:
Bonjour, si je comprends bien les diagrammes se lisent en allers-retours, or si je fais ainsi je dois faire le motif sur l’envers alors qu’on doit le faire sur l’endroit... En soi le motif commence sur le 7eme rang donc impair mais je ne comprends pas comment on peut garder tous les deux rangs le même nombre de mailles si le diagramme ne se lit pas en aller retour. Merci pour votre aide
14.07.2019 - 21:36DROPS Design answered:
Bonjour Marion, les diagrammes se lisent bien en allers et retours (rangs 1, 3, 5, 7 etc.. donc y compris les rangs avec les noeuds, et ceux avec les jours) se tricotent sur l'endroit et les autres rangs (= 2, 4, 6, 8 etc..) se tricotent sur l'envers (= à l'envers sur l'envers). Le nombre de mailles de certains des diagrammes ne change pas (les motifs du "milieu") et les autres vont changer (ceux avec les augmentations pour les raglans). Bon tricot!
15.07.2019 - 11:12
![]() Gisele Poirier wrote:
Gisele Poirier wrote:
Bonjour, Est-ce que l'on peut l'avoir en français ? Merci !
24.06.2019 - 12:34DROPS Design answered:
Bonjour Mme Poirier, cliquez sur le menu déroulant sous la photo et choisissez "français" pour accéder aux explications en français. Bon tricot!
24.06.2019 - 14:35
![]() May-Britt Sjøberg wrote:
May-Britt Sjøberg wrote:
Hei når jeg skriver ut oppskriften til Raspberry Kiss og forklaringen til oppskriften de første fem sidene blir "blokkert" av teksten til at dere bruker "cookies". Ikke lett å lese igjennom oppskriften da.
20.06.2019 - 11:42DROPS Design answered:
Hei May-Britt. Om du aksepterer bruken av cookies vil denne pop-upen forsvinne. Printer du ved å klikke på printer-ikonet øverst ved siden av "instruksjoner", isteden for å printe ut hele siden? Da skal ingen pop-up vinder følge med. God fornøyelse
24.06.2019 - 08:33
![]() Sara wrote:
Sara wrote:
Når jeg har 57 m og tager 5 m ud i str. L vef ærmet, så giver det 62 m i alt og ikke 60, som der står i opskriften. Det passer således ikke med at man skal strikke 3 ret, 2 vrang i ærmeribben. Er det meningen at man kun skal tage 3 m ud i stedet for 5 og vil i ikke sørge for at få opskriften rettet til hvis det er en fejl?
19.06.2019 - 10:27DROPS Design answered:
Hej. I storlek L har du 55 m (57 i storlek XL) och du ökar 5 m så att det blir 60 m. Lycka till!
20.06.2019 - 11:08
![]() Ada wrote:
Ada wrote:
Ook bij dit patroon is de hals voor mij te wijd. Dat is bij veel drops patronen het geval waardoor de modellen er weliswaar leuk uitzien maar niet fijn draagbaar zijn. De aangebreide voorbies in ribbelsteek vind ik niet mooi vallen. Verder vind ik een breiwerk er mooier uitzien als de achterhals hoger is dan de voorhals en dat is meestal bij drops niet.
18.06.2019 - 09:24
Raspberry Kiss#raspberrykisscardigan |
||||||||||||||||
 |
 |
|||||||||||||||
Knitted jacket with raglan in DROPS Belle. Piece is knitted top down with lace pattern. Size: S - XXXL
DROPS 202-6 |
||||||||||||||||
|
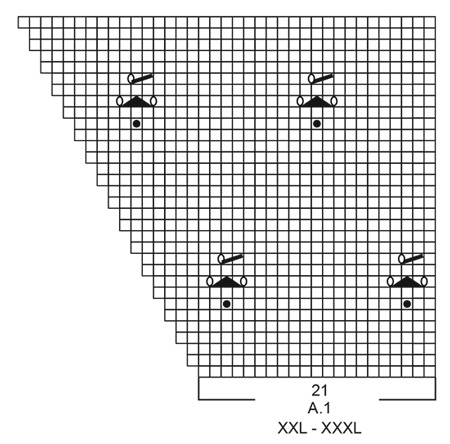
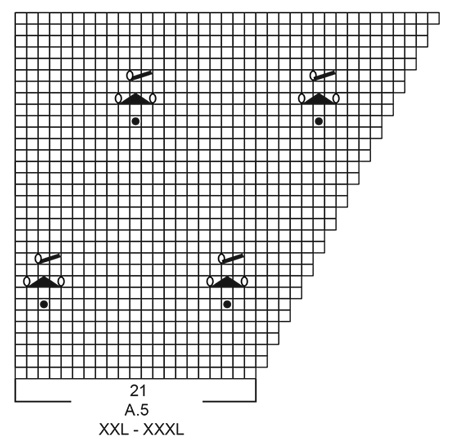
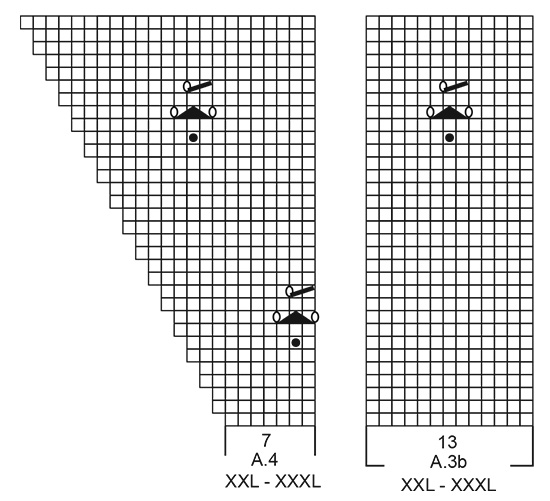
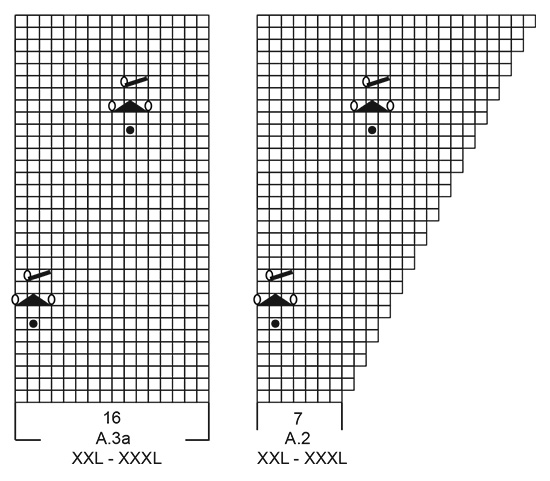
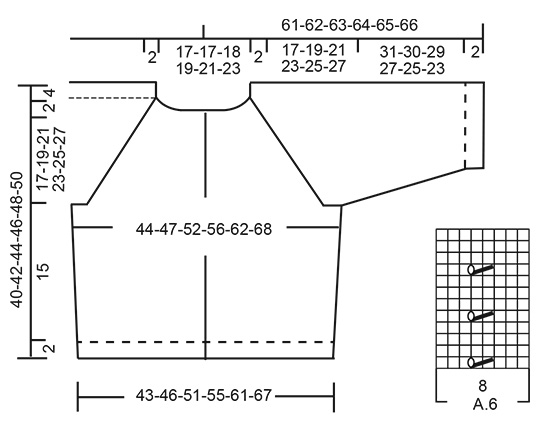
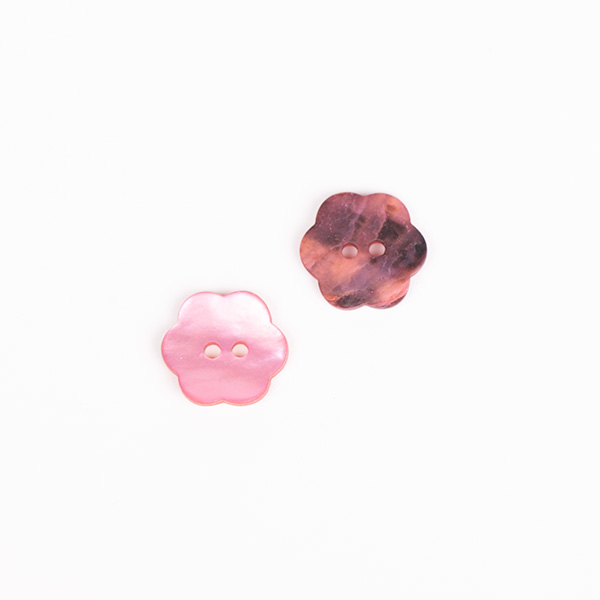
---------------------------------------------------------- EXPLANATION FOR THE PATTERN: ---------------------------------------------------------- GARTER STITCH (back and forth): Knit all rows. 1 ridge vertically = knit 2 rows. PATTERN: See diagrams A.1 to A.6. Choose diagram for your size (applies to A.1-A.2). Diagrams show all rows in pattern seen from the right side. DECREASE TIP-1 (evenly): To calculate how to decrease evenly, use the total number of stitches on row (e.g. 118 stitches), minus bands (e.g. 10 stitches) and divide the remaining stitches by number of decreases to be done (e.g. 3) = 36. In this example decrease by knitting every 35th and 36th stitch together. DECREASE TIP-2 (applies to body and sleeves): All decreases are done from the right side! Decrease 1 stitch on each side of A.6 as follows: Work until 2 stitches remain before A.6 and knit 2 together, knit A.6, slip 1 stitch knitwise, knit 1, pass slipped stitch over stitch worked. INCREASE TIP (evenly): To calculate how to increase evenly, use the total number of stitches on row (e.g. 189 stitches), minus bands (e.g. 10 stitches) and divide the remaining stitches by number of increases to be done (e.g. 24) = 7.5. In this example increase by making 1 yarn over after alternately every 7th and 8th stitch. On next row (wrong side) work yarn overs twisted to avoid holes. RAGLAN: All increases are done from the right side. Increase 1 stitch in each side of 3 knit stitches in every transition between front/back piece and sleeves (= 8 stitches increased on row). Increase 1 stitch by making 1 yarn over. On next row (wrong side) purl yarn overs twisted to avoid holes. Then work the new stitch in stockinette stitch on sleeves and work pattern on front and back piece. BUTTONHOLES: Decrease for buttonholes on right band (when garment is worn). Decrease from right side when 3 stitches remain on row as follows: Make 1 yarn over, knit the next 2 stitches together, knit last stitch. On next row knit yarn over to make holes. Decrease first buttonhole when rib in neck measures approx. 1½-2 cm = ½"-¾". Then decrease the next 4 approx. 7-7-8-8-9-9 cm = 2¾"-2¾"-3⅛"-3⅛"-3½"-3½" between each. ---------------------------------------------------------- START THE PIECE HERE: ---------------------------------------------------------- JACKET - SHORT OVERVIEW OF THE PIECE: Worked back and forth on circular needle, top down. Work sleeves in the round on double pointed needles/a short circular needle, top down. NECK EDGE: Cast on 118-118-123-128-138-143 stitches on circular needle size 3 mm = US 2,5 with Belle. Purl 1 row from wrong side. Then work rib as follows from right side: 5 band stitches in GARTER STITCH - read explanation above, (knit 3/purl 2) until 8 stitches remain on needle, knit 3, 5 band stitches in garter stitch. Continue back and forth like this until rib measures 2 cm = ¾" - remember BUTTONHOLES - read explanation above. Knit 1 row while decreasing 3-3-2-7-1-6 stitches evenly - read DECREASE TIP-1 (evenly) = 115-115-121-121-137-137 stitches. Purl 1 row from wrong side (work the 5 band stitches in garter stitches). YOKE: Switch to circular needle size 4 mm = US 6. Work in PATTERN - read explanation above, as follows: 5 band stitches in garter stitch, knit 0-0-1-1-0-0, A.1 over the next 16-16-16-16-21-21 stitches, make 1 yarn over, knit 2, insert a marker thread here (= left front piece), knit 1, make 1 yarn over, knit 15, make 1 yarn over, knit 1, insert a marker thread here (= sleeve), knit 2, 1 yarn over, A.2 over the next 3-3-5-5-7-7 stitches, A.3a over the next 14-14-14-14-16-16 stitches, A.3b over the next 11-11-11-11-13-13 stitches, A.4 over the next 3-3-5-5-7-7 stitches, make 1 yarn over, knit 2, insert a marker thread here (= back piece), knit 1, make 1 yarn over, knit 15, make 1 yarn over, knit 1, insert a marker thread here (= sleeve), knit 2, make 1 yarn over, A.5 over the next 16-16-16-16-21-21 stitches, knit 0-0-1-1-0-0, 5 band stitches in garter stitch (= right front piece). 8 stitches have been increased for RAGLAN - read explanation above. Continue pattern back and forth like this and increase every other row 24-26-29-32-35-38 times in total = 307-323-353-377-417-441 stitches. REMEMBER THE KNITTING GAUGE. When diagrams have been worked 1 time vertically, continue pattern the same way. When all increases for raglan are done, piece measures approx. 19-21-23-25-27-29 cm = 7½"-8¼"-9"-9¾"-10⅝"-11⅜" from cast-on edge and down mid front. Work next row as follows: NOTE: In size S and L divide the piece for sleeves and body at the marker threads. In size M, XL, XXL and XXXL work some of the stitches (= 1-2-1-3 stitches) on sleeves on to needle for body, so that the transition between body and sleeves are now longer at the marker threads. Work the first 47-50-53-58-64-69 stitches, slip the next 65-67-75-77-85-87 stitches on a stitch holder (= sleeve), cast on 8-10-12-12-12-14 new stitches on needle (= in the side under sleeve), work the next 83-89-97-107-119-129 stitches (= back piece), slip the next 65-67-75-77-85-87 stitches on a stitch holder (= sleeve), cast on 8-10-12-12-12-14 new stitches on needle (= in the side under sleeve), work the remaining 47-50-53-58-64-69 stitches on needle. NOW MEASURE PIECE FROM HERE! BODY: = 193-209-227-247-271-295 stitches. Work pattern A.6 (= 8 stitches) over the middle 8 stitches under sleeves, 5 band stitches in garter stitch in each side towards and work as many repetitions of pattern that will fit out towards each side (pattern should fit pattern on yoke!), work the remaining stitches in stockinette stitch. When piece measures 4 cm = 1½", decrease 1 stitch on each side of A.6 in each side - read DECREASE TIP-2 (= 4 stitches decreased) = 189-205-223-243-267-291 stitches. When piece measures 15 cm = 6" (adjust to finish after one whole lace pattern vertically and some rounds with stockinette stitch), increase 24-28-35-40-46-47 stitches evenly – read INCREASE TIP = 213-233-258-283-313-338 stitches. Switch to circular needle size 3 mm = US 2,5. Work rib from right side as follows: 5 band stitches in garter stitch, (knit 3/purl 2) until 8 stitches remain on row, knit 3, 5 band stitches in garter stitch. When rib measures 2 cm = ¾", bind off with knit over knit and purl over purl. Make sure that the bind-off edge is not too tight. Use a larger needle size when binding off. Jacket measures approx. 40-42-44-46-48-50 cm = 15¾"-16½"-17¼"-18"-19"-19¾" from shoulder and down. SLEEVE: Slip the 65-67-75-77-85-87 stitches from stitch holder in one side back on a short circular needle/double pointed needles size 4 mm = US 6. Pick in addition up 1 stitch in each of the 8-10-12-12-12-14 stitches under sleeve = 73-77-87-89-97-101 stitches. Continue in the round with stockinette stitch and work A.8 over the middle 8 stitches under sleeve. When piece measures 4-4-3-3-3-2 cm = 1½"-1½"-1⅛"-1⅛"-1⅛"-¾", decrease 2 stitches under sleeves - remember DECREASE TIP-2. Decrease in the different sizes as follows: Size S: Decrease like this on alternately every 2 and 3 cm = ¾" and 1⅛" 11 times in total. Size M: Decrease like this every 2 cm = ¾" 12 times in total. Size L: Decrease like this on every 1,5 cm = ½" 16 times in total. Size XL: Decrease like this on every 1,5 cm = ½" 16 times in total. Size XXL: Decrease like this every cm = ⅜" 19 times in total. Size XXXL: Decrease like this every cm = ⅜" 20 times in total. When all decreases on sleeve are done there are 51-53-55-57-59-61 stitches on round. Continue until sleeve measures 31-30-29-27-25-23 cm = 12¼"-11¾"-11⅜"-10⅝"-9¾"-9". Now increase 4-7-5-8-6-9 stitches evenly = 55-60-60-65-65-70 stitches. Switch to double pointed needles size 3 mm = US 2,5. Work rib (knit 3/purl 2) for 2 cm = ¾". Bind off stitches with knit over knit and purl over purl. Make sure that the bind-off edge is not too tight. Use a larger needle size when binding off. Sleeve measures approx. 33-32-31-29-27-25 cm = 13"-12½"-12¼"-11⅜"-10⅝"-9¾". Work the other sleeve the same way. ASSEMBLY: Sew the buttons on to left band. |
||||||||||||||||
Diagram explanations |
||||||||||||||||
|
||||||||||||||||
 |
||||||||||||||||
 |
||||||||||||||||
 |
||||||||||||||||
 |
||||||||||||||||
 |
||||||||||||||||
 |
||||||||||||||||
 |
||||||||||||||||
 |
||||||||||||||||
Have you finished this pattern?Tag your pictures with #dropspattern #raspberrykisscardigan or submit them to the #dropsfan gallery. Do you need help with this pattern?You'll find 27 tutorial videos, a Comments/Questions area and more by visiting the pattern on garnstudio.com. © 1982-2026 DROPS Design A/S. We reserve all rights. This document, including all its sub-sections, has copyrights. Read more about what you can do with our patterns at the bottom of each pattern on our site. |
||||||||||||||||




Post a comment to pattern DROPS 202-6
We would love to hear what you have to say about this pattern!
If you want to leave a question, please make sure you select the correct category in the form below, to speed up the answering process. Required fields are marked *.