
Popular categories
Looking for a yarn?


Comments / Questions (100)
![]() Rita Lugrine wrote:
Rita Lugrine wrote:
Hello, As I understand the "design" in the yoke and body of the pattern, I make a knot in the knit row and then I make the purl row. Next knit row is just the raglan increase; then the purl row. At the second knit row without the increase I make the 2nd part of the "design". And then the same process for the bottom of the design. When I'm done the small "textures" are not as tightly knit as I see on the photo of the sweater. Can you explain what I am missing? Thanks, Rita
29.06.2020 - 00:02DROPS Design answered:
Dear Mrs Lugrine, all rows of patterns are drawn in chart, ie the lace pattern including knot is worked over 5 rows (+last row from WS) and you will at the same time increase for raglan on every row from RS. Happy kniting!
29.06.2020 - 09:05
![]() Julie wrote:
Julie wrote:
Bonjour à nouveau! Je n'ai plus besoin de votre aide car tout est bien renseigné sur votre site! Avec toutes mes excuses! Je n'avais pas bien regardé 🙃 Julie
22.06.2020 - 12:10DROPS Design answered:
oops Merci Julie, répondu avant de lire votre commentaire, merci et bonne continuation!
22.06.2020 - 14:30
![]() Julie wrote:
Julie wrote:
Bonjour, Je ne comprends pas l'indication suivante:"Quand les diagrammes ont été tricotés 1 fois en hauteur, continuer de la même façon" dans l'empiecement. Il n'y a plus de diagramme qui tienne compte des augmentations ni des motifs supplémentaires à tricoter et je ne vois pas comment poursuivre l'empiecement... merci de votre aide.
22.06.2020 - 10:17DROPS Design answered:
Bonjour Jullie, vous continuez simplement à tricoter comme avant, vous augmentez tous les 2 tours et incorporez les nouvelles mailles dans le point fantaisie comme vous l'avez fait pour les premiers rangs, et répétez les autres motifs en hauteur/largeur comme avant également. Bon tricot!
22.06.2020 - 14:12
![]() Julie wrote:
Julie wrote:
Hi thank you for the reply...can I just confirm. I am increasing by the 8 stitches however the diagrams (A1, A2, A4 & A5) only increase by 1 stitch each...therefore I have 8 new stitches but only seem to work 4 of them into the pattern....where am I going wrong ?? Help !!
15.06.2020 - 11:49DROPS Design answered:
Dear Julie, you are increasing 8 stitches on every row from RS: 1 stitch at the end of left front piece (= A.1), 1 st at the beg + 1 st at the end of sleeve, 1 st at the beg of back piece (= A.2) + 1 st at the end of back piece (= A.4), 1 st at the beg + 1 st at the end of sleeve + 1 st at the beg of front piece (= A.5) = 8 sts on round, but only 1 st in the diagrams. Happy knitting!
15.06.2020 - 16:15
![]() Julie wrote:
Julie wrote:
I am working the yoke & have increased to 123 stitches. When I try to work the next increase row I have stitches not worked into the pattern. I am increasing each time by 8 stitches but the pattern only increases by 4 stitches on the diagrams A1, A2, A4 & A5.... am I overlooking something. Hope you can help because I love the jacket.
15.06.2020 - 00:47DROPS Design answered:
Dear Julie, you increase for raglan 8 sts on every RS row, ie you increase 1 stitch on each front piece, 2 sts on back piece and on each sleeves - the new sts are drawn in the diagrams. Happy knitting!
15.06.2020 - 09:56
![]() Rita Lugrine wrote:
Rita Lugrine wrote:
In the yoke, after the first knit row with the 8 increases I have a total of 123 stitches, including the band. Is that correct? When I begin the 2nd row of the pattern (after the purl row) I find I have stitches remaining on my working needle. I think there is something I don't understand in the increases or the design of the pattern. Would you know why I am having this problem? I love this sweater but the pattern has me stumped. Thanks Rita
05.06.2020 - 03:39DROPS Design answered:
Dear Mrs Lugrine, if you are working first or 2nd size (starting yoke with 115 sts), then you have 123 sts after first increase row (= + 8 sts). Then just work 1 row from WS as shown in the diagrams and in stocking st. On next row from WS repeat increases as before = on either side of the 2 raglan sts where you inserted markers and increased before. Happy knitting!
05.06.2020 - 07:46
![]() Dorte Hallenslev wrote:
Dorte Hallenslev wrote:
Jeg er ved at strikke denne model, men forstår ikke rigtig det med mønster A6, skal det strikkes i siden på blusen , altså faktisk der hvor man ville sy den sammen? og skal A6 også være på selve ærmet eller er ærmet kun glatstrikning??
01.06.2020 - 09:45DROPS Design answered:
Hei Dorte. Ja, du skal felle i hver side av A.6 både i sidene og under ermene. MEN du har ingen sidesøm, du strikker høyre -, bakstykket og venstre forstykket samtidig/ i et stykke. Du strikker A.6 på undersiden av ermet, resten av ermet er i glattstrikk, ermene strikkes rundt. mvh DROPS design
03.06.2020 - 15:31
![]() Bas wrote:
Bas wrote:
Bonjour, Sur l’empiècement, entre A1 et A2, il y a une partie avec 1m, 1j 15m 1j 1m: comment faire pour les rangs endroit suivants sur cette partie? (Pas de diagramme correspondant) 2m 1j 15m, puis rang endroit suivant 3m 1j 15m? Merci pour avance
30.04.2020 - 10:10DROPS Design answered:
Bonjour Mme Bas, ces mailles correspondent à celles des manches et se tricotent en jersey - vous devez toujours augmenter comme expliqué au 1er rang, autrement dit après 1 m end et le fil marqueur au début de la manche et avant 1 m end et le fil marqueur à la fin de la manche; autrement dit, à la 2ème augmentation vous aurez: marqueur, 1 m end, 1 jeté, 17 m end, 1 jeté, 1 m end, marqueur. Bon tricot!
30.04.2020 - 10:44
![]() Adélaïde wrote:
Adélaïde wrote:
Je vous remercie pour votre réponse précédente. J'ai une nouvelle question concernant les manches : le motif A6 doit être tricoté sous les manches, et le reste des manches en jersey. Mais doit-on continuer le motif A6 tout le long de la manche de manière à avoir une ligne de jours sous le bras ? Merci d'avance ! Cordialement
24.04.2020 - 23:59DROPS Design answered:
Bonjour Adelaïde, tout à fait, A.6 va être tricoté à partir de l'empiècement, autrement dit quand on reprend les mailles des manches et que l'on relève les mailles dans celles des emmanchures et jusqu'aux côtes, puis on tricote toutes les mailles en côtes. Bon tricot!
27.04.2020 - 08:02
![]() Adélaïde wrote:
Adélaïde wrote:
Bonsoir, avec combien de cm d'aisance positive est-il conseillé de porter ce gilet (en le tricotant avec la laine préconisée) ? Comme mon tour de buste correspond exactement aux mesures de l'une des tailles, j'ai peur qu'il soit un peu juste à l'arrivée. Merci d'avance pour votre aide ! Cordialement
05.04.2020 - 20:42DROPS Design answered:
Bonjour Adelaïde, nous n'utilisons pas le concept d'aisance, mesurez un vêtement similaire qui vous va et dont vous aimez la forme et comparez-les aux mesures du schéma - plus d'infos sur les schémas ici. Bon tricot!
09.04.2020 - 14:00
|
||||||||||||||||
Raspberry Kiss#raspberrykisscardigan |
||||||||||||||||
 |
 |
|||||||||||||||
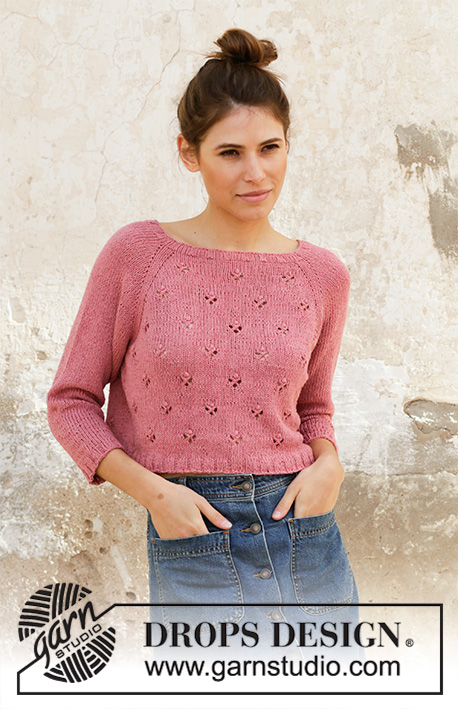
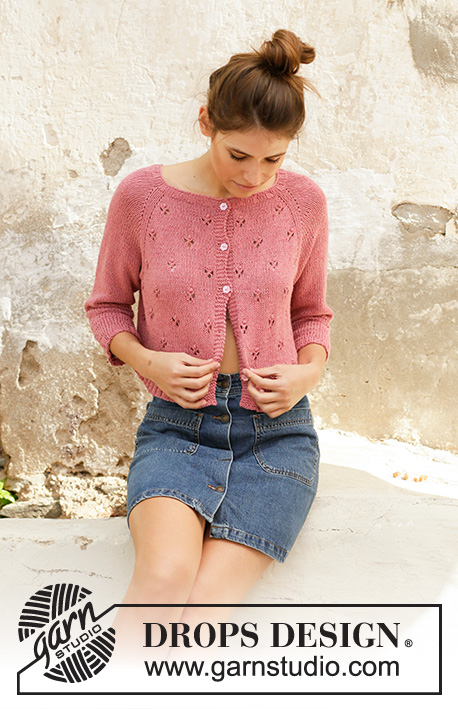
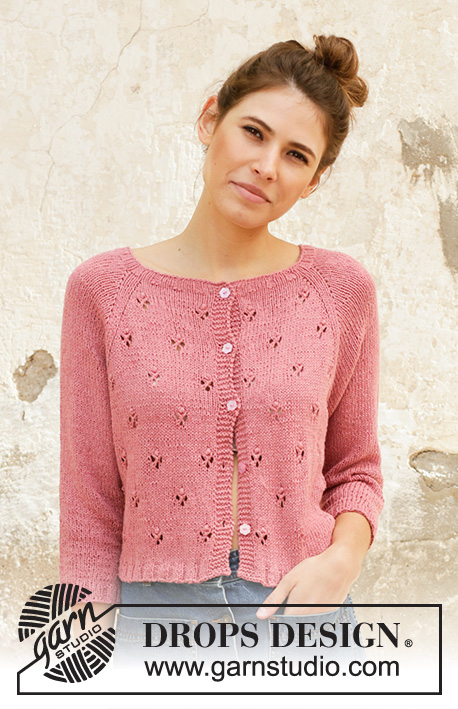
Knitted jacket with raglan in DROPS Belle. Piece is knitted top down with lace pattern. Size: S - XXXL
DROPS 202-6 |
||||||||||||||||
|
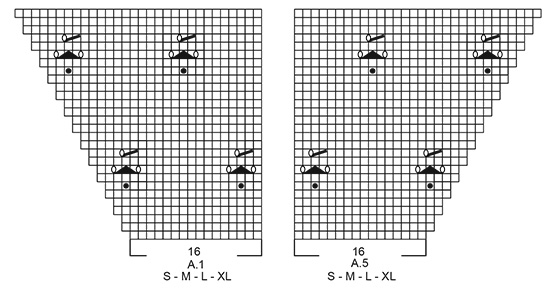
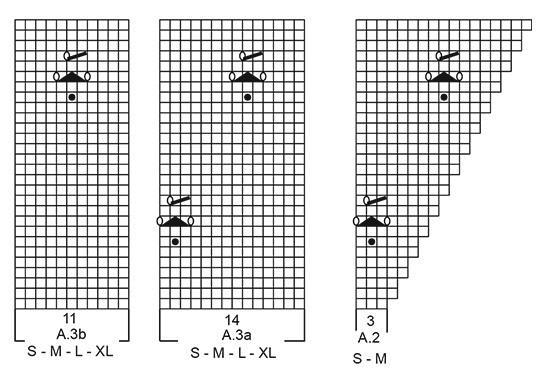
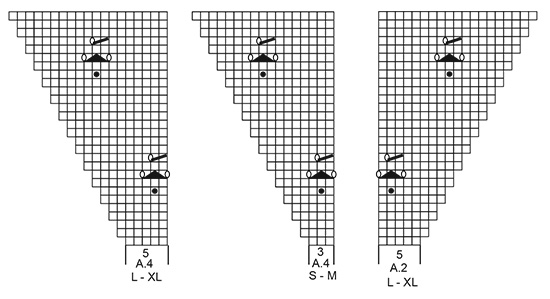
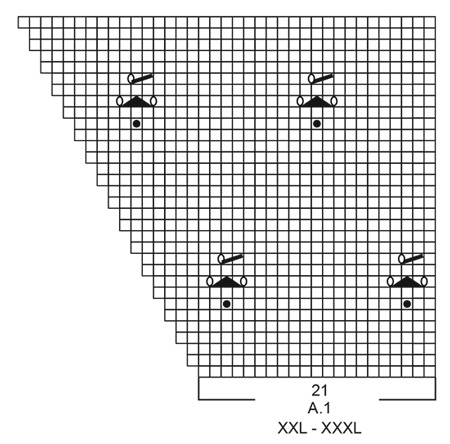
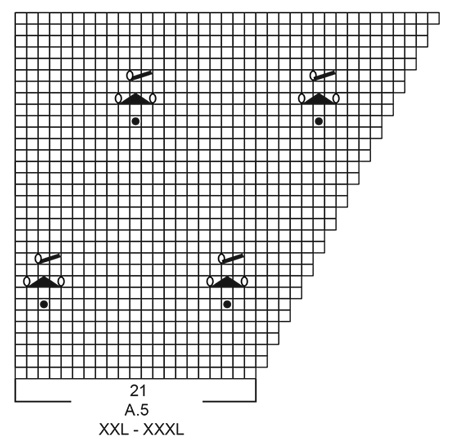
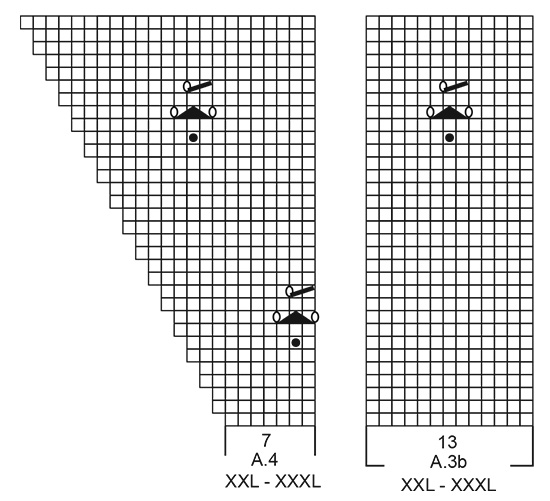
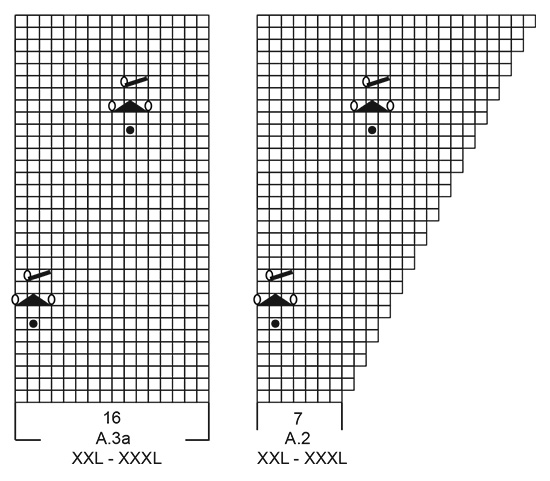
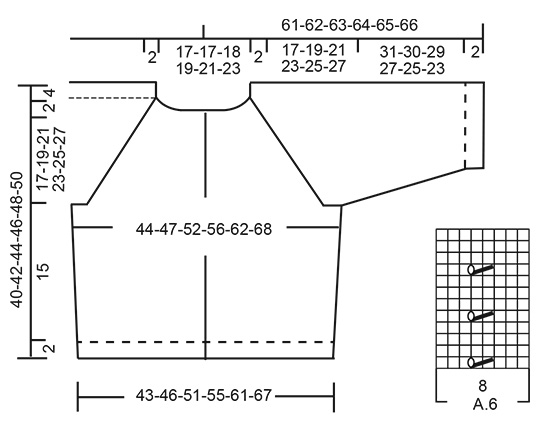
---------------------------------------------------------- EXPLANATION FOR THE PATTERN: ---------------------------------------------------------- GARTER STITCH (back and forth): Knit all rows. 1 ridge vertically = knit 2 rows. PATTERN: See diagrams A.1 to A.6. Choose diagram for your size (applies to A.1-A.2). Diagrams show all rows in pattern seen from the right side. DECREASE TIP-1 (evenly): To calculate how to decrease evenly, use the total number of stitches on row (e.g. 118 stitches), minus bands (e.g. 10 stitches) and divide the remaining stitches by number of decreases to be done (e.g. 3) = 36. In this example decrease by knitting every 35th and 36th stitch together. DECREASE TIP-2 (applies to body and sleeves): All decreases are done from the right side! Decrease 1 stitch on each side of A.6 as follows: Work until 2 stitches remain before A.6 and knit 2 together, knit A.6, slip 1 stitch knitwise, knit 1, pass slipped stitch over stitch worked. INCREASE TIP (evenly): To calculate how to increase evenly, use the total number of stitches on row (e.g. 189 stitches), minus bands (e.g. 10 stitches) and divide the remaining stitches by number of increases to be done (e.g. 24) = 7.5. In this example increase by making 1 yarn over after alternately every 7th and 8th stitch. On next row (wrong side) work yarn overs twisted to avoid holes. RAGLAN: All increases are done from the right side. Increase 1 stitch in each side of 3 knit stitches in every transition between front/back piece and sleeves (= 8 stitches increased on row). Increase 1 stitch by making 1 yarn over. On next row (wrong side) purl yarn overs twisted to avoid holes. Then work the new stitch in stockinette stitch on sleeves and work pattern on front and back piece. BUTTONHOLES: Decrease for buttonholes on right band (when garment is worn). Decrease from right side when 3 stitches remain on row as follows: Make 1 yarn over, knit the next 2 stitches together, knit last stitch. On next row knit yarn over to make holes. Decrease first buttonhole when rib in neck measures approx. 1½-2 cm = ½"-¾". Then decrease the next 4 approx. 7-7-8-8-9-9 cm = 2¾"-2¾"-3⅛"-3⅛"-3½"-3½" between each. ---------------------------------------------------------- START THE PIECE HERE: ---------------------------------------------------------- JACKET - SHORT OVERVIEW OF THE PIECE: Worked back and forth on circular needle, top down. Work sleeves in the round on double pointed needles/a short circular needle, top down. NECK EDGE: Cast on 118-118-123-128-138-143 stitches on circular needle size 3 mm = US 2,5 with Belle. Purl 1 row from wrong side. Then work rib as follows from right side: 5 band stitches in GARTER STITCH - read explanation above, (knit 3/purl 2) until 8 stitches remain on needle, knit 3, 5 band stitches in garter stitch. Continue back and forth like this until rib measures 2 cm = ¾" - remember BUTTONHOLES - read explanation above. Knit 1 row while decreasing 3-3-2-7-1-6 stitches evenly - read DECREASE TIP-1 (evenly) = 115-115-121-121-137-137 stitches. Purl 1 row from wrong side (work the 5 band stitches in garter stitches). YOKE: Switch to circular needle size 4 mm = US 6. Work in PATTERN - read explanation above, as follows: 5 band stitches in garter stitch, knit 0-0-1-1-0-0, A.1 over the next 16-16-16-16-21-21 stitches, make 1 yarn over, knit 2, insert a marker thread here (= left front piece), knit 1, make 1 yarn over, knit 15, make 1 yarn over, knit 1, insert a marker thread here (= sleeve), knit 2, 1 yarn over, A.2 over the next 3-3-5-5-7-7 stitches, A.3a over the next 14-14-14-14-16-16 stitches, A.3b over the next 11-11-11-11-13-13 stitches, A.4 over the next 3-3-5-5-7-7 stitches, make 1 yarn over, knit 2, insert a marker thread here (= back piece), knit 1, make 1 yarn over, knit 15, make 1 yarn over, knit 1, insert a marker thread here (= sleeve), knit 2, make 1 yarn over, A.5 over the next 16-16-16-16-21-21 stitches, knit 0-0-1-1-0-0, 5 band stitches in garter stitch (= right front piece). 8 stitches have been increased for RAGLAN - read explanation above. Continue pattern back and forth like this and increase every other row 24-26-29-32-35-38 times in total = 307-323-353-377-417-441 stitches. REMEMBER THE KNITTING GAUGE. When diagrams have been worked 1 time vertically, continue pattern the same way. When all increases for raglan are done, piece measures approx. 19-21-23-25-27-29 cm = 7½"-8¼"-9"-9¾"-10⅝"-11⅜" from cast-on edge and down mid front. Work next row as follows: NOTE: In size S and L divide the piece for sleeves and body at the marker threads. In size M, XL, XXL and XXXL work some of the stitches (= 1-2-1-3 stitches) on sleeves on to needle for body, so that the transition between body and sleeves are now longer at the marker threads. Work the first 47-50-53-58-64-69 stitches, slip the next 65-67-75-77-85-87 stitches on a stitch holder (= sleeve), cast on 8-10-12-12-12-14 new stitches on needle (= in the side under sleeve), work the next 83-89-97-107-119-129 stitches (= back piece), slip the next 65-67-75-77-85-87 stitches on a stitch holder (= sleeve), cast on 8-10-12-12-12-14 new stitches on needle (= in the side under sleeve), work the remaining 47-50-53-58-64-69 stitches on needle. NOW MEASURE PIECE FROM HERE! BODY: = 193-209-227-247-271-295 stitches. Work pattern A.6 (= 8 stitches) over the middle 8 stitches under sleeves, 5 band stitches in garter stitch in each side towards and work as many repetitions of pattern that will fit out towards each side (pattern should fit pattern on yoke!), work the remaining stitches in stockinette stitch. When piece measures 4 cm = 1½", decrease 1 stitch on each side of A.6 in each side - read DECREASE TIP-2 (= 4 stitches decreased) = 189-205-223-243-267-291 stitches. When piece measures 15 cm = 6" (adjust to finish after one whole lace pattern vertically and some rounds with stockinette stitch), increase 24-28-35-40-46-47 stitches evenly – read INCREASE TIP = 213-233-258-283-313-338 stitches. Switch to circular needle size 3 mm = US 2,5. Work rib from right side as follows: 5 band stitches in garter stitch, (knit 3/purl 2) until 8 stitches remain on row, knit 3, 5 band stitches in garter stitch. When rib measures 2 cm = ¾", bind off with knit over knit and purl over purl. Make sure that the bind-off edge is not too tight. Use a larger needle size when binding off. Jacket measures approx. 40-42-44-46-48-50 cm = 15¾"-16½"-17¼"-18"-19"-19¾" from shoulder and down. SLEEVE: Slip the 65-67-75-77-85-87 stitches from stitch holder in one side back on a short circular needle/double pointed needles size 4 mm = US 6. Pick in addition up 1 stitch in each of the 8-10-12-12-12-14 stitches under sleeve = 73-77-87-89-97-101 stitches. Continue in the round with stockinette stitch and work A.8 over the middle 8 stitches under sleeve. When piece measures 4-4-3-3-3-2 cm = 1½"-1½"-1⅛"-1⅛"-1⅛"-¾", decrease 2 stitches under sleeves - remember DECREASE TIP-2. Decrease in the different sizes as follows: Size S: Decrease like this on alternately every 2 and 3 cm = ¾" and 1⅛" 11 times in total. Size M: Decrease like this every 2 cm = ¾" 12 times in total. Size L: Decrease like this on every 1,5 cm = ½" 16 times in total. Size XL: Decrease like this on every 1,5 cm = ½" 16 times in total. Size XXL: Decrease like this every cm = ⅜" 19 times in total. Size XXXL: Decrease like this every cm = ⅜" 20 times in total. When all decreases on sleeve are done there are 51-53-55-57-59-61 stitches on round. Continue until sleeve measures 31-30-29-27-25-23 cm = 12¼"-11¾"-11⅜"-10⅝"-9¾"-9". Now increase 4-7-5-8-6-9 stitches evenly = 55-60-60-65-65-70 stitches. Switch to double pointed needles size 3 mm = US 2,5. Work rib (knit 3/purl 2) for 2 cm = ¾". Bind off stitches with knit over knit and purl over purl. Make sure that the bind-off edge is not too tight. Use a larger needle size when binding off. Sleeve measures approx. 33-32-31-29-27-25 cm = 13"-12½"-12¼"-11⅜"-10⅝"-9¾". Work the other sleeve the same way. ASSEMBLY: Sew the buttons on to left band. |
||||||||||||||||
Diagram explanations |
||||||||||||||||
|
||||||||||||||||
 |
||||||||||||||||
 |
||||||||||||||||
 |
||||||||||||||||
 |
||||||||||||||||
 |
||||||||||||||||
 |
||||||||||||||||
 |
||||||||||||||||
 |
||||||||||||||||
Have you finished this pattern?Tag your pictures with #dropspattern #raspberrykisscardigan or submit them to the #dropsfan gallery. Do you need help with this pattern?You'll find 28 tutorial videos, a Comments/Questions area and more by visiting the pattern on garnstudio.com. © 1982-2026 DROPS Design A/S. We reserve all rights. This document, including all its sub-sections, has copyrights. Read more about what you can do with our patterns at the bottom of each pattern on our site. |
||||||||||||||||


With over 40 years in knitting and crochet design, DROPS Design offers one of the most extensive collections of free patterns on the internet - translated to 17 languages. As of today we count 324 catalogs and 12290 patterns - 12280 of which are translated into English (US/in).
We work hard to bring you the best knitting and crochet have to offer, inspiration and advice as well as great quality yarns at incredible prices! Would you like to use our patterns for other than personal use? You can read what you are allowed to do in the Copyright text at the bottom of all our patterns. Happy crafting!
Post a comment to pattern DROPS 202-6
We would love to hear what you have to say about this pattern!
If you want to leave a question, please make sure you select the correct category in the form below, to speed up the answering process. Required fields are marked *.