
Popular categories
Looking for a yarn?


Comments / Questions (100)
![]() PILAR RIVAS wrote:
PILAR RIVAS wrote:
Hola, no entiendo porqué me sobran 4 puntos en la 3ª vuelta. Voy siguiendo los cuadraditos de los patrones, y aumentado para el ranglán. Pero al final me salen 4 puntos de más... he de ir aumentando también en donde dice 15 ptos.derechos? Por favor, podeis escribirme cómo sería la tercera fila? no sé ver mi error. Muchas gracias
11.04.2022 - 12:55DROPS Design answered:
Hola Pilar, los aumentos para el raglán se trabajan cada 2ª fila (una sí y otra no). Por favor, para que podamos solucionar mejor tus dudas indicanos la cantidad de puntos que necesitas y qué talla estás trabajando y la cantidad de puntos que obtienes.
11.04.2022 - 22:27
![]() Elisabeth Salmen wrote:
Elisabeth Salmen wrote:
The knit tension - is this with needles size 4? Thanks
22.03.2022 - 14:08DROPS Design answered:
Dear Mrs Salmen, correct, you should have 21 stitches and 28 rows stocking stitch = 10 x 10 cm with larger needles (size 4 mm or the one you will require to get this tension). Happy knitting!
22.03.2022 - 14:51
![]() Irene Baker wrote:
Irene Baker wrote:
Thank you so much for your prompt answer and solution. I can\'t believe I missed that part of the pattern. I\'m back on track now, happily knitting this beautiful cardigan.
08.02.2022 - 09:30
![]() Irene Baker wrote:
Irene Baker wrote:
On first row of pattern, I get 3 stitches extra before the 5 garter stitches band. I'm knitting medium, 118 stitches. The two front panels are equal (16 stitches, YO, 2 stitches), the two sleeve sections equal (one stitch, YO, 15 stitches, YO, one stitch) but the back section is uneven. The instructions say 2 knit YO 3 knit (A2) 14 knit (A3a) 11 knit (A3b) 3 knit (A4) yarn over 2 knit. I think my 3 extra stitches would be gone if I knitted A3a twice instead of A3a and A3b. Please advise.
07.02.2022 - 17:50DROPS Design answered:
Dear Mrs Baker, after neck edge you should decrease 3 sts to get 115 sts, that maybe the reason you have 3 extra stitches. Happy knitting!
08.02.2022 - 08:36
![]() Caroline wrote:
Caroline wrote:
Bonjour J’ai 2 petites questions concernant le motif des 8 mailles sous la manche 1- est-ce que je commence A6 au même rangs que le reste du motif ? (3 rangs endroit du motif) pour aligner les motifs 2- pourquoi A6 se répète au 4 rangs ? (On ne peut pas aligner le motif A6 avec le reste des autres diagrammes si on le répète au 4 rangs) Merci
18.08.2021 - 02:20DROPS Design answered:
Bonjour Caroline, on commence A.6 au premier rang après la division de l'ouvrage, mais vous pouvez l'ajuster comme vous préférez, sur le 1er rang ainsi qu'en hauteur, sur le nombre de rangs à tricoter pour le répéter. Bon tricot!
18.08.2021 - 07:18
![]() Caroline wrote:
Caroline wrote:
Je viens de terminer l’empiecement et je ne comprends pas bien les instructions pour faire le motif pour le dos/devants. Après avoir mis les mailles des manches sur les arrêts de maille. Au rang endroit suivant, après les 5 mailles de bordure Est-ce que je tricote A1 à A5 à partir du rangs 1 ou à partir du rangs de points de fantaisie (avec le noeud) ? Est-ce que je dois tricoter A6 (sur les 8 mailles sous la manche) dès ce premier rangs ? Merci
16.08.2021 - 03:39DROPS Design answered:
Bonjour Caroline, après avoir mis les mailles des manches en attente, tricotez le point ajouré sur les devants et le dos comme avant (alignez bien les mailles du dos comme avant pour que le motif continue en hauteur) et tricotez maintenant en plus les 8 mailles montées sous les manches en suivant le diagramme A.6. Bon tricot!
16.08.2021 - 08:30
![]() Melanie wrote:
Melanie wrote:
Vielen Dank für die rasche Hilfe. Jetzt habe ich das Muster gefunden...
30.06.2021 - 13:28
![]() Melanie wrote:
Melanie wrote:
Hallo, ich suche den Rapport A6, den man stricken soll, nachdem die Ärmel abgeteilt werden. Kann mir hier jemand helfen? Vielen Dank.
29.06.2021 - 21:02DROPS Design answered:
Liebe Melanie, ja gerne! A.6 finden Sie ganz am Ende der Seite, neben der Maßskizze (unter die linke Ärmel). Viel Spaß beim stricken!
30.06.2021 - 07:13
![]() Lulu wrote:
Lulu wrote:
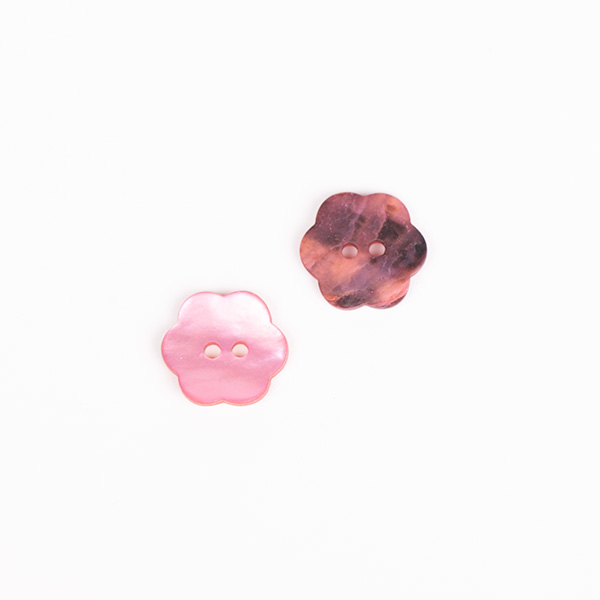
The buttons called for in the pattern measure 15mm. Not including that basic info in the pattern, or answering the question directly (instead of, or in addition to, merely posting a link to all available buttons), is pretty lame imho
31.05.2021 - 19:18
![]() Barbara Oudejans wrote:
Barbara Oudejans wrote:
Sorry, toch nog n aanvulling op mijn vraag: ik zie op de foto’s toch echt duidelijk gaatjes bij de meerderingen. Die zie ik niet in mijn werk als ik de omslagen gedraaid averecht brei.
13.05.2021 - 12:25DROPS Design answered:
Dag Barbara,
Toch zitten er geen gaatjes in de raglanlijn. Als er gaatjes zouden zitten, dan zouden die even groot zijn als de gaatjes in het patroontje. Doordat de meerderingen elkaar snel opvolgen kan er daar wel ietwat een 'minigaatje' ontstaan, maar het is dus niet de bedoeling om daar gaatjes te maken.
15.05.2021 - 14:43
|
||||||||||||||||
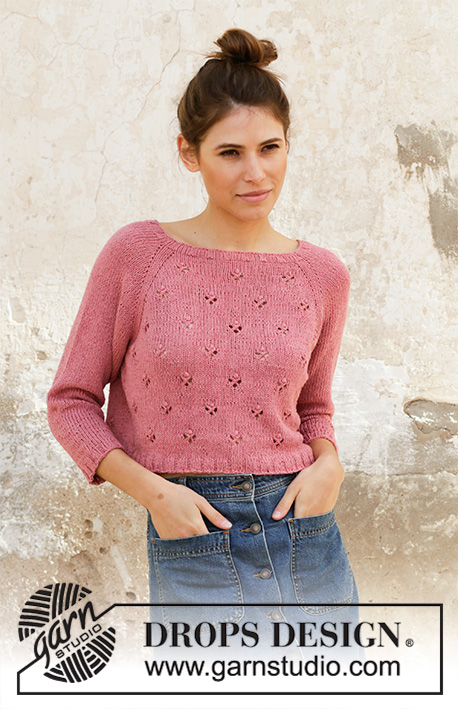
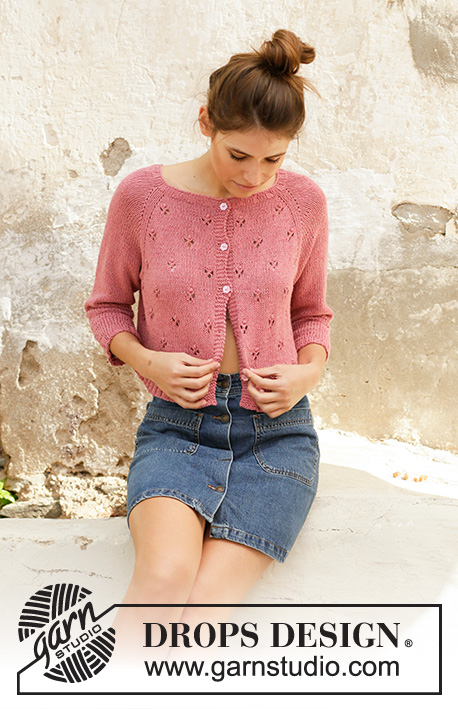
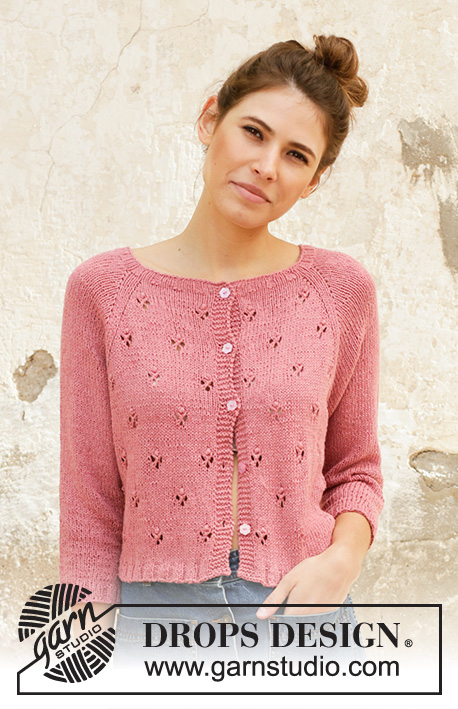
Raspberry Kiss#raspberrykisscardigan |
||||||||||||||||
 |
 |
|||||||||||||||
Knitted jacket with raglan in DROPS Belle. Piece is knitted top down with lace pattern. Size: S - XXXL
DROPS 202-6 |
||||||||||||||||
|
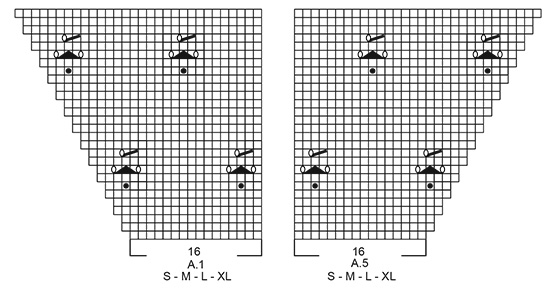
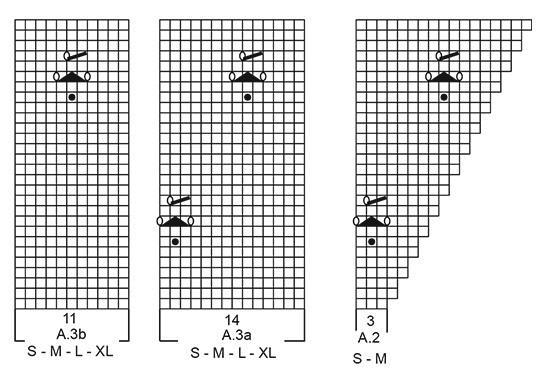
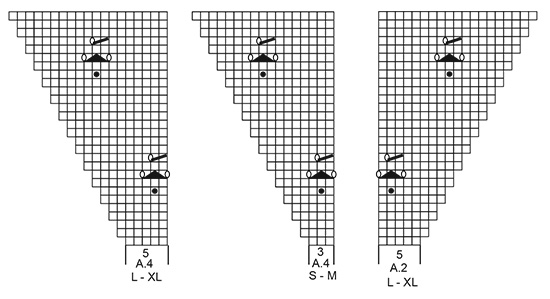
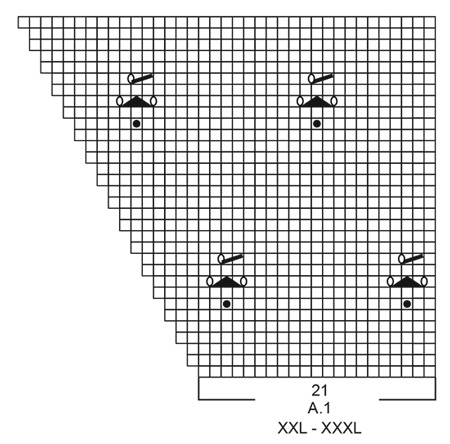
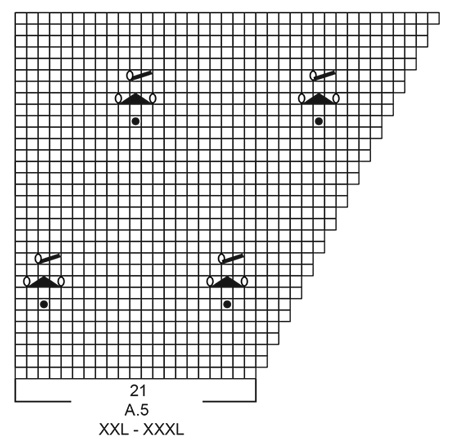
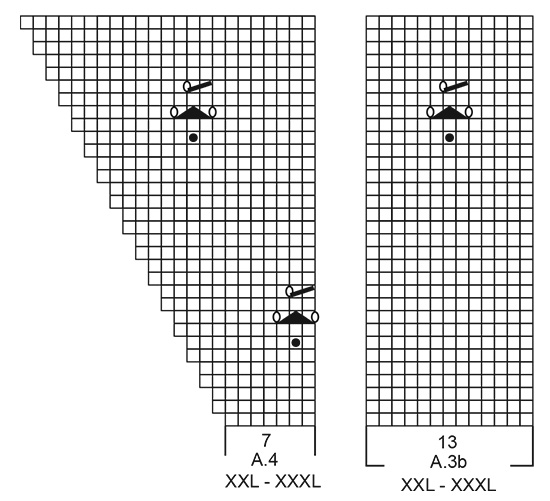
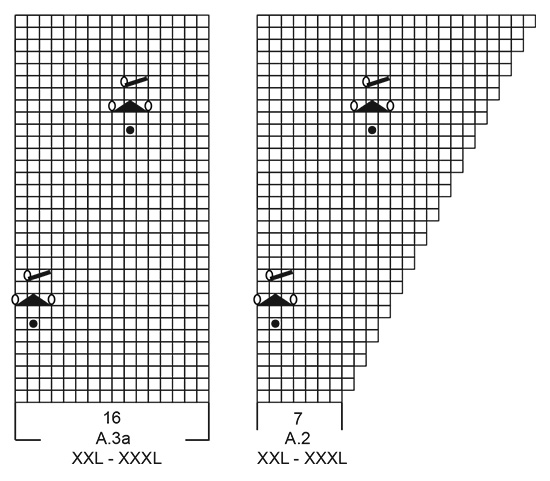
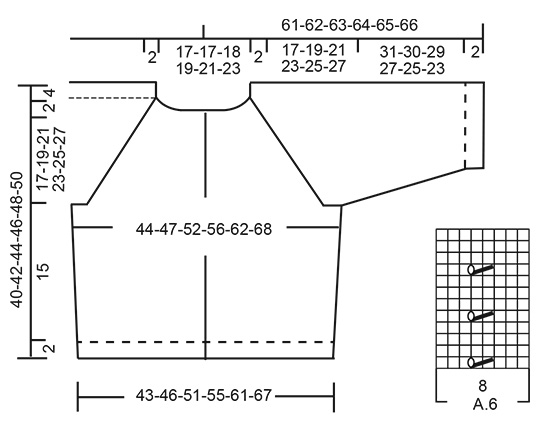
---------------------------------------------------------- EXPLANATION FOR THE PATTERN: ---------------------------------------------------------- GARTER STITCH (back and forth): Knit all rows. 1 ridge vertically = knit 2 rows. PATTERN: See diagrams A.1 to A.6. Choose diagram for your size (applies to A.1-A.2). Diagrams show all rows in pattern seen from the right side. DECREASE TIP-1 (evenly): To calculate how to decrease evenly, use the total number of stitches on row (e.g. 118 stitches), minus bands (e.g. 10 stitches) and divide the remaining stitches by number of decreases to be done (e.g. 3) = 36. In this example decrease by knitting every 35th and 36th stitch together. DECREASE TIP-2 (applies to body and sleeves): All decreases are done from the right side! Decrease 1 stitch on each side of A.6 as follows: Work until 2 stitches remain before A.6 and knit 2 together, knit A.6, slip 1 stitch knitwise, knit 1, pass slipped stitch over stitch worked. INCREASE TIP (evenly): To calculate how to increase evenly, use the total number of stitches on row (e.g. 189 stitches), minus bands (e.g. 10 stitches) and divide the remaining stitches by number of increases to be done (e.g. 24) = 7.5. In this example increase by making 1 yarn over after alternately every 7th and 8th stitch. On next row (wrong side) work yarn overs twisted to avoid holes. RAGLAN: All increases are done from the right side. Increase 1 stitch in each side of 3 knit stitches in every transition between front/back piece and sleeves (= 8 stitches increased on row). Increase 1 stitch by making 1 yarn over. On next row (wrong side) purl yarn overs twisted to avoid holes. Then work the new stitch in stockinette stitch on sleeves and work pattern on front and back piece. BUTTONHOLES: Decrease for buttonholes on right band (when garment is worn). Decrease from right side when 3 stitches remain on row as follows: Make 1 yarn over, knit the next 2 stitches together, knit last stitch. On next row knit yarn over to make holes. Decrease first buttonhole when rib in neck measures approx. 1½-2 cm = ½"-¾". Then decrease the next 4 approx. 7-7-8-8-9-9 cm = 2¾"-2¾"-3⅛"-3⅛"-3½"-3½" between each. ---------------------------------------------------------- START THE PIECE HERE: ---------------------------------------------------------- JACKET - SHORT OVERVIEW OF THE PIECE: Worked back and forth on circular needle, top down. Work sleeves in the round on double pointed needles/a short circular needle, top down. NECK EDGE: Cast on 118-118-123-128-138-143 stitches on circular needle size 3 mm = US 2,5 with Belle. Purl 1 row from wrong side. Then work rib as follows from right side: 5 band stitches in GARTER STITCH - read explanation above, (knit 3/purl 2) until 8 stitches remain on needle, knit 3, 5 band stitches in garter stitch. Continue back and forth like this until rib measures 2 cm = ¾" - remember BUTTONHOLES - read explanation above. Knit 1 row while decreasing 3-3-2-7-1-6 stitches evenly - read DECREASE TIP-1 (evenly) = 115-115-121-121-137-137 stitches. Purl 1 row from wrong side (work the 5 band stitches in garter stitches). YOKE: Switch to circular needle size 4 mm = US 6. Work in PATTERN - read explanation above, as follows: 5 band stitches in garter stitch, knit 0-0-1-1-0-0, A.1 over the next 16-16-16-16-21-21 stitches, make 1 yarn over, knit 2, insert a marker thread here (= left front piece), knit 1, make 1 yarn over, knit 15, make 1 yarn over, knit 1, insert a marker thread here (= sleeve), knit 2, 1 yarn over, A.2 over the next 3-3-5-5-7-7 stitches, A.3a over the next 14-14-14-14-16-16 stitches, A.3b over the next 11-11-11-11-13-13 stitches, A.4 over the next 3-3-5-5-7-7 stitches, make 1 yarn over, knit 2, insert a marker thread here (= back piece), knit 1, make 1 yarn over, knit 15, make 1 yarn over, knit 1, insert a marker thread here (= sleeve), knit 2, make 1 yarn over, A.5 over the next 16-16-16-16-21-21 stitches, knit 0-0-1-1-0-0, 5 band stitches in garter stitch (= right front piece). 8 stitches have been increased for RAGLAN - read explanation above. Continue pattern back and forth like this and increase every other row 24-26-29-32-35-38 times in total = 307-323-353-377-417-441 stitches. REMEMBER THE KNITTING GAUGE. When diagrams have been worked 1 time vertically, continue pattern the same way. When all increases for raglan are done, piece measures approx. 19-21-23-25-27-29 cm = 7½"-8¼"-9"-9¾"-10⅝"-11⅜" from cast-on edge and down mid front. Work next row as follows: NOTE: In size S and L divide the piece for sleeves and body at the marker threads. In size M, XL, XXL and XXXL work some of the stitches (= 1-2-1-3 stitches) on sleeves on to needle for body, so that the transition between body and sleeves are now longer at the marker threads. Work the first 47-50-53-58-64-69 stitches, slip the next 65-67-75-77-85-87 stitches on a stitch holder (= sleeve), cast on 8-10-12-12-12-14 new stitches on needle (= in the side under sleeve), work the next 83-89-97-107-119-129 stitches (= back piece), slip the next 65-67-75-77-85-87 stitches on a stitch holder (= sleeve), cast on 8-10-12-12-12-14 new stitches on needle (= in the side under sleeve), work the remaining 47-50-53-58-64-69 stitches on needle. NOW MEASURE PIECE FROM HERE! BODY: = 193-209-227-247-271-295 stitches. Work pattern A.6 (= 8 stitches) over the middle 8 stitches under sleeves, 5 band stitches in garter stitch in each side towards and work as many repetitions of pattern that will fit out towards each side (pattern should fit pattern on yoke!), work the remaining stitches in stockinette stitch. When piece measures 4 cm = 1½", decrease 1 stitch on each side of A.6 in each side - read DECREASE TIP-2 (= 4 stitches decreased) = 189-205-223-243-267-291 stitches. When piece measures 15 cm = 6" (adjust to finish after one whole lace pattern vertically and some rounds with stockinette stitch), increase 24-28-35-40-46-47 stitches evenly – read INCREASE TIP = 213-233-258-283-313-338 stitches. Switch to circular needle size 3 mm = US 2,5. Work rib from right side as follows: 5 band stitches in garter stitch, (knit 3/purl 2) until 8 stitches remain on row, knit 3, 5 band stitches in garter stitch. When rib measures 2 cm = ¾", bind off with knit over knit and purl over purl. Make sure that the bind-off edge is not too tight. Use a larger needle size when binding off. Jacket measures approx. 40-42-44-46-48-50 cm = 15¾"-16½"-17¼"-18"-19"-19¾" from shoulder and down. SLEEVE: Slip the 65-67-75-77-85-87 stitches from stitch holder in one side back on a short circular needle/double pointed needles size 4 mm = US 6. Pick in addition up 1 stitch in each of the 8-10-12-12-12-14 stitches under sleeve = 73-77-87-89-97-101 stitches. Continue in the round with stockinette stitch and work A.8 over the middle 8 stitches under sleeve. When piece measures 4-4-3-3-3-2 cm = 1½"-1½"-1⅛"-1⅛"-1⅛"-¾", decrease 2 stitches under sleeves - remember DECREASE TIP-2. Decrease in the different sizes as follows: Size S: Decrease like this on alternately every 2 and 3 cm = ¾" and 1⅛" 11 times in total. Size M: Decrease like this every 2 cm = ¾" 12 times in total. Size L: Decrease like this on every 1,5 cm = ½" 16 times in total. Size XL: Decrease like this on every 1,5 cm = ½" 16 times in total. Size XXL: Decrease like this every cm = ⅜" 19 times in total. Size XXXL: Decrease like this every cm = ⅜" 20 times in total. When all decreases on sleeve are done there are 51-53-55-57-59-61 stitches on round. Continue until sleeve measures 31-30-29-27-25-23 cm = 12¼"-11¾"-11⅜"-10⅝"-9¾"-9". Now increase 4-7-5-8-6-9 stitches evenly = 55-60-60-65-65-70 stitches. Switch to double pointed needles size 3 mm = US 2,5. Work rib (knit 3/purl 2) for 2 cm = ¾". Bind off stitches with knit over knit and purl over purl. Make sure that the bind-off edge is not too tight. Use a larger needle size when binding off. Sleeve measures approx. 33-32-31-29-27-25 cm = 13"-12½"-12¼"-11⅜"-10⅝"-9¾". Work the other sleeve the same way. ASSEMBLY: Sew the buttons on to left band. |
||||||||||||||||
Diagram explanations |
||||||||||||||||
|
||||||||||||||||
 |
||||||||||||||||
 |
||||||||||||||||
 |
||||||||||||||||
 |
||||||||||||||||
 |
||||||||||||||||
 |
||||||||||||||||
 |
||||||||||||||||
 |
||||||||||||||||
Have you finished this pattern?Tag your pictures with #dropspattern #raspberrykisscardigan or submit them to the #dropsfan gallery. Do you need help with this pattern?You'll find 28 tutorial videos, a Comments/Questions area and more by visiting the pattern on garnstudio.com. © 1982-2026 DROPS Design A/S. We reserve all rights. This document, including all its sub-sections, has copyrights. Read more about what you can do with our patterns at the bottom of each pattern on our site. |
||||||||||||||||


With over 40 years in knitting and crochet design, DROPS Design offers one of the most extensive collections of free patterns on the internet - translated to 17 languages. As of today we count 324 catalogs and 12290 patterns - 12280 of which are translated into English (US/in).
We work hard to bring you the best knitting and crochet have to offer, inspiration and advice as well as great quality yarns at incredible prices! Would you like to use our patterns for other than personal use? You can read what you are allowed to do in the Copyright text at the bottom of all our patterns. Happy crafting!
Post a comment to pattern DROPS 202-6
We would love to hear what you have to say about this pattern!
If you want to leave a question, please make sure you select the correct category in the form below, to speed up the answering process. Required fields are marked *.