
Popular categories
Looking for a yarn?


Comments / Questions (100)
![]() Helle wrote:
Helle wrote:
Jeg skal i gang med 2. Mønster omgang. Passer det at de 2 midterste mønstre i nakken skal ligge lige over mønstrene fra 1 mønster omgang ? Er det muligt at vise et foto af trøjens ryg ? Hilsen Helle
04.07.2025 - 22:19DROPS Design answered:
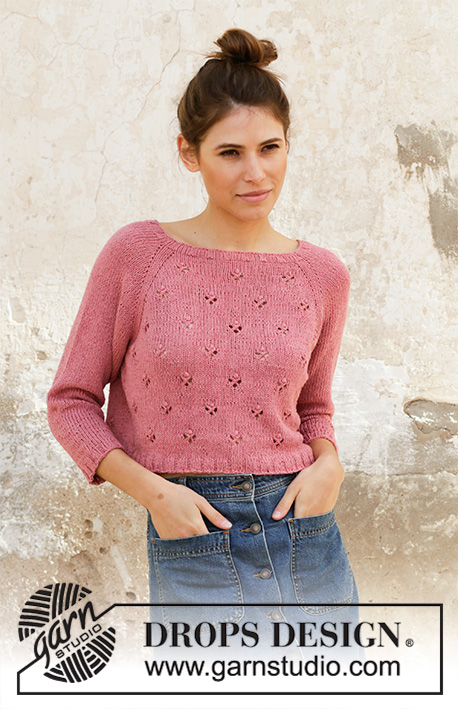
Hei Helle. Usikker på hva du mener med 2. mønster omgang. Om du ser på diagrammene er pinne 1 til 6 glattstrikk. Hullmønstret starter 7. pinne. Vi har dessverre ingen bilder av ryggen på dette plagget, men om du ser på genseren og forstykket i DROPS 202-5 vil bakstykket til DROPS 202-6 se noe lignende ut. Altså 3 "hullmønster" øverst, og neste hullmønster rad ha 4 hullmønster. mvh DROPS Design
07.07.2025 - 08:24
![]() Joanna wrote:
Joanna wrote:
Czy dobrze rozumiem, że drugi rząd robienia karczku robię na lewej stronie i jest on liczony jako drugi rząd schematu? Czy może jednak drugi rząd schematu przerabiam tylko wtedy gdy dodaję oczka na reglan (tylko na prawej stronie robótki)?
22.06.2025 - 22:33DROPS Design answered:
Witaj Joanno, drugi rząd karczku przerabiasz na lewej stronie i jest to drugi rząd schematu. Schematy przedstawiają wszystkie rzędy motywu. To co widzisz na schemacie pokazuje prawą stronę robótki. Pozdrawiamy!
23.06.2025 - 08:34
![]() Joanna wrote:
Joanna wrote:
Dzień dobry, zatrzymałam się na etapie robienia karczku. Zrobiłam pierwszy rząd według instrukcji - dodałam oczka i przerobiłam pierwszy rząd schematów. Mam jednak pytanie co dalej - kiedy jestem na lewej stronie robótki - czy przerabiam 5 oczek ściągacza -> lewe oczka -> ściągacz? Czy ten rząd jest również traktowany jako 2 rząd schematu? Czy też dodaję w 2 rzędzie oczka? Pozdrawiam
20.06.2025 - 08:03DROPS Design answered:
Witaj Joanno, dodajesz oczka na reglan wykonując narzuty co 2 rzędy, czyli zawsze na prawej stronie robótki. W następnym rzędzie (na lewej stronie robótki) przerabiasz oczka przekręcone w miejscu narzutów na lewo, aby uniknąć dziur. Jak przerabiasz 2-gi rząd: 5 oczek prawych (ścieg francuski), przerabiasz na lewo (w tym 8 oczek przekręconych na lewo - reglany), aż zostaje 5 oczek i przerabiasz je na prawo (ścieg francuski). Schematy pokazują wszystkie rzędy motywu. Pozdrawiamy!
20.06.2025 - 08:48
![]() Inma wrote:
Inma wrote:
Hola!! No entiendo cómo hacer el nudo. Tienen un vídeo sobre la realización de este punto?? Gracias
16.05.2025 - 17:38DROPS Design answered:
Hola Inma, aquítienes el video sobre cómo trabajar el nudo.
18.05.2025 - 14:56
![]() Marleen wrote:
Marleen wrote:
Hoi goedemiddag, Ik heb een vraagje over hoe ik de chart moet lezen in de verschillende stukken…….. zijn het 28 nld aan de goede kant die het patroon aangeeft (met ertussen de (niet afgebeelde) purl toeren? En lees ik de charts van rechtsonder naar links, of van linksonder naar rechts? Dat is me niet duidelijk uit de tekst geworden Dank je wel alvast
16.05.2025 - 16:57DROPS Design answered:
Dag Marleen,
In de telpatronen zijn alle naalden aangegeven, dus zowel de heengaande als de teruggaande naalden. Je leest de patronen inderdaad van rechts naar links aan de goede kant en dan de volgende naald terug van links naar rechts. Zo ga je steeds heen en weer.
16.05.2025 - 19:07
![]() Hélène wrote:
Hélène wrote:
Hi this is a lovely pattern thank you. Just a little comment on the french translation it just makes no sense it misses a lot of words and all the references to the charts. I will do it in the original version.
31.03.2025 - 16:51DROPS Design answered:
Dear Helène, should you have noticed anything wrong with the French translation, please feel free to share so that pattern can be checked and edited; you are always welcome to edit language and follow original pattern (in Norwegian). Thanks already. Happy knitting!
01.04.2025 - 09:19
![]() Gio wrote:
Gio wrote:
Salve, avete tanti bellissimi prodotti e soprattutto i modelli sono davvero belli. Io ho iniziato a fare questo modello 202-6 ma essendo alle prime armi mi perdo nella spiegazione. Chiedo se avete a disposizione 1 video dove oltre a spiegare fa vedere la realizzazione del modello. Esiste 1 video per aiutare i principianti a realizzare i vs modelli? Grazie
10.01.2025 - 01:20DROPS Design answered:
Buonasera Gio, non ci sono tutorials per la realizzazione dell'intero modello, ma ci sono dei video che la possono aiutare nelle singole tecniche. Buon lavoro!
13.01.2025 - 18:37
![]() Carla Burger wrote:
Carla Burger wrote:
Refer to yoke Instruction..the first 6 rows are not mentioned but they show on diagram A1...also how do I work with diagrams..where do I start from?..thank you
20.11.2024 - 10:58DROPS Design answered:
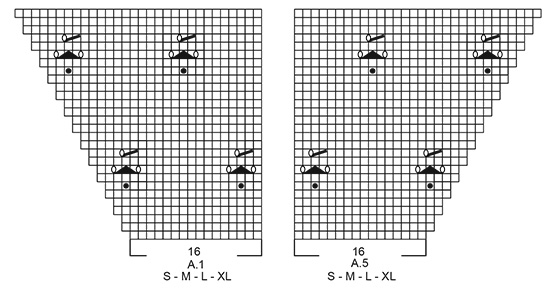
Dear Mrs Burger, when working yoke, work diagrams as explained, ie when working the first rows in A.1 just work these rows in stocking stitch = knit from right side/purl from wrong side (just as other diagrams as pattern start on same row for all diagrams). Happy knitting!
20.11.2024 - 13:45
![]() Alexa Fujise wrote:
Alexa Fujise wrote:
Sorry, but if I count the stitches as you do, the numbers do not work out. I have 3 stitches between each body piece and sleeve piece. If I always knit these three stitches with the adjacent front/back piece, will that work out?
20.09.2024 - 02:56DROPS Design answered:
Dear Mrs Fujise, if your number of stitches is right after all increases for raglan just divide piece as explained, it might have more sense when you see what happens; then you will have enough stitches to make pattern fit over alls stitches after dividing. Happy knitting!
20.09.2024 - 08:51
![]() Alexa Fujise wrote:
Alexa Fujise wrote:
Thanks so much for your help! I have another question. After the raglan increases in the Yoke, I don't understand how to "work the next row" by "work[ing] some of the stitches, ("2") on sleeves on to needle for body." The Left front section of the body (size M) is 50 stitches and ends just after the 3-stitch transition to the sleeve. Do I add 2 stitches to the Left Front, making the Left Front 52 stitches? That would decrease the transition from that sleeve to the back body section.
16.09.2024 - 08:33DROPS Design answered:
Dear Mrs Fujise, this mean here that the first and last stitch of each sleeve (in size M) will go to the front/back pieces, so for left front piece work the first 50 sts (including the 2 raglan stitches + the first stitch sleeve), slip the next 67 sts on a thread then work the next 89 sts for back piece (including the last stitch on sleeve + the 2 raglan sts before back piece and the 2 raglan sts + the first stitch on sleeve at the end of back piece), slip the next 67 sts on a thread and work the remaining stitches (including the last stitch 2nd sleeve + the 2 raglan sts). Happy knitting!
18.09.2024 - 15:58
|
||||||||||||||||
Raspberry Kiss#raspberrykisscardigan |
||||||||||||||||
 |
 |
|||||||||||||||
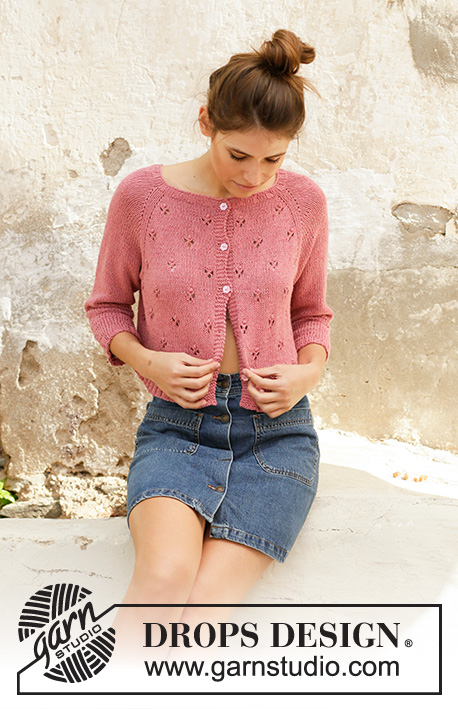
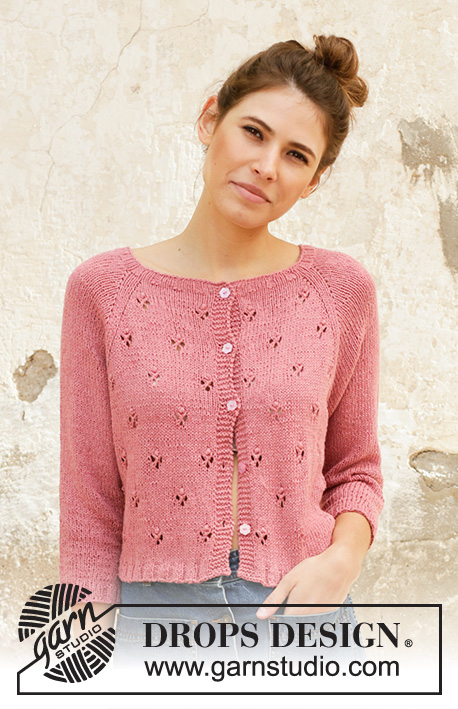
Knitted jacket with raglan in DROPS Belle. Piece is knitted top down with lace pattern. Size: S - XXXL
DROPS 202-6 |
||||||||||||||||
|
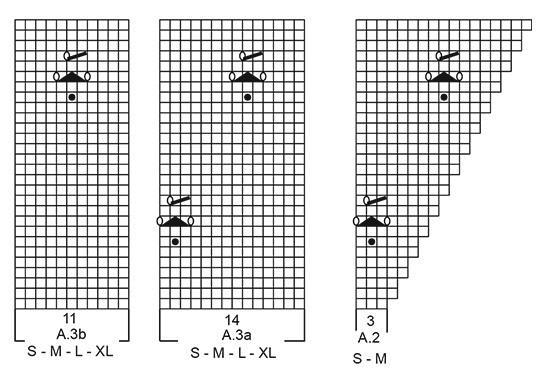
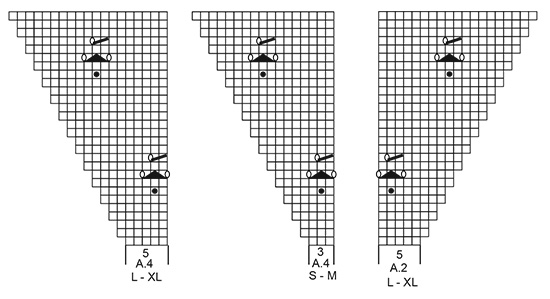
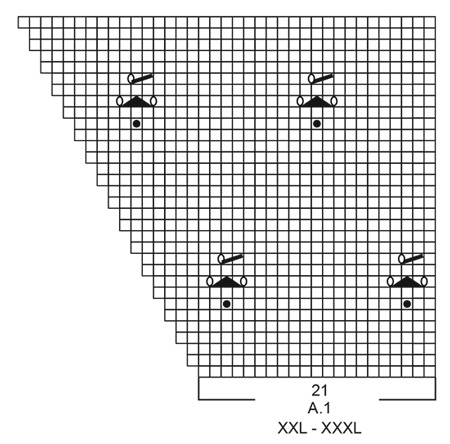
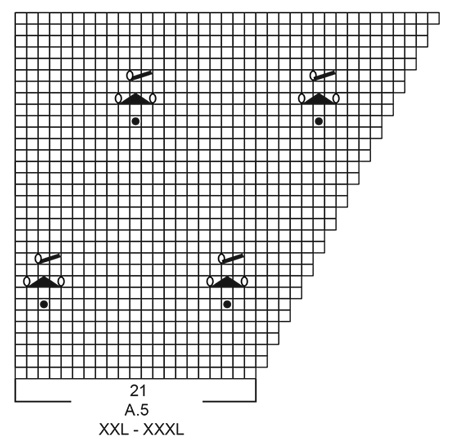
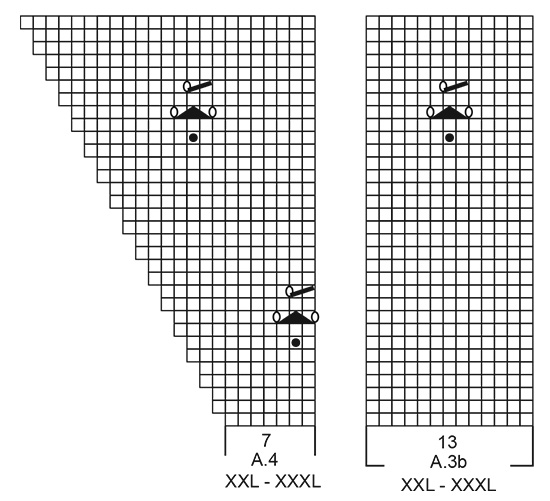
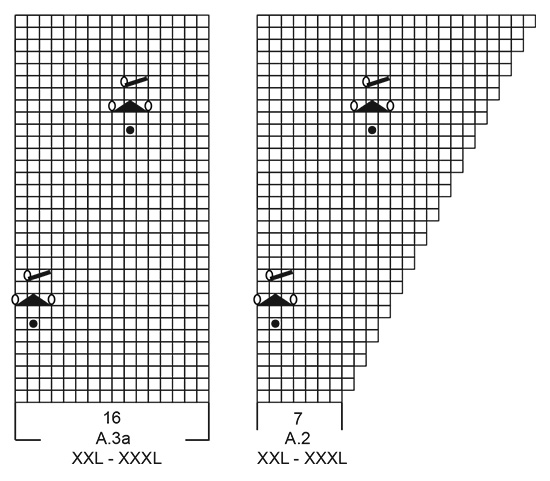
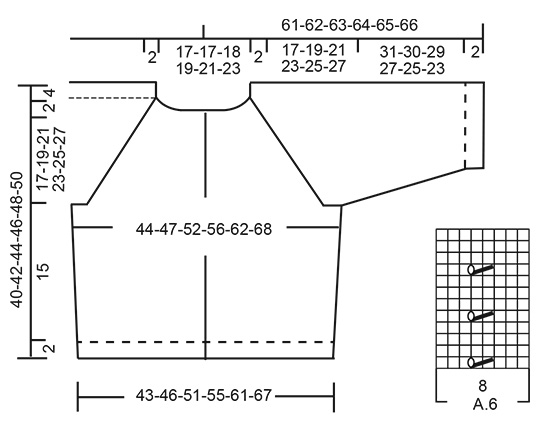
---------------------------------------------------------- EXPLANATION FOR THE PATTERN: ---------------------------------------------------------- GARTER STITCH (back and forth): Knit all rows. 1 ridge vertically = knit 2 rows. PATTERN: See diagrams A.1 to A.6. Choose diagram for your size (applies to A.1-A.2). Diagrams show all rows in pattern seen from the right side. DECREASE TIP-1 (evenly): To calculate how to decrease evenly, use the total number of stitches on row (e.g. 118 stitches), minus bands (e.g. 10 stitches) and divide the remaining stitches by number of decreases to be done (e.g. 3) = 36. In this example decrease by knitting every 35th and 36th stitch together. DECREASE TIP-2 (applies to body and sleeves): All decreases are done from the right side! Decrease 1 stitch on each side of A.6 as follows: Work until 2 stitches remain before A.6 and knit 2 together, knit A.6, slip 1 stitch knitwise, knit 1, pass slipped stitch over stitch worked. INCREASE TIP (evenly): To calculate how to increase evenly, use the total number of stitches on row (e.g. 189 stitches), minus bands (e.g. 10 stitches) and divide the remaining stitches by number of increases to be done (e.g. 24) = 7.5. In this example increase by making 1 yarn over after alternately every 7th and 8th stitch. On next row (wrong side) work yarn overs twisted to avoid holes. RAGLAN: All increases are done from the right side. Increase 1 stitch in each side of 3 knit stitches in every transition between front/back piece and sleeves (= 8 stitches increased on row). Increase 1 stitch by making 1 yarn over. On next row (wrong side) purl yarn overs twisted to avoid holes. Then work the new stitch in stockinette stitch on sleeves and work pattern on front and back piece. BUTTONHOLES: Decrease for buttonholes on right band (when garment is worn). Decrease from right side when 3 stitches remain on row as follows: Make 1 yarn over, knit the next 2 stitches together, knit last stitch. On next row knit yarn over to make holes. Decrease first buttonhole when rib in neck measures approx. 1½-2 cm = ½"-¾". Then decrease the next 4 approx. 7-7-8-8-9-9 cm = 2¾"-2¾"-3⅛"-3⅛"-3½"-3½" between each. ---------------------------------------------------------- START THE PIECE HERE: ---------------------------------------------------------- JACKET - SHORT OVERVIEW OF THE PIECE: Worked back and forth on circular needle, top down. Work sleeves in the round on double pointed needles/a short circular needle, top down. NECK EDGE: Cast on 118-118-123-128-138-143 stitches on circular needle size 3 mm = US 2,5 with Belle. Purl 1 row from wrong side. Then work rib as follows from right side: 5 band stitches in GARTER STITCH - read explanation above, (knit 3/purl 2) until 8 stitches remain on needle, knit 3, 5 band stitches in garter stitch. Continue back and forth like this until rib measures 2 cm = ¾" - remember BUTTONHOLES - read explanation above. Knit 1 row while decreasing 3-3-2-7-1-6 stitches evenly - read DECREASE TIP-1 (evenly) = 115-115-121-121-137-137 stitches. Purl 1 row from wrong side (work the 5 band stitches in garter stitches). YOKE: Switch to circular needle size 4 mm = US 6. Work in PATTERN - read explanation above, as follows: 5 band stitches in garter stitch, knit 0-0-1-1-0-0, A.1 over the next 16-16-16-16-21-21 stitches, make 1 yarn over, knit 2, insert a marker thread here (= left front piece), knit 1, make 1 yarn over, knit 15, make 1 yarn over, knit 1, insert a marker thread here (= sleeve), knit 2, 1 yarn over, A.2 over the next 3-3-5-5-7-7 stitches, A.3a over the next 14-14-14-14-16-16 stitches, A.3b over the next 11-11-11-11-13-13 stitches, A.4 over the next 3-3-5-5-7-7 stitches, make 1 yarn over, knit 2, insert a marker thread here (= back piece), knit 1, make 1 yarn over, knit 15, make 1 yarn over, knit 1, insert a marker thread here (= sleeve), knit 2, make 1 yarn over, A.5 over the next 16-16-16-16-21-21 stitches, knit 0-0-1-1-0-0, 5 band stitches in garter stitch (= right front piece). 8 stitches have been increased for RAGLAN - read explanation above. Continue pattern back and forth like this and increase every other row 24-26-29-32-35-38 times in total = 307-323-353-377-417-441 stitches. REMEMBER THE KNITTING GAUGE. When diagrams have been worked 1 time vertically, continue pattern the same way. When all increases for raglan are done, piece measures approx. 19-21-23-25-27-29 cm = 7½"-8¼"-9"-9¾"-10⅝"-11⅜" from cast-on edge and down mid front. Work next row as follows: NOTE: In size S and L divide the piece for sleeves and body at the marker threads. In size M, XL, XXL and XXXL work some of the stitches (= 1-2-1-3 stitches) on sleeves on to needle for body, so that the transition between body and sleeves are now longer at the marker threads. Work the first 47-50-53-58-64-69 stitches, slip the next 65-67-75-77-85-87 stitches on a stitch holder (= sleeve), cast on 8-10-12-12-12-14 new stitches on needle (= in the side under sleeve), work the next 83-89-97-107-119-129 stitches (= back piece), slip the next 65-67-75-77-85-87 stitches on a stitch holder (= sleeve), cast on 8-10-12-12-12-14 new stitches on needle (= in the side under sleeve), work the remaining 47-50-53-58-64-69 stitches on needle. NOW MEASURE PIECE FROM HERE! BODY: = 193-209-227-247-271-295 stitches. Work pattern A.6 (= 8 stitches) over the middle 8 stitches under sleeves, 5 band stitches in garter stitch in each side towards and work as many repetitions of pattern that will fit out towards each side (pattern should fit pattern on yoke!), work the remaining stitches in stockinette stitch. When piece measures 4 cm = 1½", decrease 1 stitch on each side of A.6 in each side - read DECREASE TIP-2 (= 4 stitches decreased) = 189-205-223-243-267-291 stitches. When piece measures 15 cm = 6" (adjust to finish after one whole lace pattern vertically and some rounds with stockinette stitch), increase 24-28-35-40-46-47 stitches evenly – read INCREASE TIP = 213-233-258-283-313-338 stitches. Switch to circular needle size 3 mm = US 2,5. Work rib from right side as follows: 5 band stitches in garter stitch, (knit 3/purl 2) until 8 stitches remain on row, knit 3, 5 band stitches in garter stitch. When rib measures 2 cm = ¾", bind off with knit over knit and purl over purl. Make sure that the bind-off edge is not too tight. Use a larger needle size when binding off. Jacket measures approx. 40-42-44-46-48-50 cm = 15¾"-16½"-17¼"-18"-19"-19¾" from shoulder and down. SLEEVE: Slip the 65-67-75-77-85-87 stitches from stitch holder in one side back on a short circular needle/double pointed needles size 4 mm = US 6. Pick in addition up 1 stitch in each of the 8-10-12-12-12-14 stitches under sleeve = 73-77-87-89-97-101 stitches. Continue in the round with stockinette stitch and work A.8 over the middle 8 stitches under sleeve. When piece measures 4-4-3-3-3-2 cm = 1½"-1½"-1⅛"-1⅛"-1⅛"-¾", decrease 2 stitches under sleeves - remember DECREASE TIP-2. Decrease in the different sizes as follows: Size S: Decrease like this on alternately every 2 and 3 cm = ¾" and 1⅛" 11 times in total. Size M: Decrease like this every 2 cm = ¾" 12 times in total. Size L: Decrease like this on every 1,5 cm = ½" 16 times in total. Size XL: Decrease like this on every 1,5 cm = ½" 16 times in total. Size XXL: Decrease like this every cm = ⅜" 19 times in total. Size XXXL: Decrease like this every cm = ⅜" 20 times in total. When all decreases on sleeve are done there are 51-53-55-57-59-61 stitches on round. Continue until sleeve measures 31-30-29-27-25-23 cm = 12¼"-11¾"-11⅜"-10⅝"-9¾"-9". Now increase 4-7-5-8-6-9 stitches evenly = 55-60-60-65-65-70 stitches. Switch to double pointed needles size 3 mm = US 2,5. Work rib (knit 3/purl 2) for 2 cm = ¾". Bind off stitches with knit over knit and purl over purl. Make sure that the bind-off edge is not too tight. Use a larger needle size when binding off. Sleeve measures approx. 33-32-31-29-27-25 cm = 13"-12½"-12¼"-11⅜"-10⅝"-9¾". Work the other sleeve the same way. ASSEMBLY: Sew the buttons on to left band. |
||||||||||||||||
Diagram explanations |
||||||||||||||||
|
||||||||||||||||
 |
||||||||||||||||
 |
||||||||||||||||
 |
||||||||||||||||
 |
||||||||||||||||
 |
||||||||||||||||
 |
||||||||||||||||
 |
||||||||||||||||
 |
||||||||||||||||
Have you finished this pattern?Tag your pictures with #dropspattern #raspberrykisscardigan or submit them to the #dropsfan gallery. Do you need help with this pattern?You'll find 28 tutorial videos, a Comments/Questions area and more by visiting the pattern on garnstudio.com. © 1982-2026 DROPS Design A/S. We reserve all rights. This document, including all its sub-sections, has copyrights. Read more about what you can do with our patterns at the bottom of each pattern on our site. |
||||||||||||||||


With over 40 years in knitting and crochet design, DROPS Design offers one of the most extensive collections of free patterns on the internet - translated to 17 languages. As of today we count 324 catalogs and 12290 patterns - 12280 of which are translated into English (US/in).
We work hard to bring you the best knitting and crochet have to offer, inspiration and advice as well as great quality yarns at incredible prices! Would you like to use our patterns for other than personal use? You can read what you are allowed to do in the Copyright text at the bottom of all our patterns. Happy crafting!
Post a comment to pattern DROPS 202-6
We would love to hear what you have to say about this pattern!
If you want to leave a question, please make sure you select the correct category in the form below, to speed up the answering process. Required fields are marked *.