
Popular categories
Looking for a yarn?


Comments / Questions (100)
![]() Dominique wrote:
Dominique wrote:
Bjr, j\'ai un doute sur l\'avancée des manches. Dois je faire dés le début de la reprise des mailles les jetés et diminutions ts les 2 rangs mais en même temps tous les 6 rangs les 2 diminutions ? en effet 13 fois tous les 6 rangs représentent 78 rangs donc un peu plus de 30cms... et si je dois commencer une fois que toutes les mailles sont en jersey soit 66 rangs cela me donnerait 66+78=144 rangs soit 57cms... Merci
13.02.2022 - 16:58DROPS Design answered:
Bonjour Dominique, dans un premier temps, vous décalez les mailles point mousse au milieu sous la manche (1 jeté avant la 1ère section point mousse + 1 jeté après la 2ème section point mousse) + on diminue 2 mailles au milieu sous la manche (1 m de chaque côté du fil marqueur); en taille S vous avez 4+8+4 m point mousse soit 16 mailles, et il faudra 16 tours pour les faire "disparaître" soit 6 cm environ + il vous faudra un peu moins de 30 cm pour les diminutions sous la manche car après la dernière diminution, on n'a pas besoin de retricoter les 5 autres rangs. Bon tricot!
14.02.2022 - 11:00
![]() Barbara wrote:
Barbara wrote:
Ich stricke den Pullover mit Drops Merino Extra fine, gleiche Garngruppe wie SKY, und Maschenprobe mit 4er Nadeln war passend. Jetzt habe ich beim Halsausschnitt mit 4er Nadeln gestrickt, ein Mass von 64 cm, aber eigentlich dürften es doch nur -nach dem Diagramm-max. 40 cm sein? Wie kann das sein? und was kann ich verändern? Liebe Grüße Barbara
12.12.2021 - 14:06DROPS Design answered:
Liebe Barbara, meinen Sie die 20 cm beim Halsausschnitt? die sind gemessen, wenn die Arbeit flach liegt, dh die Maschen auf der Nadel habe eine grösse Umfang, darin sind die Schulter enthalten. Viel Spaß beim stricken!
13.12.2021 - 09:49
![]() Unike wrote:
Unike wrote:
Hej! Var ska man lägga in uppdateringen i originalet? Svårt att få ihop det.
13.11.2021 - 08:23
![]() Carole wrote:
Carole wrote:
Bonjour, j’en suis arrivée aux augmentations / diminutions sous manches. Lorsque l’on augmente de part et d’autre en suivant les explications de départ, le point mousse est un point envers. Doit-on alors attendre le tour suivant pour faire les diminutions ? Merci d’avance.
08.05.2021 - 10:15DROPS Design answered:
Bonjour Carole, peu importe en fait, l'important et de bien conserver le bon rythme pour les augmentations/diminutions et de bien tricoter le jeté torse au tour suivant. Bon tricot!
20.05.2021 - 08:34
![]() Luminita Apostol wrote:
Luminita Apostol wrote:
Hello,i am working the body of the pattern and i can already see that the garter stitch part is shorter than the stocking stitch part and i get a creasing effect. Is this normal, will it be ok after blocking ?
21.04.2021 - 16:49DROPS Design answered:
Dear Luminita, it should block out nicely. Happy Knitting!
21.04.2021 - 18:34
![]() Wenche Rose Finstad wrote:
Wenche Rose Finstad wrote:
Hvordan skrive ut oppskrift uten kommentarene?
09.04.2021 - 09:26DROPS Design answered:
Hej Wenche, klik på "skriv ut" knappen til højre for billedet, vælg "skriv ut oppskrift" nu kan du også vælge hvilke sider du vil skrive ud. God fornøjelse!
12.04.2021 - 14:48
![]() Ilsemarie Weber wrote:
Ilsemarie Weber wrote:
Hallo, musste mehrere Reihen bei Passe zusätzlich stricken um 23 cm für Gr. M zu erreichen. Statt 328 Ma. habe ich nur 216 Ma. am Ende der Passe erreicht ??? Finde Anleitung sehr verwirrend. Was ist 1 Krausrippe (dachte, da ich ja rund stricke, dass es 2 rechte Runden sind.) Könnten Sie mir bitte eine ausführlichere Anleitung schicken? So komme ich nicht klar! z.B. Muster + dann wieviel Runden/Reihen? Oder könnten wir telefonieren? Freundlichst, I. Weber
25.03.2021 - 22:14DROPS Design answered:
Liebe Frau Weber, für den Raglan nehmen Sie 8 Maschen bei jeder Zunahmenrunde insgesamt 27 Mal in M und 29 Mal in L, so haben Sie: 88-96 + 216-328 = 308 M in M und 328 M in L. Sie haben gestrickt insgesamt 27-29x2 = 54-58 Runden. Sollte Ihre Maschenprobe in der Höhe stimmen, die Arbeit misst jetzt ca 22-23 cm von der Markierung. Viel Spaß beim stricken!
26.03.2021 - 07:25
![]() Ilsemarie wrote:
Ilsemarie wrote:
Hallo, brauche Hilfe beim STONE FIELDS Pullover. Nach den Krausrippen am Halsausschnitt in der 1. Runde wie folgt gestrickt (96): 7 M. re. (= ½ Rückent.), 1 Um., 16 M links (= kraus r. die 1. Runde ist 1 Links-Runde), usw. Danach 1 Runde rechts stricken, Umsch. verschränkt. Ab da komme ich nicht mehr zurecht. Ist es richtig, dass nun in jeder Reihe vor und nach den krausen M. 2 dazu kommen, also in der 3. Reihe = 18 M. links, in der 5. Runde 20 Maschen kraus links, usw.? Lieben Gruß, I.
06.03.2021 - 18:58DROPS Design answered:
Liebe Ilsemarie, die Umschläge beidseitig von den 16 Maschen kraus rechts sind die Raglanzunahmen, dh diese Umschläge werden verschränkt aber glatt rechts gestrickt, dh die Krausrechte Maschen sollen nur immer 16 bleiben. Nur die Maschenanzahl von den glatt rechts gestrickten Maschen wird zunehmen. Viel Spaß beim stricken!
08.03.2021 - 08:04
![]() Valerie wrote:
Valerie wrote:
Bonjour La vidéo pour tricoter une maille torse utilise la méthode continentale et du coup je n’y arrive pas car je ne sais pas tricoter de cette façon Avez vous une autre explication svp
20.02.2021 - 11:16DROPS Design answered:
Bonjour Valérie, ne vous laissez pas impressionner par la main qui tient le fil (les scandinaves, notamment, tricotent toujours avec le fil dans la main gauche), regardez simplement le chemin du fil et de l'aiguille qui doit le tricoter. Autrement dit, tricoter 1 maille torse signifie la tricoter dans le brin arrière au lieu du brin avant, piquez votre aiguille dans le brin arrière et tricotez la comme vous le faites habituellement. Bon tricot!
22.02.2021 - 10:11
![]() Louison wrote:
Louison wrote:
Ok, merci, c'est clair!
02.02.2021 - 12:06
|
|
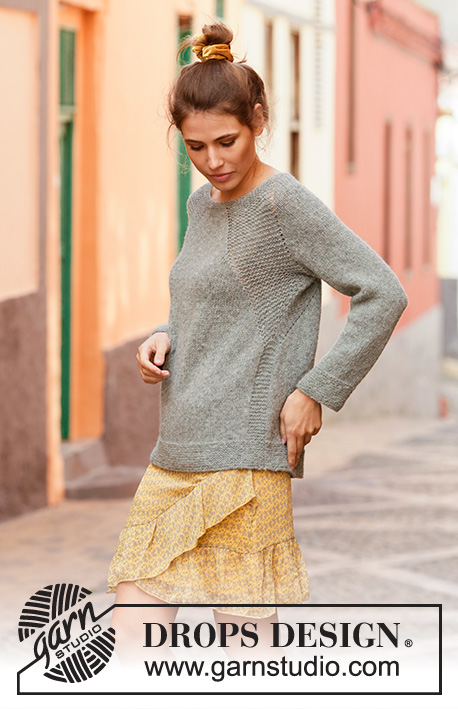
Stone Fields#stonefieldssweater |
|
 |
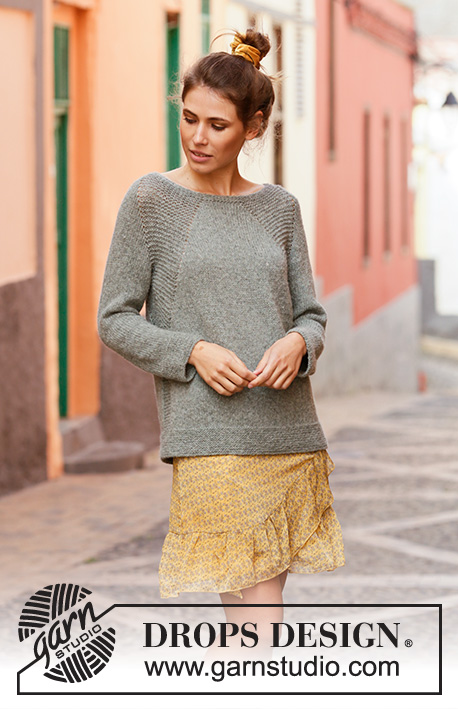 |
Knitted sweater with raglan in DROPS Sky. Piece is knitted top down in garter stitch and stockinette stitch. Size: S - XXXL
DROPS 202-8 |
|
|
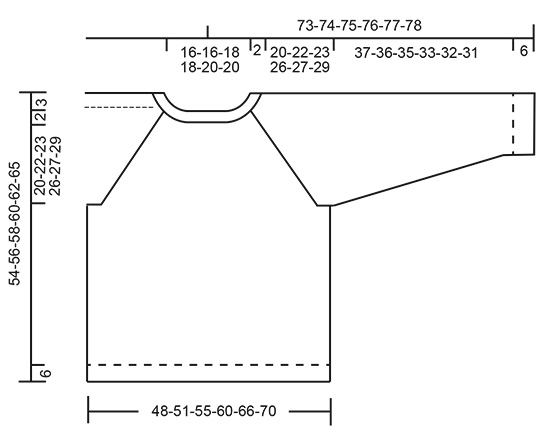
---------------------------------------------------------- EXPLANATION FOR THE PATTERN: ---------------------------------------------------------- GARTER STITCH (worked in the round): 1 ridge vertically = 2 rounds, i.e. purl 1 round and knit 1 round. DECREASE/INCREASE TIP (evenly): To calculate how to decrease/increase evenly, use the total number of stitches to be decreased/increased over (e.g. 96 stitches) and divide stitches by number of decreases/increases to be done (e.g. 8) = 12. In this example decrease by knitting every 11th and 12th stitch together. When increasing evenly make 1 yarn over after every 12th stitch. On next round knit yarn over twisted to avoid holes. KNITTING TIP: Because of the ridges in garter stitch the yoke will contract vertically when places flat, measurements should be done when the garment is held up, or lightly pull while measuring. If the yoke is too short continue pattern as before (without increasing.) DECREASE TIP (applies to sleeves): Decrease 1 stitch on each side of marker thread as follows: Work until 3 stitches remain before marker thread, slip 1 stitch knitwise, knit 1, pass slipped stitch over stitch worked, knit 2 (marker is in the middle of these stitches), knit the next 2 stitches together. ---------------------------------------------------------- START THE PIECE HERE: ---------------------------------------------------------- SWEATER - SHORT OVERVIEW OF THE PIECE: Worked in the round on circular needle, top down. After yoke work body in the round on circular needle. Work sleeves in the round on double pointed needles/a short circular needle. YOKE: Cast on 96-100-104-112-120-124 stitches on circular needle size 4 mm = US 6 with Sky. Work 4 ridges in GARTER STITCH - see explanation above. Work 1 round in stockinette stitch while decreasing 8-8-8-12-12-12 stitches evenly - read DECREASE/INCREASE TIP = 88-92-96-100-108-112 stitches. Switch to circular needle size 5 mm = US 8. Insert 1 marker here - NOW MEASURE PIECE FROM HERE! On next round start the pattern and increase for raglan as follows: (Beginning of round is mid back.) Work 5-6-7-8-9-10 stitches in stockinette stitch (= half back piece), 1 yarn over, purl 16 (= ridge, begin first round with purl), 1 yarn over, work 2-2-2-2-4-4 stitches in stockinette stitch (= sleeve), 1 yarn over, purl 16 (= ridge), 1 yarn over, work 10-12-14-16-18-20 stitches in stockinette stitch (= front piece), 1 yarn over, purl 16 (= ridge),1 yarn over, work 2-2-2-2-4-4 stitches in stockinette stitch (= sleeve), 1 yarn over, purl 16 (= ridge), 1 yarn over and work 5-6-7-8-9-10 stitches in stockinette stitch (= half back piece) until mid back. Knit 1 round, work yarn overs twisted (= the increased stitches are worked in stockinette stitch). First increase for raglan is now done (= 8 stitches increased on round). Continue with stockinette stitch / garter stitch and increase 1 stitch on each side of the 16 stitches in garter stitch between sleeves and body, and increase every other round 25-27-29-32-34-36 times in total (including first increase explained above). After last increase for raglan there are 288-308-328-356-380-400 stitches on needle. Yoke should measure 20-22-23-26-27-29 cm = 8"-8¾"-9"-10¼"-10⅝"-11⅜" from marker - READ KNITTING TIP! Work next round as follows: Work 30-33-36-40-43-46 stitches in stockinette stitch, 12-11-11-12-14-14 stitches in garter stitch (= half back piece), slip the next 60-66-70-74-76-80 stitches on 1 stitch holder for sleeve, cast on 8-8-10-10-12-12 new stitches on needle (= in the side under sleeve), work in garter stitch over the next 12-11-11-12-14-14 stitches, work in stockinette stitch over the next 60-66-72-80-86-92 stitches, work 12-11-11-12-14-14 stitches in garter stitch (= front piece), slip the next 60-66-70-74-76-80 stitches on 1 stitch holder for sleeve, cast on 8-8-10-10-12-12 new stitches on needle (= in the side under sleeve), work 12-11-11-12-14-14 stitches in garter stitch, work in stockinette stitch over the last 30-33-36-40-43-46 stitches (= half back piece). Finish body and sleeves separately. NOW MEASURE PIECE FROM HERE! BODY: = 184-192-208-228-252-264 stitches. Insert 1 marker thread in the middle of the 8-8-10-10-12-12 new stitches that were cast on under sleeve in each side. Begin round at one of the marker threads and move the marker threads when working. READ ALL OF THE FOLLOWING SECTION BEFORE CONTINUING! Continue in the round with stockinette stitch and in garter stitch over stitches in the side (= the stitches in garter stitch left on each side of front/back piece and the new stitches cast on under sleeve), AT THE SAME TIME on every other round make 1 yarn over on the outside of each section in garter stitch towards mid front and mid back as before (= 4 stitches increased in total on round) and decrease 2 stitches in the middle of each section in garter stitch by working the middle 4 stitches together 2 by 2 (= 4 stitches decreased in total on round). Increase/decrease like this until there are only 8 stitches in garter stitch in each side of garment. NOTE: Number of stitches on round will stay the same but stitches in garter stitch will gradually disappear and there will be more stitches in stockinette stitch. Continue in stockinette stitch and 8 stitches in garter stitch in each side until piece measures 23-23-24-23-24-25 cm = 9"-9"-9½"-9"-9½"-9¾" from division (approx. 48-50-52-54-56-59 cm = 19"-19¾"-20½"-21¼"-22"-23¼" from shoulder). Switch to circular needle size 4 mm = US 6 and work in garter stitch for 6 cm = 2⅜". Loosely bind off. Sweater measures approx. 54-56-58-60-62-65 cm = 21¼"-22"-22¾"-23⅝"-24⅜"-25½" from shoulder. SLEEVE: Slip the 60-66-70-74-76-80 stitches from stitch holder in one side of piece on circular needle/double pointed needles size 5 mm = US 9 and pick in addition up 1 stitch in each of the 8-8-10-10-12-12 new stitches cast on under sleeve = 68-74-80-84-88-92 stitches. Insert 1 marker thread in the middle of the 8-8-10-10-12-12 stitches under sleeve and begin round here. Continue in the round with stockinette stitch and in garter stitch over stitches on the underside of sleeve (= the garter stitches that are on sleeve and the new stitches cast on under sleeve), AT THE SAME TIME on every other round make 1 yarn over on the outside of each section in garter stitch as before (= 2 stitches increased in total on round) and decrease 2 stitches in the middle of each section in garter stitch by working the middle 4 stitches together 2 by 2 (= 2 stitches decreased in total on round). NOTE: Number of stitches will stay the same on round but stitches in garter stitch will gradually disappear and there will be more stitches in stockinette stitch. Increase/decrease like this until there are no more stitches in garter stitch left, and then continue in stockinette stitch over all stitches. Now decrease 2 stitches mid under sleeve - read DECREASE TIP. Decrease like this every 6th-5th-4th-4th-4th-4th round 13-15-17-18-18-19 times in total = 42-44-46-48-50-54 stitches. Work until sleeve measures 37-36-35-33-32-31 cm = 14½"-14¼"-13¾"-13"-12½"-12¼" from division (shorter measurements in the larger sizes because of longer yoke). Switch to double pointed needles size 4 mm = US 6 and work 6 cm = 2⅜" in garter stitch. Sleeve measures approx. 43-42-41-39-38-37 cm = 17"-16½"-16 1/8-15¼"-15"-14½" from division. Loosely bind off. Work the other sleeve the same way. |
|
 |
|
Have you finished this pattern?Tag your pictures with #dropspattern #stonefieldssweater or submit them to the #dropsfan gallery. Do you need help with this pattern?You'll find 24 tutorial videos, a Comments/Questions area and more by visiting the pattern on garnstudio.com. © 1982-2026 DROPS Design A/S. We reserve all rights. This document, including all its sub-sections, has copyrights. Read more about what you can do with our patterns at the bottom of each pattern on our site. |
|


With over 40 years in knitting and crochet design, DROPS Design offers one of the most extensive collections of free patterns on the internet - translated to 17 languages. As of today we count 324 catalogs and 12290 patterns - 12280 of which are translated into English (US/in).
We work hard to bring you the best knitting and crochet have to offer, inspiration and advice as well as great quality yarns at incredible prices! Would you like to use our patterns for other than personal use? You can read what you are allowed to do in the Copyright text at the bottom of all our patterns. Happy crafting!
Post a comment to pattern DROPS 202-8
We would love to hear what you have to say about this pattern!
If you want to leave a question, please make sure you select the correct category in the form below, to speed up the answering process. Required fields are marked *.