
Popular categories
Looking for a yarn?


|
|
Bretagne |
|
 |
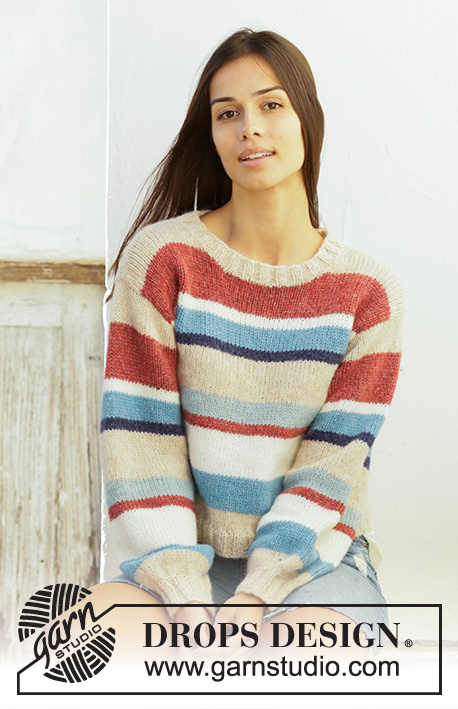 |
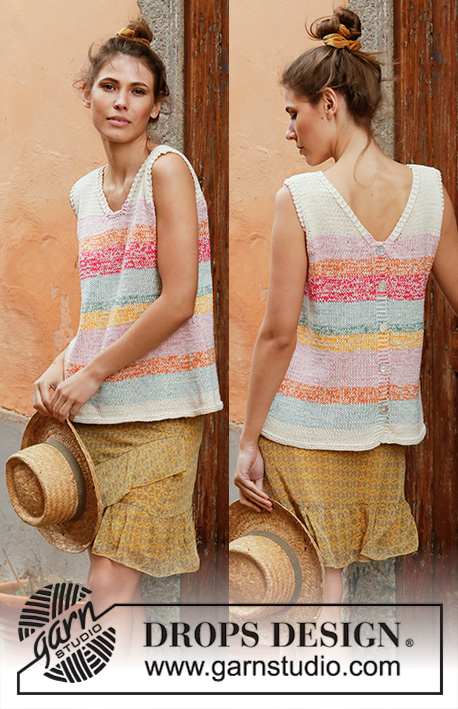
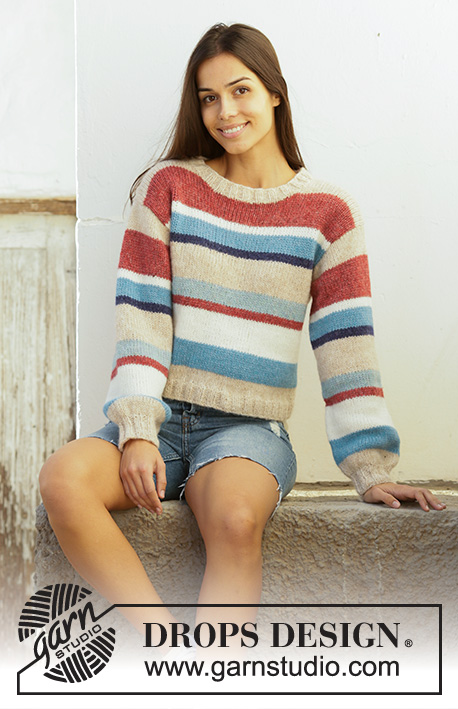
Knitted sweater with stripes in DROPS Air. Size: S - XXXL
DROPS 202-15 |
|
|
---------------------------------------------------------- EXPLANATION FOR THE PATTERN: ---------------------------------------------------------- DECREASE/INCREASE TIP (evenly): To calculate how to decrease/increase evenly, use the total number of stitches on row (e.g. 152 stitches) and divide stitches by number of decreased/increases to be done (e.g. 12) = 12.6. In this example decrease by knitting alternately approx. every 11th and 12th stitch and every 12th and 13th stitch together. When increasing make 1 yarn over after alternately approx. every 12th and 13th stitch. On next round knit yarn overs twisted to avoid holes. STRIPES BODY: Work all stripes in stockinette stitch! 3-3-3-3-3-3 cm = 1⅛"-1⅛"-1⅛"-1⅛"-1⅛"-1⅛" with color 02, wheat 6-6-7-7-7-7 cm = 2⅜"-2⅜"-2¾"-2¾"-2¾"-2¾" with color 21, sea blue 7-8-8-8-8-9 cm = 2¾"-3⅛"-3⅛"-3⅛"-3⅛"-3½" with color 01, off white 2-2-2-2-2-2 cm = ¾"-¾"-¾"-¾"-¾"-¾" with color 28, red brick 3-3-3-3-4-4 cm = 1⅛"-1⅛"-1⅛"-1⅛"-1½"-1½" with color 27, sea green 7-8-8-8-8-9 cm = 2¾"-3⅛"-3⅛"-3⅛"-3⅛"-3½" with color 02, wheat 2-2-2-2-2-2 cm = ¾"-¾"-¾"-¾"-¾"-¾" with color 09, navy blue 3-3-3-3-4-4 cm = 1⅛"-1⅛"-1⅛"-1⅛"-1½"-1½" with color 21, sea blue 2-2-2-2-2-2 cm = ¾"-¾"-¾"-¾"-¾"-¾" with color 01, off white 7-7-7-8-8-8 cm = 2¾"-2¾"-2¾"-3⅛"-3⅛"-3⅛" with color 28, red brick 5-5-6-6-6-6 cm = 2"-2"-2⅜"-2⅜"-2⅜"-2⅜" (or until finished measurements) with color 02, wheat STRIPES SLEEVE: Work all stripes in stockinette stitch. 4 cm = 1½" with color 02, wheat 6 cm = 2⅜" with color 21, sea blue 8 cm = 3⅛" with color 01, off white 2 cm = ¾" with color 28, red brick 3 cm = 1⅛" with color 27, sea green 8 cm = 3⅛" with color 02, wheat 1 cm = ⅜" with color 09, navy blue 3 cm = 1⅛" with color 21, sea blue 2 cm = ¾" with color 01, off white 8 cm = 3⅛" with color 28, red brick 6-6-6-5-5-5 cm = 2⅜"-2⅜"-2⅜"-2"-2"-2" (or until finished measurements) with color 02, wheat INCREASE TIP (applies to mid under sleeves): Work until 3 stitches remain before marker, make 1 yarn over, knit 6 (marker is in the middle of these 6 stitches), make 1 yarn over = 2 stitches increased. On next round knit yarn overs twisted to avoid holes. Then work the new stitches in stockinette stitch. ---------------------------------------------------------- START THE PIECE HERE: ---------------------------------------------------------- SWEATER - SHORT OVERVIEW OF THE PIECE: Work body in the round on circular needle, from the bottom and up to armholes. Then work front and back piece separately back and forth on circular needle. Work sleeves in the round on double pointed needles/a short circular needle, bottom-up. Sew piece together on the shoulders. Sew in sleeves and work a neck edge. The entire garment is worked in stockinette stitch and stripes. BODY: Cast on 152-164-184-200-220-240 stitches on circular needle size 4.5 mm = US 7 with wheat. Knit 1 round. Then work rib in the round (= knit 2 / purl 2) for 3-3-3-4-4-4 cm = 1⅛"-1⅛"-1⅛"-1½"-1½"-1½". Knit 1 round while decreasing 12-12-16-16-20-20 stitches evenly - read DECREASE/INCREASE TIP = 140-152-168-184-200-220 stitches. Switch to circular needle size 5.5 mm = US 9 and work STRIPES BODY - see explanation above. REMEMBER THE KNITTING GAUGE! When piece measures 30-31-32-33-34-35 cm = 11¾"-12¼"-12½"-13"-13⅜"-13¾", bind off for armholes as follows: cast 2-2-3-3-4-5 stitches for armhole, work 66-72-78-86-92-100 stitches as before (= back piece), bind off 4-4-6-6-8-10 stitches for armhole, work 66-72-78-86-92-100 stitches as before (= front piece), bind off 2-2-3-3-4-5 stitches for armhole. Then work front and back piece separately as explained below. BACK PIECE: = 66-72-78-86-92-100 stitches. Continue stripes as before. AT THE SAME TIME bind off for armholes at beginning of every row in each side as follows: Bind off 2 stitches 0-0-1-1-2-3 times in each side and 1 stitch 1-2-2-4-4-4 times in each side = 64-68-70-74-76-80 stitches. Continue to work until piece measures 48-50-52-54-56-58 cm = 19"-19¾"-20½"-21¼"-22"-22¾". On next row bind off the middle 26-26-28-28-30-30 stitches for neck and finish each shoulder separately. Bind off 1 stitch on next row from neck = 18-20-20-22-22-24 stitches remain on the shoulder. Continue until piece measures 50-52-54-56-58-60 cm = 19¾"-20½"-21¼"-22"-22¾"-23⅝" and loosely bind off. Work the other shoulder the same way. FRONT PIECE: = 66-72-78-86-92-100 stitches. Continue stripes as before. AT THE SAME TIME bind off for armholes at beginning of every row in each side as follows: Bind off 2 stitches 0-0-1-1-2-3 times in each side and 1 stitch 1-2-2-4-4-4 times in each side = 64-68-70-74-76-80 stitches. Continue to work until piece measures 42-44-46-47-49-51 cm = 16½"-17¼"-18"-18½"-19¼"-20". On next row slip the middle 14-14-16-16-18-18 stitches on 1 stitch holder for neck and finish each shoulder separately. Continue back and forth with stripes as before and bind off for neck at the beginning of every row from the neck as follows: Bind off 2 stitches 2 times and 1 stitch 3 times = 18-20-20-22-22-24 stitches. Continue until piece measures 50-52-54-56-58-60 cm = 19¾"-20½"-21¼"-22"-22¾"-23⅝" and loosely bind off. Work the other shoulder the same way. SLEEVE: Cast on 36-36-40-40-44-44 stitches on double pointed needles size 4.5 mm = US 7 with wheat. Knit 1 round. Then work rib in the round (= knit 2 / purl 2) for 5-5-5-6-6-6 cm = 2"-2"-2"-2⅜"-2⅜"-2⅜". Knit 1 round while increasing 20-24-22-24-22-26 stitches evenly = 56-60-62-64-66-70 stitches. Insert 1 marker at beginning of round. Use marker later when increasing mid under sleeve. Switch to double pointed needles/a short circular needle size 5.5 mm = US 9 and work STRIPES SLEEVE - see explanation above. AT THE SAME TIME when piece measures 10 cm = 4", increase 2 stitches mid under sleeve - READ INCREASE TIP. Then increase in L, XL, XXL and XXXL as follows (do not increase more stitches in S and M): Increase 2 stitches mid under sleeve every 8 cm = 3⅛" 1-2-2-3 more times. After increases mid under sleeve, there are 58-62-66-70-72-78 stitches on needle. Continue in the round with stripes. When piece measures 51-51-50-49-47-46 cm = 20"-20"-19¾"-19¼"-18½"-18" (shorter measurements in the larger sizes because of wider shoulders and longer sleeve cap), work next round as follows: Work as before until 2-2-3-3-4-5 stitches remain before marker at beginning of round and bind off the next 4-4-6-6-8-10 stitches. Now work sleeve cap back and forth on a short circular needle size 5.5 mm = US 9 as follows: Continue stripes and bind off for sleeve cap at the beginning of every row in each side as follows: Bind off 2 stitches 2 times in all sizes and 1 stitch 1-1-1-2-4-5 times. Then bind off 2 stitches in each side until piece measures 56 cm = 22" in all sizes, then bind off 3 stitches 1 time in each side. Bind off the remaining stitches. Sleeve measures approx. 57 cm = 22½" in all sizes. Work another sleeve the same way. ASSEMBLY: Sew shoulder seams inside bind-off edge. Sew in sleeves inside 1 edge stitch in stockinette stitch in each side. NECK EDGE: Begin at one shoulder and pick up from right side approx. 80 to 92 stitches around the neck (number of stitches should be divisible by 4) on a short circular needle size 4.5 mm = US 7 with wheat. Work rib in the round = knit 2/purl 2 for approx. 3 cm = 1⅛". Loosely bind off stitches with knit over knit and purl over purl. |
|

|
|
|
Have you made this or any other of our designs? Tag your pictures in social media with #dropsdesign so we can see them! Do you need help with this pattern?You'll find tutorial videos, a Comments/Questions area and more by visiting the pattern on garnstudio.com. © 1982-2024 DROPS Design A/S. We reserve all rights. This document, including all its sub-sections, has copyrights. Read more about what you can do with our patterns at the bottom of each pattern on our site. |
|


With over 40 years in knitting and crochet design, DROPS Design offers one of the most extensive collections of free patterns on the internet - translated to 17 languages. As of today we count 304 catalogs and 11422 patterns - 11417 of which are translated into English (US/in).
We work hard to bring you the best knitting and crochet have to offer, inspiration and advice as well as great quality yarns at incredible prices! Would you like to use our patterns for other than personal use? You can read what you are allowed to do in the Copyright text at the bottom of all our patterns. Happy crafting!
Comments / Questions (18)
What should the tension be, it is not on the pattern
06.07.2023 - 08:51DROPS Design answered:
Dear Mrs Cox, you will find the tension on the top of the pattern, together with the sizes, materials (quantity of each color) and needle size. Happy knitting!
06.07.2023 - 10:33Salve, che taglia indossa la modella?
13.12.2021 - 16:16DROPS Design answered:
Buonasera Mc, solitamente le modelle indossano la taglia M. Buon lavoro!
15.12.2021 - 22:07Luk ind til ærmer, jeg kan ikke få det til at passe - er ikke meget øvet. Hvis jeg lukker 3m. - strikker 86m. -lukker 6m. så har jeg 85 tilbage på bagstykket, stikker 86m. så har jeg 4m. tilbage at skulle lukke af? Selvom jeg gør så der er 3m. tilbage at lukke af så vil der jo være 1m. som “svæver” alene. Vil det ikke være mere rigtigt at efter der lukket de 6 m. at strikke til enden med de 89 m. vende forstykket og så lukke de 3 m. af?
12.09.2021 - 11:13DROPS Design answered:
Hej Jette. Det är för att du ska få starten av varvet mitt i sidan vi gör på detta sätt. Du har 184 m, lukker 3 m, stickar 86m, lukker 6 m, stickar 86 m och lukker 3 m. Den sista maskan som "svävar" drar du bara igenom tråden i som vanligt vid avslut. Mvh DROPS Design
22.09.2021 - 08:11Waarom is het moeilijk om de patronen te begrijpen hoe lees je een patroon
17.01.2021 - 15:08De mouw is nu 46 cm lang hoe nu verder dat begrijp ik niet
15.01.2021 - 21:20DROPS Design answered:
Dag Dina,
Als je op een hoogte van 46 cm bent, ga je gewoon verder alleen je breit nu de eerste naald tot er 2-2-3-3-4-5 steken over zijn voor de markeerdraad. Dan kan je de volgende 4-4-6-6-8-10 af en brei je de mouw verder heen en weer, waarbij je steken afkant aan beide kanten zoals aangegeven in het patroon.
17.01.2021 - 11:30Meerder twee steken onder de mouw wat bedoelen ze
10.01.2021 - 15:36DROPS Design answered:
Dag De Man,
Bij tip voor het meerderen bovenaan staat aangegeven hoe je 2 steken meerdert onder de mouw. Dit wordt aan beide kanten van de markeerdraad gedaan.
17.01.2021 - 13:05Vielen Dank für die Antwort, meine Frage bezog sich allerdings auf die Angaben der Armkugel. Nehme ich zuerst in 4 Reihen je 2 Maschen zu Beginn und anschließend in 2 Reihen 1 Masche zu Beginn ab, nur um dann wieder zu Beginn jeder Reihe 2 Maschen abzunehmen? Oder nehme ich jetzt zu Beginn und Ende jeder Reihe ab? Vielen Dank!
08.01.2021 - 17:20DROPS Design answered:
Liebe Lisa in der Größe S, M und L sollen Sie 2 Maschen am Anfang der 4 nächsten Reihen (= 2 Maschen beidseitig) abketten, dann 1 Masche am Anfang der 2 nächsten Reihe abketten. Dann ketten Sie 2 Maschen am Anfang jeder Reihe bis die Ärmel 56 cm mist (beachten Sie, daß Sie genausoviele Maschen beidseitig abgekettet haben), dann ketten Sie 3 Maschen am Anfang der 2 nächsten Reihe und ketten die restlichen Maschen ab. Viel Spaß beim Stricken!
11.01.2021 - 06:53Meine Frage bezieht sich auf die Abnahmen an den Ärmeln, habe ich sie folgendermaßen richtig verstanden: Zuerst nehme ich 2 Maschen je Reihe (sowohl Hin- als Rückreihe) an je einem Ende ab. Danach 1 Masche je Reihe und anschließend 4 Maschen (also je 2 am Anfang und Ende von jeder Hin- und Rückreihe). Schlussendlich noch jeweils zu Beginn einer Hin- und einer Rückreihe 3 Maschen abketten und in der folgenden Reihe die verbliebenen Maschen abketten. Vielen Dank!
27.12.2020 - 00:29DROPS Design answered:
Liebe Lisa, Sie nehmen zuerst 2 Maschen siehe ZUNAHMETIPP (gilt für die untere Ärmelmitte): dann in XL nehmen Sie noch 2 Mal 2 Maschen in jeder 8 cm - dann für den Armkugel stricken Sie bis 3 Maschen vor Ende der Runde bleiben, und die nächsten 6 Maschen abketten (= 3 M vor der Ende der Runde + 3 Maschen nach dem Anfang der Reihe). Viel Spaß beim stricken!
04.01.2021 - 09:21Ik vind het schandalig dat ik nog niks gehoord heb van jullie hoe gaat de kop mouw hoe moet dat
20.12.2020 - 22:30Ik heb een bericht gestuurd nog niks ge hoord ik ben bij de armschaten hoe gaat het verder
10.12.2020 - 15:24DROPS Design answered:
Dag De Man,
Het bericht stond bij de algemene opmerkingen, vandaar dat het niet als vraag was opgemerkt.
Vanaf de armsgaten zou je het lijf inderdaad met rechte naalden kunnen breien in plaats van heen en weer met de rondbreinaald.
22.12.2020 - 11:40