
Popular categories
Looking for a yarn?


Comments / Questions (88)
![]() Veronique wrote:
Veronique wrote:
Bonjour, j'ai beau suivre vos indications, une fois la 1ére manche finie, lorsque je monte les mailles pour tricoter le devant et le dos, le pull est très étroit, et ne fait absolument pas la longueur que vous proposez... Ne vous seriez-vous pas trompés dans le nombre de mailles à monter pour le dos et devant? (j'e, suis dèjà à mon 3ème essai, et je ne suis pas débutante...) merci
08.09.2019 - 22:43DROPS Design answered:
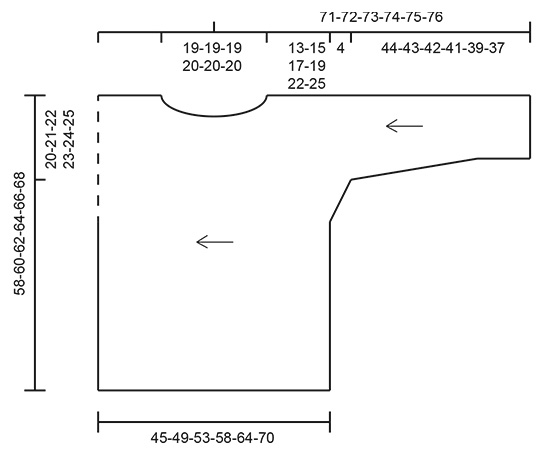
Bonjour Véronique, vous devez avoir 45-49-53-58-64-70 cm à partir du marqueur A (après avoir monté les mailles du devant et du dos) jusqu'au point D (avant de rabattre les mailles du devant et du dos, soit la largeur indiquée pour chaque taille dans le schéma - 13-15-17-19-22-25 cm pour chaque épaule entre les 19-20 cm de l'encolure. Avez-vous bien ces mesures? Bon tricot!
09.09.2019 - 11:12
![]() Lotte wrote:
Lotte wrote:
Is dit een makkelijke trui om te breien? Ik zie nergens bij de patronen wat de moeilijkheidsgraad is.
07.09.2019 - 17:11DROPS Design answered:
Dag Lotte,
Ja, dit is een redelijk makkelijk patroon. Als je ergens niet uit komt, kun je de video's die bij het patroon staan bekijken of een vraag achter laten.
08.09.2019 - 13:03
![]() Marcella wrote:
Marcella wrote:
Yvonne, heb je zelf berekend hoeveel steken je moet opzetten om de gewenste breedte te krijgen? Dat lijkt met het beste. Met pen nr 5 heb ik 18 steken op 10 cm. Losser vind ik niet mooi; dat betekent wat omrekenwerk, uitgaande van het vereiste aantal cm’s.
06.09.2019 - 15:04
![]() Yvonne wrote:
Yvonne wrote:
Hallo Marcella, ik had hetzelfde probleem, maar ben gewoon begonnen en heb op het aantal cm s voor de breedte gelet: In de hoogte brei je toch per cm. Mevr Huisman ,jammer dat het niet goed werd, had je bij het opzetten van de zijkant dan de lengte niet gecontroleerd?
26.08.2019 - 10:26
![]() Marcella Jansen wrote:
Marcella Jansen wrote:
In het patroon staat wordt naalden 4 aangegeven. Ik brei een proeflapje maar zelfs met nld 6 heb ik nog meer steken (19 ipv 15). Kan dat wel kloppen? Ik ga nu 6,5 proberen maar ik word daar wel wat onzeker van...
17.08.2019 - 21:35DROPS Design answered:
Dag Marcella,
Bij het tellen van de steken worden de omslagen niet meegeteld als steken omdat deze bij de rechte steken horen. Heb je hier rekening mee gehouden?
16.10.2019 - 10:15
![]() J Huisman wrote:
J Huisman wrote:
Ik heb deze tru gemaakt, met dunnere wol, op naalddikte 4. Ik nam maat L maar het klopte echt totaal niet. De trui kwam tot de taille. Ik heb er maar een stuk aan gebreid maar mooi is anders. Geen succes helaas
27.04.2019 - 19:35
![]() Leni wrote:
Leni wrote:
Ein toller Pullover mit sehr verständlicher Anleitung und dabei auch angenehm zu stricken. Ich stricke ihn nun schon zum zweitenmal in einer anderen Farbe :-)
12.04.2019 - 08:53
![]() Solange wrote:
Solange wrote:
Solange 11-4-2019 Merci pour votre réponse mais l’idée est d’avoir les côtes verticales devant c’est pourquoi je pensais commencer par devant
11.04.2019 - 21:28DROPS Design answered:
Bonjour Solange, vous trouverez alors probablement un modèle correspondant à vos envies parmi nos pulls en côtes anglaises, en choisissant un modèle de haut en bas ou de bas en haut, vous aurez bien les côtes verticales. Bon tricot!
12.04.2019 - 09:11
![]() Solange wrote:
Solange wrote:
Solange 11-4-2019 Merci pour votre réponse mais l’idée est d’avoir les côtes verticales devant c’est pourquoi je pensais commencer par devant
11.04.2019 - 19:57
![]() Estelle wrote:
Estelle wrote:
Merci pour tous vos magnifiques modèles. J'ai l'intention de tricoter celui-ci en côtes anglaises bi-color. Cela change-t-il la quantité de fil nécessaire? Ou puis-je commander la moitié de chaque couleur? Merci pour votre aide.
10.04.2019 - 18:17DROPS Design answered:
Bonjour Estelle, nous n'avons pas ces informations car ce modèle a été tricoté en uni, mais votre magasin DROPS devrait pouvoir vous renseigner, n'hésitez pas à le contacter, même par mail ou téléphone. Bon tricot!
11.04.2019 - 09:34
|
||||||||||
Daily Wonder#dailywondersweater |
||||||||||
 |
 |
|||||||||
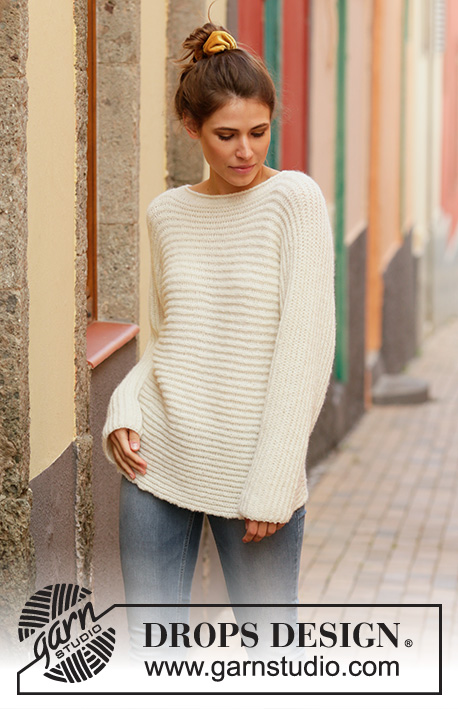
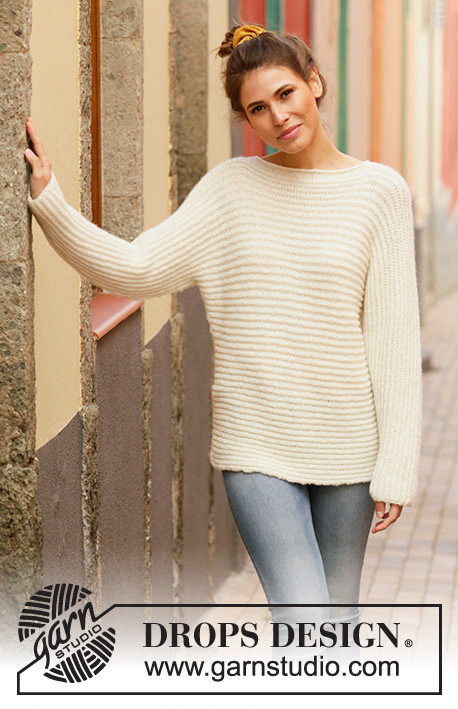
Sweater knitted sideways in DROPS Sky. The piece is worked in English rib. Sizes S - XXXL.
DROPS 201-7 |
||||||||||
|
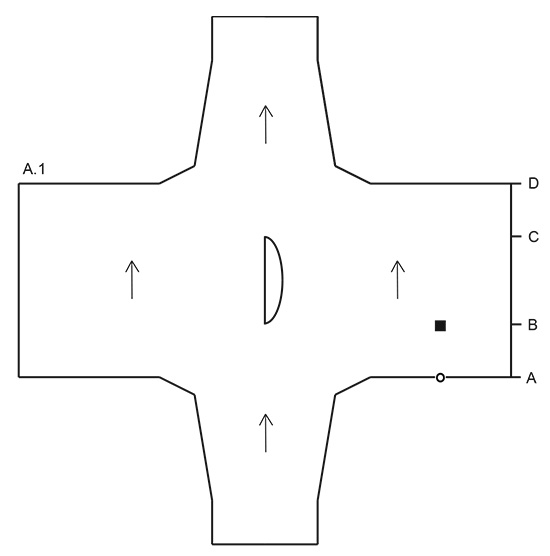
------------------------------------------------------- EXPLANATIONS FOR THE PATTERN: ------------------------------------------------------- KNITTING TIP: Make sure the garment lies flat when measuring. As this garment is worked sideways it is even more important than usual that the measurements are exact and taken on the suggested part of the garment. See sketch and Figure A.1. Figure A.1 has marks where the body should be and where the marker thread for the neck should be. All measurements for body and neck are taken in middle of garment and not by the neck, to avoid the neck/width of body being wrong. ENGLISH RIB: ROW 1 (= right side): 1 stitch in garter stitch, * knit 1, 1 yarn over, slip 1 stitch as if to purl *, work from *-* until there are 2 stitches left on the row and finish with knit 1 and 1 stitch in garter stitch. ROW 2 (= wrong side): 1 stitch in garter stitch, * 1 yarn over, slip 1 stitch as if to purl, knit together next stitch and yarn over *, work from *-* until there are 2 stitches left on row and finish with 1 yarn over, slip 1 stitch as if to purl and 1 stitch in garter stitch. ROW 3 (= right side): 1 stitch in garter stitch, * knit together next stitch and yarn over, 1 yarn over, slip 1 stitch as if to purl *, work from *-* until there are 2 stitches left on row, knit together next stitch and yarn over and 1 stitch in garter stitch. Repeat ROWS 2-3 - NOTE: From ROW 2 the stitches with yarn overs are always knitted. The yarn over lies over the stitch and is knitted together with the stitch. ------------------------------------------------------- START THE PIECE HERE: ------------------------------------------------------- SWEATER - SHORT OVERVIEW OF THE PIECE: The piece is worked back and forth with circular needle in one piece from the sleeve to the neck. It is then divided and front and back pieces are worked separately until the neck is finished. The piece is joined again and continued in one piece. It is very important to get the correct measurements as you work, read KNITTING TIP in description above. SWEATER: Cast on 39-41-43-43-45-45 stitches with circular needle size 4.5 mm = US 7 and Sky (= bottom of sleeve). Work ENGLISH RIB - see description above. When the piece measures 12 cm = 4¾" increase 1 stitch in each side inside the 1 stitch every 3-2½-2½-2-2-1½ cm = 1⅛"-1"-1"-¾"-¾"-½" a total of 10-11-11-13-13-15 times = 59-63-65-69-71-75 stitches - the increased stitches are worked into the English rib as you go. REMEMBER THE KNITTING GAUGE! When the piece measures 44-43-42-41-39-37 cm = 17¼"-17"-16½"-16⅛"-15¼"-14½", loosely cast on stitches on both sides at the end of each row as follows: 2 stitches 2 times, 4 stitches 6 times and then 30-30-32-32-36-36 stitches 1 time. You have now cast on stitches for the body; insert a marker in the middle of the last stitches cast on - this is the side of the body and you now measure from here - read KNITTING TIP in description above and see Figure A.1 point A! There are 175-179-185-189-199-203 stitches on the needle. Continue with English rib. When the piece measures 13-15-17-19-22-25 cm = 5⅛"-6"-6¾"-7½"-8¾"-9¾" from the marker in the side (from point A to point B in Figure A.1), work the next row as follows (make sure this row is worked from the wrong side): Work 87-89-92-94-99-101 stitches (= back piece) and then place these stitches on a thread, bind off 5 stitches for neck, work 83-85-88-90-95-97 stitches (= front piece). Insert a marker thread in the middle of the piece here; the neck is measured from here (position the marker thread so that it is directly over the marker in the side, see Figure A.1, there is 13-15-17-19-22-25 cm = 5⅛"-6"-6¾"-7½"-8¾"-9¾" between the marker (point A) and the marker thread (point B)). Now continue by working the front piece at the same time as you decrease for neck. FRONT PIECE: There are 83-85-88-90-95-97 stitches on the needle. Decrease to neck on every row from the neck as follows: 1 stitch 8 times = 75-77-80-82-87-89 stitches. Work until the piece measures 15-15-15-16-16-16 cm = 6"- 6"- 6"-6¼"-6¼"-6¼"- from the marker thread (point B) and 28-30-32-35-38-41 cm = 11"-11¾"-12½"-13¾"-15"-16⅛" from the marker in the side of body (point A). Loosely cast on for neck, at the end of each row towards the neck as follows: 1 stitch 8 times and 5 stitches 1 time = 88-90-93-95-100-102 stitches. The neck measures approx. 19-19-19-20-20-20 cm = 7½"-7½"-7½"-8"-8"-8" from the marker thread (from point B to point C). Then place all stitches on a thread and continue with the back piece. Cut the strand. BACK PIECE: Place the 87-89-92-94-99-101 stitches from the thread on the circular needle. Continue with the back piece until the neck measures 19-19-19-20-20-20 cm = 7½"-7½"-7½"-8"-8"-8" (see Figure A.1 point C) - adjust so that you have worked the same length as on the front piece. Both pieces can now be placed on the same needle and you continue working in one piece. FRONT AND BACK PIECE: Place the 88-90-93-95-100-102 stitches from the thread on the same circular needle as the back piece = 175-179-185-189-199-203 stitches. Continue working until the front/back pieces measures 45-49-53-58-64-70 cm = 17¾"-19¼"-21"-22¾"-25¼"-27½" from the marker in the side of the body (from point A to point D). Now loosely bind off on each side, at the beginning of each row as follows: 30-30-32-32-36-36 stitches 1 time, 4 stitches 6 times and 2 stitches 2 times = 59-63-65-69-71-75 stitches. Insert 1 new marker here and now measure from here. Work the same length over the stitches as on the other sleeve after the last increase, then decrease 1 stitch on each side inside the 1 stitch every 3-2½-2½-2-2-1½ cm = 1⅛"-1"-1"-¾"-¾"-½" a total of 10-11-11-13-13-15 times = 39-41-43-43-45-45 stitches. Work until the piece measures 44-43-42-41-39-37 cm = 17¼"-17"-16½"-16⅛"-15¼"-14½" from the marker and loosely bind off. NOTE! When binding off, work the yarn overs together with their stitches below AT THE SAME TIME as you bind off. ASSEMBLY: Fold the piece, wrong side to wrong side. Start sewing outermost on sleeve. Sew in the outermost loop of the outermost stitch along the whole sleeve and then down the side of front/back piece. Repeat on other side. NECK: Knit up stitches around the whole neck inside the 1 edge stitch (make sure you knit up in purled stitches mid front and along the neck on the back piece). Knit up approx. 90-106 stitches from the right side with short circular needle size 4.5 mm = US 7 and Sky. Work 8 rounds of stockinette stitch and then loosely bind off. The edge should roll. |
||||||||||
Diagram explanations |
||||||||||
|
||||||||||
 |
||||||||||
 |
||||||||||
Have you finished this pattern?Tag your pictures with #dropspattern #dailywondersweater or submit them to the #dropsfan gallery. Do you need help with this pattern?You'll find 20 tutorial videos, a Comments/Questions area and more by visiting the pattern on garnstudio.com. © 1982-2026 DROPS Design A/S. We reserve all rights. This document, including all its sub-sections, has copyrights. Read more about what you can do with our patterns at the bottom of each pattern on our site. |
||||||||||


With over 40 years in knitting and crochet design, DROPS Design offers one of the most extensive collections of free patterns on the internet - translated to 17 languages. As of today we count 324 catalogs and 12239 patterns - 12229 of which are translated into English (US/in).
We work hard to bring you the best knitting and crochet have to offer, inspiration and advice as well as great quality yarns at incredible prices! Would you like to use our patterns for other than personal use? You can read what you are allowed to do in the Copyright text at the bottom of all our patterns. Happy crafting!
Post a comment to pattern DROPS 201-7
We would love to hear what you have to say about this pattern!
If you want to leave a question, please make sure you select the correct category in the form below, to speed up the answering process. Required fields are marked *.