
Popular categories
Looking for a yarn?


Comments / Questions (46)
![]() FarmingWoman wrote:
FarmingWoman wrote:
Hello There! I am making this pattern in the largest size. I would be grateful for help on my 2 questions. 1) Are the blank ovals on A.2 yarn overs? 2) When I have completed the very first row of the yoke section, how many stitches should be on my needle? I have 266 and I'm concerned I may have not counted right, but no count is given in the pattern. Thank you!
22.11.2019 - 07:59DROPS Design answered:
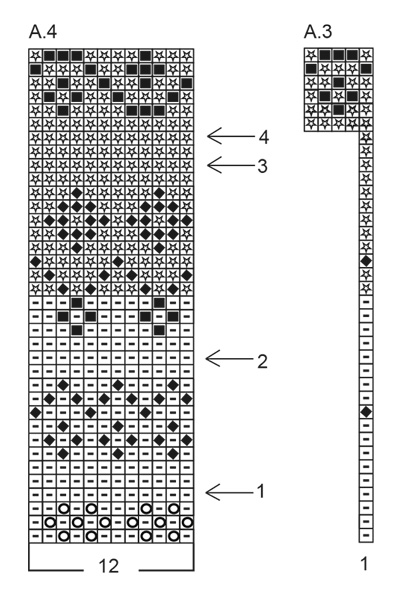
Dear FarmingWoman, you are right, the blank ovals in A.2 are yarn overs = increases. You start working A.2 in L with 127 sts (= 5 front band sts, A.1 (= 1 st), 29 x A.2 (= 4 sts), 5 front band sts. You increase 4 sts in each A.2 (= there are 8 sts in each A.2 on row before the one with the star)= 5+1+ 29x8 + 5= 243 sts + 20 sts inc on row with the star = 263 sts. Happy knitting!
22.11.2019 - 08:46
![]() Sonja Bruholt wrote:
Sonja Bruholt wrote:
Jeg har strikker vrangbord, men fikk det IKKE til å gå opp at jeg skulle gjenta diagrammene 30 ganger - helt til jeg så svarer på et annet spm her: A1 skal bare strikkes først og sist, ved stolpene. DET syns jeg IKKE var så lett å forstå. Det kan godt presiseres i oppskriften, at det bare er diagram A2 som skal gjentas. Men da går det sikkert opp med 30 ganger A2 på pinnen også.
19.11.2019 - 13:12
![]() Torhild Grimstad wrote:
Torhild Grimstad wrote:
Hvorfor skal det økes ut så mange masker før Bråtet ?
02.10.2019 - 20:03DROPS Design answered:
Hej Torhild, mener du før bærestykket?
03.10.2019 - 10:58
![]() Ulrika Berg wrote:
Ulrika Berg wrote:
Hej! Jag förstår inte hur jag ska börja sticka oket. Jag förstår att jag först stickar A1 = 1 maska och sedan upprepar A2. Men vad är det jag ska upprepa av A2? Raden längst ner = 4 maskor? Eller ska jag följa mönsterbeskrivningen rad för rad upp på samma varv i stickningen ? Eller ska jag sticka en rad av mönsterbeskrivningn i taget? Alltså först A1 och sedan A2 tills jag betat av alla rader i mönstret för A1+A2? Tack!
16.09.2019 - 17:28DROPS Design answered:
Hej Ulrika, ja du börjar sticka första varv i diagrammet längst ner, när du kommer till 4:e varv ökar du enligt beskrivningen till din storlek. Fortsätter enligt diagrammet och ökar vid varje pil. Lycka till :)
17.09.2019 - 15:44
![]() Jasmin wrote:
Jasmin wrote:
Hallo liebes Drops Team, kann es sein das man die 1. Reihe Passe mit A.1 enden sollte zwecks Symmetrie und Muster ? 2.Frage : Evtl Ab und zu nur die Blendmaschen hin und zurück Stricken, damit sich die Blende nicht so sehr nach oben zieht ? Liebe Grüße Jasmin
07.05.2019 - 20:16DROPS Design answered:
Liebe Jasmin, die erste Reihe mit Farbemuster bei der Passe wird so gestrickt: (Hinreihe): 5 Blendemaschen, A.1 (für die Symetrie) und dann A.2 wiederholen, und mit 5 Blendemaschen enden. Bei den Rückreihen stricken Sie dann: 5 Blendemaschen, A.2 wiederholen und mit A.1 und 5 Blendemaschen enden. Viel Spaß beim stricken!
08.05.2019 - 08:14
![]() Agneta Bergkvist wrote:
Agneta Bergkvist wrote:
Maskantalet stämmer ej med mönstret, från oket då det först minskas efter resår halskant, kvar då är 119 m (stlkM) Sen vid oket, ökas först 24 m sen ska det helt plötsligt finnas 251 m. Stämmer ej vad gör jag för fel?
04.03.2019 - 16:05DROPS Design answered:
Hej. Det ska vara 251 m när A.1 och A.2 är färdigstickade. A.2 stickas 27 gånger per varv och i hela diagrammet finns totalt 4 ökningar (varv 1,3,11,13), dvs att när hela diagrammet är färdigstickat så har det ökats 27x4=108 m + de 24 m du ska öka på varvet med svart stjärna. 119+108+24=251 m. Lycka till!
08.03.2019 - 08:06
![]() Bente Dalen wrote:
Bente Dalen wrote:
Jeg har fått til første omgang på bærestykket, men skal det strikkes A1, A2 likedan videre? Skal det strikkes mønster på vrangen?
23.02.2019 - 12:12DROPS Design answered:
Hei Bente. Ja, du fortsetter diagrammene rad for rad oppver, så det må strikkes mønster fr vrangen. Husk at diagrammene viser alle pinner sett fra rettsiden, så når du strikker fra vrangen må du lese diagrammene motsatt vei (altså fra venstre mot høyre). God fornøyelse
25.02.2019 - 14:24
![]() Bente Dalen wrote:
Bente Dalen wrote:
Jeg har fått til første pinne på bærestykket, men skal det strikkes A1, A2 likedan videre? Skal det strikkes mønster på vrangen også?
23.02.2019 - 12:08
![]() Lena Sköld wrote:
Lena Sköld wrote:
Jag får inte antalet mönstergrupper att stämma. Gör jag fel då jag stickarA1-A2-A1-A2.......och så vidare.Får mindre antal grupper.
19.02.2019 - 14:34DROPS Design answered:
Hei Lena. Du skal strikke slik: 5 stolpemasker i rille, A.1 over den neste masken, så gjentar du A.2 26-27-29-30-32-33 ganger, over alle maskene til det gjenstår 5 masker. De siste 5 maskene strikkes i rille. Det er altså kun A.2 som skal gjentas. A.1 strikkes bare 1 gang, rett etter/før venstre stolpe. God fornøyelse
20.02.2019 - 15:53
![]() Irene wrote:
Irene wrote:
På varv ett på A2 är det en oval ring i början. Betyder det att det ska ökas en maska?
25.01.2019 - 16:43DROPS Design answered:
Hej Irene, ja en oval ring betyder att du skall öka med 1 omslag mellan 2 maskor. Lycka till :)
30.01.2019 - 09:07
|
||||||||||||||||||||||||||||
Talvik Jacket#talvikjacket |
||||||||||||||||||||||||||||
 |
 |
|||||||||||||||||||||||||||
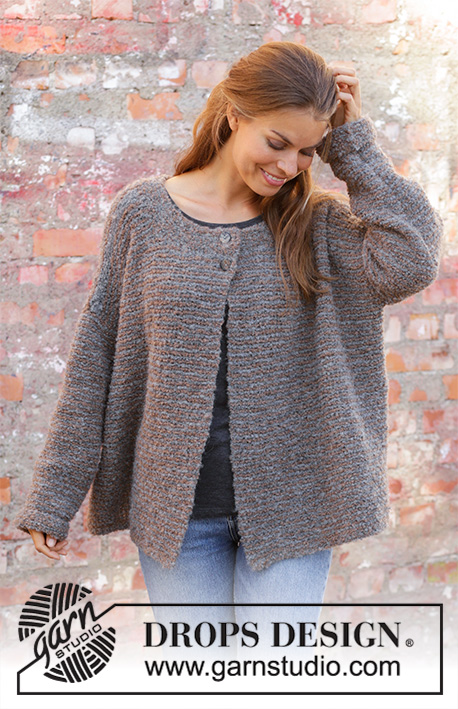
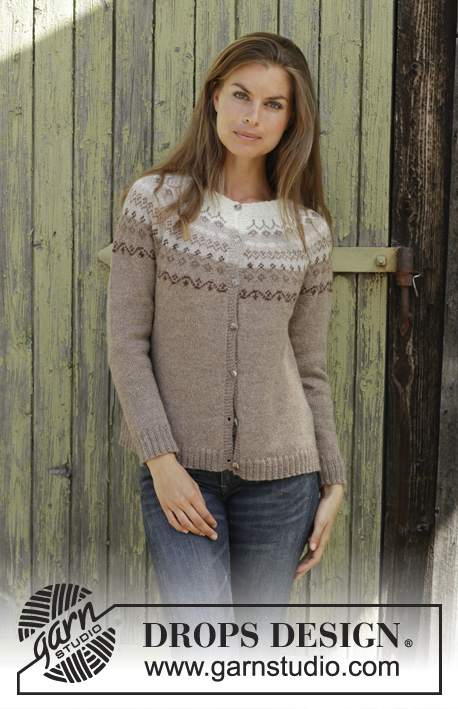
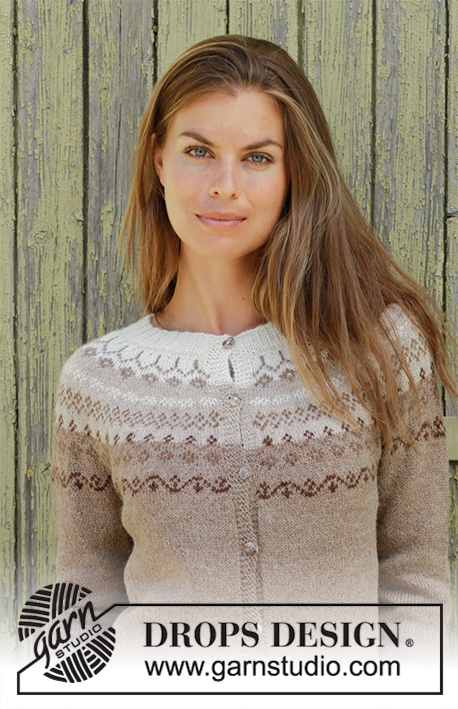
Knitted jacket with round yoke in DROPS Alpaca. Piece is knitted top down with Nordic pattern. Size: S - XXXL
DROPS 197-11 |
||||||||||||||||||||||||||||
|
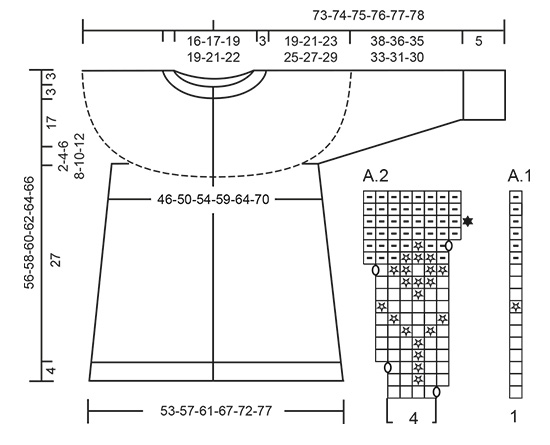
---------------------------------------------------------- EXPLANATION FOR THE PATTERN: ---------------------------------------------------------- GARTER STITCH (back and forth): 1 ridge = knit 2 rows. PATTERN: See diagrams A.1 to A.4. Work all stitches in stockinette stitch. Diagrams show all rows in pattern seen from the right side. DECREASE/INCREASE TIP (evenly): To calculate how to decrease/increase evenly, use the total number of stitches on row (e.g. 132 stitches), minus bands (e.g. 10 stitches) and divide the remaining stitches by number of decrease/increases to be done (e.g. 17) = 7.1. In this example decrease by knitting approx. every 6th and 7th stitch together and do not decrease of bands. If increasing increase after approx. every 7th stitch (increase 1 stitch by making 1 yarn over. On next row purl yarn over twisted to avoid hole. KNITTING TIP-1 (applies to bands): When working pattern border with two colors on yoke, also work with base color in pattern border over the 5 band stitches in each side. KNITTING TIP-2: To avoid the knitting gauge to tighten when working pattern, it is important not to tighten the strands on back side of piece. Switch to a higher needle number when working pattern if the pattern is somewhat tight. INCREASE TIP (applies to sides of body): All increases are done from the right side. Work until 2 stitches remain before marker thread, make 1 yarn over, knit 4 (marker thread is in the middle of these stitches), make 1 yarn over (= 2 stitches increased). On next row purl yarn over twisted to avoid hole. Then work the new stitches in stockinette stitch. DECREASE TIP (applies to mid under sleeve): Decrease 1 stitch on each side of marker thread as follows: Work until 4 stitches remain before marker thread and knit 2 together, knit 4 (marker thread is between these 4 stitches), slip 1 stitch knitwise, knit 1, pass slipped stitch over stitch worked (= 2 stitches decreased). BUTTONHOLES: Decrease for buttonholes on right band (when garment is worn): Work from right side until 3 stitches remain at the end of row, make 1 yarn over, knit the next 2 stitches together and knit last stitch. On next row knit yarn over to make holes. Decrease first buttonhole when rib in neck measures approx. 1½-2 cm = ½"-¾". Then decrease the next 7 buttonholes, approx. 7-7½-7½-8-8½-8½ cm = 2¾"-3"-3"-3⅛"-3¼"-3¼" between each. ---------------------------------------------------------- START THE PIECE HERE: ---------------------------------------------------------- JACKET - SHORT OVERVIEW OF THE PIECE: Work back and forth on circular needle from mid front, work top down. Work sleeves in the round on a short circular needle, switch to double pointed needles when needed. NECK EDGE: Cast on 132-136-140-144-152-160 stitches (including 5 band stitches in each side towards mid front) on circular needle size 2.5 mm = US 1,5 with off white. Purl 1 row from wrong side. Work next row as follows from right side: Work 5 band stitches in GARTER STITCH - read explanation above - * knit 2, purl 2 *, work from *-* until 7 stitches remain, knit 2 and finish with 5 band stitches in garter stitch. Continue rib like this – remember BUTTONHOLES on right band – read explanation above. When rib measures 3 cm = 1⅛", knit 1 row from right side while at the same time decreasing 17-17-13-13-13-17 stitches evenly - read DECREASE/INCREASE TIP = 115-119-127-131-139-143 stitches. Work 1 row from wrong side. Then work yoke as explained below. YOKE: Switch to circular needle size 3 mm = US 2,5. Read KNITTING TIP-1 AND KNITTING TIP-2. REMEMBER THE KNITTING GAUGE! Work pattern from the right side follows: 5 band stitches in garter stitch, A.1 (= 1 stitch), work A.2 (= 4 stitches) 26-27-29-30-32-33 times in total in width, 5 band stitches in garter stitch. On row with black star in A.2 increase 20-24-20-24-32-36 stitches evenly – remember DECREASE/INCREASE TIP = 239-251-263-275-299-311 stitches (including the 4 stitches increased in every repetition of A.1). Now work pattern as follows: 5 band stitches in garter stitch, A.3 (= 1 stitch), A.4 until 5 stitches remain on row, 5 band stitches in garter stitch, AT THE SAME TIME on row with arrow increase evenly as follows: ARROW-1: Increase 24-36-36-36-36-36 stitches = 263-287-299-311-335-347 stitches. ARROW-2: Increase 24-24-36-36-36-36 stitches = 287-311-335-347-371-383 stitches. ARROW-3: Increase 12-24-24-36-36-36 stitches = 299-335-359-383-407-419 stitches. ARROW-4: Increase 28-28-28-28-28-28 stitches = 327-363-387-411-435-447 stitches. When entire A.3 and A.4 has been worked vertically, piece measures 20 cm = 8" from cast-on edge. Now work piece in light beige over all stitches until finished measurements. Continue in stockinette stitch and with 5 band stitches in garter stitch in each side towards mid front, AT THE SAME TIME on first row from right side increase 10-8-8-10-12-13 stitches evenly Increase like this every 4th-4th-4th-6th-8th-8th row 1-2-3-3-3-4 times in total = 337-379-411-441-471-499 stitches. Then work until piece measures 22-24-26-28-30-32 cm from cast-on edge. Work next row from right side as follows: Knit 55-60-64-70-75-81 (= front piece), slip the next 64-75-83-86-90-93 stitches on a stitch holder for sleeve, cast on 10-10-12-12-14-16 new stitches on row (= in the side under sleeve), knit 99-109-117-129-141-151 (= back piece), slip the next 64-75-83-86-90-93 stitches on a stitch holder for sleeve, cast on 10-10-12-12-14-16 new stitches on row (= in the side under sleeve) and knit the remaining 55-60-64-70-75-81 stitches as before (= front piece). Finish body and sleeves separately. NOW MEASURE PIECE FROM HERE! BODY: = 229-249-269-293-319-345 stitches. Insert 1 marker thread 60-65-70-76-82-89 stitches in from each side = 109-119-129-141-155-167 stitches between marker threads on back piece. Continue in stockinette stitch back and forth with 5 band stitches in garter stitch in each side towards mid front. When piece measures 4 cm = 1½" from division, increase 1 stitch on each side of both marker threads - read INCREASE TIP (= 4 stitches increased). Increase like this every 8th row 9 times in total = 265-285-305-329-355-381 stitches on needle. Continue like this until piece measures 27 cm = 10⅝". Purl 1 row from wrong side while increasing 83-87-95-107-117-123 stitches evenly = 348-372-400-436-472-504 stitches. Switch to circular needle size 2.5 mm = US 1,5 and work next row from right side as follows: Work 5 band stitches in garter stitch, * knit 2, purl 2 *, work from *-* until 7 stitches remain, knit 2 and finish with 5 band stitches in garter stitch. Continue rib like this for 4 cm = 1½". Bind off with garter stitch over garter stitch, knit over knit and purl over purl but to avoid a tight bind-off edge make 1 yarn over after every 4th stitch (bind off yarn overs as stitches). Jacket measures approx. 56-58-60-62-64-66 cm from shoulder and down. SLEEVE: Slip the 64-75-83-86-90-93 stitches from stitch holder in one side of piece a short circular needle size 3 mm = US 2,5 and pick in addition up 1 stitch in each of the 10-10-12-12-14-16 new stitches cast on under sleeve = 74-85-95-98-104-109 stitches. Insert 1 marker thread in the middle of the 10-10-12-12-14-16 stitches under sleeve. Begin round here and work in stockinette stitch in the round. When sleeve measures 4 cm = 1½" from division, decrease 2 stitches mid under sleeve - read DECREASE TIP! Decrease like this every 10th-8th-6th-6th-6th-4th round 7-3-9-5-1-18 times and every 8th-6th-4th-4th-4th-2nd round 4-12-10-14-20-4 times = 52-55-57-60-62-65 stitches. Work until sleeve measures 38-36-35-33-31-30 cm = 15"-14¼"-13¾"-13"-12¼"-11¾" from division (shorter measurements in the larger sizes because of longer yoke), knit 1 round while increasing 16-17-19-20-18-19 stitches evenly = 68-72-76-80-80-84 stitches. Switch to double pointed needles size 2.5 mm = US 1,5 and work rib in the round = knit 2/purl 2. When rib measures 5 cm = 2", bind off with knit over knit and purl over purl but to avoid a tight bind-off edge make 1 yarn over after every 4th stitch (bind off yarn overs as regular stitches). Sleeve measures approx. 43-41-40-38-36-35 cm from division. Work the other sleeve the same way. ASSEMBLY: Sew the buttons on to left band. |
||||||||||||||||||||||||||||
Diagram explanations |
||||||||||||||||||||||||||||
|
||||||||||||||||||||||||||||
 |
||||||||||||||||||||||||||||
 |
||||||||||||||||||||||||||||
Have you finished this pattern?Tag your pictures with #dropspattern #talvikjacket or submit them to the #dropsfan gallery. Do you need help with this pattern?You'll find 28 tutorial videos, a Comments/Questions area and more by visiting the pattern on garnstudio.com. © 1982-2026 DROPS Design A/S. We reserve all rights. This document, including all its sub-sections, has copyrights. Read more about what you can do with our patterns at the bottom of each pattern on our site. |
||||||||||||||||||||||||||||


With over 40 years in knitting and crochet design, DROPS Design offers one of the most extensive collections of free patterns on the internet - translated to 17 languages. As of today we count 324 catalogs and 12290 patterns - 12280 of which are translated into English (US/in).
We work hard to bring you the best knitting and crochet have to offer, inspiration and advice as well as great quality yarns at incredible prices! Would you like to use our patterns for other than personal use? You can read what you are allowed to do in the Copyright text at the bottom of all our patterns. Happy crafting!
Post a comment to pattern DROPS 197-11
We would love to hear what you have to say about this pattern!
If you want to leave a question, please make sure you select the correct category in the form below, to speed up the answering process. Required fields are marked *.