
Popular categories
Looking for a yarn?


Comments / Questions (114)
![]() Ilse Kürschner wrote:
Ilse Kürschner wrote:
Ich stricke den Pullover in M und habe das Muster A1 27x gestrickt und habe somit die 108 Maschen aufgenommen. Aber ich verstehe nicht, wie die nächsten Schritte ablaufen sollen. Wie genau muss ich die Maschen aufnehmen und verteilen, damit die Abstände gleich bleiben?
20.11.2025 - 13:39DROPS Design answered:
Liebe Frau Kürschne, das Diagram A.1 wird die ganze Runde wiederholt, gerne können Sie Markierer zwischen jedem Rapport einsetzen, so können Sie am besten die Maschenanzahl/Farben bei jeder Runde prüfen; in der 1., 3., 11. und 13. Reihe wird man je 1 Masche in jedem A.1 zunehmen = so sind es 8 Maschen x 27 Raporte = 216 Maschen, dann bei der Runde mit dem Sternchen werden Sie 24 Maschen regelmäßig verteilt zunehmen, so haben Sie: 216+24=240 Maschen. Viel Spaß beim Stricken!
20.11.2025 - 16:51
![]() LUISELLA wrote:
LUISELLA wrote:
Buongiorno! non mi è chiara la sequenza degli aumenti dello sprone, specie in A1. oltre alla stella* sono aumenti anche le parentesi ()? potete darmi chiarimenti? grazie
02.11.2025 - 18:29DROPS Design answered:
Buonasera Luisella, sullo sprone in A.1 si aumenta nei giri con la stella e 4 maglie per ripetizione di A.1. Buon lavoro!
02.11.2025 - 18:47
![]() Angela Korzendorfer wrote:
Angela Korzendorfer wrote:
Ich verstehe dir Zunahme in A1 nicht. In der Reihe mit dem schwarzen Stern sollen 32 Maschen zugenommen werden. Da heißt 1x in Reihe 16 ? Da komme ich doch nicht auf 228 Maschen gesamt. Muss man nicht schon vorher zunehmen?
24.10.2025 - 20:03DROPS Design answered:
Liebe Angelika, Sie nehmen ja in A.1 schon vorher im Diagramm mit Umschlägen zu. Das Diagramm beginnt mit 4 Maschen, in der 14. Reihe sind es dann schon 8 Maschen (= 4 Maschen zugenommen in Diagramm A.1). Sie stricken in Gr. XXL A.1 32x in der Runde, d.h. 32 x 4 Maschen zugenommen = 128 Maschen zugenommen. In der Reihe mit dem schwarzen Stern nehmen Sie dann noch 1 x 32 Maschen gleichmäßig verteilt zu = 160 Maschen zugenommen. Dann kommen Sie auf 288 Maschen (vor dem Stricken von A.1 hatten Sie 128 Maschen). Viel Spaß beim Weiterstricken!
24.10.2025 - 23:20
![]() Katja wrote:
Katja wrote:
Ich liebe diese Pullover. Aber ich finde nicht die Schema
15.10.2025 - 12:51DROPS Design answered:
Hi Katja, the diagrams are at the bottom, along with schematic drawing. Happy knitting!
16.10.2025 - 10:10
![]() Ghislaine wrote:
Ghislaine wrote:
Bonjour, je commence le tricot circulaire. Si je comprends bien, ce modèle est d'abord tricoté en rang? Puis en rond au milieu du ds, donc il y a une ouverture en haut du dos? Merci de votre réponse.
26.09.2025 - 22:28DROPS Design answered:
Bonjour Ghislaine, ce pull n'a aucune ouverture au dos. Il se tricote de haut en bas, en rond sur aiguille circulaire, à partir du milieu dos (debut du tour). Les manches se tricotent en rond sur les aiguilles doubles pointes/la petite aiguille circulaire. Bon tricot!
28.09.2025 - 11:08
![]() Janine Pieters wrote:
Janine Pieters wrote:
In telpatroon A1 moet je in de 11e naald weer meerderen dmv een omslag. Ik kom er niet uit. Met welke kleur doe je dat? ( Ik brei andere kleuren). Na de omslag komt namelijk een andere kleur.
21.08.2025 - 11:39
![]() Maria wrote:
Maria wrote:
Ich möchte diesen Pullover gerne Stricken, kann jedoch nirgends die Farbe mittelbraun 403 bestellen. Gibt es einen Nachfolger für diese Farbe? Mit freundlichen Grüßen Maria Siebert
06.05.2025 - 14:24DROPS Design answered:
Liebe Maria, gerne wird Ihnen Ihr DROPS Händler die beste passende Farbe der heutigen Farbkarte - auch per E-Mail oder per Telefon - empfehlen. Viel Spaß beim Stricken !
06.05.2025 - 15:54
![]() Annick DESCHAMPS wrote:
Annick DESCHAMPS wrote:
Bonjour, j'aimerai savoir pourquoi vous augmentez avant de faire les côtes ? Merci de votre réponse
18.04.2025 - 10:09DROPS Design answered:
Bonjour Mme Deschamps, pour la même largeur/circonférence, il va falloir davantage de mailles pour tricoter les côtes 2/2 avec les aiguilles 2,5 que pour tricoter le jersey avec les aiguilles 3, raison pour laquelle on doit augmenter juste avant les côtes. Bon tricot!
22.04.2025 - 11:18
![]() Bay wrote:
Bay wrote:
Bonjour, excusez moi mais je ne comprends toujours pas, au 2eme tour en partant depuis le marqueur milieu dos, 2m naturel 1m beige clair 2m naturel 1m beige clair..... ça ne fait pas 4m naturel entre chaque m beige clair , je nage...
03.03.2025 - 10:26DROPS Design answered:
Bonjour Mme Bay, au 2ème tour, vous répétez le diagramme soit (2 m naturel, 1 m beige, 2 m naturel) donc, en répétant de (à) tout le tour, vous aurez en fait à partir du début du tour: 2 m naturel, 1 m beige, 4 m naturel, 1 m beige, 4 m naturel, etc.. et terminerez le tour par 2 m naturel. Bon tricot!
03.03.2025 - 12:02
![]() Bay wrote:
Bay wrote:
Bonjour, pouvez-vous m'aider?. Je ne comprends pas le diagramme A1. J'ai mes 128 m pour la taille M, je tricote à partir du marqueur milieu dos un jeté puis 4 m, 1 jeté puis 4 m etc jusqu'à la fin du rang. Au rang suivant le diagramme dit 2m en naturel 1m en brun mais quand on regarde la photo du pull il y a 5m entre chaque maille en brun, je suis perdue, merci de votre aide
02.03.2025 - 12:06DROPS Design answered:
Bonjour Mme Bay, en taille M, vous devez diminuer 20 mailles après les côtes du col, ainsi vous devez commencer l'empiècement avec 108 mailles, vous avez ainsi suffisamment de mailles pour répéter 27 fois les 4 mailles de A.1. Au 1er tour de A.1, vous tricotez ainsi: (1 jeté, 4 m end), répétez de (à) tout le tour, au 2ème tour (2 m naturel, 1 m beige clair, 2 m naturel), répétez de (à) tout le tour (vous avez ainsi 4 m naturel entre chaque m beige clair), et ainsi de suite. Pensez à mettre un marqueur entre chaque diagramme, cela peut vous aider à mieux repérer le nombre de mailles à tricoter. Bon tricot!
03.03.2025 - 09:59
|
||||||||||||||||||||||||||||
Talvik#talviksweater |
||||||||||||||||||||||||||||
 |
 |
|||||||||||||||||||||||||||
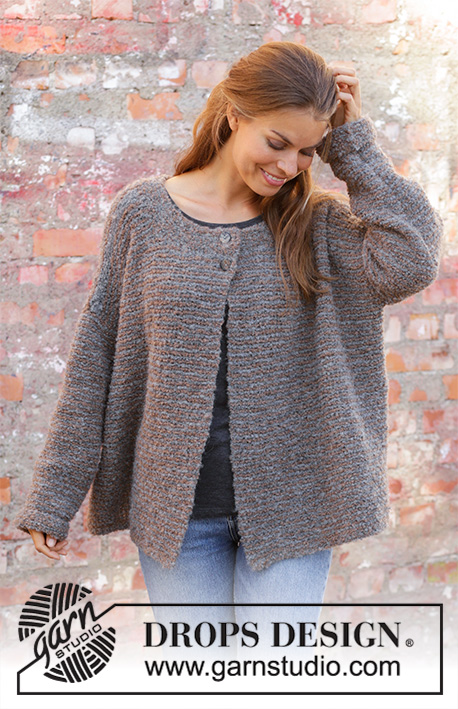
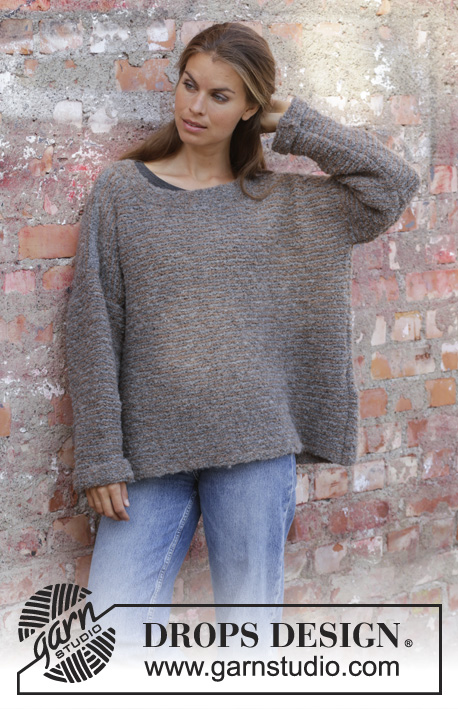
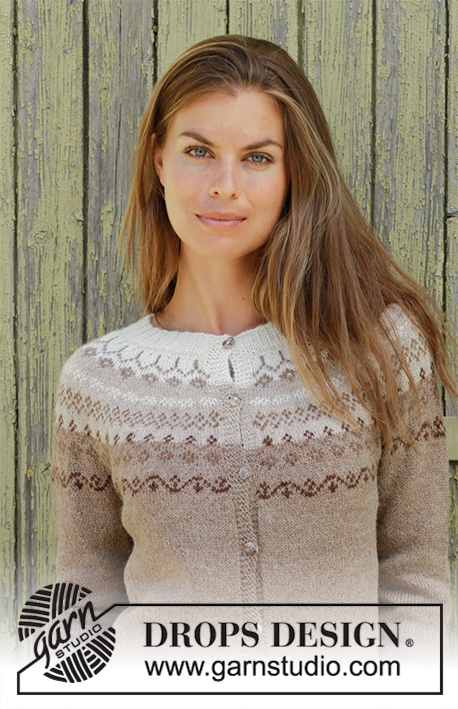
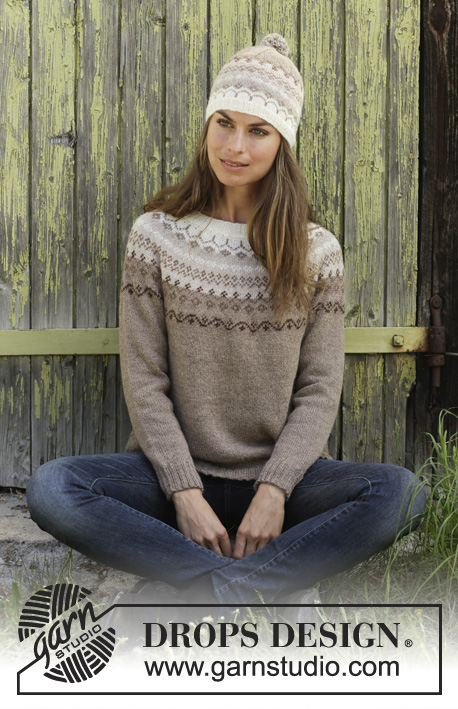
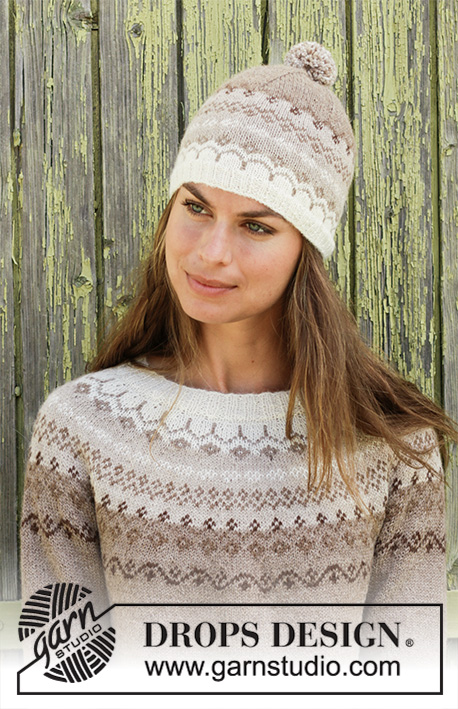
Knitted sweater with round yoke in DROPS Alpaca. Piece is knitted top down with Nordic pattern. Size: S - XXXL Knitted hat with Nordic pattern and pompom in DROPS Alpaca
DROPS 197-10 |
||||||||||||||||||||||||||||
|
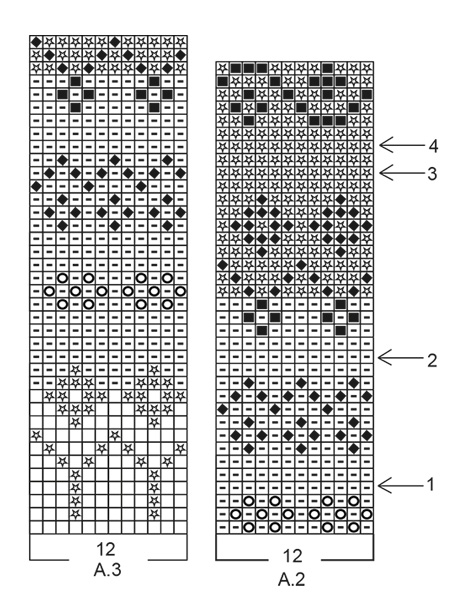
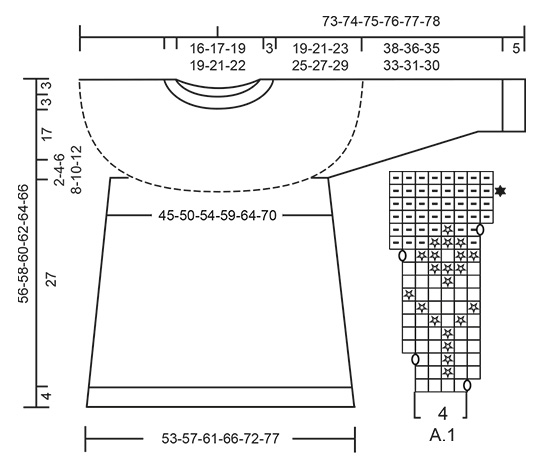
EXPLANATION FOR THE PATTERN: ---------------------------------------------------------- PATTERN: Sweater: See diagrams A.1 and A.2. Hat: See diagram A.3. Work all stitches in stockinette stitch. DECREASE/INCREASE TIP (evenly): To calculate how to decrease/increase evenly, use the total number of stitches on round (e.g. 124 stitches) and divide stitches by number of decreased/increases to be done (e.g. 20) = 6.2. In this example decrease by knitting approx. every 5th and 6th stitch together. When increasing make a yarn over after approx. every 6th stitch. On next round work yarn over twisted to avoid hole. KNITTING TIP: To avoid the knitting gauge to tighten when working pattern, it is important not to tighten the strands on back side of piece. Switch to a higher needle number when working pattern if the pattern is somewhat tight. INCREASE TIP (applies to sides of body): Work until 2 stitches remain before marker thread, make 1 yarn over, knit 4 (marker thread is in the middle of these stitches), make 1 yarn over (= 2 stitches increased). On next round knit yarn over twisted to avoid holes. Then work the new stitches in stockinette stitch. DECREASE TIP-1 (applies to mid under sleeve): Decrease 1 stitch on each side of marker thread as follows: Work until 4 stitches remain before marker and knit 2 together, knit 4 (marker thread is between these 4 stitches), slip 1 stitch knitwise, knit 1, pass slipped stitch over stitch worked (= 2 stitches decreased). DECREASE TIP-2 (applies to hat): Work until 2 stitches remain before marker thread, knit the next 2 stitches together (= 1 stitch decreased). Repeat at each of the remaining marker threads. ---------------------------------------------------------- START THE PIECE HERE: ---------------------------------------------------------- SWEATER - SHORT OVERVIEW OF THE PIECE: Worked in the round on circular needle from mid back, work top down. Work sleeves in the round on double pointed needles/a short circular needle. NECK EDGE: Cast on 124-128-136-140-148-152 stitches on a short circular needle size 2.5 mm = US 1,5 with off white. Knit 1 round. Now work rib (= knit 2/purl 2) for 3 cm = 1⅛". Knit 1 round while decreasing 20-20-20-20-20-20 stitches evenly - read DECREASE/INCREASE TIP = 104-108-116-120-128-132 stitches. Knit 1 round. YOKE: Switch to circular needle size 3 mm = US 2,5. Read KNITTING TIP and REMEMBER THE KNITTING GAUGE! Now work pattern A.1 (= 4 stitches) 26-27-29-30-32-33 times in total on round. On round with black star in A.1 increase 20-24-20-24-32-36 stitches evenly – remember DECREASE/INCREASE TIP = 228-240-252-264-288-300 stitches (including the 4 stitches increased in every repetition of A.1. Now work pattern A.2 in the round, AT THE SAME TIME on round with arrow increase evenly as follows: ARROW-1: Increase 24-36-36-36-36-36 stitches = 252-276-288-300-324-336 stitches. ARROW-2: Increase 24-24-36-36-36-36 stitches = 276-300-324-336-360-372 stitches. ARROW-3: Increase 24-24-24-36-36-36 stitches = 300-324-348-372-396-408 stitches. ARROW-4: Increase 12-24-24-24-24-24 stitches = 312-348-372-396-420-432 stitches. When entire A.2 has been worked vertically, piece measures 20 cm = 8" from cast-on edge. Now work piece in light beige and stockinette stitch, AT THE SAME TIME on first round increase 14-10-14-17-20-14 stitches evenly. Increase like this every 4th-4th-5th-6th-8th-8th round 1-2-2-2-2-4 times in total = 326-368-400-430-460-488 stitches. Then work until piece measures 22-24-26-28-30-32 cm = 8¾"-9½"-10¼"-11"-11¾"-12½" from cast-on edge. Work next round as follows: Knit 49-54-58-64-70-75 (= half back piece), slip the next 64-75-83-86-90-93 stitches on a stitch holder for sleeve, cast on 10-10-12-12-14-16 new stitches on needle (= in the side under sleeve), knit 99-109-117-129-140-151 (= front piece), slip the next 64-75-83-86-90-93 stitches on a stitch holder for sleeve, cast on 10-10-12-12-14-16 new stitches on needle (= in the side under sleeve) and knit the remaining 50-55-59-65-70-76 stitches (= half back piece). Finish body and sleeves separately. NOW MEASURE PIECE FROM HERE! BODY: = 218-238-258-282-308-334 stitches. Insert 1 marker thread in the middle of the 10-10-12-12-14-16 new stitches that were cast on under sleeves. Move the marker threads upwards when working. Continue in the round with light beige and stockinette stitch. When piece measures 4 cm = 1½" from division, increase 1 stitch on each side of both marker threads - read INCREASE TIP (= 4 stitches increased). Increase like this every 8th round 9 times in total = 254-274-294-318-344-370 stitches. Continue like this until piece measures 27 cm = 10⅝". Knit 1 round while increasing 82-86-94-106-116-122 stitches evenly - remember DECREASE/INCREASE TIP = 336-360-388-424-460-492 stitches. Switch to circular needle size 2.5 mm = US 1,5 and work rib = knit 2/purl 2 for 4 cm = 1 1/2. Bind off with knit over knit and purl over purl but to avoid at tight cast-off edge make 1 yarn over after every 4th stitch (bind off yarn overs as stitches). Sweater measures approx. 56-58-60-62-64-66 cm = 22"-22¾"-23⅝"-24⅜"-25¼"-26" from shoulder and down. SLEEVE: Slip the 64-75-83-86-90-93 stitches from stitch holder in one side of piece double pointed needles/a short circular needle size 3 mm = US 2,5 and pick in addition up 1 stitch in each of the 10-10-12-12-14-16 new stitches cast on under sleeve = 74-85-95-98-104-109 stitches. Insert 1 marker thread in the middle of the 10-10-12-12-14-16 stitches under sleeve. Begin round here and work in stockinette stitch in the round. When sleeve measures 4 cm = 1½" from division, decrease 2 stitches mid under sleeve - read DECREASE TIP-1! Decrease like this every 10th-8th-6th-6th-6th-4th round 7-3-9-5-1-18 times and every 8th-6th-4th-4th-4th-2nd round 4-12-10-14-20-4 times = 52-55-57-60-62-65 stitches. When sleeve measures 38-36-35-33-31-30 cm = 15"-14¼"-13¾"-13"-12¼"-11¾" from division (shorter measurements in the larger sizes because of longer yoke), knit 1 round while increasing 16-17-19-20-18-19 stitches evenly - remember DECREASE/INCREASE TIP = 68-72-76-80-80-84 stitches. Switch to double pointed needles size 2.5 mm = US 1,5 and work rib in the round = knit 2/purl 2. When rib measures 5 cm = 2", bind off with knit over knit and purl over purl but to avoid a tight bind-off edge make 1 yarn over after every 4th stitch (bind off yarn overs as regular stitches). Sleeve measures approx. 43-41-40-38-36-35 cm = 17"-16⅛"-15¾"-15"-14¼"-13¾" from division. Work the other sleeve the same way. ---------------------------------------------------------- HAT - SHORT OVERVIEW OF THE GARMENT: Work in the round on a short circular needle. Switch to double pointed needles when needed. HAT: Cast on 120-132 stitches on circular needle size 2.5 mm = US 1,5 with off white. Knit 1 round. Then work rib (= knit 2/purl 2) for 2 cm = ¾". Switch to circular needle size 3 mm = 2,5 and work pattern A.3 (= 12 stitches) 10-11 times in total on round. REMEMBER THE KNITTING GAUGE! When A.3 has been worked vertically, piece measures approx. 14-14 cm = 5½"-5½". Then work in stockinette stitch in the round with light beige. When piece measures 15-15 cm = 6"-6", insert 6 marker threads in the piece, 20-22 stitches apart each marker thread. On next round, decrease 1 stitch before every marker thread – read DECREASE TIP-2. Decrease like this every other round 14-17 times in total = 36-30 stitches. Knit 2 and 2 stitches together until there are 9-8 stitches on needle. Cut the yarn and pull it through the remaining stitches, tighten tog and fasten. Hat measures approx. 24-26 cm = 9½"-10¼". Make a pompom approx. 6 cm = 2⅜" in diameter. Use 3 strand light camel, 1 strand off white and 1 strand light beige to make pompom and fasten at the top of hat. |
||||||||||||||||||||||||||||
Diagram explanations |
||||||||||||||||||||||||||||
|
||||||||||||||||||||||||||||
 |
||||||||||||||||||||||||||||
 |
||||||||||||||||||||||||||||
Have you finished this pattern?Tag your pictures with #dropspattern #talviksweater or submit them to the #dropsfan gallery. Do you need help with this pattern?You'll find 26 tutorial videos, a Comments/Questions area and more by visiting the pattern on garnstudio.com. © 1982-2026 DROPS Design A/S. We reserve all rights. This document, including all its sub-sections, has copyrights. Read more about what you can do with our patterns at the bottom of each pattern on our site. |
||||||||||||||||||||||||||||


With over 40 years in knitting and crochet design, DROPS Design offers one of the most extensive collections of free patterns on the internet - translated to 17 languages. As of today we count 324 catalogs and 12290 patterns - 12280 of which are translated into English (US/in).
We work hard to bring you the best knitting and crochet have to offer, inspiration and advice as well as great quality yarns at incredible prices! Would you like to use our patterns for other than personal use? You can read what you are allowed to do in the Copyright text at the bottom of all our patterns. Happy crafting!
Post a comment to pattern DROPS 197-10
We would love to hear what you have to say about this pattern!
If you want to leave a question, please make sure you select the correct category in the form below, to speed up the answering process. Required fields are marked *.