
Popular categories
Looking for a yarn?


Comments / Questions (57)
![]() Kirsten Jørgensen wrote:
Kirsten Jørgensen wrote:
Skal bølgemønstret strikkes ret på retsiden og vrang på vrangsiden.
08.03.2024 - 16:36DROPS Design answered:
Hej Kirsten, ja det stemmer, men hver 6.pind strikkes ret fra vrangen :)
13.03.2024 - 15:21
![]() Eva Malmberg Beckman wrote:
Eva Malmberg Beckman wrote:
Kan ni vara snälla och översätta ert svar till svenska på Pia Holmens fråga. Jag har kört fast på samma ställe och förstår inte vad ni svarar henne. Ledsen men jag brukar kunna få till sticktermer från såväl norska som danska. Jag måste bara skapa den här sjalen den är bedårande vacker
28.01.2023 - 23:17DROPS Design answered:
Hej Eva. Du stickar A.1 över de första 4 maskorna, 1 maska slätstickning (=mittmaska) och A.2 över de 4 sista maskorna. En rund vit cirkel betyder "mellan 2 maskor görs det 2 omslag om stickan, på nästa varv stickas det första omslaget rätt eller avigt som diagrammet visar och det sista omslaget släpps ned" och en svart cirkel betyder "mellan 2 maskor görs 1 omslag om stickan, på nästa varv stickas omslaget vridet rätt eller vridet avig som diagrammet visar (det ska inte bli hål)". Det är symbolförklaring nr 3 och 4 över diagrammen. Mvh DROPS Design
31.01.2023 - 07:55
![]() Pia Holmen wrote:
Pia Holmen wrote:
Jeg strikker nordic romance sjal,- men jeg forstår simpelthen ikke diagrammet. Det går galt allerede i A1 og A2 Jeg har 9 masker og de 4 skal strikkes i diagram A1,- men hvilke masker skal strikkes ? Er 3. maske rund hvid cirkel med sort streg igennem,- hvad er det ? Står ikke i diagramforklaringen. Meget forvirrende opskrift ! og hvor mange masker skal jeg have efter 1. pind i diagrammet ?
19.05.2022 - 19:35DROPS Design answered:
Hej Pia, Du strikker A.1 over de første 4 masker og A.2 over de sidste 4 masker. A.1 og A.2 består kun af retstrik hvor du tager ud i hver side, en ring på stregen er 2 omslag, hvor det ene strikke og det andet slippes af pinden på næste pind. Den sorte ring på stregen betyder 1 omslag, som strikkes drejet på næste pind. Alle symboler finder du i symbolforklaringen over diagrammerne :)
20.05.2022 - 09:00
![]() Eva wrote:
Eva wrote:
Tror dette er det mest "rotete" mønsteret jeg har vært borte i. Veldig forvirrende. Men har begynt å strikke sånn cirka og etter eget hode. Men litt skuffende. 😖
13.06.2021 - 20:05
![]() Ingvild wrote:
Ingvild wrote:
Jeg leser at sjalet skal strikkes ovenfra og ned. Jeg forstår ikke at det da skal legges opp 5 masker?????
29.05.2021 - 11:22DROPS Design answered:
Hei Ingvild. Jo, det startes med 5 masker. På 1. pinne økes det med 4 masker = 9 masker, sammen maskeantallet du starter med når du begynner på diagram A.1 og A.2. Når du strikker A.1 og A.2 økes det masker på hver pinne fra retten og når du har strikket totalt 43 riller etter oppleggskanten skal du har 261 masker på pinnen. mvh DROPS design
31.05.2021 - 09:40
![]() Emmanuelle wrote:
Emmanuelle wrote:
Bonjour, j'ai également fait deux fois ce modèle un pour ma mère et en pour moi avec des couleurs différentes. Vos explications sont parfaites, vos vidéos sont parfois aussi très utiles. Merci beaucoup...
17.04.2021 - 09:48
![]() Christiane Fouere wrote:
Christiane Fouere wrote:
J'ai fait 2 exemplaires de ce châle magnifique et en suis très fière. Je suis une fan de drops design. Que de beaux modèles vous nois proposez....
20.03.2021 - 21:06
![]() May-Britt wrote:
May-Britt wrote:
Kan jeg få en korrekt beskrivelse av mosaikk mønster i A3. Det er umulig å løfte av 3 mørkegrå masker når det kun er en mørkegrå maske i utgangspunktet. Jeg strikker nå sjalet for 2. gang, og har forsøkt flere løsninger (ingen av de stemmer med oppskriften), men her må oppskriften være feil. Og ja, jeg har sjekket hvordan mosaikk mønster skal strikkes. Når jeg studerer bildet ser det ut til at dere har strikket mønstret i vanlig !
23.02.2021 - 01:43
![]() Heidi Forberg wrote:
Heidi Forberg wrote:
Nordic romanse. Linje 7 ...der skal man ta 3 grå løs av, men er jo bare en grå ( grå = svart firkant)der....vet at mønster linjene hvisker 2 omg... har sett video med mosaikk strikk....men skjønner likevel ikke Er det en feil der?
28.12.2020 - 21:02DROPS Design answered:
Hei Heidi. Vi skal hjelpe deg så kan vi kan, men i hvilket diagram i 7. rad (linje) tenker du på? mvh DROPS design
13.01.2021 - 11:48
![]() Gro Hustad wrote:
Gro Hustad wrote:
Hei. Strikker nordic romance sjal. Er det slik at rettomgangene i mønster A. 13A skal starte m. 2 kast, og ikke en rett, dobbeltkast, en rett, enkeltkast som tidligere omg og slutten av omg.?
01.12.2020 - 21:54DROPS Design answered:
Hei Gro. A.13a strikkes nesten i midten av oppskriften og starter med et dobbeltkast. Slik er forklaringen til ikonet (stående oval sirkel): Mellom 2 masker lages det 2 kast om pinnen, på neste pinne strikkes det første kastet rett eller vrang slik diagrammet viser og det siste kastet slippes ned. mvh DROPS design
09.12.2020 - 13:07
|
|||||||||||||||||||||||||||||||||||||
Nordic Romance#nordicromanceshawl |
|||||||||||||||||||||||||||||||||||||
 |
 |
||||||||||||||||||||||||||||||||||||
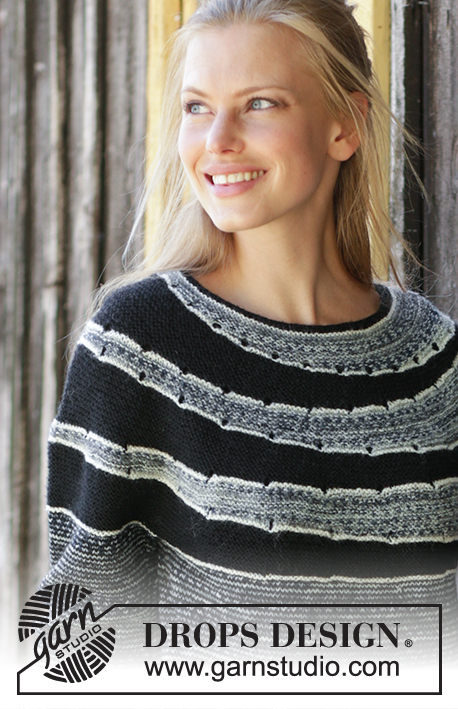
Knitted shawl in DROPS Nord. The piece is worked top down with garter stitch, mosaic pattern and wave pattern.
DROPS 195-5 |
|||||||||||||||||||||||||||||||||||||
|
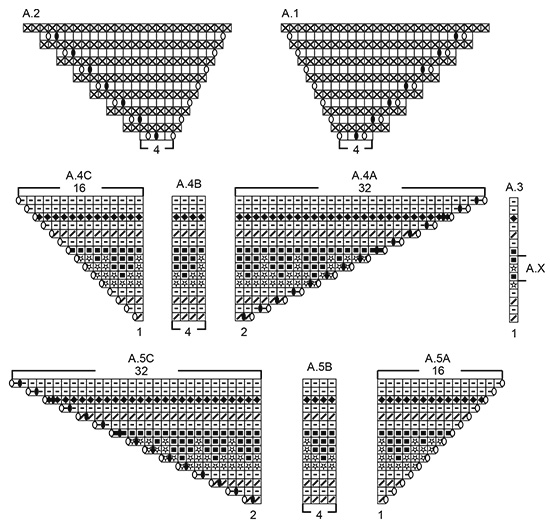
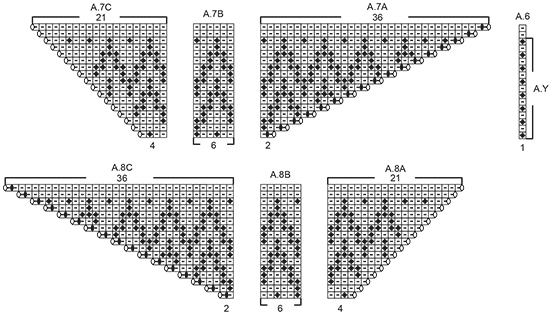
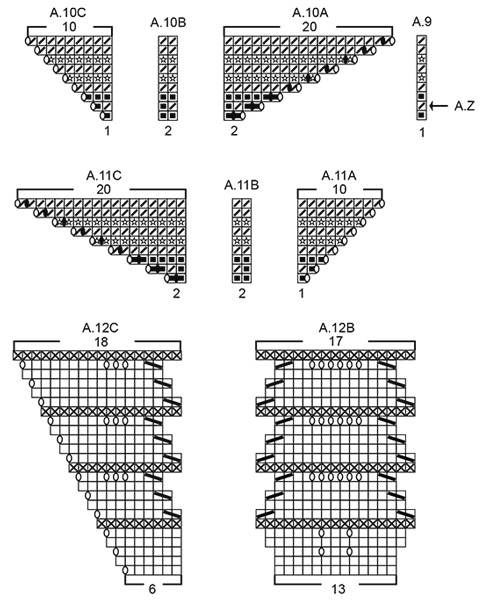
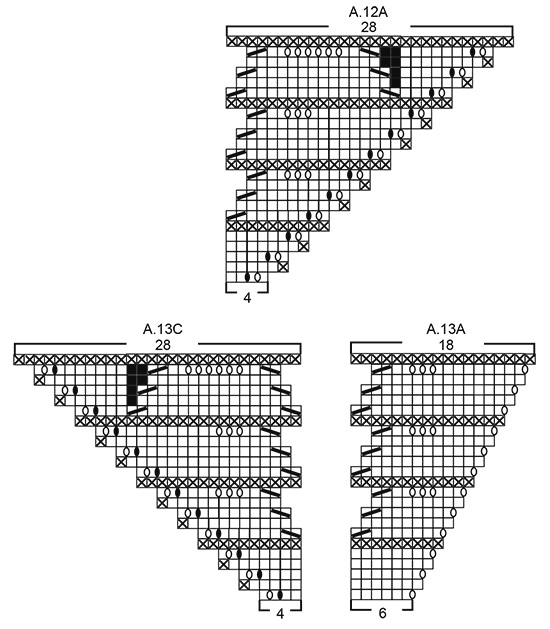
------------------------------------------------------- EXPLANATIONS FOR THE PATTERN: ------------------------------------------------------- RIDGE/GARTER STITCH (worked back and forth): 1 ridge = Knit 2 rows. INCREASE IN ONE-COLORED GARTER STITCH SECTION: See diagrams A.1 and A.2. Each row in the diagrams is equivalent to one row worked. The diagrams show all the rows in the pattern seen from the right side. INCREASE TIP (evenly spaced): To work out how to increase evenly, count the total number of stitches on the needle (e.g. 261 stitches), minus the mid-stitch (= 1 stitch) and divide the remaining stitches by 2 = 130 stitches on each side of the mid-stitch. Then divide 130 stitches by the number of increases to be made before/after the mid-stitch (e.g. 3) = 43.3. In this example, increase by making 1 yarn over after approx. each 43rd stitch before the mid-stitch. Increase in the same way after the mid-stitch. On the next row knit the yarn overs twisted to avoid holes. CASTING-OFF TIP: So that the bind-off edge is not tight you can make 1 yarn over AT THE SAME TIME as binding off. Make 1 yarn over above all the yarn overs from the previous row, the yarn overs are then bind off as normal stitches. Make sure that you do not tighten the strand while binding off. If the bind-off edge is still tight, you can bind off with a size larger needle. MOSAIC PATTERN: See diagrams A.3 to A.11 and read description of the technique below. Each row in these diagrams is equivalent to 2 rows worked. I.e. from the right side the diagram is worked from right to left with increases as shown in the diagrams and from the wrong side you work the same row from left to right, but without the increases (i.e. increases are only done from the right side). On all rows from the right side, keep the strand at the back of the piece (i.e. on the wrong side) when a stitch is slipped. On all rows from the wrong side, keep the strand in front of the piece (i.e. towards you and still on the wrong side) when a stitch is slipped. Make sure the strands are not tight at the back of the piece! To keep track of the pattern, you can insert a marker between each pattern-repeat on A.4B/A.5B. A.3, A.6 and A.9 = start-stitch and end-stitch. This stitch is worked in the color shown by the symbol, AT THE SAME TIME the symbol tells you how the pattern row is worked in A.X, A.Y and A.Z. A.X, A.Y and A.Z are sections which show the rows the mosaic pattern is worked on. On the other rows in A.4/A.5, A.7/A.8 and A.10/A.11 (i.e. the one-colored rows) you work 1 ridge back and forth over all stitches without slipping stitches (mid-stitch always worked in stockinette stitch). SECTION A.X: On each row of the pattern in A.3 which has a square with a small, black square inside (i.e. color A), all stitches with color A in A.4 and A.5 are knitted and all stitches with color B are slipped. On each row of pattern in A.3 which has a square with an empty star inside (color B), all stitches with color B in A.4 and A.5 are knitted and all stitches with color A are slipped. SECTION A.Y: On each row of pattern in A.6 which has a square with a small, black diamond inside (i.e. color C), all stitches with color C in A.7 and A.8 are knitted and all stitches with color D are slipped. On each row of pattern in A.6 which has a square with a small, horizontal line inside (color D), all stitches with color D in A.7 and A.8 are knitted and all stitches with color C are slipped. SECTION A.Z: On this row of pattern in A.9 which starts with a square with a diagonal line inside (i.e. color E), all stitches with color E in A.10 and A.11 are knitted and all stitches with color A are slipped. WAVE PATTERN: See diagrams A.12 and A.13. Each row is equivalent to 1 row worked. The diagrams show all the rows in the pattern seen from the right side. ------------------------------------------------------- START THE PIECE HERE: ------------------------------------------------------- SHAWL - SHORT OVERVIEW OF THE PIECE: The piece is worked back and forth with circular needle (so that you have room for all stitches) and worked top down. Always increase 1 stitch on each side of the mid-stitch and 2 stitches in each side of each row from the right side as described in the text (= 6 stitches increased on each increase row). At the beginning of the shawl a section is worked in one-color garter stitch. Then you work mosaic pattern. To finish an edge is worked in wave pattern. It is important to follow the diagrams carefully. The mosaic pattern itself is worked in garter stitch, but the pattern is not worked in normal garter stitch - it is made by by slipping stitches. Read description for Mosaic pattern before working it. Be aware that each row in the diagrams for the mosaic pattern (A.3 to A.11) is equivalent to 1 ridge (i.e. 2 rows). In the other diagrams (A.1, A.2, A.12 and A.13) 1 row in the diagram = 1 row worked. SHAWL: Cast on 5 stitches with circular needle size 3.5 mm / US 4 and gray. The first 2 rows are worked as follows: ROW 1 (= right side): Work 1 edge stitch in GARTER STITCH – read description above, 1 yarn over, 1 stitch in stockinette stitch, 1 yarn over, 1 stitch in stockinette stitch, 1 yarn over, 1 stitch in stockinette stitch, 1 yarn over and 1 edge stitch in garter stitch. ROW 2 (= wrong side): 2 edge stitches in garter stitch, purl until there are 2 stitches left on the row and finish with 2 edge stitches in garter stitch = 9 stitches on needle. Then work A.1 and A.2 as follows: Work A.1 over the first 4 stitches, work 1 stitch in stockinette stitch (= mid-stitch – this stitch is worked in stockinette stitch to finished length, irrespective of how the other stitches are worked), work A.2 over the last 4 stitches. REMEMBER THE GAUGE! Continue working and increasing as shown in A.1 and A.2 until you have worked a total of 43 ridges after the cast-on edge = 261 stitches on the needle. Work 1 more ridge with gray and increases in each side and in the middle as before, in addition increase 6 stitches evenly on row, i.e. increase 3 stitches before and 3 stitches after the mid-stitch - read INCREASE TIP. You have now worked a total of 44 ridges and there are 273 stitches on the needle. The piece measures approx. 19 cm from the middle out – measured in the knitting direction. Continue with MOSAIC PATTERN – read description above, i.e. the first row is from the right side as follows: Work A.3 (= 1 stitch), A.4A over 2 stitches, A.4B over the next 132 stitches (= 33 repeats of 4 stitches), work A.4C over 1 stitch, 1 stitch in stockinette stitch (= mid-stitch – this stitch is worked in the background color of the pattern stripe), work A.5A over 1 stitch, A.5B over the next 132 stitches (= 33 repeats of 4 stitches), work A.5C over 2 stitches and finish with A.3 (= 1 stitch). Continue this pattern, but remember that 1 row in each of these diagrams is equivalent to 1 ridge (2 rows). Make sure the strands at the back are not tight. When A.3, A.4 and A.5 have been completed in height there are 363 stitches on the needle. The next row is worked as follows from the right side: Work A.6 (= 1 stitch), A.7A over 2 stitches, A.7B over the next 174 stitches (= 29 repeats of 6 stitches), work A.7C over 4 stitches, 1 stitch in stockinette stitch (= mid-stitch – this stitch is worked in the background color of the pattern stripe), work A.8A over 4 stitches, A.8B over the next 174 stitches (= 29 repeats of 6 stitches), work A.8C over 2 stitches and finish with A.6 (= 1 stitch). When A.6, A.7 and A.8 have been completed in height there are 465 stitches on the needle. The next row is worked as follows from the right side: Work A.9 (= 1 stitch), A.10A over 2 stitches, A.10B over the next 228 stitches (= 114 repeats of 2 stitches), work A.10C over 1 stitch, 1 stitch in stockinette stitch (= mid-stitch – this stitch is worked in the background color of the pattern stripe), work A.11A over 1 stitch, A.11B over the next 228 stitches (= 114 repeats of 2 stitches), work A.11C over 2 stitches and finish with A.9 (= 1 stitch). When A.9, A.10 and A.11 have been completed in height there are 519 stitches on the needle. Continue with pearl gray and knit 2 rows where you increase 16 stitches evenly on the first row, i.e. the increases in sides and middle continue as before, in addition increase 8 stitches evenly both before and after the mid-stitch = 541 stitches on needle. Change to off white and work WAVE PATTERN – read description above, i.e. the first row is worked as follows from the right side: Work A.12A over 4 stitches, A.12B over the next 260 stitches (= 20 repeats of 13 stitches), work A.12C over 6 stitches, 1 stitch in stockinette stitch (= mid-stitch), work A.13A over 6 stitches, A.12B over the next 260 stitches (= 20 repeats of 13 stitches) and finish with A.13C over the last 4 stitches. When the wave pattern is finished there are 773 stitches on the needle. Work 2 ridges back and forth over all stitches with increases in the sides and on each side of the mid-stitch as before = 785 stitches on the needle. Read CASTING-OFF TIP and bind off with knit from the right side. Cut and fasten the strands. SHAPING: Dampen the piece and carefully lay out in the right shape. Allow to dry. Repeat the process each time the shawl is washed. |
|||||||||||||||||||||||||||||||||||||
Diagram explanations |
|||||||||||||||||||||||||||||||||||||
|
|||||||||||||||||||||||||||||||||||||
 |
|||||||||||||||||||||||||||||||||||||
 |
|||||||||||||||||||||||||||||||||||||
 |
|||||||||||||||||||||||||||||||||||||
 |
|||||||||||||||||||||||||||||||||||||
Have you finished this pattern?Tag your pictures with #dropspattern #nordicromanceshawl or submit them to the #dropsfan gallery. Do you need help with this pattern?You'll find 17 tutorial videos, a Comments/Questions area and more by visiting the pattern on garnstudio.com. © 1982-2026 DROPS Design A/S. We reserve all rights. This document, including all its sub-sections, has copyrights. Read more about what you can do with our patterns at the bottom of each pattern on our site. |
|||||||||||||||||||||||||||||||||||||


With over 40 years in knitting and crochet design, DROPS Design offers one of the most extensive collections of free patterns on the internet - translated to 17 languages. As of today we count 324 catalogs and 12290 patterns - 12280 of which are translated into English (US/in).
We work hard to bring you the best knitting and crochet have to offer, inspiration and advice as well as great quality yarns at incredible prices! Would you like to use our patterns for other than personal use? You can read what you are allowed to do in the Copyright text at the bottom of all our patterns. Happy crafting!
Post a comment to pattern DROPS 195-5
We would love to hear what you have to say about this pattern!
If you want to leave a question, please make sure you select the correct category in the form below, to speed up the answering process. Required fields are marked *.