
Popular categories
Looking for a yarn?


Comments / Questions (36)
![]() Aga wrote:
Aga wrote:
I love the pattern except for the high neck. Which parts of the pattern should I skip to get a simple, basic short neck with a rolled edge?
07.11.2024 - 09:36DROPS Design answered:
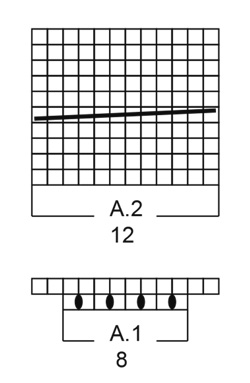
Dear Aga, in this pattern, neck edge is 12 cm high, you can probably adjust the length to the desired one- note that there are cables on the neck edge, with A.1 increasing stitches to prepare cable in A.2. Happy knitting!
07.11.2024 - 12:54
![]() Pirjo wrote:
Pirjo wrote:
Det står rätmaska och förklaringen så är det ett varv rätt och ett varv aviga. Men på bilden ser det ut som tröjan är slätstickad!? A1 Ska varv 1 vara rätt och varv 2 avig? Eller ska bara flätan vara rätstickad?
15.08.2024 - 20:29DROPS Design answered:
Hej Pirjo. Ja det stämmer att tröjan är slätstickad. När vi skriver: "RÄTSTICKNING (stickas runt): Sticka *1 varv rätt och 1 varv avigt*, upprepa *-*." så är det bara en förklaring på hur rätstickning stickas (det stickas 4 varv rätstickning längst ner på fram- & bakstycke och ärmar). Mvh DROPS Design
16.08.2024 - 07:07
![]() Sylvie ROBERT wrote:
Sylvie ROBERT wrote:
Bonjour, la torsade se décale à gauche ... tout dépend de comment je regarde mon tricot. Je voudrais savoir si je dois la décaler vers le centre du tricot ou vers la manche gauche ? Merci de votre réponse
01.06.2023 - 09:50DROPS Design answered:
Bonjour Mme Robert, vous la décalez à gauche, dans le sens du tricot: vous tricotez jusqu'aux mailles de A.2, tricotez 1 m endroit (= la 1ère m de A.2) et tricotez la torsade. Bon tricot!
01.06.2023 - 16:25
![]() Maizee wrote:
Maizee wrote:
I made this jumper a year ago, and have worn it pretty nearly constantly in the colder weather. The yarn is so soft and warm. I adapted the sleeves to finish with a rib, as I like a cuff! It was quick to knit and looked great.
29.12.2021 - 20:52
![]() Nikolett Megyeri wrote:
Nikolett Megyeri wrote:
When I increase to raglan I end up with 276 stitches rather than 272. Not sure what I he done wrong and how to go on from here
04.12.2021 - 15:18DROPS Design answered:
Dear Nikolett, you need to check the increases for the raglan, maybe in some markers you have increased each round instead of every 2nd round. Happy knitting!
05.12.2021 - 17:02
![]() Silvia Alessi wrote:
Silvia Alessi wrote:
Bellissimo modello, ma anche la small risulta poi enorme! Cambio misura dei ferri?
29.11.2021 - 11:30DROPS Design answered:
Buonasera Silvia, ha lavorato il campione prima di iniziare a lavorare? Buon lavoro!
29.11.2021 - 23:43
![]() Carol wrote:
Carol wrote:
I love this website and how you can get a pattern to suit any gauge. This pattern is awesome and we'll explained directions. Thanks
08.07.2021 - 06:40DROPS Design answered:
Dear Carol, tension is very important to check and keep when knitting a pattern, you will read more about tension here. Happy knitting!
08.07.2021 - 09:19
![]() Stine wrote:
Stine wrote:
Hei Jeg har lyst å stikke denne, men det ser ut som om den er så trang over skulderpartiet. Er det modellen som er ekstra bredskuldret, eller skal genseren være strukket over skulderpartiet?
26.09.2020 - 11:42DROPS Design answered:
Hei Stine. Vil ikke si at modellen er bredskuldret, men sitter kanskje litt skrått på det ene bilde, slik at du syns den ser trang ut(?) Men se på målene på målskissen og se om målene vil passe deg. God Fornøyelse!
28.09.2020 - 11:52
![]() Mathilda K wrote:
Mathilda K wrote:
Wat ik jammer vind is, dat ook deze trui weer rondgebreid wordt en met name de mouwen en raglan vind ik er niet mooi uitzien en sluiten ook niet erg fijn aan. Zoals ook op de foto, zie je dat het trekt en dat de okselpartij wat zakkerig eruit ziet. Dit heb ik met meerdere truien/vesten...........Zijn er geen patronen met twee pennen?
17.08.2019 - 10:11DROPS Design answered:
Dag Mathilda,
De patronen worden in Noorwegen ontworpen en daar is het van oudsher gebruikelijk om met rondbreinaalden te breien. Op de site staan ook patronen die je met rechte naalden kan breien, maar we hebben ook een instructie gemaakt hoe je patronen aan kunt passen om met rechte naalden te breien. Deze vindt je hier
03.10.2019 - 18:01
![]() Ann Miller wrote:
Ann Miller wrote:
Très beau pull ! J'ai juste commencé le col, je le fais en gris beige avec le col, l'empiècement et la torsade bleu roi, avec de la laine chinée. Par contre, les mesures de mon pull correspondent bien au modèle, mais j'ai l'impression que le col est quand même très large. Est-ce normal ?
27.04.2019 - 18:40DROPS Design answered:
Bonjour Mme Miller, avez-vous bien le bon échantillon de 19 m x 25 rangs en jersey = 10 x 10 cm? Il est indispensable d'avoir le bon échantillon pour obtenir les mêmes mesures que le modèle. Bon tricot!
29.04.2019 - 11:36
|
||||||||||
Malmö#malmosweater |
||||||||||
 |
 |
|||||||||
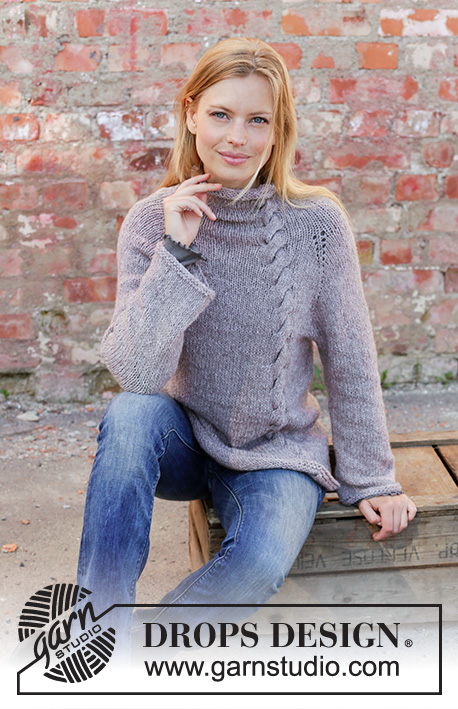
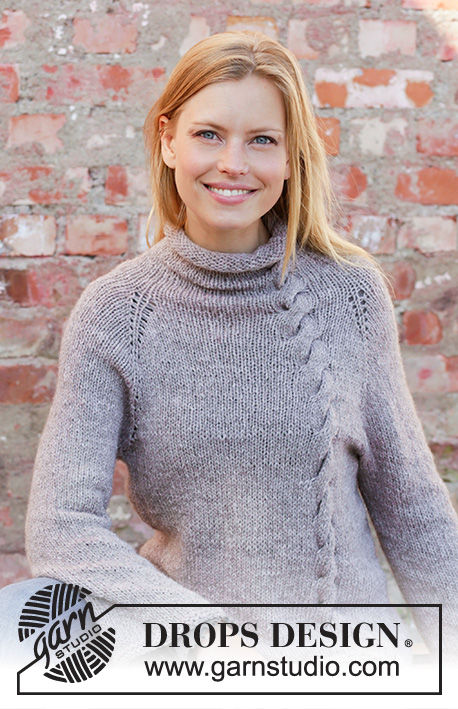
Knitted sweater with raglan in DROPS Sky. The piece is worked top down with cable, high neck and rolled edge. Sizes S - XXXL.
DROPS 194-8 |
||||||||||
|
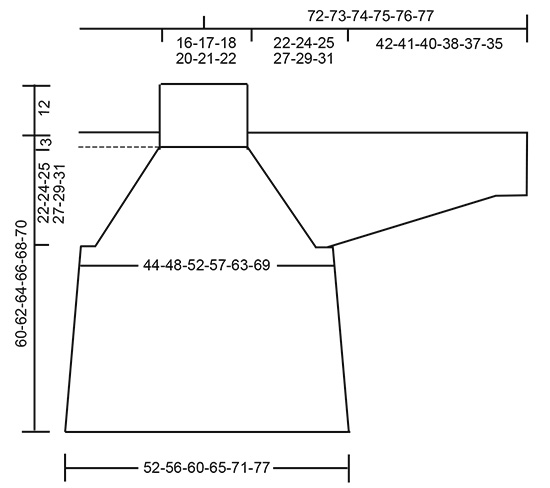
------------------------------------------------------- EXPLANATIONS FOR THE PATTERN: ------------------------------------------------------- RIDGE/GARTER STITCH (worked in the round): 1 ridge = 2 rounds. Knit 1 round and purl 1 round. PATTERN: See diagrams A.1 and A.2. CABLE: The next time you work the cable (i.e. on round 5 in A.2), it is displaced by 1 stitch to the left as follows: Work as before as far as A.2, knit 1, place the next 6 stitches on cable needle behind the piece, knit 6, knit 6 from the cable needle. Displace the cable like this (i.e. 1 stitch to the left) each time you work it until the piece measures 22-24-25-27-29-31 cm / 8⅝"-9⅜"-9 ¾"-10⅝"-11⅜"-12⅛" from the marker thread (i.e. to end of yoke). INCREASE TIP-1 (for raglan): Work until there is 1 stitch left before the marker, make 1 yarn over (= 1 stitch increased), knit 1, 1 yarn over (= 1 stitch increased). Increase like this by each of the 4 marker threads (= a total of 8 stitches increased). The yarn overs are not worked twisted on the next round so you will have holes! INCREASE TIP-2 (for sides of body): Work until there are 2 stitches left before the marker thread, 1 yarn over, knit 4 (the marker thread sits in the middle of these 4 stitches) 1 yarn over (= a total of 4 stitches increased on the round as there are 2 marker threads). On the next round knit the yarn overs twisted to avoid holes. Then knit the new stitches. DECREASE TIP (for sleeves): Decrease 1 stitch on each side of the marker thread as follows: Work until there are 3 stitches left before the marker thread, knit 2 together, knit 2 (the marker thread sits in the middle of these 2 stitches), slip 1 stitch as if to knit, knit 1, pass the slipped stitch over the knitted stitch. ------------------------------------------------------- START THE PIECE HERE: ------------------------------------------------------- SWEATER - SHORT OVERVIEW OF THE PIECE: The piece is worked in the round with circular needle, top down. First you work a high neck, then the yoke. The yoke is divided for body and sleeves. The body is worked in the round with circular needle and the sleeves in the round with double pointed needles HIGH NECK: Cast on 84-88-92-96-104-112 stitches with circular needle size 5 mm / US 8 and Sky. Work stockinette stitch for 3 cm / 1" (= rolled edge). Then work rib (= knit 1 / purl 1) over all stitches. Work a total of 3 rounds of rib. Then continue as follows (the round starts mid back): Knit 44-47-50-53-59-65 stitches, A.1 (= 8 stitches) and finish with knit 32-33-34-35-37-39 stitches. When A.1 has been worked 1 time in height there are 88-92-96-100-108-116 stitches on the needle. Work A.2 (= 12 stitches) over A.1. REMEMBER THE GAUGE! When the piece measures 12 cm / 4¾", insert 1 marker thread in the piece; THE PIECE IS NOW MEASURED FROM HERE! YOKE: On the next round insert 4 markers for raglan as follows: Knit 15-16-17-18-20-22 stitches (= half back piece), insert 1 marker, knit 12 stitches (= right sleeve), insert 1 marker, knit 17-19-21-23-27-31 stitches, A.2 as before (= 12 stitches), knit 5 stitches (= front piece), insert 1 marker, knit 12 stitches (= left sleeve), insert 1 marker and finish with knit 15-16-17-18-20-22 stitches (= half back piece). Now increase to raglan and displace the cable in A.2 by 1 stitch to the left each time it is worked – read CABLE. On the next round increase 1 stitch on each side of each marker – read INCREASE TIP-1! Increase like this every 2nd round a total of 23-26-28-31-33-36 times = 272-300-320-348-372-404 stitches. Continue working knit and A.2 as before until the piece measures 22-24-25-27-29-31 cm / 8⅝"-9⅜"-9 ¾"-10⅝"-11⅜"-12⅛" from the marker thread. Now divide the piece for body and sleeves as follows: Knit 38-42-44-49-54-60 stitches (= half back piece), place the next 58-64-70-74-76-80 stitches on a thread for sleeve, cast on 8-8-10-10-12-12 stitches under the sleeve, knit and work A.2 over the next 80-88-92-102-112-124 stitches as before (= front piece), place the next 58-64-70-74-76-80 stitches on a thread for sleeve, cast on 8-8-10-10-12-12 stitches under the sleeve and finish with knit 38-42-44-49-54-60 stitches (= half back piece) = 172-188-200-220-244-268 stitches. BODY: Insert 1 marker thread in the middle of the 8-8-10-10-12-12 stitches under each sleeve. Continue in the round with knit and A.2 (A.2 is now worked over the same stitches to finished length, i.e. displacing is now finished). When the piece measures 3 cm / 1" from where the body was divided from the sleeves, increase 1 stitch on each side of each marker thread – read INCREASE TIP-2! Increase like this every 4th row a total of 7-7-8-8-7-7 times = 200-216-232-252-272-296 stitches. Continue with knit until the piece measures 34-34-35-35-35-35 cm / 13⅜"-13⅜"-13 ¾"-13 ¾"-13 ¾"-13 ¾" from where the body was divided from the sleeves. Change to circular needle size 4 mm / US 6. Work 2 RIDGES – read description above. Bind off with knit. The piece measures approx. 60-62-64-66-68-70 cm / 23⅝"-24⅜"-25¼"-26"-26¾"-27½" / 23⅝"-24⅜"-25¼"-26"-26¾"-27½" from the shoulder down. SLEEVE: Place the 58-64-70-74-76-80 stitches from the thread on the one side of the piece on double pointed needles size 5 mm / US 8 and knit up 1 stitch in each of the 8-8-10-10-12-12 stitches cast on under the sleeve = 66-72-80-84-88-92 stitches. Insert 1 marker thread in the middle of the 8-8-10-10-12-12 stitches under the sleeve. Knit. When the piece measures 3 cm / 1" from where the sleeve was divided from the body, decrease 1 stitch on each side of the marker thread – read DECREASE TIP! Decrease like this every 6-3½-2½-2-2-1½ cm/2½"-1¼"-⅞"-¾"-¾"-½" a total of 6-9-12-13-14-16 times = 54-54-56-58-60-60 stitches. When the piece measures 41-40-39-37-36-34 cm / 16⅛"-15 ¾"-15 ¼"-14 ½"-14⅛"-13⅜" from where the sleeve was divided from the body, change to double pointed needles size 4 mm / US 6 and work 2 ridges. Bind off with knit. The sleeve measures approx. 64-65-65-65-66-67 cm / 25⅛"-25 ½"-25 ½"-25 ½"-26"-26⅜" from the cast-on edge. Work the other sleeve in the same way. |
||||||||||
Diagram explanations |
||||||||||
|
||||||||||
 |
||||||||||
 |
||||||||||
Have you finished this pattern?Tag your pictures with #dropspattern #malmosweater or submit them to the #dropsfan gallery. Do you need help with this pattern?You'll find 28 tutorial videos, a Comments/Questions area and more by visiting the pattern on garnstudio.com. © 1982-2026 DROPS Design A/S. We reserve all rights. This document, including all its sub-sections, has copyrights. Read more about what you can do with our patterns at the bottom of each pattern on our site. |
||||||||||


With over 40 years in knitting and crochet design, DROPS Design offers one of the most extensive collections of free patterns on the internet - translated to 17 languages. As of today we count 324 catalogs and 12290 patterns - 12280 of which are translated into English (US/in).
We work hard to bring you the best knitting and crochet have to offer, inspiration and advice as well as great quality yarns at incredible prices! Would you like to use our patterns for other than personal use? You can read what you are allowed to do in the Copyright text at the bottom of all our patterns. Happy crafting!
Post a comment to pattern DROPS 194-8
We would love to hear what you have to say about this pattern!
If you want to leave a question, please make sure you select the correct category in the form below, to speed up the answering process. Required fields are marked *.