
Popular categories
Looking for a yarn?


Comments / Questions (193)
![]() Sabrina wrote:
Sabrina wrote:
Hallo! Ich habe eine Frage zum Beginn des Vorderteils in Größe S. Ich habe die Luftmaschen angeschlagen und nun 49 Stäbchen gehäkelt. Aber nun weiß ich nicht wie es weitergeht. Ich verstehe nicht wie das gemeint ist mit gleichzeitig im Muster häkeln. Welches Muster? Weil weiter unten steht dann im Diagramm A1a bis A1c häkeln. Welches Muster bzw. Diagramm soll man vorher häkeln mit den Zunahmen? Es wäre toll eine Erklärung zu bekommen. Danke und lg Sabrina
06.03.2025 - 17:54DROPS Design answered:
Liebe Sabrina, man wird jetzt im Muster häkeln, aber gleichzeitig zunehmen, so in S häkeln Sie: A.1a (10 Maschen), gleicheiztig nehmen Sie 1 Stäbchen am Anfang der Reihe zu, dann häkeln Sie 5 Mal A.1b dann A.1c häkeln, gleichzeitig nehmen Sie 1 Stäbchen am Ende der Reihe zu. Häkeln Sie mit A.1 so weiter, und gleichzeitig insgesamt 3 Mal in jeder Reihe (1. ist oben beschrieben) + 5 Mal in jeder 2. Reihe zunehmen = 65 Maschen. Viel Spaß beim Häkeln!
07.03.2025 - 08:40
![]() Daniela wrote:
Daniela wrote:
No puedo hacer coincidir el final de las vueltas en A.4, he seguido el diagrama pero al cerrar y pasar a la siguiente hilera en el ultimo punto se pierde el patrón. Pienso que estoy haciendo algo mal o no entendí bien como tejerlo en redondo. Hay algún video que explique ese punto en particular?
01.12.2024 - 05:32DROPS Design answered:
Hola Daniela, A.4a se trabaja 1 vez, al inicio de la vuelta. El símbolo al inicio de la vuelta te explica cómo termina la vuelta también. El resto de la vuelta se trabaja según A.4b. La unión a las cadenetas de inicio, al final de la vuelta, romperá ligeramente el patrón, pero esto es algo que no es posible ocultar demasiado al trabajar a ganchillo, siempre quedará algo visible. Por eso se suele intentar que la unión quede en los lados y no en el centro de la espalda, donde podría estar más visible. Si tienes problemas en una fila concreta puedes indicarnos la fila y el símbolo problemático para que podamos ayudarte mejor.
08.12.2024 - 18:12
![]() Daniela wrote:
Daniela wrote:
No puedo hacer coincidir el final de las vueltas en A.4, he seguido el diagrama pero al cerrar y pasar a la siguiente hilera en el ultimo punto se pierde el patrón. Pienso que estoy haciendo algo mal o no entendí bien como tejerlo en redondo. Hay algún video que explique ese punto en particular?
01.12.2024 - 05:31DROPS Design answered:
Hola Daniela, A.4a se trabaja 1 vez, al inicio de la vuelta. El símbolo al inicio de la vuelta te explica cómo termina la vuelta también. El resto de la vuelta se trabaja según A.4b. La unión a las cadenetas de inicio, al final de la vuelta, romperá ligeramente el patrón, pero esto es algo que no es posible ocultar demasiado al trabajar a ganchillo, siempre quedará algo visible. Por eso se suele intentar que la unión quede en los lados y no en el centro de la espalda, donde podría estar más visible. Si tienes problemas en una fila concreta puedes indicarnos la fila y el símbolo problemático para que podamos ayudarte mejor.
08.12.2024 - 18:12
![]() Karina Chiriboga wrote:
Karina Chiriboga wrote:
Hola muchas gracias por el patrón,tal vez tienen ese patrón en video?
25.09.2024 - 11:36DROPS Design answered:
Hola Karina, puedes encontrar todos los videos relevantes para realizar la labor en la pestaña de videos en la parte superior del patrón. No hay un video paso a paso para este patrón.
29.09.2024 - 19:03
![]() Susan T wrote:
Susan T wrote:
So sorry, I am trying to make this beautiful top for my granddaughter and not use to your crochet chart. On the chart underneath each section you have to dc (t) displayed but are the spaces in between supposed to be counted as a st. Example: A.1a chart: *t ttttt t ttt* there are 10 t (dc) displayed; are the spaces just to make room on the chart for the symbols and don’t represent a st or do they represent a st and should be counted? t ttt
14.09.2024 - 21:32DROPS Design answered:
Dear Susan, you are correct the spaces between the symboles do not represent stitches, they are there so later you can see how stitches and rows relate to each other (making room for the symboles above them). I hope this helps. Happy Stitching!
15.09.2024 - 02:56
![]() Susan T wrote:
Susan T wrote:
On Front Piece: A.1a over the next 10 double crochets, repeat A.1b … When I refer to the chart the symbol T=sc around ch st/ch sp . Can you give me a written pattern for this section of your chart as it doesn’t make sense to me how it states (dc, ch 3, dc), ch2, T, ch2 … where do I place the T ?
14.09.2024 - 18:50
![]() Susan T wrote:
Susan T wrote:
1st: can you verify how to read your charts as I understand it and have always read crochet charts: from bottom up, right to left 2nd row left to right then repeat upward. What way do your charts read, please explain.
14.09.2024 - 18:43DROPS Design answered:
Dear Susan, HERE you can find our lesson on how to read our crochet diagrams. I hope this helps. Happy Stitching!
15.09.2024 - 02:50
![]() Esther wrote:
Esther wrote:
Hoi, ik ben begonnen met dit patroon, maar ik loop vast met het begin. Ik snap dat ik aan het begin en einde moet meerderen en meteen het patroon moet volgen. Maar dit stuk snap ik niet: Meerder zo iedere toer 3-5-8-13-14-15 keer in totaal, en dan iedere andere toer 5-5-3-0-0-0 keer in totaal = 65-71-73-79-83-87 stokjes op de laatste toer. Ik haak maat S, dus moet ik nu in totaal 8 toeren aan het begin en eind een extra stokje haken? Alvast bedankt voor de uitleg.
10.09.2024 - 16:34DROPS Design answered:
Dag Esther,
Je meerdert eerst 3 keer op elke toer en daarna meerder je nog eens 5 keer maar dan om de toer, dus steeds een toer zonder meerderingen ertussen.
12.09.2024 - 20:49
![]() Rocío Ramírez wrote:
Rocío Ramírez wrote:
Habrá algún vídeo para realizar está blusa?? Perdón pero no entiendo los gráficos
29.08.2024 - 03:11DROPS Design answered:
Hola Rocío, no tenemos un vídeo del patrón entero; todos los vídeos relevantes para realizar el patrón puedes encontrarlos en el apartado vídeos, debajo del título. Para entender mejor nuestros diagramas puedes leer la siguiente lección: https://www.garnstudio.com/lesson.php?id=69&cid=23. También nos puedes preguntar aquí si tienes alguna duda concreta respecto a los diagramas.
31.08.2024 - 18:17
![]() Lucília Ribeiro wrote:
Lucília Ribeiro wrote:
Como se faz o ponto alto à volta do aro? a explicação do esquema do modelo, está muito confusa.
17.07.2024 - 12:11DROPS Design answered:
Bom dia, Pode aprender a fazer o ponto alto à volta do aro consultando o separador vídeos na receita. Encontra todos os tutoriais em vídeo para a ajudar a tecer esta blusa. Bons crochés!
19.07.2024 - 09:44
|
|||||||||||||||||||||||||||||||||||||||||||
California Dream#californiadreamtop |
|||||||||||||||||||||||||||||||||||||||||||
 |
 |
||||||||||||||||||||||||||||||||||||||||||
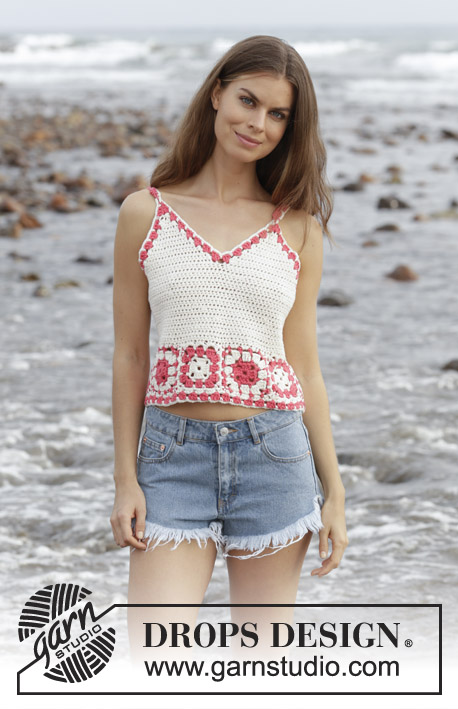
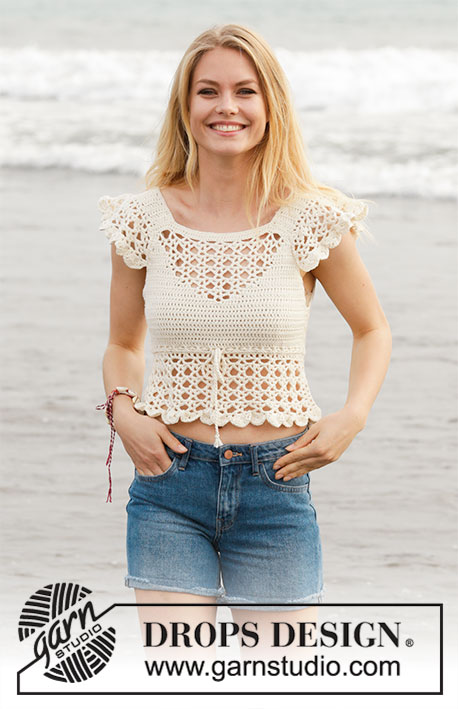
Crocheted top with lace pattern and flounce. Size: S - XXXL Piece is crocheted in DROPS Cotton Merino.
DROPS 190-21 |
|||||||||||||||||||||||||||||||||||||||||||
|
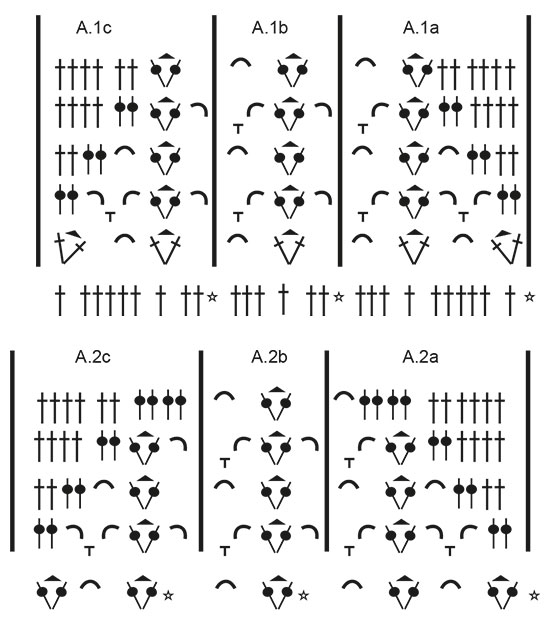
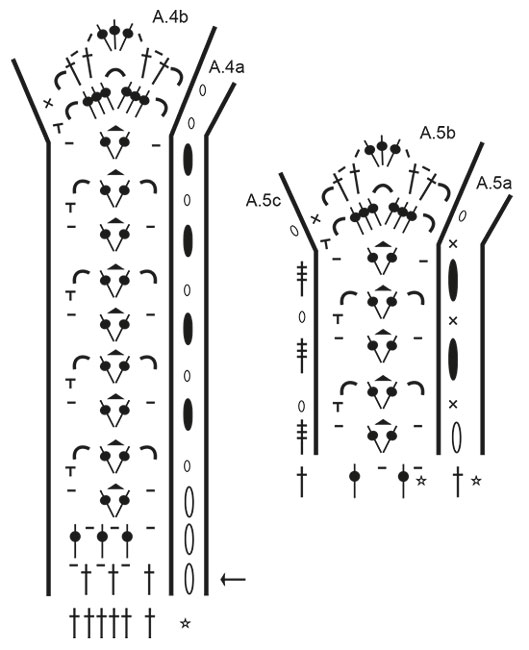
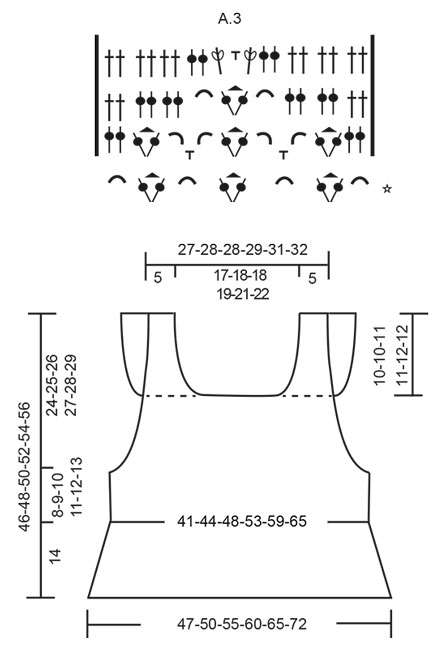
INFORMATION FOR PATTERN: PATTERN: See diagrams A.1 to A.5. INCREASE TIP-1: Increase 1 double crochet by working 2 double crochets in same stitch. CROCHET TIP-1 (applies to body but not diagram): Replace first double crochet at beginning of every row with 3 chain stitches. CROCHET TIP-2 (applies to body but not diagram): When working in the round, replace first treble with 3 chain stitches, finish round with 1 slip stitch in 3rd chain stitch at beginning of round. DECREASE TIP: Decrease by working 2 double crochets together. INCREASE TIP-2 (evenly): To calculate how to increase evenly, use the total number of double crochets on row (e.g. 146 double crochets) and divide double crochets by number of increases to be done (e.g. 22) = 6.6. In this example increase by working 2 double crochets in same double crochet alternately approx. every 6th and 7th double crochet. ---------------------------------------------------------- TOP: Piece is worked back and forth, top down, work front and back piece separately down to armhole, then work in the round over both parts. Then work straps from bottom up and then work flounces back and forth on straps, fasten flounce to front/back piece. FRONT PIECE: Work 51-53-53-55-57-59 chain stitches (including 3 chain stitches to turn with) on hook size 5 mm / H/8 with Cotton Merino. Switch to hook size 4 mm / G/6, turn and work 1 double crochet in 4th chain stitch from hook (= 2 double crochets), work 1 double crochet in each of the next 47-49-49-51-53-55 chain stitches = 49-51-51-53-55-57 double crochets. On next row begin increase in each side of piece AT THE SAME TIME work pattern as follows: Increase 1 double crochet in each side of piece (= 2 double crochets increased) - read INCREASE TIP-1. Increase like this every row 3-5-8-13-14-15 times in total, and then every other row 5-5-3-0-0-0 times in total = 65-71-73-79-83-87 double crochets on last row. Work next row as follows, begin from right side: Read CROCHET TIP-1 – work 1 double crochet in each of the first 0-1-1-2-3-4 double crochets, A.1a over the next 10 double crochets, repeat A.1b over the next 30 double crochets (= 5 times in total in width), A.1c over the next 9 double crochets and 1 double crochet in each of the last 0-1-1-2-3-4 double crochets. Continue until A.1 has been work 1 time vertically. REMEMBER THE CROCHET GAUGE! Then work as follows, begin from wrong side: Work 1 double crochet in every double crochet until 1 double crochet remains before first chain space, work A.2c, repeat A.2b 3 times in total in width, A.2a and 1 double crochet in every double crochet the entire row. Continue until A.2 has been worked vertically. Then work as follows, begin from wrong side: Work 1 double crochet in every double crochet until first chain space, work A.3 and 1 double crochet in every double crochet the rest of row. Continue until A.3 has been worked vertically. Now work 1 double crochet in every stitch until piece measures 14-15-15-16-16-17 cm / 5 ½"-5⅞"-5⅞"-6 ¼"-6 ¼"-6⅝". Fasten off, turn. Put piece aside. BACK PIECE: Work 51-53-53-55-57-59 chain stitches (including 3 chain stitches to turn with) on hook size 5 mm / H/8 with Cotton Merino. Switch to hook size 4 mm / G/6, turn and work 1 double crochet in 4th chain stitch from hook (= 2 double crochets), work 1 double crochet in each of the next 47-49-49-51-53-55 chain stitches = 49-51-51-53-55-57 double crochets. Then work 1 double crochet in every double crochet - AT THE SAME TIME increase 1 double crochet in each side of piece - remember INCREASE TIP-1. Increase like this every row 8-10-11-13-14-15 times in total = 65-71-73-79-83-87 double crochets on last row. When piece measures 14-15-15-16-16-17 cm / 5 ½"-5⅞"-5⅞"-6 ¼"-6 ¼"-6⅝" (adjust according to front piece), fasten off, turn. BODY: Now work the two parts together as follows: Work 4-4-7-8-12-15 chain stitches for armhole, 1 double crochet in each of the 65-71-73-79-83-87 double crochets from back piece, work 8-8-14-16-24-30 chain stitches for armhole, 1 double crochet in each of the 65-71-73-79-83-87 double crochets from front piece, work 4-4-7-8-12-15 chain stitches for armhole and finish with 1 slip stitch in first chain stitch at beginning of round. Then work piece in the round, continue with 1 double in every double/chain stitch = 146-158-174-190-214-234 double crochets. When working in the round, turn after every round to work alternately from right side and wrong side. This is so that the texture is the same on the entire top - read CROCHET TIP-2. Insert 1 marker thread in each side, in the middle of the 8-8-14-16-24-30 chain stitches. NOW MEASURE THE PIECE FROM HERE! Continue like this until piece measures 8-9-10-11-12-13 cm / 3⅛"-3½"-4"-4⅜"-4¾"-5⅛". Now work in the round according to diagram A.4 while at the same time increasing on first round (round marked with arrow in diagram) as follows: Work A.4b 28-30-33-36-39-43 times in total on round – A.4a shows how rounds begin and end and is worked in addition to A.4b – AT THE SAME TIME increase 11-11-12-13-10-12 chain spaces (= 1 double crochet + 1 chain stitch) evenly – read INCREASE TIP-2 = 84-90-99-108-117-129 chain spaces (= 1 double crochet + 1 chain stitch). Continue in the round, i.e. always work pattern from right side. When A.4 is done vertically, fasten off. STRAPS: Now work a strap back and forth in cast-on edge on front piece over the first 8-9-9-9-10-10 double crochets. Work 1 double crochet in every double crochet until strap measures 10-10-11-11-12-12 cm / 4"-4"-4⅜"-4⅜"-4¾"-4¾". Fasten off. Work 1 strap over the first 8-9-9-9-10-10 double crochets in the other side the same way. Work straps the same way on back piece. Sew tog straps on shoulder. FLOUNCE: Work back and forth over every row on strap (= 20-20-22-22-24-24 cm / 7⅞"-7⅞"-8⅝"-8⅝"-9⅜"-9⅜"). Begin from wrong side and work 1 double crochet in first row, * 1 chain stitch, 1 double crochet around row *, work from *-* along the entire strap – adjust so that there are 26-26-28-28-30-30 chain spaces (= 1 chain stitch + 1 double crochet) on this row, finish with 1 double crochet in last row = 1 double crochet in each side and 26-26-28-28-30-30 chain spaces (= 1 chain stitch + 1 double crochet). Turn and work as follows from right side: A.5a, A.5b 13-13-14-14-15-15 times in total in width, finish with A.5c. Continue this pattern until A.5 is done vertically, fasten off. Work flounce on the other strap the same way. NECK EDGE: Work 1 single crochet in every double crochet/2 single crochets along every double crochet row along the entire neck. SLEEVE EDGE: Work 1 single crochet in every double crochet/2 single crochets along every double crochet row along armhole – start right after flounce, work along armhole and to the flounce. Place flounce edge to edge to this sleeve edge (on both front and back piece) and fasten with small, neat stitches. Work the other sleeve edge the same way and fasten flounce. TIE: Cut 3 lengths of 3 metres each with Cotton Merino. Twine the strands tog until they resist, fold them double so that they twine again. Make a knot at each end. Baste the yarn up and down through first row with eyelet holes - start mid front. Tie a bow at the front. |
|||||||||||||||||||||||||||||||||||||||||||
Diagram explanations |
|||||||||||||||||||||||||||||||||||||||||||
|
|||||||||||||||||||||||||||||||||||||||||||
 |
|||||||||||||||||||||||||||||||||||||||||||
 |
|||||||||||||||||||||||||||||||||||||||||||
 |
|||||||||||||||||||||||||||||||||||||||||||
Have you finished this pattern?Tag your pictures with #dropspattern #californiadreamtop or submit them to the #dropsfan gallery. Do you need help with this pattern?You'll find 10 tutorial videos, a Comments/Questions area and more by visiting the pattern on garnstudio.com. © 1982-2026 DROPS Design A/S. We reserve all rights. This document, including all its sub-sections, has copyrights. Read more about what you can do with our patterns at the bottom of each pattern on our site. |
|||||||||||||||||||||||||||||||||||||||||||


With over 40 years in knitting and crochet design, DROPS Design offers one of the most extensive collections of free patterns on the internet - translated to 17 languages. As of today we count 324 catalogs and 12290 patterns - 12280 of which are translated into English (US/in).
We work hard to bring you the best knitting and crochet have to offer, inspiration and advice as well as great quality yarns at incredible prices! Would you like to use our patterns for other than personal use? You can read what you are allowed to do in the Copyright text at the bottom of all our patterns. Happy crafting!
Post a comment to pattern DROPS 190-21
We would love to hear what you have to say about this pattern!
If you want to leave a question, please make sure you select the correct category in the form below, to speed up the answering process. Required fields are marked *.