
Popular categories
Looking for a yarn?


|
|||||||||||||||||||||||||||||||||||||||||||
California Dream |
|||||||||||||||||||||||||||||||||||||||||||
 |
 |
||||||||||||||||||||||||||||||||||||||||||
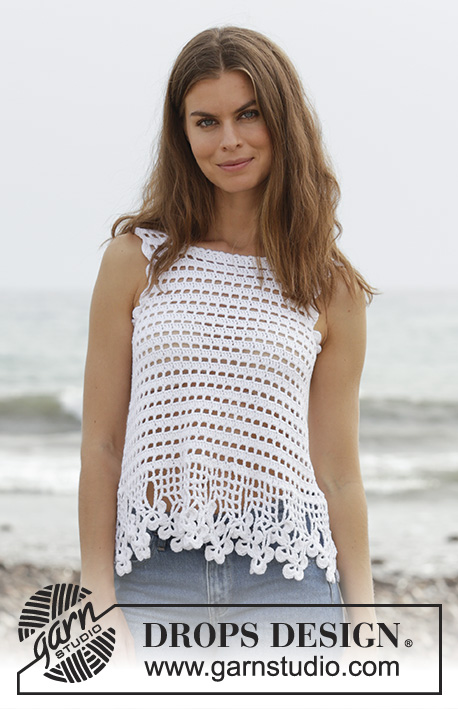
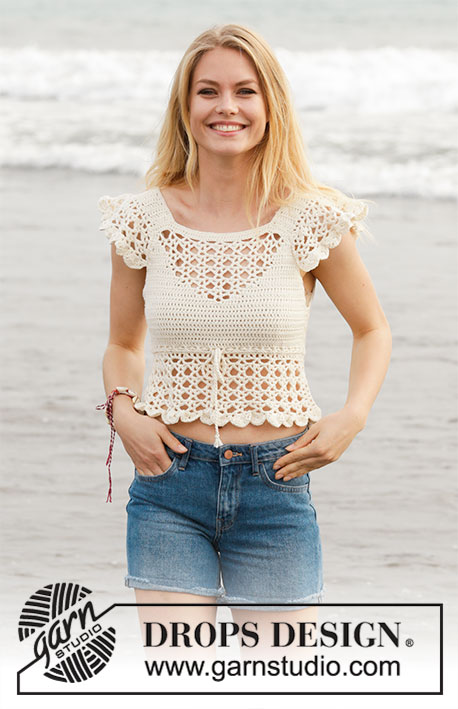
Crocheted top with lace pattern and flounce. Size: S - XXXL Piece is crocheted in DROPS Cotton Merino.
DROPS 190-21 |
|||||||||||||||||||||||||||||||||||||||||||
|
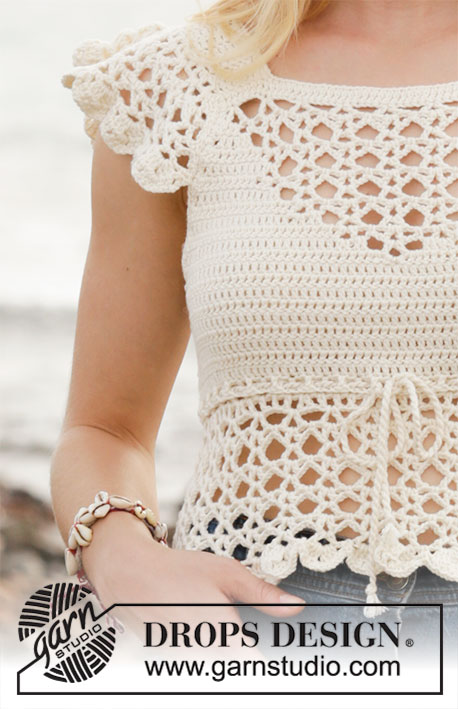
INFORMATION FOR PATTERN: PATTERN: See diagrams A.1 to A.5. INCREASE TIP-1: Increase 1 double crochet by working 2 double crochets in same stitch. CROCHET TIP-1 (applies to body but not diagram): Replace first double crochet at beginning of every row with 3 chain stitches. CROCHET TIP-2 (applies to body but not diagram): When working in the round, replace first treble with 3 chain stitches, finish round with 1 slip stitch in 3rd chain stitch at beginning of round. DECREASE TIP: Decrease by working 2 double crochets together. INCREASE TIP-2 (evenly): To calculate how to increase evenly, use the total number of double crochets on row (e.g. 146 double crochets) and divide double crochets by number of increases to be done (e.g. 22) = 6.6. In this example increase by working 2 double crochets in same double crochet alternately approx. every 6th and 7th double crochet. ---------------------------------------------------------- TOP: Piece is worked back and forth, top down, work front and back piece separately down to armhole, then work in the round over both parts. Then work straps from bottom up and then work flounces back and forth on straps, fasten flounce to front/back piece. FRONT PIECE: Work 51-53-53-55-57-59 chain stitches (including 3 chain stitches to turn with) on hook size 5 mm / H/8 with Cotton Merino. Switch to hook size 4 mm / G/6, turn and work 1 double crochet in 4th chain stitch from hook (= 2 double crochets), work 1 double crochet in each of the next 47-49-49-51-53-55 chain stitches = 49-51-51-53-55-57 double crochets. On next row begin increase in each side of piece AT THE SAME TIME work pattern as follows: Increase 1 double crochet in each side of piece (= 2 double crochets increased) - read INCREASE TIP-1. Increase like this every row 3-5-8-13-14-15 times in total, and then every other row 5-5-3-0-0-0 times in total = 65-71-73-79-83-87 double crochets on last row. Work next row as follows, begin from right side: Read CROCHET TIP-1 – work 1 double crochet in each of the first 0-1-1-2-3-4 double crochets, A.1a over the next 10 double crochets, repeat A.1b over the next 30 double crochets (= 5 times in total in width), A.1c over the next 9 double crochets and 1 double crochet in each of the last 0-1-1-2-3-4 double crochets. Continue until A.1 has been work 1 time vertically. REMEMBER THE CROCHET GAUGE! Then work as follows, begin from wrong side: Work 1 double crochet in every double crochet until 1 double crochet remains before first chain space, work A.2c, repeat A.2b 3 times in total in width, A.2a and 1 double crochet in every double crochet the entire row. Continue until A.2 has been worked vertically. Then work as follows, begin from wrong side: Work 1 double crochet in every double crochet until first chain space, work A.3 and 1 double crochet in every double crochet the rest of row. Continue until A.3 has been worked vertically. Now work 1 double crochet in every stitch until piece measures 14-15-15-16-16-17 cm / 5 ½"-5⅞"-5⅞"-6 ¼"-6 ¼"-6⅝". Fasten off, turn. Put piece aside. BACK PIECE: Work 51-53-53-55-57-59 chain stitches (including 3 chain stitches to turn with) on hook size 5 mm / H/8 with Cotton Merino. Switch to hook size 4 mm / G/6, turn and work 1 double crochet in 4th chain stitch from hook (= 2 double crochets), work 1 double crochet in each of the next 47-49-49-51-53-55 chain stitches = 49-51-51-53-55-57 double crochets. Then work 1 double crochet in every double crochet - AT THE SAME TIME increase 1 double crochet in each side of piece - remember INCREASE TIP-1. Increase like this every row 8-10-11-13-14-15 times in total = 65-71-73-79-83-87 double crochets on last row. When piece measures 14-15-15-16-16-17 cm / 5 ½"-5⅞"-5⅞"-6 ¼"-6 ¼"-6⅝" (adjust according to front piece), fasten off, turn. BODY: Now work the two parts together as follows: Work 4-4-7-8-12-15 chain stitches for armhole, 1 double crochet in each of the 65-71-73-79-83-87 double crochets from back piece, work 8-8-14-16-24-30 chain stitches for armhole, 1 double crochet in each of the 65-71-73-79-83-87 double crochets from front piece, work 4-4-7-8-12-15 chain stitches for armhole and finish with 1 slip stitch in first chain stitch at beginning of round. Then work piece in the round, continue with 1 double in every double/chain stitch = 146-158-174-190-214-234 double crochets. When working in the round, turn after every round to work alternately from right side and wrong side. This is so that the texture is the same on the entire top - read CROCHET TIP-2. Insert 1 marker thread in each side, in the middle of the 8-8-14-16-24-30 chain stitches. NOW MEASURE THE PIECE FROM HERE! Continue like this until piece measures 8-9-10-11-12-13 cm / 3⅛"-3½"-4"-4⅜"-4¾"-5⅛". Now work in the round according to diagram A.4 while at the same time increasing on first round (round marked with arrow in diagram) as follows: Work A.4b 28-30-33-36-39-43 times in total on round – A.4a shows how rounds begin and end and is worked in addition to A.4b – AT THE SAME TIME increase 11-11-12-13-10-12 chain spaces (= 1 double crochet + 1 chain stitch) evenly – read INCREASE TIP-2 = 84-90-99-108-117-129 chain spaces (= 1 double crochet + 1 chain stitch). Continue in the round, i.e. always work pattern from right side. When A.4 is done vertically, fasten off. STRAPS: Now work a strap back and forth in cast-on edge on front piece over the first 8-9-9-9-10-10 double crochets. Work 1 double crochet in every double crochet until strap measures 10-10-11-11-12-12 cm / 4"-4"-4⅜"-4⅜"-4¾"-4¾". Fasten off. Work 1 strap over the first 8-9-9-9-10-10 double crochets in the other side the same way. Work straps the same way on back piece. Sew tog straps on shoulder. FLOUNCE: Work back and forth over every row on strap (= 20-20-22-22-24-24 cm / 7⅞"-7⅞"-8⅝"-8⅝"-9⅜"-9⅜"). Begin from wrong side and work 1 double crochet in first row, * 1 chain stitch, 1 double crochet around row *, work from *-* along the entire strap – adjust so that there are 26-26-28-28-30-30 chain spaces (= 1 chain stitch + 1 double crochet) on this row, finish with 1 double crochet in last row = 1 double crochet in each side and 26-26-28-28-30-30 chain spaces (= 1 chain stitch + 1 double crochet). Turn and work as follows from right side: A.5a, A.5b 13-13-14-14-15-15 times in total in width, finish with A.5c. Continue this pattern until A.5 is done vertically, fasten off. Work flounce on the other strap the same way. NECK EDGE: Work 1 single crochet in every double crochet/2 single crochets along every double crochet row along the entire neck. SLEEVE EDGE: Work 1 single crochet in every double crochet/2 single crochets along every double crochet row along armhole – start right after flounce, work along armhole and to the flounce. Place flounce edge to edge to this sleeve edge (on both front and back piece) and fasten with small, neat stitches. Work the other sleeve edge the same way and fasten flounce. TIE: Cut 3 lengths of 3 metres each with Cotton Merino. Twine the strands tog until they resist, fold them double so that they twine again. Make a knot at each end. Baste the yarn up and down through first row with eyelet holes - start mid front. Tie a bow at the front. |
|||||||||||||||||||||||||||||||||||||||||||
Diagram explanations |
|||||||||||||||||||||||||||||||||||||||||||
|
|||||||||||||||||||||||||||||||||||||||||||

|
|||||||||||||||||||||||||||||||||||||||||||

|
|||||||||||||||||||||||||||||||||||||||||||

|
|||||||||||||||||||||||||||||||||||||||||||
|
Have you made this or any other of our designs? Tag your pictures in social media with #dropsdesign so we can see them! Do you need help with this pattern?You'll find tutorial videos, a Comments/Questions area and more by visiting the pattern on garnstudio.com. © 1982-2024 DROPS Design A/S. We reserve all rights. This document, including all its sub-sections, has copyrights. Read more about what you can do with our patterns at the bottom of each pattern on our site. |
|||||||||||||||||||||||||||||||||||||||||||


With over 40 years in knitting and crochet design, DROPS Design offers one of the most extensive collections of free patterns on the internet - translated to 17 languages. As of today we count 304 catalogs and 11422 patterns - 11417 of which are translated into English (US/in).
We work hard to bring you the best knitting and crochet have to offer, inspiration and advice as well as great quality yarns at incredible prices! Would you like to use our patterns for other than personal use? You can read what you are allowed to do in the Copyright text at the bottom of all our patterns. Happy crafting!
Comments / Questions (159)
Buonasera, sto eseguendo una taglia s, sono al davanti, ho 65 m.a. di base e devo eseguire A.1a sulle 10 maglie alte, ripetere A.1b sulle 30 maglie alte successive (= 5 volte in totale in larghezza), A.1c sulle 9 maglie alte successive. Il problema è che con questo schema non copro le 65 maglie alte di base. Deve rimanermi dello spazio? Non sono molto esperta e non vorrei sbagliare. Grazie
17.04.2023 - 21:41DROPS Design answered:
Buonasera Michela, per la taglia S parte con 47 maglie di base e arriva alla fine di A.1 lavorando gli aumenti a 65 maglie. Buon lavoro!
17.04.2023 - 23:30Entonces en el patrón cm091, la segunda vuelta quedaría así: 8 aumentos,(1 punto alto,1 aum.)x3 ,23 puntos altos,(1aum.,1 punto alto)x3,8 aumentos= 73 puntos para la talla L???????
07.04.2023 - 00:21DROPS Design answered:
Hola Vicky, en las primeras 8 filas trabajas como sigue: 2 puntos altos en 1 punto, un punto alto en cada punto hasta que quede un punto antes del final de la fila, 2 puntos altos en un punto. Después de estas 8 filas, no vas a aumentar en cada fila, sino que en filas alternas. En la primera fila, trabajar un punto alto en cada punto alto; en la segunda fila trabajar: 2 puntos altos en 1 punto, un punto alto en cada punto hasta que quede un punto antes del final de la fila, 2 puntos altos en un punto. Trabajar la tercera y quinta fila como la primera y la cuarta y sexta fila como la segunda. De este modo, solo aumentas en filas alternas (o cada 2ª fila).
08.04.2023 - 20:33En el patrón cm091, cuando hago la fila de aumentos del delantero, me dice que aumente para la talla L ocho veces, pero luego me dice que para la segunda fila aumente para la talla L tres veces y me quedarían 73 puntos en total. No entiendo dónde tengo que hacer esos tres aumentos ni cuál es la segunda fila.
06.04.2023 - 02:35DROPS Design answered:
Hola Vicky, primero aumentas 8 veces en cada fila. Es decir, vas a aumentar en las siguientes 8 filas. Después de aumentar en estas 8 filas pasas a aumentar cada 2ª fila o filas alternas. En ese caso, alternas entre una fila con aumentos y una sin aumentos. Tienes que trabajar 3 filas con aumentos de esta manera (como comienzas con una fila sin aumentos, habrás trabajado 6 filas, 3 con aumentos y 3 sin ellos).
06.04.2023 - 23:04Guten Tag, ich bin keine Anfängerin im Häkeln, aber diese Anleitung ist nicht nachvollziehbar. Wie viele Reihen häkel ich beim Vorderteil nur Stäbchen ehe ich mit dem Muster anfange? Die Verteilung der Zunahme ab der dritten Reihe ist für mich auch nicht klar. Schade. Ich bin enttäuscht von der vermeintlichen Anleitung Grüße Jacqueline
26.03.2023 - 18:06DROPS Design answered:
Liebe Frau Helfricht , die Zunahmen beim Vorderteil beginnen bei der 1. Reihe mit Muster. dh bei der 2. Reihe ab Anfang häkeln Sie Muster A.1 und gleichzeitig nehmen Sie beidseitig zu. Diese Zunahme häkeln Sie in jeder Reihe dann in jeder 2. Reihe. Viel Spaß beim häkeln!
27.03.2023 - 09:33Hej, jeg hækler forsiden af toppen nu men forstår ikke dette,”tag us således på hver række totalt 3 gange, derefter på hver 2.række totalt 5 gange = 65 stangmasker” vil det sige at jeg skal hækle 13 rækker? eller skal jeg hækle 8 rækker med 2 udtagninger? Jeg kan ikke helt se hvordan det vil passe.
12.03.2023 - 16:53DROPS Design answered:
Hei Daniella Om du hekler str S har du 49 staver på raden før du begynner på økningene. Du skal øke med 1 stav i hver side på hver rad 3 ganger = 6 økte masker = 49+6= 55 masker. Deretter skal det økes på hver 2. rad 5 ganger = 10 rader = 10 økte masker = 55 + 10 økte masker = 65 masker på raden. mvh DROPS Design
13.03.2023 - 13:30Hi, I have read, reread instructions and can’t figure out where A1 and A2, etc. are? A3 is at the bottom of the charts. When you say A1, or A2, etc., are the letters a, b and c to be ignored? Many thanks.
10.03.2023 - 06:21DROPS Design answered:
Hi Carole, The text specifies A.1a, A.1b, A.1c when you start working the pattern. These diagrams are worked over 10, 30 and 9 treble crochets respectively. Work these diagrams 1 time in height before working A.2a-c 1 time in height. Hope this helps and happy crocheting!
10.03.2023 - 06:51Bom dia, estou fazendo tamanho L e na parte dos aumentos que pede para aumentar a cada 2 carreiras eu faço 1 carreira com aumento e depois aumento na terceira ou na quarta carreira? Obrigada
13.02.2023 - 13:09DROPS Design answered:
Boa tarde, Faz o aumento na 3.ª carreira. Bons crochés!
13.02.2023 - 15:05Hola! Estoy empecinada en realizar esta labor, aunque me resulte excepcionalmente difícil entender la explicación, no tanto los diagramas... Mi pregunta es con respecto a esta parte : "Ahora unir las 2 partes como sigue: Trabajar 4-4-7-8-12-15 puntos de cadeneta para la sisa, 1 punto alto en cada uno de los 65-71-73-79-83-87 puntos altos de la espalda..." Significa que debo montar las cadenetas en la aguja crochet, antes de seguir tejiendo los puntos altos de la espalda??
28.11.2022 - 20:08DROPS Design answered:
Hola Alicia, sí, primero montas la cadeneta y después continúas trabajando los puntos de la espalda.
06.12.2022 - 19:06Muy hermosa la blusa, pero me gustaría que me ayudara con cuántos puntos empezar una talla G y una Xl por favor
10.11.2022 - 05:04Hvor er den bare sød, ville ønske at i så have lave den i kjole udgave 😍😀
28.09.2022 - 11:11