
Looking for a yarn?


Comments / Questions (46)
![]() Heike wrote:
Heike wrote:
Hallo, ich verstehe das nicht mit dem Knopf. Gibt es vom Hinterteil auch ein Foto ? Weiss nicht , wo ich den annähen soll .
29.06.2025 - 22:01DROPS Design answered:
Liebe Heike, das Rückenteil wurd in 2 Teilen fertiggehäkelt, das Knopf wird oben an einem Rückenteil genäht, und durch 2 Stäbchen vom anderen Rückenteil zugeknöpft (es wurde keine Knopflöcher dafür gearbeitet). Viel Spaß beim Häkeln!
30.06.2025 - 09:28
![]() Lauralee wrote:
Lauralee wrote:
I am wondering how to apart the pattern for a left handed Crocheter.
23.06.2025 - 16:48DROPS Design answered:
Dear Lauralee, you will find how to read crochet diagrams here - this might help you adjusting if necessary. Happy crocheting!
24.06.2025 - 18:20
![]() Iwona wrote:
Iwona wrote:
Nie rozumiem schematu A4. Odczytuję go, że ostatecznie gubisz 4oczka, a nie 3 jak jest w objaśnieniu. To było by 4 po obu stronach 6 razy, czyli gubimy 48 oczek. ??????🤔🤯
27.05.2025 - 12:10DROPS Design answered:
Witaj Iwono, w 1-szym rzędzie schematu A.4 wykonujesz 2 grupy (= 1 sł, 2 oł, 1 sł, 2 oł, 1 sł), w rzędzie 2 przerabiasz 1 sł w każdy sł i 1 sł wokół każdego łuku (zamiast 2 sł w schemacie A.3). W rzędzie 3 przerabiasz 1 sł w sł, 2 oł, omijasz 3 sł i kończysz przerabiając 1 sł w następny sł), w 4-tym rzędzie przerabiasz 1 sł w sł, 1 sł w łuk i 1 sł w następny sł = zamknięte 3 słupki. Miłej pracy!
28.05.2025 - 08:02
![]() Angie wrote:
Angie wrote:
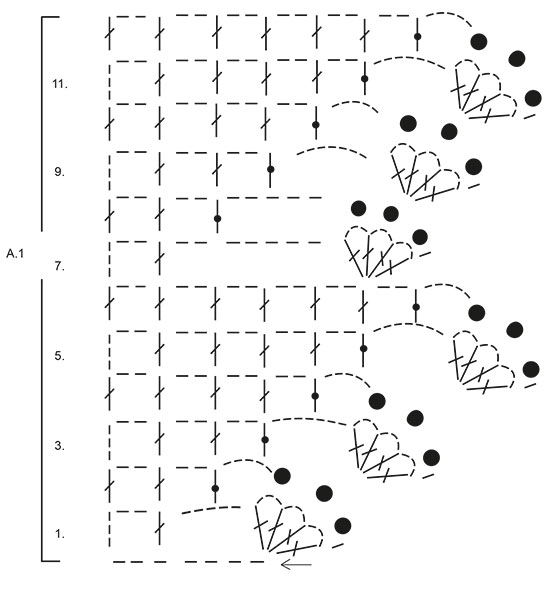
De top begint met het klaverpatroon volgens A.1 , ik zie vervolgens staan ‘informatie voor het haken-1. De eerste toer op elk klaverblad (=1 stokje, 3 lossen, 1 stokje, 3 lossen, 1 stokje in hetzelfde stokje) wordt in het midden van het dubbele stokje van het vorige klaverblad gehaakt- zie A.2’. Wanneer moet ik die toer volgens A.2. haken? Als de rand volgens A.1. klaar is of eerder, of tegelijk? Het is me niet duidelijk
23.02.2025 - 16:16DROPS Design answered:
Dag Angie,
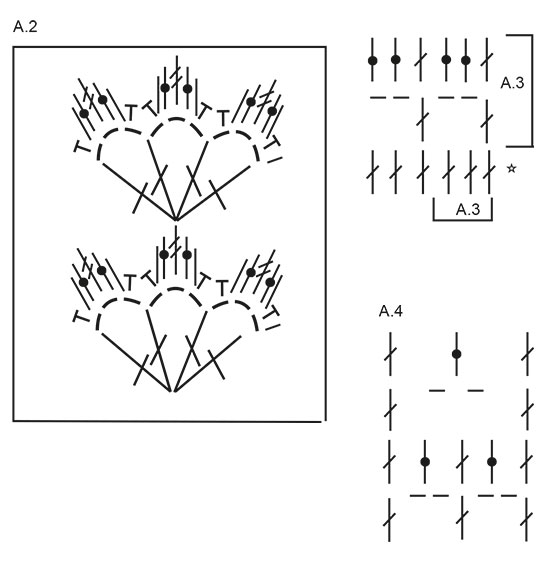
In telpatroon A.1 zie je aan de rechterkant de klaverblaadjes staan met boven elk klaverblaadje 3 dikke stippen. In de middelste van die 3 dikke stippen haak je het klaverblad van de volgende toer. A.2 is eigenlijk een uitvergroting van het klaverblad, waarbij de steken die beschreven staan bij de dikke zwarte stip uitgetekend zijn.
19.04.2025 - 11:14
![]() Amanda Tran wrote:
Amanda Tran wrote:
How can I get audio from your video?
30.08.2024 - 05:29DROPS Design answered:
Dear Mrs Tran, Our videos do not have sound. We are a worldwide company and our videos are watched by people speaking endless of different languages and many do not understand English. So since there is not a given language for us to use, we instead have written instructions to accompany the video, and then there is no sound to disturb while watching. Happy crocheting!
30.08.2024 - 14:39
![]() Nora wrote:
Nora wrote:
Hola me puede decir a partir de donde se mide la blusa estoy haciendo la talla chica y dice que al llegar a los 25 cm dividir el delantero y la espalda
05.06.2024 - 23:53
![]() Gaby Sandoval wrote:
Gaby Sandoval wrote:
Necesito ayuda para interpretar esta parte del patron: Cuando la labor mida 2 cm disminuir 1 grupo de puntos altos (= 3 puntos altos o 1 punto alto + 2 puntos de cadeneta) a cada lado, disminuir antes de ambos marcapuntos. El diagrama A.4 muestra cómo disminuir en el patrón. Agradecería a quien me pueda ayudar. Gracias Gaby
08.04.2024 - 22:08DROPS Design answered:
Hola Gaby, en el diagrama A.4 puedes ver como se disminuye el grupo hasta 1 punto alto. En la fila 2 del diagrama tienes 3 puntos centrales que vas a disminuir y 1 punto alto a cada lado de estos puntos. En la fila 3 disminuyes estos 3 puntos trabajando 2 cadenetas encima de estos puntos altos. En la siguiente fila trabajas 1 punto alto dentro de este arco de cadenetas. De este modo pasas de tener 3 puntos altos en la fila 2, a 2 cadenetas en la Fila 3 y 1 punto alto en la Fila 4. Si en vez de 3 puntos altos tienes 1 punto alto y 2 cadenetas se haría lo mismo; solo cambian los puntos iniciales.
14.04.2024 - 18:24
![]() Sandra wrote:
Sandra wrote:
Hallo ik ben net aan dit patroon begonnen met A1 maar weet niet goed hoe ik het tweede klavertje moet haken( rij 3)
23.03.2024 - 19:02
![]() Jane wrote:
Jane wrote:
If you start with chain 12 on the clover bottom the first clover is much shorter than all the other and looks odd when joined. Wouldn't it be better to start with a 21 chain as per the clover position on round 7 ?
25.09.2023 - 22:03DROPS Design answered:
Dear Jane, the garment was made like this, but feel free to change and start with row 7 and more chains if you like to. Happy crocheting!
02.10.2023 - 09:19
![]() Ingrid wrote:
Ingrid wrote:
Hallo, kapiere die Abnahme vom armausschnitt nicht. Vorderteil 6 Stäbchen, Rückenteil 11 Stäbchen.Die Maschen welche noch über sind, sind bei Vorderteil und Rückenteil gleich . Das kann doch nicht stimmen. Da ist doch der Rücken kleiner.
05.07.2022 - 14:14DROPS Design answered:
Liebe Ingrid, am Anfang Vorderteil überspringen Sie die 6 ersten Stäbchen dann häkeln Sie A.3 insgesamt 23-25 Mal (siehe Größe) - bei dem Rückenteil, überspringen Sie 11 Stäbchen nach dem Vorderteil und häkeln A.3 insgesamt 23-25 Mal = es sind 11 Stäbchen für das 2. Armoch vor dem Vorderteil. Viel Spaß beim häkeln!
05.07.2022 - 15:45
|
|||||||||||||||||||||||||
Ipanema#ipanematop |
|||||||||||||||||||||||||
 |
 |
||||||||||||||||||||||||
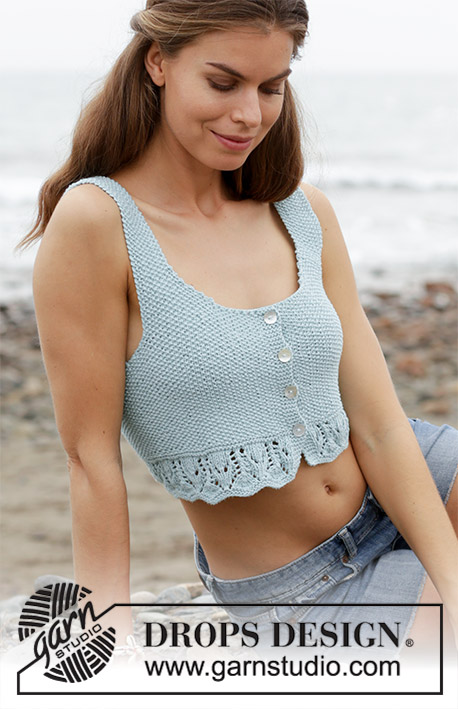
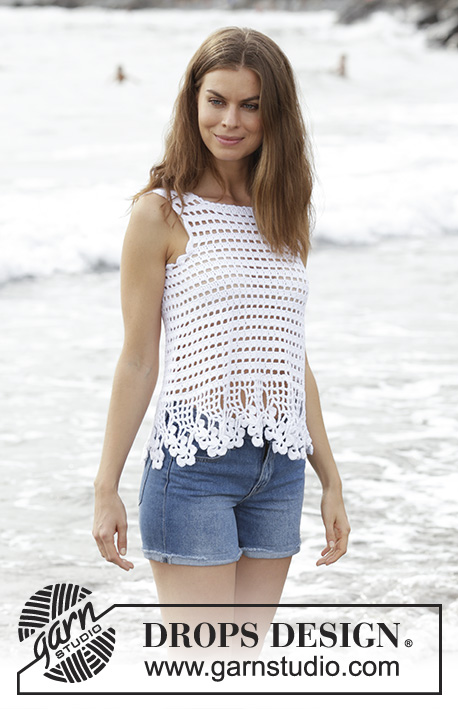
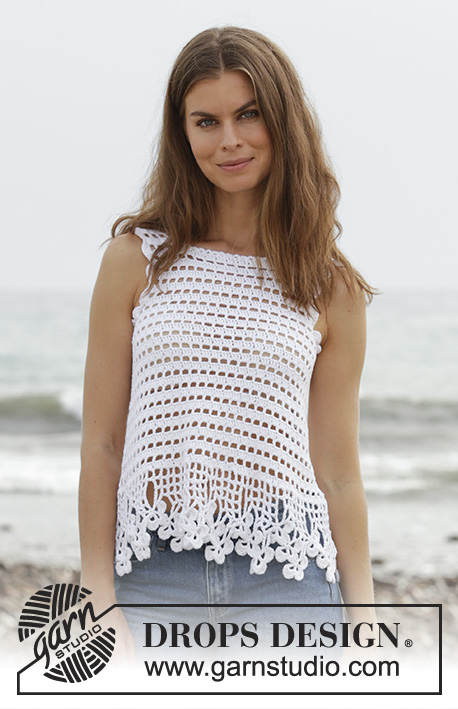
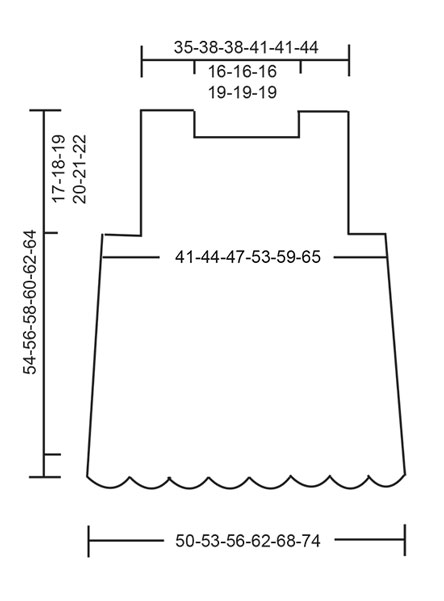
Crocheted top with clover and lace pattern. The piece is worked in DROPS Cotton Light. Sizes S - XXXL.
DROPS 190-2 |
|||||||||||||||||||||||||
|
INFORMATION FOR THE PATTERN: PATTERN: See diagrams A.1 to A.4. CROCHET INFO-1: The first row on each clover leaf (= 1 double crochet, 3 chain stitches, 1 double crochet, 3 chain stitches, 1 double crochet, 3 chain stitches, 1 double crochet in the same double crochet) is worked in the middle treble crochet of the previous clover leaf - see A.2. CROCHET INFO-2: The first double crochet at the beginning of the row/round is replaced by 3 chain stitches. Finish the row/round with 1 slip stitch in the 3rd chain stitch at the beginning of the row/round. The first single crochet at the beginning of the row is replaced by 1 chain stitch. ---------------------------------------------------------- TOP: First the clover pattern is worked from side to side at the bottom, then the top is worked upwards in the round as far as the armholes. Here the piece is divided and the front and back pieces are worked separately. Work 12 chain stitches (including 5 chain stitches to turn) with Cotton Light and hook size 3.5 mm/E/4. Read CROCHET INFO-1! Continue by working according to A.1 until you have worked 1 repeat in height. Then repeat rows 7-12 until the piece measures approx. 100-106-112-124-136-148 cm / 39⅜"-41⅝"-44"-48 ¾"-53 ½"-58 ¼" – finish after row 12. Sew the clover edge together to make a ring (seam = side of the top). Then continue working upwards in the round, THE PIECE IS NOW MEASURED FROM HERE! Crochet up 198-210-222-246-270-294 double crochets around the double crochets from the long-side in A.1. Then work according to A.3 – read CROCHET INFO-2. Continue this pattern upwards. Insert 2 marker threads in the piece, 1 at the beginning of the round and 1 after 99-105-111-123-135-147 double crochets (= sides). When the piece measures 2 cm / ¾" decrease 1 double crochet group (= 3 double crochets or 1 double crochet + 2 chain stitches) in each side, decrease before both marker threads. Diagram A.4 shows how to decrease in the pattern. Repeat the decrease upwards every 4 cm / 1½"; decrease alternately before and after the marker threads in the sides, i.e. the first time you decrease 1 double crochet group before the marker threads, the second time you decrease 1 double crochet group after both marker threads. Decrease a total of 6 times in each side of the top = 162-174-186-210-234-258 double crochets/chain stitches. When the piece measures 25-26-27-28-29-30 cm / 9¾"-10¼"-10⅝"-11"-11⅜"-11¾", adjust so that the next round to be worked is the first round in A.3, divide the piece for the front and back pieces. Cut the strand. FRONT PIECE: Skip the first 6-6-9-12-18-21 double crochets, work A.3 over the next 70-76-76-82-82-88 double crochets (= 23-25-25-27-27-29 repeats of A.3 + 1 double crochet). Turn and work back. Continue this pattern upwards. When the piece measures 36-38-40-42-44-46 cm / 14¼"-15"-15¾"-16½"-17¼"-18" work over just the first 19-22-22-22-22-25 double crochets/chain stitches on the row = right shoulder. Continue until the piece measures 42-44-46-48-50-52 cm / 16½"-17¼"-18"-19"-19¾"-20½" / 16½"-17¼"-18"-19"-19¾"-20½", cut and fasten the strand. Work the left shoulder in the same way, i.e. work over just the last 19-22-22-22-22-25 double crochets/chain stitches on the row. The 32-32-32-38-38-38 double crochets/chain stitches not worked = neck. The piece measures a total of 54-56-58-60-62-64 cm / 21¼"-22"-22¾"-23⅝"-24⅜"-25¼" / 21¼"-22"-22¾"-23⅝"-24⅜"-25¼". BACK PIECE: Skip the first 11-11-17-23-35-41 double crochets after the front piece, work A.3 over the next 70-76-76-82-82-88 double crochets (= 23-25-25-27-27-29 repeats of A.3 + 1 double crochet). Turn and work back (there are now 11-11-17-23-35-41 double crochets in each side which are not worked (= armholes). Continue A.3 upwards. When the piece measures 30-32-34-36-38-40 cm / 11¾"-12½"-13⅜"-14¼"-15"-15¾ divide the back piece so that you have a split mid back. RIGHT BACK PIECE: Now work over just the first 35-38-38-41-41-44 double crochets; work A.3 over the first 33-36-36-39-39-42 double crochets/chain stitches and finish with 2 double crochets towards mid back. When the piece measures 36-38-40-42-44-46 cm / 14¼"-15"-15¾"-16½"-17¼"-18" work over just the first 19-22-22-22-22-25 double crochets/chain stitches on the row = right shoulder. The 16-16-16-19-19-19 double crochets not worked = neck. Continue until the piece measures 42-44-46-48-50-52 cm / 16½"-17¼"-18"-19"-19¾"-20½" / 16½"-17¼"-18"-19"-19¾"-20½", cut and fasten the strand. LEFT BACK PIECE: Now work over just the last 35-38-38-41-41-44 double crochets; work 1 double crochet towards mid back, work A.3 over the next 33-36-36-39-39-42 double crochets/chain stitches and finish with 1 double crochet towards the side. When the piece measures 36-38-40-42-44-46 cm / 14¼"-15"-15¾"-16½"-17¼"-18" work over just the last 19-22-22-22-22-25 double crochets/chain stitches on the row = left shoulder. The 16-16-16-19-19-19 double crochets not worked = neck. Continue until the piece measures 42-44-46-48-50-52 cm / 16½"-17¼"-18"-19"-19¾"-20½" / 16½"-17¼"-18"-19"-19¾"-20½", cut and fasten the strand. ASSEMBLY: Sew the shoulder seams. CROCHET EDGE AROUND THE ARMHOLES: Start at bottom of armhole. Work 1 single crochet,* skip forward approx. 2 cm / ¾", work 7 double crochets around the next double crochet, skip forward approx. 2 cm / ¾", work 1 single crochet around the next double crochet *, repeat from *-* and finish with 1 slip stitch in the single crochet at the beginning of the round. Work in the same way around the other armhole. CROCHET EDGE AROUND THE NECK: Start mid back. Work 1 single crochet, * 3 chain stitches, skip forward approx. 1 cm / ⅜", work 1 single crochet *, repeat from *-*. ASSEMBLY -2: Sew a button to the top of the split mid back; the button is buttoned through 2 double crochets. |
|||||||||||||||||||||||||
Diagram explanations |
|||||||||||||||||||||||||
|
|||||||||||||||||||||||||
|
|||||||||||||||||||||||||
|
|||||||||||||||||||||||||
|
|||||||||||||||||||||||||
Have you finished this pattern?Tag your pictures with #dropspattern #ipanematop or submit them to the #dropsfan gallery. Do you need help with this pattern?You'll find 10 tutorial videos, a Comments/Questions area and more by visiting the pattern on garnstudio.com. © 1982-2025 DROPS Design A/S. We reserve all rights. This document, including all its sub-sections, has copyrights. Read more about what you can do with our patterns at the bottom of each pattern on our site. |
|||||||||||||||||||||||||


With over 40 years in knitting and crochet design, DROPS Design offers one of the most extensive collections of free patterns on the internet - translated to 17 languages. As of today we count 314 catalogs and 11822 patterns - 11812 of which are translated into English (US/in).
We work hard to bring you the best knitting and crochet have to offer, inspiration and advice as well as great quality yarns at incredible prices! Would you like to use our patterns for other than personal use? You can read what you are allowed to do in the Copyright text at the bottom of all our patterns. Happy crafting!
Post a comment to pattern DROPS 190-2
We would love to hear what you have to say about this pattern!
If you want to leave a question, please make sure you select the correct category in the form below, to speed up the answering process. Required fields are marked *.