DROPS Cotton Light
DROPS Cotton Light
50% Cotton, 50% Polyester
from 1.25 $ /50g
Get the yarn to make this pattern from 3.75$.

The yarn cost is calculated from the pattern’s smallest size and the yarn’s cheapest product type. Looking for an even better price? You might find it on the DROPS Deals!

DROPS Super Sale

Island Dream

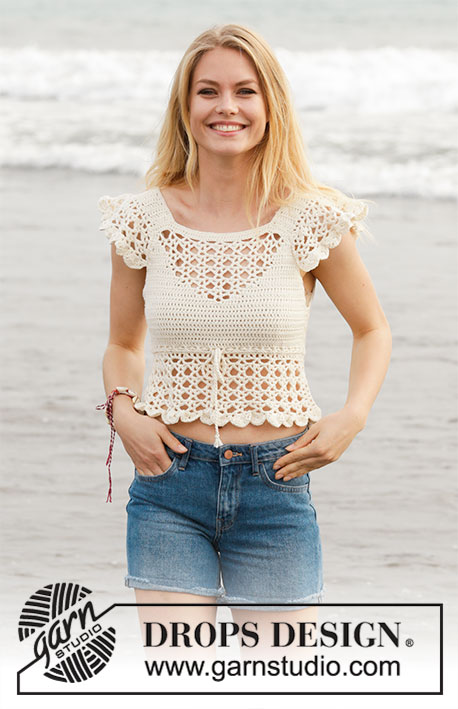
Knitted top with lace pattern and seed stitch. Size: S - XXXL Piece is knitted in DROPS Cotton Light.

DROPS 190-42
DROPS design: Pattern cl-090
Yarn group B
----------------------------------------------------------
Size: S - M - L - XL - XXL - XXXL
NOTE: Measurements on chart can seem small but because of pattern the garment is elastic. Work the size you normally would.
Materials:
DROPS COTTON LIGHT from Garnstudio (belongs to yarn group B)
150-200-200-200-250-250 g color 27, mint

Piece can also be knitted with yarn from:
“Alternative yarn (yarn group B)” - see link below.

DROPS CIRCULAR NEEDLE (80 cm / 32'') SIZE 4 mm/US 6 – or size needed to get 21 stitches and 32 rows in seed stitch = width 10 cm / 4'' and 10 cm / 4'' vertically.

DROPS MOTHER-OF-PEARL BUTTON ARCHED (white), NO 521: 4-4-4-4-5-5 pieces

-------------------------------------------------------

Alternative Yarn – See how to change yarns here
Yarn Groups A to F – Use the same pattern and change the yarn here
Yarn usage using an alternative yarn – Use our yarn converter here

-------------------------------------------------------

DROPS Cotton Light
DROPS Cotton Light
50% Cotton, 50% Polyester
from 1.25 $ /50g
Get the yarn to make this pattern from 3.75$.

The yarn cost is calculated from the pattern’s smallest size and the yarn’s cheapest product type. Looking for an even better price? You might find it on the DROPS Deals!

DROPS Super Sale

SAVE 30% on 6 cotton favorites!
Valid until 04.12.2024

Pattern instructions

NOTE: This pattern is written in American English. All measurements in charts are in cm. For conversion from inches to cm - click here. There are different terms for crocheting in American and British English. If this pattern includes crochet, click for "crochet terms" here. For this pattern in British English, please click here.
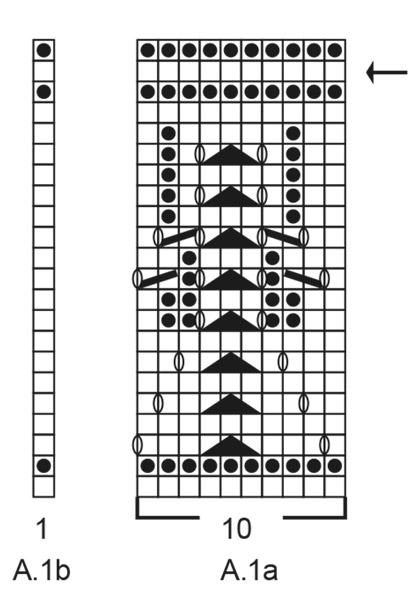
INFORMATION FOR PATTERN:

GARTER STITCH (back and forth):
1 ridge = knit 2 rows.

PATTERN:
See diagram A.1. Diagrams show all rows in pattern seen from the right side.

DECREASE/INCREASE TIP (evenly):
To calculate how to decrease/increase evenly, use total number of stitches (i.e. 161 stitches), minus bands (e.g. 10 stitches) and divide the remaining stitches by number of decreases/increases to be done (= e.g. 3) = 50.3. In this example decrease by knitting approx. every 49th and 50th stitch together. Do not decrease over bands. If increase is done, increase after approx. every 50th stitch (increase 1 stitch by making 1 yarn over, on next row work yarn over twisted to avoid holes).

SEED STITCH:
ROW 1: * Knit 1, purl 1 *, repeat from *-*.
ROW 2: Knit over purl and purl over knit.
Repeat 2nd row upwards.

BUTTONHOLES (bottom up):
Decrease for buttonholes on right band. 1 BUTTONHOLE = knit third and fourth stitch from edge together and make 1 yarn over. On next row knit yarn over = hole.
Decrease for buttonholes when piece measures:
S: 7, 11, 15 and 20 cm
M: 7, 12, 17 and 22 cm.
L: 7, 12, 17 and 23 cm.
XL: 7, 13, 19 and 25 cm.
XXL: 1, 12, 17, 22 and 26 cm
XXXL: 7, 13, 18, 23 and 28 cm
----------------------------------------------------------

TOP:
Work back and forth from mid front, bottom up to armholes. Then work front pieces and back piece back and forth on circular needle separately.

BODY:
Cast on 161-171-191-211-241-261 stitches on circular needle size 4 mm / US 6 with Cotton Light. Knit 1 row (= from wrong side). Work next row as follows - from right side: Work 5 band stitches in GARTER STITCH - see explanation above, work diagram A.1a over the next 150-160-180-200-230-250 stitches (= 15-16-18-20-23-25 repetitions of 10 stitches), A.1b (= 1 stitch) and 5 band stitches in garter stitch. Continue pattern back and forth until A.1 is done vertically - on row marked with arrow in diagram adjust number of stitches to 158-174-190-210-238-262 - read DECREASE/INCREASE TIP. REMEMBER THE GAUGE!
Insert 1 marker thread each side, 42-46-50-55-62-68 stitches in from mid front - marks the sides (= 74-82-90-100-114-126 stitches on back piece).
Then work as follows: 5 band stitches in garter stitch, SEED STITCH - see explanation above over the next 148-164-180-200-228-252 stitches and 5 band stitches in garter stitch. Continue pattern like this - AT THE SAME TIME when piece measures 7 cm / 2¾'', begin decrease for BUTTONHOLES – see explanation above. When piece measures 17-18-19-20-21-22 cm / 6¾''-7''-7½''-8''-8¼''-8¾'', work next row as follows: Work the first 38-42-46-51-58-64 stitches, bind off the next 8 stitches for armhole (= 4 stitches on each side of marker thread in the side), work 66-74-82-92-106-118 stitches, bind off the next 8 stitches for armhole, work 38-42-46-51-58-64 stitches. Finish each part separately.

BACK PIECE:
= 66-74-82-92-106-118 stitches. Continue with seed stitch over all stitches - AT THE SAME TIME bind off for armholes and neck.
ARMHOLES:
Continue to bind off for armholes in each side as follows: bind off 3 stitches 0-0-0-1-1-2 times, 2 stitches 1-2-4-2-4-5 times and 1 stitch 1-2-2-5-7-7 times (= 3-6-8-12-18-23 stitches bind off in each side)
NECK:
When piece measures 21-23-24-26-27-29 cm / 8 ¼"-9"-9 3/8"-10 ¼"-10 5/8"-11 3/8", bind off the middle 20-22-22-22-22-24 stitches for neck and finish each shoulder separately. Continue to bind off for neck at beginning of every row from neck as follows: bind off 2 stitches 3 times in total and then 1 stitch 3-3-5-5-6-6 times in total.
When all stitches are bind off there is 11-11-11-12-12-12 stitches on row. Continue back and forth over shoulder until piece measures 36-38-40-42-44-46 cm / 14¼''-15''-15¾''-16½''-17¼''-18'', bind off. Work the other shoulder the same way.

RIGHT FRONT PIECE:
= 38-42-46-51-58-64 stitches. Continue with seed stitch and 5 band stitches in garter stitch - AT THE SAME TIME bind off for armhole and neck as follows:
ARMHOLE:
Continue to bind off for armhole at the beginning of every row from the side as follows: bind off 3 stitches 0-0-0-1-1-2 times, 2 stitches 1-2-4-2-4-5 times and 1 stitch 1-2-2-5-7-7 times (= 3-6-8-12-18-23 stitches bind off).
NECK:
When piece measures 21-23-24-26-27-29 cm / 8 ¼"-9"-9 3/8"-10 ¼"-10 5/8"-11 3/8", bind off the first 15-16-16-16-16-17 stitches from right side for neck. Continue to bind off for neck at beginning of every row from neck as follows: bind off 2 stitches 3 times in total and then 1 stitch 3-3-5-5-6-6 times in total.
When all stitches are bind off there is 11-11-11-12-12-12 stitches on row. Continue back and forth over shoulder until piece measures 36-38-40-42-44-46 cm / 14¼''-15''-15¾''-16½''-17¼''-18'', bind off.

LEFT FRONT PIECE:
Work as right front piece but reversed. I.e. Bind off for neck at the beginning of every row from wrong side.

ASSEMBLY:
Sew the shoulder seams. Sew the buttons on to left front piece.

This pattern has been corrected.

Updated online: 25.08.2023
RIGHT FRONT PIECE: ... NECK: When piece measures 21-23-24-26-27-29 cm = 8 1/4"-9"-9 1/2"-10 1/4"-10 5/8"-11 3/8", bind off the first 15-16-16-16-16-17 stitches from right side for neck. Continue to bind off for neck ...

Diagram

All measurements in charts are in cm.

symbols = knit from the right side, purl from the wrong side
symbols = purl from the right side, knit from the wrong side
symbols = between 2 stitches make 1 yarn over
symbols = knit 2 together
symbols = slip 1 stitch knitwise, knit 1, pass slipped stitch over stitch worked
symbols = slip 1 stitch knitwise, knit 2 stitches together, pass slipped stitch over stitches worked together
symbols = increase/decrease row
diagram
diagram
Do you have a question? See a list of frequently asked questions (FAQ)

Knitting tension is what determines the final measurements of your work, and is usually measured per 10 x 10 cm. It is provided like so: number of stitches in width x number of rows in height - eg: 19 stitches x 26 rows = 10 x 10 cm.

The knitting tension is very individual; some people knit/crochet loosely while others work tightly. You adjust the knitting tension with the needle size, which is why the suggested needle size only serve as a guide! You need to adjust this (up or down) to ensure that YOUR knitting tension matches the knitting tension provided in the pattern. If you work with a different knitting tension than provided you will have a different yarn consumption, and your work will have different measurements than what the pattern suggests.

The knitting tension also determines which yarns can replace each other. As long as you achieve the same knitting tension you can replace one yarn with another.

See DROPS lesson: How to measure your tension/gauge

See DROPS video: How to make a gauge tension swatch

The required amount of yarn is provided in grams, eg: 450 g. To calculate how many balls you’ll need you first need to know how many grams are in 1 ball (25g, 50g or 100g). This information is available if you click on the individual yarn quality on our pages. Divide the amount required with the amount of each ball. For example, if each ball is 50g (the most common amount), the calculation will be as follows: 450 / 50 = 9 balls.

The important thing when changing from one yarn to another is that the knitting/crochet tension remains the same. This is so that the measurements of the finished piece will be the same as on the sketch provided. It is easier to achieve the same knitting tension using yarns from the same yarn group. It is also possible to work with multiple strands of a thinner yarn to achieve the knitting tension of a thicker one. Please try our yarn converter. We recommend you to always work a test swatch.

Please NOTE: when changing yarn the garment might have a different look and feel to the garment in the photo, due to individual properties and qualities of each yarn.

See DROPS lesson: Can I use a different yarn than the one mentioned in the pattern?

All our yarns are categorised into yarn groups (from A to F) according to thickness and knitting tension – group A contains the thinnest yarns and group F the thickest. This makes it easier for you to find alternative yarns to our patterns, should you wish to switch yarn. All yarns within the same group have a similar knitting tension and can easily replace each other. However, different yarn qualities have different structures and properties which will give the finished work a unique look and feel.

Click here for an overview of the yarns in each yarn group

At the top of all our patterns you’ll find a link to our yarn converter, which is a helpful tool should you wish to use a different yarn than suggested. By filling in the yarn quality you wish to replace, the amount (in your size) and number of strands, the converter will present good alternative yarns with the same knitting tension. Additionally it will tell you how much you’ll require in the new qualities and whether you’ll need to work with multiple strands. Most skeins are 50g (some are 25g or 100g).

If the pattern is worked with multiple colours, every colour will have to be converted separately. Similarly, if the pattern is worked with several strands of different yarns (for example 1 strand Alpaca and 1 strand Kid-Silk) you will have to find alternatives for each, individually.

Click here to see our yarn converter

Since different yarns have different qualities and textures we have chosen to keep the original yarn in our patterns. However, you can easily find options among our available qualities by using our yarn converter, or simply pick a yarn from the same yarn group.

It is possible that some retailers still have discontinued yarns in stock, or that someone has a few skeins at home that they would like to find patterns for.

The yarn converter will provide both alternative yarn as well as required amount in the new quality.

If you think it's hard to decide what size to make, it can be a good idea to measure a garment you own already and like the size of. Then you can pick the size by comparing those measures with the ones available in the pattern's size chart.

You'll find the size chart at the bottom of the pattern.

See DROPS lesson: How to read size chart

The needle size provided in the pattern serves only as a guide, the important thing is to follow the knitting tension. And since knitting tension is very individual, you will have to adjust the needle size to ensure that YOUR tension is the same as in the pattern – maybe you’ll have to adjust 1, or even 2 needle sizes, up or down to achieve the correct tension. For this, we recommend that you work test swatches.

Should you work with a different knitting tension than the one provided, the measurements of the finished garment might deviate from the measurement sketch.

See DROPS lesson: How to measure your tension/gauge

See DROPS video: How to make a gauge tension swatch

Working a garment top-down provides more flexibility and room for personal adjustment. For example it is easier to try the garment on while working, as well as making adjustments to length of yoke and shoulder caps.

The instructions are carefully explaining every step, in the correct order. Diagrams are adjusted to the knitting direction and are worked as usual.

The diagram depicts all rows/rounds, and every stitch seen from the right side. It is read from bottom to top, from right to left. 1 square = 1 stitch.

When working back and forth, every other row is worked from the right side and every other row is worked from the wrong side. When working from the wrong side, the diagram will have to be worked reversed: from left to right, knit stitches are purled, purl stitches are knit etc.

When working in the round every round is worked from the right side and the diagram are worked from right to left on all rounds.

See DROPS lesson: How to read knitting diagrams

The diagram depicts all rows/rounds, and every stitch seen from the right side. It is worked from bottom to top, from right to left.

When working back and forth every other row is worked from the right side: from right to left and every other row is worked from the wrong side: from left to right.

When working in the round, every row in the diagram are worked from the right side, from right to left.

When working a circular diagram you start in the middle and work your way outwards, counter clockwise, row by row.

The rows usually start with a given number of chain stitches (equivalent to the height of the following stitch), this will either be depicted in the diagram or explained in the pattern.

See DROPS lesson: How to read crochet diagrams

Instructions for working several diagrams after each other on the same row/round, will often be written like so: “work A.1, A.2, A.3 a total of 0-0-2-3-4 times". This means you work A.1 once, then A.2 is worked once, and A.3 is repeated (in width) the number of times provided for your size – in this case like so: S = 0 times, M = 0 times, L=2 times, XL= 3 times and XXL = 4 times.

The diagrams are worked as usual: begin with the first row in A.1, then work the first row in A.2 etc.

See DROPS lesson: How to read knitting diagrams

See DROPS lesson: How to read crochet diagrams

The total width of the garment (from wrist-to-wrist) will be larger in the larger sizes, despite the actual sleeves being shorter. The larger sizes have longer sleeve caps and wider shoulders, so there will be a good fit in all sizes.

The measurement sketch/schematic drawing provides information regarding the full length of the garment. If it’s a jumper or a jacket the length is measured from the highest point on the shoulder (usually closest to the neckline), and straight down to the bottom of the garment. It is NOT measured from the tip of shoulder. Similarly, the length of yoke is measured from the highest point on the shoulder and down to where yoke is split into body and sleeves.

See DROPS lesson: How to read a schematic drawing

Diagrams are often repeated on the round or in height. 1 repeat is the diagram the way it appears in the pattern. If it says to work 5 repeats of A.1 in the round, then you work A.1 a total of 5 times after/next to each other in the round. If it says to work 2 repeats of A.1 vertically/in height you work the entire diagram once, then begin again at the start and work the entire diagram one more time.

Chain stitches are slightly narrower than other stitches and to avoid working the cast-on edge too tight, we simply chain more stitches to begin with. The stitch count will be adjusted on the following row to fit the pattern and measurement sketch.

The rib edge is more elastic and will contract slightly compared to, for example, stocking stitch. By increasing before the rib edge, you avoid a visible difference in width between the rib edge and the rest of the body.

It’s very easy to cast off too tightly, and by making yarn overs while casting off (and simultaneously casting these off) you avoid a too tight cast off edge.

See DROPS video: How to bind off with yarn overs (yo)

To achieve an even increase (or decrease) you can increase on, for example: every 3rd and 4th row alternately, like so: work 2 rows and increase on the 3rd row, work 3 rows and increase on the 4th. Repeat this until the increase is complete.

See DROPS lesson: Increase or decrease 1 st on every 3rd and 4th row alternately

Should you prefer to work in the round instead of back and forth, you may of course adjust the pattern. You’ll need to add steeks mid-front (usually 5 stitches), and follow the instructions. When you would normally turn and work from the wrong side, simply work across the steek and continue in the round. At the end you’ll cut the piece open, pick up stitches to work bands, and cover the cut edges.

See DROPS video: How to knit steeks and cut open

Should you prefer to work back and forth instead of in the round, you may of course adjust the pattern so you work the pieces separately and then assemble them at the end. Divide the stitches for the body in 2, add 1 edge stitch in each side (for sewing) and work the front and back pieces separately.

See DROPS lesson: Can I adapt a pattern for circular needles into straight needles?

Pattern repeats can vary slightly in the different sizes, in order to get the correct proportions. If you’re not working the exact same size as the garment in the photo, yours might deviate slightly. This has been carefully developed and adjusted so that the complete impression of the garment is the same in all sizes.

Make sure to follow instructions and diagrams for your size!

If you have found a pattern you like which is available in women’s size it’s not very difficult to convert it to men’s size. The biggest difference will be the length of sleeves and body. Start working on the women size that you think would fit across the chest. The additional length will be worked right before you cast off for the armhole/sleeve cap. If the pattern is worked top-down you can add the length right after the armhole or before the first decrease on sleeve.

Regarding additional yarn amount, this will depend on how much length you add, but it is better with a skein too many than too few.

All yarns will have excess fibres (from production) that might come off as lint or shedding. Brushed yarns (ie hairier yarns) have more of these loose, excess fibres, causing more shedding.

Shedding also depends on what is worn under or over the garment, and whether this pulls at the yarn fibres. It’s therefore not possible to guarantee that there will be no shedding

Below are some tips on how to get the best result when working with hairier yarns:

1. When the garment is finished (before you wash it) shake it vigorously so the looser hairs come off. NOTE: do NOT use a lint roller, brush or any method that pulls at the yarn.

2. Place the garment in a plastic bag and put it in your freezer - the temperature will cause the fibres to become less attached to each other, and excess fibres will come off easier.

3. Leave in the freezer for a few hours before taking it out and shaking it again.

4. Wash the garment according to the instructions on the yarn label.

Pilling is a natural process that happens to even the most exclusive of fibers. It's a natural sign of wear and tear that is hard to avoid, and that is most visible in high friction areas of your garment like a sweater's arms and cuffs.

You can make your garment look as new by removing the pilling, using a fabric comb or a pill/lint remover.

Still can't find the answer you need? Then scroll down and leave your question so one of our experts can try to help you. This will be done normally within 5 to 10 working days.
In the meantime, you can read the questions and answers that others have left to this pattern or join the DROPS Workshop on Facebook to get help from fellow knitters/crocheters!

You might also like...

Island Dream

jurgita17

Island Dream

Yarnveiled, Netherlands

Island Dream

Bodil, Sweden

Post a comment to pattern DROPS 190-42

We would love to hear what you have to say about this pattern!

If you want to leave a question, please make sure you select the correct category in the form below, to speed up the answering process. Required fields are marked *.

Comments / Questions (21)

country flag Patricia wrote:

¿Cuantos puntos debo restar para tejer talla XS?

28.07.2023 - 06:50

DROPS Design answered:

Hola Patricia, no hay un cálculo fijo para obtener una talla más pequeña. Puedes leer la siguiente lección sobre cómo calcular un patrón https://www.garnstudio.com/lesson.php?id=25&cid=23; si tienes la misma tensión que la indicada puedes obtener los números a montar a partir de los cm necesarios para tu talla. Para calcular el patrón deberás usar reglas de tres.

29.07.2023 - 16:36

country flag Françoise wrote:

Bonjour dans l’explication du devant droit il est indiqué < rabattre pour l'encolure les 15-16-16-16-16-17 premières mailles sur l'endroit et terminer chaque épaule séparément.> or il me semble qu’il n’y a q’une épaule sur le devant droit . Est-ce une erreur: un copier collé des explications du dos? Ou doit on suivre la suite des diminutions qui sont les mêmes qu’au dos?

02.07.2023 - 21:29

country flag Françoise wrote:

Bonjour dans l’explication du devant droit il est indiqué < rabattre pour l'encolure les 15-16-16-16-16-17 premières mailles sur l'endroit et terminer chaque épaule séparément.> or il me semble qu’il n’y a q’une épaule sur le devant droit . Est-ce une erreur: un copier collé des explications du dos? Ou doit on suivre la suite des diminutions qui sont les mêmes qu’au dos?

01.07.2023 - 11:09

DROPS Design answered:

Bonjour Françoise, il s'agit effectivement d'une erreur, qui sera corrigée dès que possible, mais ne prenez pas cette info en compte ici, naturellement, vous n'avez qu'une seule épaule ici. Vous continuez à former l'emmanchure comme indiqué précédemment (comme pour le dos) et formez en même temps l'encolure de l'autre côté. Bonne continuation!

03.07.2023 - 09:54

country flag Angèle wrote:

Bonjour Lorsque vous dîtes rabattre 0 fois 3 mailles, 1 fois 2 mailles et 1 fois 1 maille. Faut-il tricoter le rang sans rabattre ou commencer directement en rabattant 1 x 2 mailles. Merci pour votre retour.

13.06.2023 - 15:09

DROPS Design answered:

Bonjour Angèle, en taille S, on ne rabat pas les 3 mailles, on rabat directement 1 fois 2 mailles puis 1 fois 1 maille. Bon tricot!

13.06.2023 - 16:07

country flag Grace wrote:

How do the decreases for the armholes on the back section work? Do you do all of the cast-offs on the same row, consecutive rows, or every other row? For reference, I am making the size S.

25.06.2022 - 05:43

DROPS Design answered:

Dear Grace, the decreases are worked at the beginning of every row. So, you cast off 3 stitches at the beginning of the row on the RS and on the next row you cast off 3 stitches at the beginning of the row on the WS, e.t.c. Happy knitting!

26.06.2022 - 13:22

country flag Shubhangi Kundu wrote:

Hello! In the row marked with an arrow, we are supposed to make an increase or a decrease, but that depends on the adjustment that's supposed to be made. As in, for size L, the 191 stiches are to be adjusted to 190. We minus 10 band stitches so we have 181 sts. Now do we subtract 181 from 190 or 190 from 191? The first case will require an increase of 9 whereas the second case will require a decrease of 1. Which one of the cases is to be followed for size L?

20.02.2022 - 17:29

DROPS Design answered:

Hi Shubhangi Kundu, in your size you should decrease 1 stitch. Happy knitting!

20.02.2022 - 18:40

country flag Natalie wrote:

Hi! For the spacing of the buttonholes, I am wondering where on the piece I should be measuring from (e.g from the band stitches, the longest part of the scalloped edge, or the shorter part of the scalloped edge)? I know it should be when the piece measures 7cm, but would love to know where I should be measuring from. Thanks so much, love the pattern!

23.01.2022 - 08:58

DROPS Design answered:

Hi Natalie, You measure from the longest point, so the bottom of the scallops. Happy knitting!

24.01.2022 - 08:03

country flag Anneli wrote:

Hei på forstykket og felling til hals, stemmer ikke maskeantaller! Vi skal jo ha 70 masker og felle 15 m(minste str) så skal vi ha 11 masker igjen etter å ha felt-får flere masker igjen! Vet ikke hvor det er feil...

06.09.2021 - 15:53

country flag Isuri wrote:

What does the pattern refer to as "bands"?

23.08.2021 - 20:56

DROPS Design answered:

Dear Isuri, the pattern refer the button and button-hole bands as "bands". Happy Stitching!

24.08.2021 - 03:26

country flag Susana wrote:

Hola, me gustaria si me podes explicar las disminuciones en las sisas,no entiendo eso de 5_5_7_7_ veces. Gracias

22.08.2021 - 23:25

DROPS Design answered:

Hola Susana, cada número hace referencia a su correspondiente talla. Los patrones están escritos para diferentes tallas a la vez, por lo que se separan con guiones las instrucciones en cada talla. Por ejemplo, se trabaja 5 veces para la talla S (la primera del patrón), 5 veces para la talla M, 7 para la talla L, y así sucesivamente.

23.08.2021 - 13:33