
Popular categories
Looking for a yarn?


Comments / Questions (35)
![]() Alena wrote:
Alena wrote:
Návod je podle mě nesrozumitelný. Pletu XXL, mám 180 ok, prv ní dírky,nad tím řadu hladce a fakt nevím, jak přidávat ?
16.05.2026 - 23:52
![]() Merete Sandø Wils wrote:
Merete Sandø Wils wrote:
Diagrammet A1.a er vendt på hovedet
06.05.2026 - 21:13DROPS Design answered:
Hej Merethe, hvilket mønster er det du savner? Blusen strikkes oppefra MEN diagrammet strikkes nedefra!!
07.05.2026 - 11:22
![]() Merete Sandø Wils wrote:
Merete Sandø Wils wrote:
Hvorfor er der ændret i diagrammet i forhold til den model I viser? De 2 øverste mønster er ikke i diagrammet??
05.05.2026 - 20:12DROPS Design answered:
Hej Merete, jo de er med. Du starter nederst i diagram A.1a, 3.pind (nedefra) er den øverste hulrække i halsudskæringen osv :)
06.05.2026 - 07:42
![]() Merete Sandø Wils wrote:
Merete Sandø Wils wrote:
Hvorfor er der ændret i diagrammet i forhold til den model I viser? De 2 øverste mønster er ikke i diagrammet??
02.05.2026 - 22:00DROPS Design answered:
Hei Merete. Jo, selv om denne toppen strikkes ovenfra og ned, leser man diagrammene som vanlig. Man leser et strikkediagram fra høyre mot venstre, nedenfra og opp. Du begynner altså nederst i det høyre hjørnet, og jobber deg mot venstre og oppover. På denne toppen strikker man først etter diagram A.1a. Der økes det også 6 ganger, se pilene i diagrammet, deretter strikker man etter diagram A.1b, der det økes 4-6 ganger. mvh DROPS Design
04.05.2026 - 13:14
![]() Andrea wrote:
Andrea wrote:
M-es méretnél a borda után 144 szem a munka. Az 1. szaporításnál 12 szem, akkor 156 kéne legyen a munka. A leírásban 168 szem szerepel. Mi a helyes? a szaporítás vagy a teljes szemszám? Köszönöm, ha segítenek!
21.04.2026 - 11:52
![]() Ewa wrote:
Ewa wrote:
Ten sam wzór jest na zdjęciu z młodą modelką ( bluzka z długim rękawem). W komentarzach pod tamtym opisem wzoru osoba z Norwegii napisała że wszystko się psuje przy 34 rzędzie. Jest jakieś przesunięcie o jedno oczko. Pytała też czy przesunięty jest tylko ten rząd i jak robić dalej. Mnie też tak wygląda, ale ja jestem początkująca. Niestety odpowiedź była nieprecyzyjna. W odpowiedzi napisaliście żeby korzystać z wzoru A1b. Wdzięczna będę za poprawienie wzoru.
04.04.2026 - 17:45
![]() Ewa wrote:
Ewa wrote:
Odpisałam na Waszą odpowiedź. I co? I nic. Nawet tego nie widać.
03.04.2026 - 14:28DROPS Design answered:
Witaj Ewo, niestety nie widać. Nie wiem co mogło się stać. Możesz przesłać swoje uwagi na email poland@dropsproject.com?
03.04.2026 - 22:22
![]() Ewa wrote:
Ewa wrote:
Ten wzór ma błędy w górnej części wzoru 1a.
31.03.2026 - 20:32DROPS Design answered:
Witaj Ewo, proszę napisz jeszcze w którym rzędzie/rzędach i w których rozmiarach?
31.03.2026 - 22:10
![]() Jytte wrote:
Jytte wrote:
Kan man forhøje nakken efter bærestykket?
15.07.2025 - 17:15DROPS Design answered:
Hei Jytte. Det kan du fint gjøre. Avgjør selv om du vil ha det i glattstrikk eller riller. mvh DROPS Design
04.08.2025 - 14:15
![]() Marie Die wrote:
Marie Die wrote:
Ich habe das Shirt für meine Mutter in einer Merinowolle gestickt. Es war mein erstes Werk mit einer Rundpasse. Anfangs hatte ich ein Problem mit der Strickschrift. Aber es hilft sehr auch die Tipps zu lesen. Vielen Dank für die tolle Anleitung.
05.08.2024 - 11:37
|
||||||||||||||||||||||
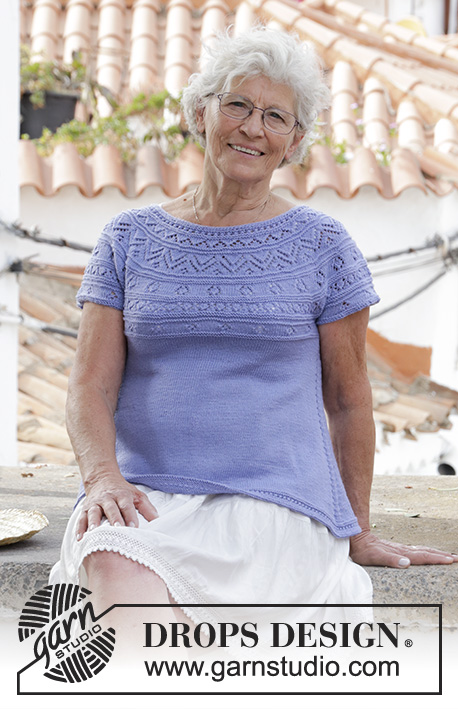
Taormina Top#taorminatop |
||||||||||||||||||||||
 |
 |
|||||||||||||||||||||
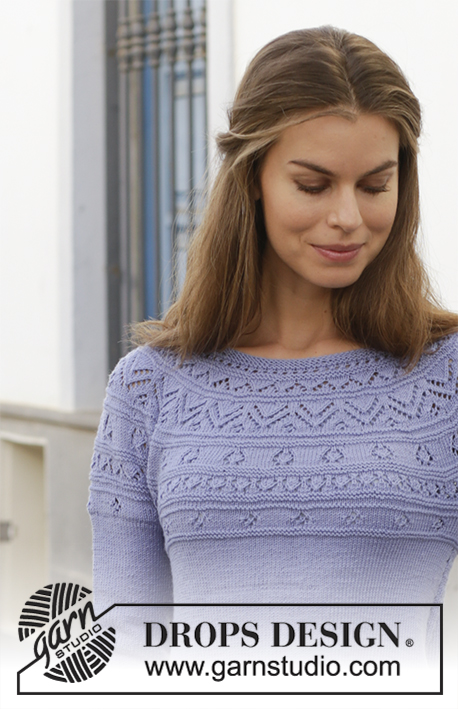
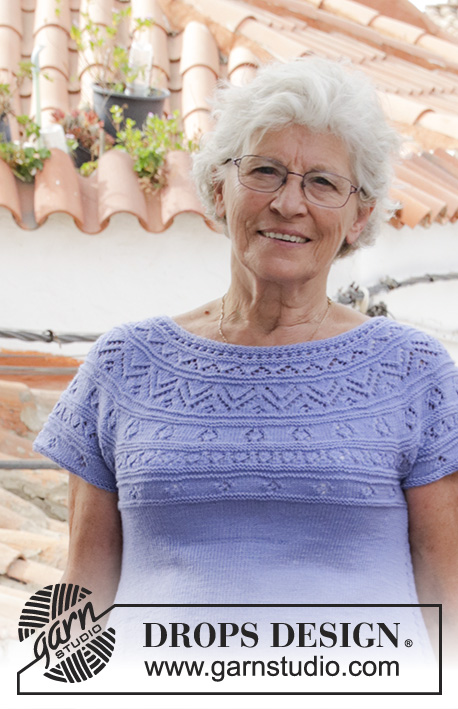
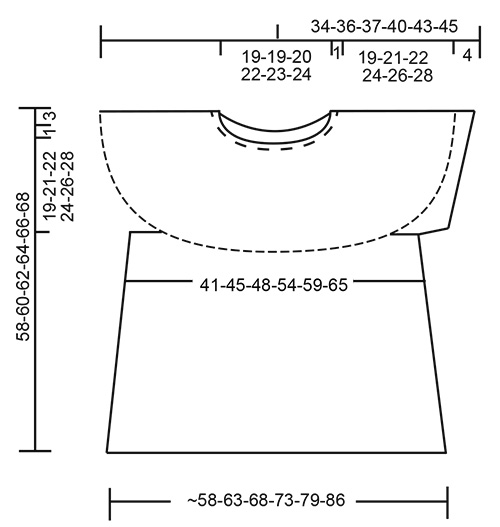
Knitted top with lace pattern, round yoke and short sleeves, worked top down. Sizes S - XXXL. The piece is worked in DROPS BabyMerino.
DROPS 186-37 |
||||||||||||||||||||||
|
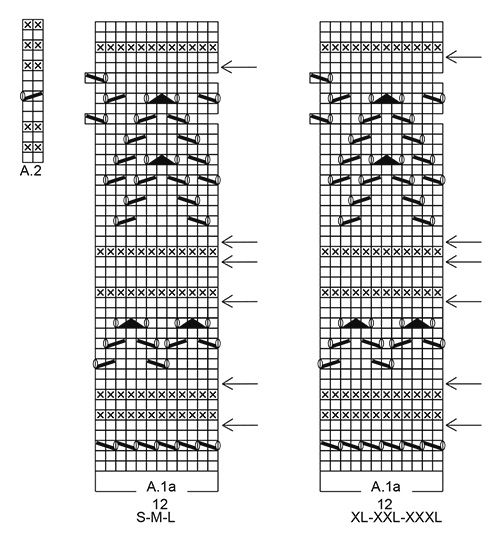
INFORMATION FOR THE PATTERN: RIDGE/GARTER STITCH (worked in the round): 1 ridge = 2 rounds. Knit 1 round and purl 1 round PATTERN: See diagrams A.1 and A.2. Choose diagram for your size (applies to A.1). INCREASE TIP-1 (for increases on yoke): To work out how to increase evenly, count the total number of stitches on the needle (e.g. 116 stitches) and divide by the number of increases to be made (e.g. 16) = 7.25. In this example, increase by making 1 yarn over after approx. every 7th stitch. On the next round, work the yarn overs twisted into the pattern to avoid holes. INCREASE TIP-2 (for increases on body): Work until there are 2 stitches left before the marker thread, 1 yarn over, knit 4 stitches (the marker thread sits in the middle of these 4 stitches), 1 yarn over (= 2 stitches increased), increase like this at both marker threads (= a total of 4 stitches increased). The yarn overs are not worked twisted on the next round, there will be holes. ---------------------------------------------------------- TOP: The yoke and body are worked in the round, top down. The short sleeves are worked in the round with double pointed needles. YOKE: Cast on 116-120-126-132-139-144 stitches with circular needle size 2.5 mm / US 1.5 and BabyMerino. The round starts mid back. Work 2 RIDGES – see description above. Knit 1 round and increase 16-24-30-36-41-36 stitches evenly on round – read INCREASE TIP-1 = 132-144-156-168-180-180 stitches. Purl 1 round (the yarn overs are worked twisted to avoid holes). REMEMBER THE GAUGE! Change to circular needle size 3 mm / US 2.5. Work A.1a (= 12 stitches) in the round over all stitches (= 11-12-13-14-15-15 times in width) Continue the pattern like this AT THE SAME TIME as you increase evenly on the rounds marked with an arrow in diagram A.1 as follows: Each time you increase 12 stitches, work A.1 one more time in width. Each time you increase 24 stitches, work A.1 two more times in width. Each time you increase 36 stitches, work A.1 three more times in width. INCREASE 1: Increase 24-24-24-24-24-36 stitches = 156-168-180-192-204-216 stitches. INCREASE 2: Increase 24-24-24-24-24-36 stitches = 180-192-204-216-228-252 stitches. INCREASE 3: Increase 24 stitches = 204-216-228-240-252-276 stitches. INCREASE 4: Increase 24 stitches = 228-240-252-264-276-300 stitches. INCREASE 5: Increase 24 stitches = 252-264-276-288-300-324 stitches. INCREASE 6: Increase 24 stitches = 276-288-300-312-324-348 stitches. When A.1a has been worked 1 time in height, the piece measures approx. 14 cm / 5½" from the neck edge. Now work A.1b over A.1a and the increases continue as follows: INCREASE 7: Increase 12-24-24-24-24-24 stitches = 288-312-324-336-348-372 stitches. INCREASE 8: Increase 12-12-24-24-24-24 stitches = 300-324-348-360-372-396 stitches. INCREASE 9: Increase 12-12-24-24-24-24 stitches = 312-336-372-384-396-420 stitches. INCREASE 10: Increase 12-12-12-12-24-24 stitches = 324-348-384-396-420-444 stitches. The increases are now finished in sizes S, M and L, but continue in sizes XL, XXL and XXXL as follows: INCREASE 11: Increase 12-24-24 stitches = 408-444-468 stitches. INCREASE 12: Increase 12-12-24 stitches = 420-456-492 stitches. ALL SIZES: = 324-348-384-420-456-492 stitches (A.1b is now repeated 27-29-32-35-38-41 times in width). Work pattern until the piece measures 20-22-23-25-27-29 cm / 8"-8¾"-9"-9¾"-10½"-11½" from the cast-on edge. Now divide the piece for body and sleeves as follows: (The stitches which do not fit into the pattern are knitted when the stitches are knitted and purled when the stitches are purled). Work pattern as before over the first 44-49-53-60-66-73 stitches (= half back piece), place the next 74-76-86-90-96-100 stitches on a thread for sleeves, cast on 10 new stitches on the needle (= side under the sleeve), insert 1 marker thread in the middle of the new stitches, work pattern as before over the next 88-98-106-120-132-146 stitches (= front piece), place the next 74-76-86-90-96-100 stitches on a thread for sleeve, cast on 10 new stitches on the needle (= side under the sleeve), insert 1 marker thread in the middle of the new stitches, work pattern as before over the last 44-49-53-60-66-73 stitches (= half back piece). Body and sleeves are finished separately. THE PIECE IS NOW MEASURED FROM HERE! BODY: = 196-216-232-260-284-312 stitches. Continue to work pattern; the stitches which do not fit into the pattern under the sleeves are knitted when the stitches are knitted and purled when the stitches are purled. When A.1b has been worked 1 time in height, the piece measures approx. 27-27-27-30-30-30 cm / 10½"-10½"-10½"-11¾"-11¾"-11¾". Continue working in stockinette stitch. On the next round increase 1 stitch on each side of each marker thread – read INCREASE TIP-2! Increase like this every 4th round until the piece measures 32-32-33-33-33-33 cm / 12½"-12½"-13"-13"-13"-13" from where the body and sleeves were divided = approx. 276-300-324-348-380-412 stitches. Change to circular needle size 2.5 mm / US 1.5. Work A.2 in the round over all stitches. When A.2 has been worked 1 time in height, the piece measures approx. 35-35-36-36-36-36 cm / 13¾"-13¾"-14¼"-14¼"-14¼"-14¼" from where the body and sleeves were divided and approx. 55-57-59-61-63-65 cm / 21⅝"-22½"-23¼"-24"-24¾"-25½" from the neck edge. Bind off (make sure you bind off loosely; you can use a needle 1 size larger if necessary). SLEEVE EDGE: The piece is worked in the round with double pointed needles. Place the 74-76-86-90-96-100 stitches from the thread on the one side of the piece on double pointed needles size 3 mm / US 2.5 and knit up 1 stitch in each of the 10 stitches cast on under the sleeve = 84-86-96-100-106-110 stitches. Continue with A.1b over the stitches which fit into the pattern; the stitches which do not fit into the pattern under the sleeve are purled when the stitches are purled and knitted when the stitches are knitted. When the sleeve measures 3 cm / 1" from where it was divided from the body (adjust so that you finish neatly in relation to the pattern) change to double pointed needles size 2.5 mm / US 1.5 and work 2 ridges. Then bind off, make sure you bind off loosely; you can use a needle 1 size larger if necessary. Work the other sleeve edge in the same way. |
||||||||||||||||||||||
Diagram explanations |
||||||||||||||||||||||
|
||||||||||||||||||||||
 |
||||||||||||||||||||||
 |
||||||||||||||||||||||
 |
||||||||||||||||||||||
Have you finished this pattern?Tag your pictures with #dropspattern #taorminatop or submit them to the #dropsfan gallery. Do you need help with this pattern?You'll find 23 tutorial videos, a Comments/Questions area and more by visiting the pattern on garnstudio.com. © 1982-2026 DROPS Design A/S. We reserve all rights. This document, including all its sub-sections, has copyrights. Read more about what you can do with our patterns at the bottom of each pattern on our site. |
||||||||||||||||||||||


With over 40 years in knitting and crochet design, DROPS Design offers one of the most extensive collections of free patterns on the internet - translated to 17 languages. As of today we count 325 catalogs and 12298 patterns - 12288 of which are translated into English (US/in).
We work hard to bring you the best knitting and crochet have to offer, inspiration and advice as well as great quality yarns at incredible prices! Would you like to use our patterns for other than personal use? You can read what you are allowed to do in the Copyright text at the bottom of all our patterns. Happy crafting!
Post a comment to pattern DROPS 186-37
We would love to hear what you have to say about this pattern!
If you want to leave a question, please make sure you select the correct category in the form below, to speed up the answering process. Required fields are marked *.