
Popular categories
Looking for a yarn?


Comments / Questions (65)
![]() Vera wrote:
Vera wrote:
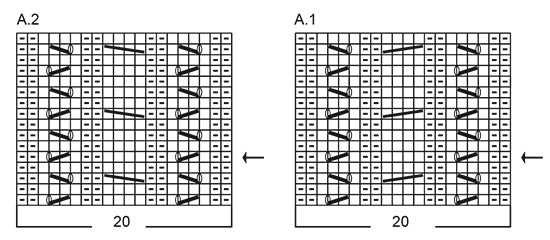
Bei A1 bzw A2 fehlen da nicht noch 2 Reihen also 17+18 damit immer 5 Reihen zwischen den Zöpfen sind? Lg Vera
16.03.2018 - 12:51DROPS Design answered:
Liebe Vera, wenn A.1 und A.2 einmal in der Höhe gestrickt wurden, die Diagramme von der Pfeil wiederholen, damit die Zöpfe in der Höhe stimmen (= 5 Reihen zwischen den Zöpfen). - siehe auch Diagram Text. Viel Spaß beim stricken!
16.03.2018 - 14:25Vera wrote:
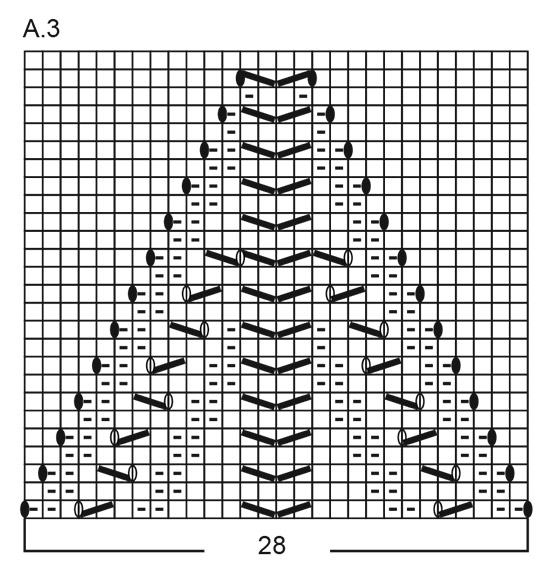
I am knitting it right now, I faced a problem :in the middle of A3 there are 2signs knit together without YO, but on the next round the number of stitches above them is the same, how can this be?
15.03.2018 - 11:25DROPS Design answered:
Dear Vera, you dec 2 sts in the middle of A.3 and increase with 1 YO (worked twisted on next round to avoid hole) at the beg/end of the pattern (= black oval symbol, ie before and after stocking st sections), so that number of sts will remain the same, there will be no decrease but pattern section will decrease by and by to the end of A.3. Happy knitting!
15.03.2018 - 13:10
![]() Lone Bang wrote:
Lone Bang wrote:
Hej. Jeg er gået igang med at strikke " Madrid" -Under Udtagningstips -1 står der at ikke tages ud over forkanterne - vil det sige at det kun er på halvdelen / bagstykket der skal tages ud ? hilsen Lone
14.03.2018 - 07:52DROPS Design answered:
Hej Lone, nej det er kun de yderste kanter der ikke tages ud over. God fornøjelse!
14.03.2018 - 15:51
![]() Marie Barot wrote:
Marie Barot wrote:
Bonjour et merci pour ce très joli modèle. Quelle est la taille que porte votre mannequin plus âgée ?
04.03.2018 - 08:36DROPS Design answered:
Bonjour Mme Barot, les 2 mannequins portent la même taille, soit une taille M. Bon tricot!
04.05.2018 - 11:50Alejandra wrote:
Cuando estara disponible en Español??
02.03.2018 - 13:02DROPS Design answered:
Hola Alejandra. El 188-19 estará disponible a partir del martes.
04.03.2018 - 16:57Alejandra wrote:
Cuando estara disponible en Español??
02.03.2018 - 13:01DROPS Design answered:
Ver la respuesta arriba
04.03.2018 - 16:59
![]() Yvonne wrote:
Yvonne wrote:
Super ! Bedankt, ik ga er meteen aan beginnen!
02.03.2018 - 12:27
![]() Susanne wrote:
Susanne wrote:
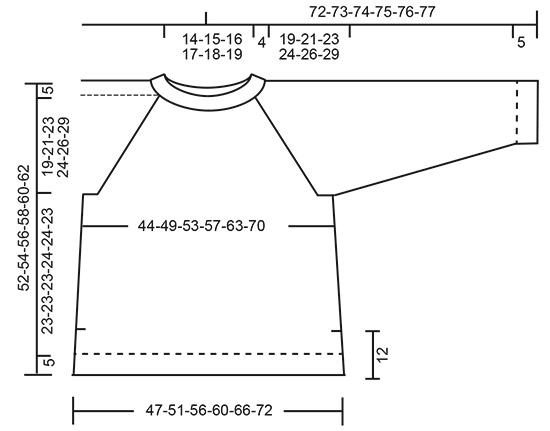
Kommer der en måle skitse til denne opskrift, så jeg ved hvilken str. jeg skal strikke den i?
01.03.2018 - 22:22DROPS Design answered:
Hej Susanne, måleskitsen ligger aller nederst i opskriften. God fornøjelse!
06.03.2018 - 16:04
![]() Monica wrote:
Monica wrote:
Salve, è un bellissimo modello, ma come mai in calce alle istruzioni non c'è lo schema della maglia con tutte le misure?
01.03.2018 - 19:56DROPS Design answered:
Buonasera Monica. Segnaleremo la mancanza di alcuni diagrammi e dello schema con le misure alla casa madre. La ringraziamo per la segnalazione. Buon lavoro!
01.03.2018 - 23:17
![]() Anna Lundström wrote:
Anna Lundström wrote:
Fantastiskt fin modell. Vill sticka
28.02.2018 - 10:03
|
||||||||||||||||||||||||||||
Madrid#madridsweater |
||||||||||||||||||||||||||||
 |
 |
|||||||||||||||||||||||||||
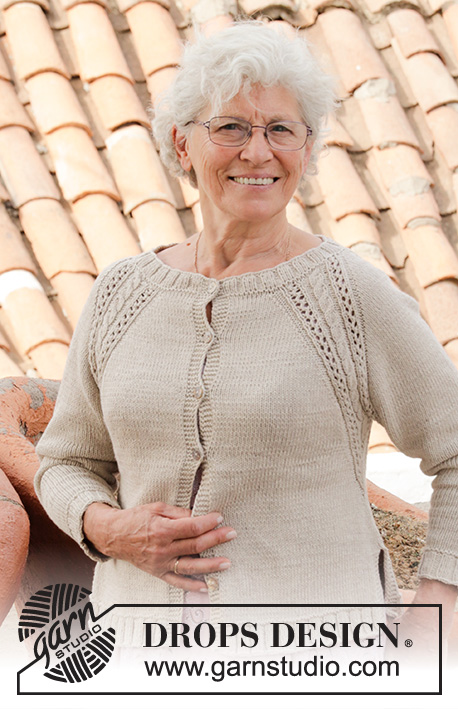
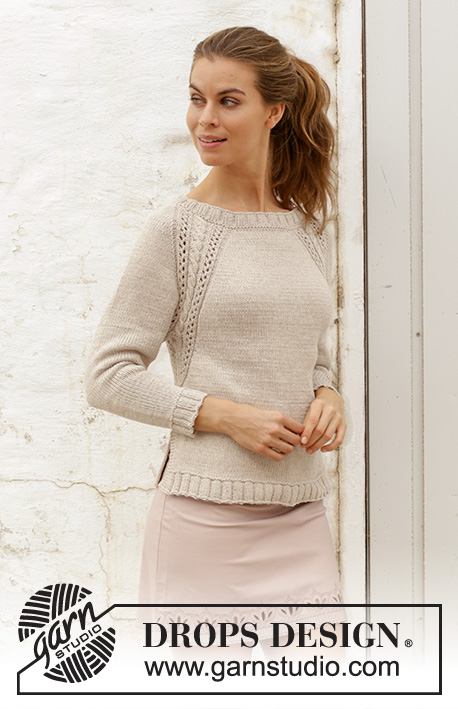
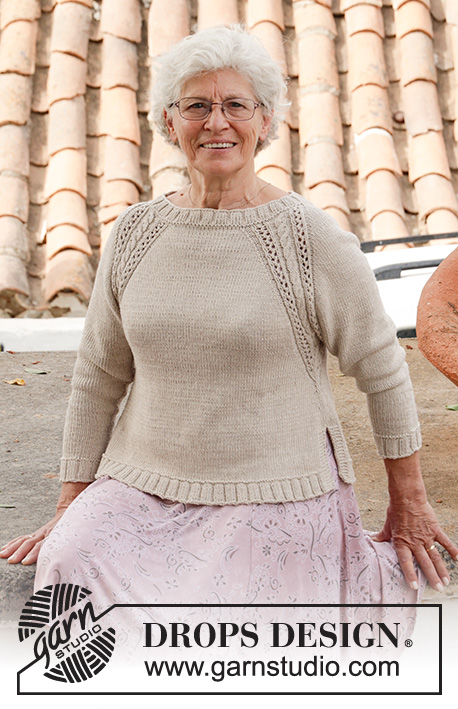
Knitted sweater with raglan, cables, lace pattern and split in sides, worked top down. Sizes S - XXXL. The piece is worked in DROPS Cotton Light.
DROPS 188-19 |
||||||||||||||||||||||||||||
|
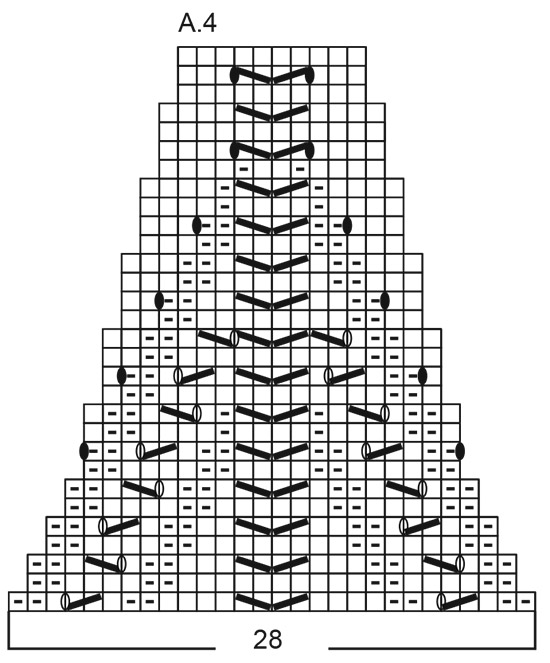
INFORMATION FOR THE PATTERN: RIDGE/GARTER STITCH (worked in the round): 1 ridge = 2 rounds. Knit 1 round and purl 1 round. RIDGE/GARTER STITCH (worked back and forth): 1 ridge = Knit 2 rows. PATTERN: See diagrams A.1 to A.4. The diagrams show all the rows in the pattern seen from the right side. RAGLAN: Increase 1 stitch on each side of each repeat of A.1/A.2 (= 8 stitches increased on the round). Increase 1 stitch by making 1 yarn over. On the next round knit the yarn overs twisted to avoid holes. INCREASE TIP-1 (evenly spaced): To work out how to increase evenly, count the total number of stitches on the needle (e.g. 110 stitches), and divide by the number of increases to be made (e.g. 4) = 27.5. In this example, increase alternately after every 27th and 28th stitch. Increase with a yarn over after the stitch and work the yarn over twisted on the next row to avoid a hole. INCREASE TIP-2 (for sides): All increases are made from the right side! Work until there are 2 stitches left before the marker thread, 1 yarn over, knit 4 (the marker sits in the middle of these 4 stitches), 1 yarn over. On the next round knit the yarn overs twisted to avoid holes. DECREASE TIP (for sleeves): Decrease 1 stitch on each side of the marker thread as follows: Work until there are 2 stitches left before the marker thread, knit 2 stitches together, (marker thread sits here), slip 1 stitch as if to knit, knit 1, pass the slipped stitch over. ---------------------------------------------------------- SWEATER: The piece is worked in the round with circular needle, top down as far as the split at the bottom of the body. Then the front and back pieces are finished separately back and forth. The sleeves are worked in the round with double pointed needles/ short circular needle. NECK: Cast on 110-115-120-125-135-145 stitches with circular needle size 3.5 mm / US 4 and Cotton Light. Knit 1 round. Then work rib (knit 3 / purl 2) for 4 cm / 1½". Work 1 RIDGE – see description above, where on the first round you increase 4-7-10-9-11-17 stitches evenly – read INCREASE TIP-1 (evenly spaced) = 114-122-130-134-146-162 stitches. YOKE: Change to circular needle size 4 mm / US 6. Insert a marker here. THE PIECE IS NOW MEASURED FROM HERE! Work pattern as follows: Knit 8-10-12-13-16-20 stitches (= half back piece), make 1 yarn over, A.1 (= 20 stitches), 1 yarn over, knit 1 (= sleeve), 1 yarn over, A.2 (= 20 stitches), 1 yarn over, knit 16-20-24-26-32-40 stitches (= front piece), 1 yarn over, A.1, 1 yarn over, knit 1 (= sleeve), 1 yarn over, A.2, 1 yarn over, knit 8-10-12-13-16-20 stitches (= half back piece). The first increase to RAGLAN – see description above, is now finished. Continue the pattern like this and increase every 2nd round a total of 24-27-30-33-36-39 times = 306-338-370-398-434-474 stitches. REMEMBER THE KNITTING GAUGE. When all the increases to raglan are finished, the piece measures 17-19-21-24-26-28 cm / 6¾"-7½"-8¼"-9½"-10¼"-11". Continue pattern without increasing until the piece measures 19-21-23-24-26-29 cm / 7½"-8¼"-9"-9½"-10¼"-11½". The next round is worked as follows: Knit 32-37-42-46-52-59 stitches, work the next 6 stitches in pattern as before, purl 2, knit 2 (= half back piece), place the next 69-75-81-87-93-99 stitches on a thread (= sleeve), cast on 8 new stitches on the needle (= side under sleeve), knit 2, purl 2, work the next 6 stitches in pattern as before, knit 64-74-84-92-104-118 stitches, work the next 6 stitches in pattern as before, purl 2, knit 2 (= front piece), place the next 69-75-81-87-93-99 stitches on a thread (= sleeve), cast on 8 new stitches on the needle (= side under sleeve), knit 2, purl 2, work the next 6 stitches in pattern as before, knit 32-37-42-46-52-59 stitches (= half back piece). THE PIECE IS NOW MEASURED FROM HERE! BODY: = 184-204-224-240-264-292 stitches. Insert 1 marker thread in each side, in the middle of the new stitches cast on. Continue in the round with knit and A.3 (= 28 stitches) over the 8 new stitches cast on under the sleeves + 10 stitches on each side of these (i.e. 14 stitches on each side of the marker thread in each side). When A.3 has been completed in height, the piece measures 9 cm / 3½". Continue in the round with knit and on the next round increase 1 stitch on each side of the marker thread in each side – read INCREASE TIP-2 (for sides)! Increase like this every 3 cm / 1" a total of 3 times = 196-216-236-252-276-304 stitches. Continue with knit until the piece measures 16-16-16-17-17-16 cm / 6¼"-6¼"-6¼"-6¾"-6¾"-6¼". Now divide the piece into front and back pieces, which are finished separately back and forth. Place the one set of 98-108-118-126-138-152 stitches between the marker threads on a thread for the front piece and work the back piece as follows: BACK PIECE: = 98-108-118-126-138-152 stitches. Work stockinette stitch with 5 stitches garter stitch in each side. When the piece measures 23-23-23-24-24-23 cm / 9"-9"-9"-9½"-9½"-9" increase 30-30-30-37-40-41 stitches evenly on row (but not over the stitches in garter stitch) = 128-138-148-163-178-193 stitches. Change to circular needle size 3.5 mm / US 4. Work 1 ridge. Work rib from the right side as follows: 5 stitches in garter stitch, (knit 3 / purl2) until there are 8 stitches left on the row, knit 3, 5 stitches in garter stitch. Continue like this until the rib measures 5 cm / 2". Bind off with knit over knit and purl over purl. To avoid the bind-off edge being tight you can make a yarn over after approx. every 5th stitch. The yarn over is bind off as a normal stitch. The piece measures a total of 52-54-56-58-60-62 cm / 20½"-21¼"-22"-22¾"-23⅝"-24⅜" from the shoulder down. FRONT PIECE: = 98-108-118-126-138-152 stitches. Place the other set of stitches back on circular needle size 4 mm / US 6 and work in the same way as for the back piece. SLEEVE: Place the 69-75-81-87-93-99 stitches from the thread on the one side of the piece onto double pointed needles/short circular needle size 4 mm / US 6 and, in addition, knit up 1 new stitch in each of the 8 stitches cast on under the sleeve = 77-83-89-95-101-107 stitches. Insert a marker thread in the middle of the new stitches (= 4 new stitches on each side of the marker thread). Work A.4 (= 28 stitches) mid under the sleeve so that there are 14 stitches of A.4 on each side of the marker thread mid under sleeve. The remaining stitches on the round are worked knitted. When the whole of A.4 has been worked in height you have decreased 18 stitches = 59-65-71-77-83-89 stitches. Continue to decrease 2 stitches under the sleeve – read DECREASE TIP! Decrease like this every 10th-7th-6th-5th-4th-3rd round a total of 7-9-11-13-15-17 times = 45-47-49-51-53-55 stitches. Continue with knit until the sleeve measures 37-35-34-33-32-29 cm / 14½"-13¾"-13½"-13"-12½"-11½". Now increase 5-8-6-9-7-10 stitches evenly on round = 50-55-55-60-60-65 stitches. Change to double pointed needles size 3.5 mm / US 4. Work 1 ridge. Then work rib (knit 3 / purl 2) until the sleeve measures 42-40-39-38-37-34 cm / 16½"-15¾"-15¼"-15"-14½"-13½" from the division. Bind off with knit over knit and purl over purl. To avoid the bind-off edge being tight you can make a yarn over after approx. every 5th stitch. The yarn over is bind off as a normal stitch. Work the other sleeve in the same way. |
||||||||||||||||||||||||||||
Diagram explanations |
||||||||||||||||||||||||||||
|
||||||||||||||||||||||||||||
 |
||||||||||||||||||||||||||||
 |
||||||||||||||||||||||||||||
 |
||||||||||||||||||||||||||||
 |
||||||||||||||||||||||||||||
Have you finished this pattern?Tag your pictures with #dropspattern #madridsweater or submit them to the #dropsfan gallery. Do you need help with this pattern?You'll find 32 tutorial videos, a Comments/Questions area and more by visiting the pattern on garnstudio.com. © 1982-2026 DROPS Design A/S. We reserve all rights. This document, including all its sub-sections, has copyrights. Read more about what you can do with our patterns at the bottom of each pattern on our site. |
||||||||||||||||||||||||||||


With over 40 years in knitting and crochet design, DROPS Design offers one of the most extensive collections of free patterns on the internet - translated to 17 languages. As of today we count 324 catalogs and 12290 patterns - 12280 of which are translated into English (US/in).
We work hard to bring you the best knitting and crochet have to offer, inspiration and advice as well as great quality yarns at incredible prices! Would you like to use our patterns for other than personal use? You can read what you are allowed to do in the Copyright text at the bottom of all our patterns. Happy crafting!
Post a comment to pattern DROPS 188-19
We would love to hear what you have to say about this pattern!
If you want to leave a question, please make sure you select the correct category in the form below, to speed up the answering process. Required fields are marked *.