
Looking for a yarn?


Comments / Questions (9)
![]() Gabriele wrote:
Gabriele wrote:
Hallo, ich versuche sie Strickschrift seit 3 Tagen zu drucken,funktioniert nicht auch nicht bei meiner Freundin. Bitte senden sie mir doch die Strickschrift im pdfFormat. Dankeschön im Vorraus, Gabriele
21.12.2022 - 14:15DROPS Design answered:
Liebe Gabriele, wir könnten diese Anleitung ganz normal drucken - auf dem Knopf "drucken" drücken, um ein neues Fenster zu öffnen, dann können Sie entweder Ihren Drucker oder einen virtuellen Drucker (und als .PDF zu speichern) wählen - sonnst kann Ihnen gerne Ihr DROPS Händler damit helfen, die Anleitung Ihnen zu senden - fragen Sie ihm entweder per Telefon oder per E-Mail. Viel Spaß beim stricken!
21.12.2022 - 14:21
![]() Nelly wrote:
Nelly wrote:
Bonjour Pensez vous qu’il est possible de remplacer les mailles de bordure au point mousse par le point de côtés 1/1 afin que la bordure soit plus rigide ? ou alors de la faire après en reprenant les mailles et en supprimant 10 mailles au modèle ?
29.10.2022 - 04:08DROPS Design answered:
Bonjour Nelly, les deux sont probablement faisables, tout dépend du résultat que vous préférez. Bon tricot!
31.10.2022 - 08:26
![]() P Laurence wrote:
P Laurence wrote:
Bonjour, jai des difficultés avec le diagramme A3\r\n Lorsqu on effectue les 2 mailles ensemble puis les mailles glissées au centre, on diminue donc de 2 mailles. Au rang suivant, on décale les mailles envers vers le centre, je me retrouve avec 8 mailles centrales et non pas 10 .... quelque chose m\'échappe. Merc.i
27.08.2021 - 00:22DROPS Design answered:
Bonjour Laurence, A.3 se tricote sur les 8 mailles du milieu sous la manche + 10 mailles avant et 10 mailles après, le jeté au début et à la fin de A.3 va décaler le motif vers le centre et les diminutions au milieu de A.3 vont le diminuer - autrement dit, ces 28 mailles vont faire disparaître le motif en forme de pointe sur les côtés. Est-ce que ceci peut vous aider?
27.08.2021 - 08:06
![]() Mrs Harknett wrote:
Mrs Harknett wrote:
Why must patterns be top to bottom. In England we knit from bottom to top. Very confusing also why round needles when we use two needles
29.11.2020 - 13:43DROPS Design answered:
Dear Mrs Harknett, Working a garment top-down provides more flexibility and room for personal adjustment. For example it is easier to try the garment on while working, as well as making adjustments to length of yoke and shoulder caps. The instructions are carefully explaining every step, in the correct order. Diagrams are adjusted to the knitting direction and are worked as usual. About the needles, we usually use round needles since they're more comfortable to work with when there is a large amount of stitches and because it allows us to work without seams, all in one piece. Happy knitting!
29.11.2020 - 18:23
![]() MAMA ULI wrote:
MAMA ULI wrote:
Nach Muster A. 3 habe ich 24 Maschen zu wenig. Wo ist der Fehler? Im Muster werden 36 Maschen abgenommen und seitlich anschließend 12 zugenommen. Ich komme nie und nimmer auf 226 Maschen in Größe M.
16.05.2020 - 16:15DROPS Design answered:
Liebe Mama Uli, in A.3 werden keine Maschen zugenommen, aber es wird nach A.3 1 Masche beidseitig jeder Markierung auf beiden Seiten zugenommen = 4 Maschen x 3 = 12 Maschen + 214= 226 Maschen. Viel Spaß beim stricken!
18.05.2020 - 08:11
![]() Mhvaurs wrote:
Mhvaurs wrote:
Pour la taille xl le patron n est pas juste après les cotes il manque pas de maille pour continuer . C est une déception !
21.05.2019 - 16:41DROPS Design answered:
Bonjour Mhvaurs, après le col, vous avez 144 m (on a augmenté 6 m à la fin des côtes) et vous tricotez ainsi: 5 mailles point mousse, 13 m jersey (= devant gauche), 1 jeté, A.1 (= 20 m), 1 jeté, 1 m jersey (= manche), 1 jeté, A.2 (= 20 m), 1 jeté, 26 m jersey (= dos), 1 jeté, A.1 (= 20 m), 1 jeté, 1 m jersey (= manche), 1 jeté, A.2 (= 20 m), 1 jeté, 13 m jersey, 5 mailles point mousse (= devant droit) soit: 5+12+(1) +20 +(1)+1+(1)+ 20 + (1)+26+(1) + 20 + (1)+1+(1) + 20 + (1)+13+5= 144 m + (8) jetés = 152 m après ce rang. Bon tricot!
22.05.2019 - 09:48
![]() Barbara wrote:
Barbara wrote:
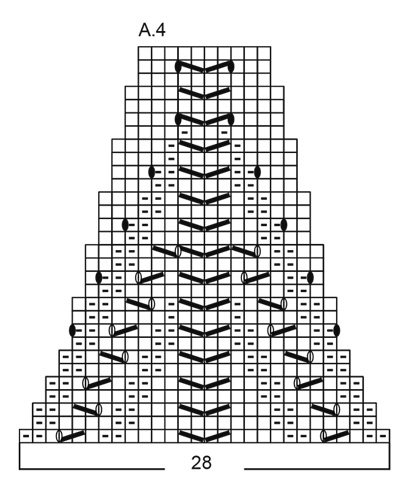
Hallo, bin beim Ärmel und verstehe nicht, wie es bei A4 zu Abnahmen kommen soll, wenn doch nach/vor dem 2 zusammenstricken gleich wieder ein U gemacht wird, der zu einer neuen Masche wird? Das würde auch den Madrid-Pullover betreffen. Ich versuche es mal ohne Umschläge ...
04.08.2018 - 13:15DROPS Design answered:
Liebe Barbara, bei den 1., 3., 5. und 7. Reihe in A.4 haben Sie 2 Umschläge aber 4 Abnahmen = es wird in jeder diese Reihen 2 M im Diagram abgenommen. Viel Spaß beim stricken!
06.08.2018 - 08:51
![]() Naudan Suzanne wrote:
Naudan Suzanne wrote:
Je ne sais pas tricoter avec des aiguilles circulaires. Est il possible d'obtenir les explications de ce modèle en tricotant de bas en haut et si possible morceau par morceau. Merci
26.07.2018 - 08:32DROPS Design answered:
Bonjour Mme Naudan, le gilet se tricote en allers et retours sur aiguille circulaire pour avoir suffisamment de place pour y loger toutes les mailles, vous pouvez le tricoter sur aiguilles droites, mais pensez à bien vérifier votre tension car les mailles seront beaucoup plus serrées - lisez ici comment adapter un modèle sur aiguilles droites. Bon tricot!
26.07.2018 - 10:13
![]() Ked wrote:
Ked wrote:
Why wasn't this sweater included when I asked for "Raglan"?
19.07.2018 - 11:25DROPS Design answered:
Dear Ked, this pattern is listed under "Raglan" - see here. Happy knitting!
19.07.2018 - 11:57
|
||||||||||||||||||||||||||||
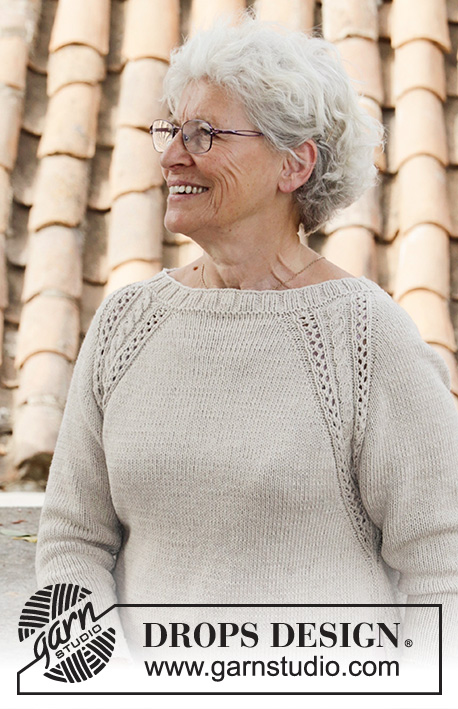
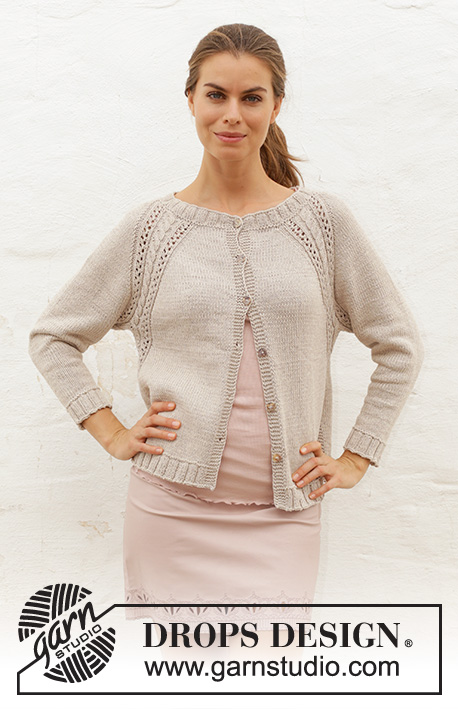
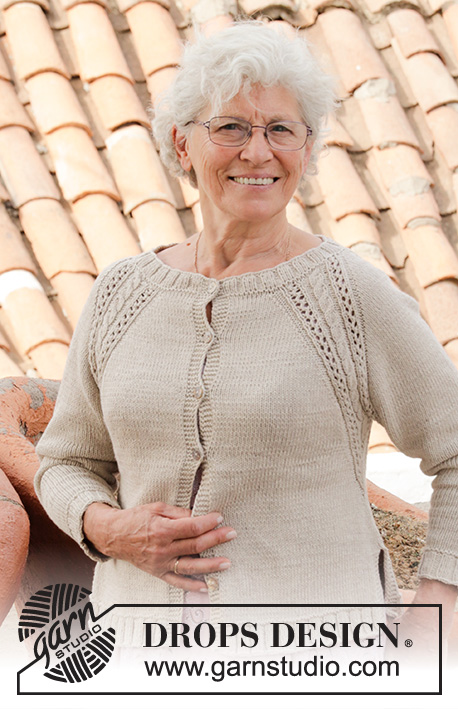
Madrid Cardigan#madridcardigan |
||||||||||||||||||||||||||||
 |
 |
|||||||||||||||||||||||||||
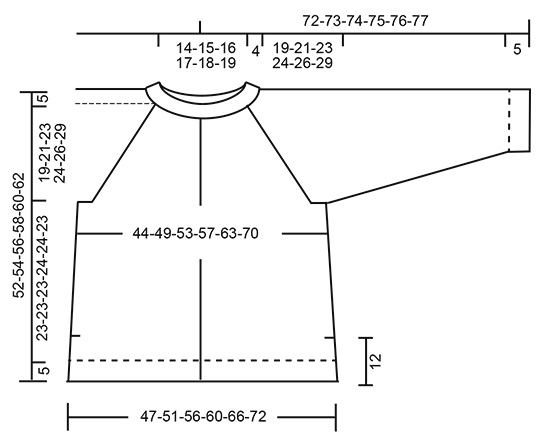
Knitted jacket with raglan, cables, lace pattern and split in sides, worked top down. Sizes S - XXXL. The piece is worked in DROPS Cotton Light.
DROPS 188-20 |
||||||||||||||||||||||||||||
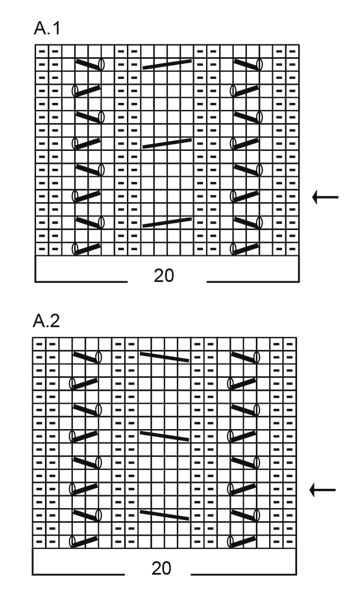
|
INFORMATION FOR THE PATTERN: RIDGE/GARTER STITCH (worked in the round): 1 ridge = 2 rounds. Knit 1 round and purl 1 round. RIDGE/GARTER STITCH (worked back and forth): 1 ridge = Knit 2 rows. PATTERN: See diagrams A.1 to A.4. The diagrams show all the rows in the pattern seen from the right side. RAGLAN: All increases are made from the right side! Increase 1 stitch on each side of each repeat of A.1/A.2 (= 8 stitches increased on the row). Increase 1 stitch by making 1 yarn over. On the next row purl the yarn overs twisted to avoid holes. INCREASE TIP-1 (evenly spaced): To work out how to increase evenly, count the total number of stitches on the needle (e.g. 128 stitches), minus the bands (e.g. 10 stitches) and divide the remaining stitches by the number of increases to be made (e.g. 4) = 29.5. In this example, increase alternately after every 29th and 30th stitch. Do not increase over the bands. Increase with a yarn over after the stitch and work the yarn over twisted on the next row to avoid a hole. INCREASE TIP-2 (for sides): All increases are made from the right side! Work until there are 2 stitches left before the marker thread, 1 yarn over, knit 4 (the marker sits in the middle of these 4 stitches), 1 yarn over. On the next row (from the wrong side) purl the yarn overs twisted to avoid holes. DECREASE TIP (for sleeves): Decrease 1 stitch on each side of the marker thread as follows: Work until there are 2 stitches left before the marker thread, knit 2 stitches together, (marker thread here), slip 1 stitch as if to knit, knit 1, pass the slipped stitch over. BUTTONHOLES: Work buttonholes on the right band (when the garment is worn). Work from the right side until there are 3 stitches left on the row and then work as follows: Make 1 yarn over, knit together the next 2 stitches and knit the last stitch. On the next row knit the yarn over to leave a hole. The first buttonhole is worked when the rib in the neck measures approx. 1½-2 cm. Then work the other 5 buttonholes with 8-8-8-9-9-9 cm / 3⅛"-3⅛"-3⅛"-3½"-3½"-3½" between each. ---------------------------------------------------------- JACKET: The piece is worked back and forth with circular needle, top down. The sleeves are worked in the round with double pointed needles/short circular needle. NECK: Cast on 123-128-133-138-148-158 stitches with circular needle size 3.5 mm / US 4 and Cotton Light. Purl 1 row from the wrong side. Then work rib from the right side as follows: 5 band stitches in GARTER STITCH – see description above, (knit 3 / purl 2) until there are 8 stitches left on the row, knit 3, 5 band stitches in garter stitch. Continue the rib like this until the piece measures 4 cm / 1½" (last row is worked from the wrong side). Remember BUTTONHOLE! Work 1 ridge where, on the first row, you increase 1-4-7-6-8-14 stitches evenly on row – read INCREASE TIP-1 (evenly spaced) = 124-132-140-144-156-172 stitches. YOKE: Change to circular needle size 4 mm / US 6. Insert a marker here. THE PIECE IS NOW MEASURED FROM HERE! Work pattern from the right side as follows: 5 band stitches in garter stitch, 8-10-12-13-16-20 stitches stockinette stitch (= left front piece), make 1 yarn over, A.1 (= 20 stitches), 1 yarn over, 1 stitch stockinette stitch (= sleeve), 1 yarn over, A.2 (= 20 stitches), 1 yarn over, 16-20-24-26-32-40 stitches stockinette stitch (= back piece), 1 yarn over, A.1, 1 yarn over, 1 stitch stockinette stitch (= sleeve), 1 yarn over, A.2, 1 yarn over, 8-10-12-13-16-20 stitches stockinette stitch, 5 band stitches in garter stitch (= right front piece). The first increase to RAGLAN – see description above, is now finished. Continue the pattern like this and increase every 2nd row a total of 24-27-30-33-36-39 times = 316-348-380-408-444-484 stitches. REMEMBER THE KNITTING GAUGE. When all the increases to raglan are finished, the piece measures 17-19-21-24-26-28 cm / 6⅝"-7⅜"-8¼"-9⅜"-10¼"-11". Continue without increasing until the piece measures 19-21-23-24-26-29 cm / 7⅜"-8¼"-9"-9⅜"-10¼"-11⅜". The next row from the right side is worked as follows: Work 5 band stitches in garter stitch, 32-37-42-46-52-59 stitches stockinette stitch, work the next 6 stitches in pattern as before, purl 2, knit 2 (= left front piece), place the next 69-75-81-87-93-99 stitches on a thread (= sleeve), cast on 8 new stitches on the needle (= side under sleeve), knit 2, purl 2, work the next 6 stitches in pattern as before, work 64-74-84-92-104-118 stitches stockinette stitch, work the next 6 stitches in pattern as before, purl 2, knit 2 (= back piece), place the next 69-75-81-87-93-99 stitches on a thread (= sleeve), cast on 8 new stitches on the needle (= side under sleeve), knit 2, purl 2, work the next 6 stitches in pattern as before, work 32-37-42-46-52-59 stitches stockinette stitch (= right front piece), finish with 5 band stitches in garter stitch. THE PIECE IS NOW MEASURED FROM HERE! BODY: = 194-214-234-250-274-302 stitches. Insert 1 marker thread in each side, in the middle of the new stitches cast on. Continue back and forth with 5 band stitches in garter stitch in each side towards mid front, stockinette stitch and A.3 (= 28 stitches) over the 8 new stitches cast on under the sleeves + 10 stitches on each side of these (i.e. 14 stitches on each side of the marker thread in each side). When A.3 has been completed in height, the piece measures 9 cm / 3½". Continue back and forth with 5 band stitches in garter stitch towards mid front and stockinette stitch over the remaining stitches. AT THE SAME TIME on the next row from the right side increase 1 stitch on each side of the marker thread in each side – read INCREASE TIP-2 (for sides)! Increase like this every 3 cm / 1" a total of 3 times = 206-226-246-262-286-314 stitches. Continue working until the piece measures 16-16-16-17-17-16 cm / 6¼"-6¼"-6¼"-6⅝"-6⅝"-6¼" - adjust so that the last row worked is from the wrong side. Now the piece is divided into front and back pieces and each piece is finished separately. Place the first and last 54-59-64-68-74-81 stitches on 2 separate threads for the right and left front pieces and work the back piece. BACK PIECE: = 98-108-118-126-138-152 stitches. Work stockinette stitch with 5 stitches in garter stitch in each side. When the piece measures 23-23-23-24-24-23 cm / 9"-9"-9"-9⅜"-9⅜"-9" increase 30-30-30-37-40-41 stitches evenly on row (but not over the stitches in garter stitch) = 128-138-148-163-178-193 stitches. Change to circular needle size 3.5 mm / US 4. Work 1 ridge. Work rib from the right side as follows: 5 stitches in garter stitch, (knit 3 / purl2) until there are 8 stitches left on the row, knit 3, 5 stitches in garter stitch. Continue like this until the rib measures 5 cm / 2". Bind off with knit over knit and purl over purl. To avoid the bind-off edge being tight you can make a yarn over after approx. every 5th stitch. The yarn over is bind off as a normal stitch. The piece measures a total of 52-54-56-58-60-62 cm / 20½"-21¼"-22"-22¾"-23⅝"-24⅜" from the shoulder down. RIGHT FRONT PIECE: = 54-59-64-68-74-81 stitches. Work stockinette stitch with 5 stitches in garter stitch in each side. When the piece measures 23-23-23-24-24-23 cm / 9"-9"-9"-9⅜"-9⅜"-9" increase 14-14-14-15-19-22 stitches evenly on row (but not over the stitches in garter stitch) = 68-73-78-83-93-103 stitches. Change to circular needle size 3.5 mm / US 4. Work 1 ridge. Work rib from the right side as follows: 5 stitches in garter stitch, (knit 3 / purl 2) until there are 8 stitches left on the row, knit 3, 5 band stitches in garter stitch. Continue like this until the rib measures 5 cm / 2". Bind off with knit over knit and purl over purl. To avoid the bind-off edge being tight you can make a yarn over after approx. every 5th stitch. The yarn over is bind off as a normal stitch. The piece measures a total of 52-54-56-58-60-62 cm / 20⅜"-21¼"-22"-22¾"-23⅝"-24⅜" from the shoulder down. LEFT FRONT PIECE: = 54-59-64-68-74-81 stitches. Work stockinette stitch with 5 stitches in garter stitch in each side. When the piece measures 23-23-23-24-24-23 cm / 9"-9"-9"-9⅜"-9⅜"-9" increase 14-14-14-15-19-22 stitches evenly on row (but not over the stitches in garter stitch) = 68-73-78-83-93-103 stitches. Change to circular needle size 3.5 mm / US 4. Work 1 ridge. Work rib from the right side as follows: 5 band stitches in garter stitch, (knit 3 / purl 2) until there are 8 stitches left on the row, knit 3, 5 stitches in garter stitch. Continue like this until the rib measures 5 cm / 2". Bind off with knit over knit and purl over purl. To avoid the bind-off edge being tight you can make a yarn over after approx. every 5th stitch. The yarn over is bind off as a normal stitch. The piece measures a total of 52-54-56-58-60-62 cm / 20½"-21¼"-22"-22¾"-23⅝"-24⅜" from the shoulder down. SLEEVE: Place the 69-75-81-87-93-99 stitches from the thread on the one side of the piece onto double pointed needles/short circular needle size 4 mm / US 6 and, in addition, knit up 1 new stitch in each of the 8 stitches cast on under the sleeve = 77-83-89-95-101-107 stitches. Insert a marker thread in the middle of the new stitches (= 4 new stitches on each side of the marker thread). Work A.4 (= 28 stitches) mid under the sleeve so that there are 14 stitches of A.4 on each side of the marker thread mid under sleeve. The remaining stitches on the round are worked knitted. When the whole of A.4 has been worked in height you have decreased 18 stitches = 59-65-71-77-83-89 stitches. Continue to decrease 2 stitches under the sleeve – read DECREASE TIP! Decrease like this every 10th-7th-6th-5th-4th-3rd round a total of 7-9-11-13-15-17 times = 45-47-49-51-53-55 stitches. Continue with knit until the sleeve measures 37-35-34-33-32-29 cm / 14½"-13¾"-13⅜"-13"-12½"-11⅜". Now increase 5-8-6-9-7-10 stitches evenly on round = 50-55-55-60-60-65 stitches. Change to double pointed needles size 3.5 mm / US 4. Work 1 ridge. Then work rib (knit 3 / purl 2) until the sleeve measures 42-40-39-38-37-34 cm / 16½"-15¾"-15¼"-14⅞"-14½"-13⅜" from the division. Bind off with knit over knit and purl over purl. To avoid the bind-off edge being tight you can make a yarn over after approx. every 5th stitch. The yarn over is bind off as a normal stitch. Work the other sleeve in the same way. ASSEMBLY: Sew buttons onto the left band. Fasten the strands. |
||||||||||||||||||||||||||||
Diagram explanations |
||||||||||||||||||||||||||||
|
||||||||||||||||||||||||||||
|
||||||||||||||||||||||||||||

|
||||||||||||||||||||||||||||
|
||||||||||||||||||||||||||||
|
||||||||||||||||||||||||||||
Have you finished this pattern?Tag your pictures with #dropspattern #madridcardigan or submit them to the #dropsfan gallery. Do you need help with this pattern?You'll find 27 tutorial videos, a Comments/Questions area and more by visiting the pattern on garnstudio.com. © 1982-2025 DROPS Design A/S. We reserve all rights. This document, including all its sub-sections, has copyrights. Read more about what you can do with our patterns at the bottom of each pattern on our site. |
||||||||||||||||||||||||||||


With over 40 years in knitting and crochet design, DROPS Design offers one of the most extensive collections of free patterns on the internet - translated to 17 languages. As of today we count 314 catalogs and 11822 patterns - 11812 of which are translated into English (US/in).
We work hard to bring you the best knitting and crochet have to offer, inspiration and advice as well as great quality yarns at incredible prices! Would you like to use our patterns for other than personal use? You can read what you are allowed to do in the Copyright text at the bottom of all our patterns. Happy crafting!
Post a comment to pattern DROPS 188-20
We would love to hear what you have to say about this pattern!
If you want to leave a question, please make sure you select the correct category in the form below, to speed up the answering process. Required fields are marked *.