
Popular categories
Looking for a yarn?


Comments / Questions (11)
![]() Lena Nilsson wrote:
Lena Nilsson wrote:
Hej, jag undrar hur ni har stickat kanterna, de ser jättefina ut på bilden men så blir de inte när man stickar efter mönstret tyvärr. Så jag undrar nu hur jag skall göra dessa snygga kanter?
25.02.2026 - 13:09DROPS Design answered:
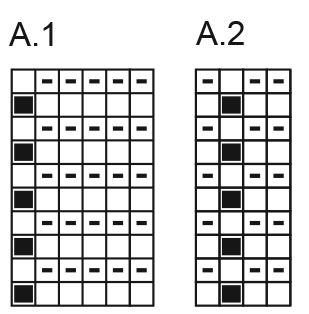
Hei Lena. Kantene på skjerfet er en naturlig brett i patentmaskene (i A.1). Bildet av skjerfet (det som viser frynsene) viser A.1 3 ganger + patentmaskene (= 19 masker), mens de andre 16 maskene ligger bak . mvh DROPS Design
09.03.2026 - 10:23
![]() Deborah wrote:
Deborah wrote:
Hi! I just knitted the scarf as a beginner and it came out lovely so thank you for this pattern! I am just confused about the instructions for the hat. Firstly; is there a way I could adapt it to use straight needles instead of circular and then just sew it in the middle? Secondly; what does knitting 2 by 2 mean Thirdly; why do you knit the rib, then go to A.1. and then start knitting rib stitches again? doesn't the rib stay at the bottom? Thanks!
12.09.2019 - 12:19DROPS Design answered:
Dear Deborah, you will find how to adapt a pattern into straight needles here - knit the stitches 2 by 2 together means you work K2 tog across. At the top of hat, before starting to decrease, you don't work pattern A.1 anymore but rib K1/P1 then start to decrease. Happy knitting!
12.09.2019 - 13:20
![]() Helena Maine wrote:
Helena Maine wrote:
Hello This is a lovely pattern, however, in the photo it looks like the scarf has been knitted with the salvage stitch at the beginning of each row, I.e. the side edges of the scarf are very neat. It would have been good if you incorporated that technique in your demo of the pattern video.
09.08.2019 - 16:51
![]() Jennie wrote:
Jennie wrote:
Var är a1 och a2? bild saknas
24.03.2019 - 05:47DROPS Design answered:
Hej. Nu finns diagrammen längst ner på mönstret även på den svenska översättningen. Lycka till!
25.03.2019 - 11:30
![]() Bereaux wrote:
Bereaux wrote:
Bonjour, les explications du diagramme modèle 184-16 pour l'écharpe ne correspondent pas pour des rangs aller retour. Il me semble que tout se tricote à l'endroit sauf la maille double qui elle se tricote à l'envers lorsque l'on a fait un premier rang à l'endroit. Est-ce bien cela ?
31.01.2019 - 11:50DROPS Design answered:
Bonjour Mme Bereaux, les diagrammes montrent les motifs, vus sur l'endroit, pour tricoter A.1 en rangs, on tricote sur l'endroit (rang1): 5 m end, 1 m double et sur l'envers: (on lit de gauche à droite: 1 m env, 5 m end. Bon tricot!
31.01.2019 - 13:21
![]() Marion Böhm wrote:
Marion Böhm wrote:
Wenn ich den Schal nach Anleitung und Diagramm A.1 stricke, entsteht kein Bild, das krausrechts ist. Die Hinreihen werden rechts, die Rückreihen links gestrickt. Das geht zumindest aus der Anleitung so hervor. So entsteht das Bild glattrechts. Ist das Diagramm falsch?
29.01.2019 - 14:08DROPS Design answered:
Liebe Frau Böhm, die Diagramme zeigen alle Reihen, wie sie von der Vorderseite aussehen, wenn Sie in Reihen stricken, stricken Sie die 5 ersten Maschen in A.1 rechts (sie sehen wie links von der Vorderseite aus), diese 5 ersten Maschen in A.1 werden links in der Runde gestrickt. Viel Spaß beim stricken!
29.01.2019 - 16:31
![]() Josefine wrote:
Josefine wrote:
Hej gør man det samme med at stikke højre pind igennem masken fra forrige omgang, når man strikker vanter?
09.10.2018 - 10:06DROPS Design answered:
Hei Josefine. Ja, du strikker A.2 som anvist også på vottene. God fornøyelse.
16.10.2018 - 13:16
![]() Anita Heimpel wrote:
Anita Heimpel wrote:
Vielen lieben dank
05.10.2018 - 12:02
![]() Anita Heimpel wrote:
Anita Heimpel wrote:
Irgendwas mache ich beim Schal fals die Seiten rollen sich bei mir ein Danke für die hilfe
05.10.2018 - 11:03DROPS Design answered:
Liebe Frau Heimpel, beim Schal stricken Sie die ersten 5 Maschen krausrechts (= immer rechts stricken) und die 5. Masche in A.1 soll bei der Hinreihe 1 Masche tiefer rechts gestrickt, und bei der Rückreihe links gestrickt. Viel Spaß beim stricken!
05.10.2018 - 11:54
![]() Joanna wrote:
Joanna wrote:
Witam, Nie jestem pewna, czy dobrze rozumiem wzór na szalik. Jeśli na końcu rzędu nieparzystego przerobię 5 oczek z sześciooczkowego okresu wzoru A1, to przy przerabianiu parzystego rzędu będę trafiać podwójnym oczkiem na jedno z oczek lewych, a oczka przerabiane na prawo w rzędach nieparzystych będą tworzyć jakieś niezależne paski. Czy to tak ma być? Nie widzę takich dodatkowych pasków na zdjęciu szalika.
03.01.2018 - 14:11DROPS Design answered:
Witaj Joanno, w rzędzie parzystym przerabiasz schemat od lewej do prawej strony, tzn. zaczynasz od 5 pierwszych oczek schematu A.1 i dalej powtarzasz już cały 6-oczkowy schemat A.1. Pozdrawiam
04.01.2018 - 09:41
|
||||||||||
Tangerine#tangerineset |
||||||||||
 |
 |
|||||||||
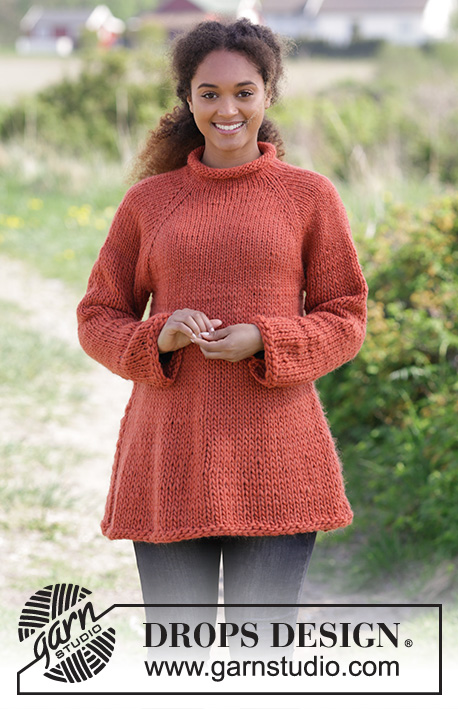
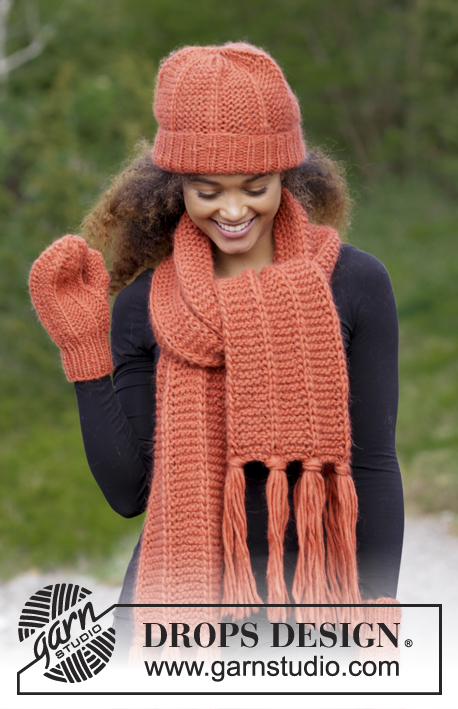
Set consists of: Knitted scarf, hat and mittens with false Fisherman's rib variation and garter stitch. Set is knitted in DROPS Snow.
DROPS 184-16 |
||||||||||
|
INFORMATION FOR PATTERN: GARTER STITCH (worked in the round): 1 ridge = 2 rounds. Knit 1 round and purl 1 round. PATTERN: See diagrams A.1 and A.2. Diagrams show all rows in pattern seen from the right side. INCREASE TIP: Increase 1 stitch by making 1 yarn over, on next row work yarn overs twisted (i.e. work in back loop of stitch instead front) to avoid holes. ---------------------------------------------------------- SCARF: Work piece back and forth on circular needle. Cast on 35 stitches on circular needle size 9 mm / US 13. Knit 1 row. Work A.1 over the first 30 stitches, finish row with the first 5 stitches in A.1. Continue this pattern until piece measures 150 cm / 59". REMEMBER THE GAUGE! bind off. FRINGES: Cut 6 lengths of yarn of 50 cm / 19¾" (= 1 fringe). Place them double, thread loop from right side between each stitch in false Fisherman's rib at the bottom of scarf. Then pull yarn ends through loops and tighten. Fasten a fringe in outermost stitch in each side = 7 fringes. Repeat on the other side of scarf. ---------------------------------------------------------- HAT: Work in the round on a short circular needle. Switch to double pointed needles when needed. Cast on 54-60 stitches on a short circular needle size 8 mm / US 11. Work rib (= purl 1/knit 1) the entire round. Continue with rib until piece measures 14 cm / 5½". REMEMBER THE GAUGE! Then work according to A.1 (= 9-10 repetitions on round). Continue with A.1 until piece measures 27-28 cm / 10½"-11". Now work rib (= purl 1/knit 1) over all stitches. When piece measures 29-30 cm / 11½"-11¾", knit all stitches together 2 by 2 = 27-30 stitches. Knit 1 round, then knit all stitches together 2 by 2 = 14-15 stitches. Cut the yarn and pull it through the remaining stitches, tighten together and fasten. Hat measures approx. 32-33 cm / 12½"-13" in total. ---------------------------------------------------------- MITTENS: LEFT MITTEN: Worked in the round on double pointed needles. Cast on 28-32 stitches on double pointed needles size 5 mm / US 8 with Snow. * Knit 1, purl 1 *, repeat from *-* the entire round. Continue with rib for 6 cm / 2⅜". Then work A.2 over all stitches (= 7-8 repetitions in width). REMEMBER THE GAUGE! When piece measures 12-13 cm / 4¾"-5", increase 1 stitch on each side of first stitch on round for thumb gusset - READ INCREASE TIP! Increase on each side of the increased stitches on every round 4-5 times in total (work the increased stitches in GARTER STITCH - see explanation above) = 36-42 stitches. Then slip the 9-11 thumb stitches on 1 stitch holder. Cast on 1 new stitch behind stitches on stitch holder = 28-32 stitches. Continue with A.2 until piece measures approx. 22-24 cm / 8¾"-9½", adjust so that the next round is a knit round. Knit the first 2 stitches in every repetition of A.2 together = 21-24 stitches. Work 3 rounds, on next round knit the last 2 stitches in every repetition together = 14-16 stitches. Work 3 rounds, on next round knit all stitches together 2 by 2 = 7-8 stitches remain. Cut the yarn and pull it through the remaining stitches, tighten together and fasten. THUMB: Slip the 9-11 stitches from stitch holder on double pointed needles size 5 mm / US 8 and pick in addition up 2 new stitches behind stitches = 11-13 stitches distributed on double pointed needles. Continue in the round in garter stitch until thumb measures approx. 5-6 cm / 2"-2⅜" (measured from where stitches were put back on double pointed needles). On next round knit all stitches together 2 by 2 = 6-7 stitches remain on needle. Cut the yarn and pull it through the remaining stitches, tighten together and fasten. RIGHT MITTEN: Work as left mitten. |
||||||||||
Diagram explanations |
||||||||||
|
||||||||||
 |
||||||||||
Have you finished this pattern?Tag your pictures with #dropspattern #tangerineset or submit them to the #dropsfan gallery. Do you need help with this pattern?You'll find 23 tutorial videos, a Comments/Questions area and more by visiting the pattern on garnstudio.com. © 1982-2026 DROPS Design A/S. We reserve all rights. This document, including all its sub-sections, has copyrights. Read more about what you can do with our patterns at the bottom of each pattern on our site. |
||||||||||


With over 40 years in knitting and crochet design, DROPS Design offers one of the most extensive collections of free patterns on the internet - translated to 17 languages. As of today we count 324 catalogs and 12290 patterns - 12280 of which are translated into English (US/in).
We work hard to bring you the best knitting and crochet have to offer, inspiration and advice as well as great quality yarns at incredible prices! Would you like to use our patterns for other than personal use? You can read what you are allowed to do in the Copyright text at the bottom of all our patterns. Happy crafting!
Post a comment to pattern DROPS 184-16
We would love to hear what you have to say about this pattern!
If you want to leave a question, please make sure you select the correct category in the form below, to speed up the answering process. Required fields are marked *.