DROPS Snow
DROPS Snow
100% vlna
od 57.00 Kč /50g
Přízi na tento model můžete mít už za 855.00Kč.

Cenu za klubka počítáme podle spotřeby při výrobě modelu v nejmenší velikosti a nejlevnější variantě příze. Rádi byste ještě lepší cenu? Třeba ji najdete mezi DROPS Deals!

Tangerine

Souprava: šála, čepice a rukavice – palčáky pletené chytovým patentem a vroubkoým vzorem z příze DROPS Snow.

DROPS 184-16
DROPS design: model č. ee-601
Skupina přízí E nebo C + C
----------------------------------------------------------
ŠÁLA:
Rozměry: 35 x 150 cm
Materiál:
DROPS SNOW firmy Garnstudio (spadá do skupiny přízí E)
450 g, barva č. 07, oranžová

Použitou přízi můžete také nahradit některou ze seznamu:
"Náhradní příze (Skupina přízí E)" – viz link níže.

DROPS KRUHOVÁ JEHLICE (40, 60 nebo 80 cm) č.9 – nebo velikosti potřebné k upletení zkušebního vzorku o rozměrech 10 ok a 14 řad lícovým žerzejem = 10 cm na šířku a 10 cm na výšku.
----------------------------------------------------------

ČEPICE:
Velikost: S/M – M/L
Obvod hlavy: 56/58 - 58/60 cm
Materiál:
DROPS SNOW firmy Garnstudio (spadá do skupiny přízí E)
150-150 g, barva č. 07, oranžová

Použitou přízi můžete také nahradit některou ze seznamu:
"Náhradní příze (Skupina přízí E)" – viz link níže.

DROPS PONOŽKOVÉ JEHLICE a krátká KRUHOVÁ JEHLICE (40 cm) č.8 – nebo velikosti potřebné k upletení zkušebního vzorku o rozměrech 11 ok a 15 řad lícovým žerzejem = 10 cm na šířku a 10 cm na výšku.
----------------------------------------------------------

RUKAVICE:
Velikost: S/M – M/L
Materiál:
DROPS SNOW firmy Garnstudio (spadá do skupiny přízí E)
150-150 g, barva č. 07, oranžová

Použitou přízi můžete také nahradit některou ze seznamu:
"Náhradní příze (Skupina přízí E)" – viz link níže.

DROPS PONOŽKOVÉ JEHLICE č.5  – nebo velikosti potřebné k upletení zkušebního vzorku o rozměrech 14,5 oka a 18 řad lícovým žerzejem = 10 cm na šířku a 10 cm na výšku.
----------------------------------------------------------

-------------------------------------------------------

Náhradní příze – Podívejte se, jak změnit přízi
Skupina přízí A až F – Neměňte návod, změňte přízi
Spotřeba příze při použití náhradní příze – Využijte náš převodník

-------------------------------------------------------

DROPS Snow
DROPS Snow
100% vlna
od 57.00 Kč /50g
Přízi na tento model můžete mít už za 855.00Kč.

Cenu za klubka počítáme podle spotřeby při výrobě modelu v nejmenší velikosti a nejlevnější variantě příze. Rádi byste ještě lepší cenu? Třeba ji najdete mezi DROPS Deals!

DROPS Super Sale

SAVE 30% on 6 cotton favourites!
Platí do 12.04.2024

Návod

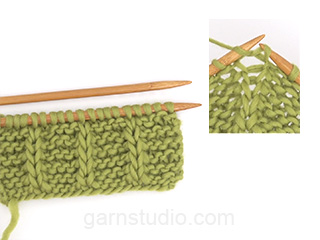
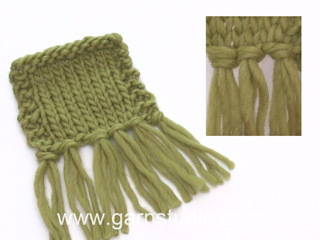
VROUBKOVÝ VZOR:
Pleteme střídavě 1 kruhovou řadu hladce, 1 obrace. 1 vroubek = 2 kruhové řady.

VZOR:
Viz schémata A.1 a A.2. Zobrazeny jsou všechny řady vzoru nahlížené z lícové strany.

TIP - PŘIDÁVÁNÍ:
Přidáváme nahozením; v následující řadě pleteme nahození za zadní nit, aby se v pletenině netvořily dírky.
----------------------------------------------------------

ŠÁLA:
Pleteme v řadách na kruhové jehlici.
Na kruhovou jehlici č.9 nahodíme 35 ok a prvních 30 ok pleteme vzorem A.1; řadu končíme prvními 5 oky vzoru A.1. Takto pokračujeme v pletení vzoru. Když je šála dlouhá 150 cm, všechna oka uzavřeme.

TŘÁSNĚ:
Ustřihneme si 6 vláken příze, každé o délce 50 cm (= 1 třásnička). Přeložíme je napolovic a vzniklou smyčku protáhneme z lícové strany mezi oky chytového patentu v počáteční (nahozené) i v poslední (uzavřené) řadě; smyčkou pak provlečeme konce příze a stáhneme. Po 1 třásni navážeme také do obou “rohů”, krajních ok = na každém krátkém okraji šály máme 7 třásní.
----------------------------------------------------------

ČEPICE:
Pleteme v kruhových řadách na krátké kruhové jehlici. Podle potřeby převedeme pleteninu na ponožkové jehlice.
Na krátkou kruhovou jehlici č.8 nahodíme 54-60 ok a pleteme lem pružným vzorem 1/1 (tj. střídáme 1 oko hladce, 1 obrace – začínáme 1 okem obrace). Když je lem vysoký 14 cm, začneme plést vzor A.1 (= v kruhové řadě máme 9-10 sekvencí vzoru). Takto pokračujeme až do výše 27-28 cm. Pak pleteme nad všemi oky pružným vzorem 1/1. Ve výši 29-30 cm spleteme každá 2 oka hladce = 27-30 ok. Pak upleteme 1 kruhovou řadu hladce a poté opět spleteme každá 2 oka hladce = 14-15 ok.
Přízi odstřihneme, protáhneme zbylými oky, stáhneme a zapošijeme.
Čepice je vysoká asi 32-33 cm.
----------------------------------------------------------

RUKAVICE - PALČÁKY:
LEVÁ RUKAVICE:
Pleteme v kruhových řadách na ponožkových jehlicích.
Na ponožkové jehlice č.5 nahodíme přízí Snow 28-32 ok a pleteme pružný lem, takto: *1 oko hladce, 1 obrace*, *-* opakujeme v průběhu celé kruhové řady. Když je lem vysoký 6 cm, pleteme nad všemi oky vzor A.2 (= v kruhové řadě máme 7-8 sekvencí vzoru). Ve výši 12-13 cm přidáme na obou stranách 1. oka v kruhové řadě 1 oko (= klínek pro palec) – viz TIP - PŘIDÁVÁNÍ! Dál přidáváme na obou stranách vznikajícího klínu, a to v každé 2. kruhové řadě, celkem 4-5x (přidaná oka pleteme VROUBKOVÝM VZOREM – viz výše) = 36-42 ok. Pak odložíme 9-11 ok palce na pomocnou jehlici a za nimi nahodíme 1 oko nové = 28-32 ok. Pokračujeme vzorem A.2 až do výše asi 22-24 cm, končíme tak, aby následující kruhové řada byla pletená hladce. První 2 oka v každé sekvenci vzoru A.2 spleteme hladce = 21-24 ok. Upleteme 3 kruhové řady. V následující kruhové řadě spleteme poslední 2 oka v každé sekvenci vzoru hladce dohromady = 14-16 ok. Upleteme 3 kruhové řady. V další kruhové řadě spleteme každá 2 oka hladce = zbývá 7-8 ok. Přízi odstřihneme, protáhneme zbylými oky, stáhneme a zapošijeme.

PALEC:
Odložených 9-11 ok palce vrátíme z pomocné jehlice zpět na ponožkové jehlice č.5 a navíc k nim nabereme 2 nová oka z okraje za nimi = 11-13 ok rozdělených na ponožkové jehlice. Pokračujeme v kruhových řadách vroubkovým vzorem do výše asi 5-6 cm (měřeno od místa, kde jsme oka vrátili z pomocné jehlice zpět na jehlice). V následující kruhové řadě spleteme každá 2 oka hladce = na jehlicích zbývá 6-7 ok. Přízi odstřihneme, protáhneme zbylými oky, stáhneme a zapošijeme. 

PRAVÁ RUKAVICE:
Pleteme stejně jako levou rukavici.

Schéma

symbols = lícový žerzej (líc hladce, rub obrace)
symbols = rubový žerzej (líc obrace, rub hladce)
symbols = pravou jehlici vpíchneme do oka z předchozí kruhové řady, upleteme 1 oko hladce a oka spustíme z jehlice
diagram

Každý náš návod je doprovázen speciálními video-ukázkami, které vás navedou.

Chcete se na něco zeptat? Projděte si seznam nejčastějších otázek (FAQ).

Knitting tension is what determines the final measurements of your work, and is usually measured per 10 x 10 cm. It is provided like so: number of stitches in width x number of rows in height - eg: 19 stitches x 26 rows = 10 x 10 cm.

The knitting tension is very individual; some people knit/crochet loosely while others work tightly. You adjust the knitting tension with the needle size, which is why the suggested needle size is only meant as a guide! You need to adjust this (up or down) to ensure that YOUR knitting tension matches the knitting tension provided in the pattern. If you work with a different knitting tension than provided you will have a different yarn consumption, and your work will have different measurements than what the pattern suggests.

The knitting tension also determines which yarns can replace each other. As long as you achieve the same knitting tension you can replace one yarn with another.

See DROPS lesson: How to measure your tension/gauge

See DROPS video: How to make a gauge tension swatch

The required amount of yarn is provided in grams, eg: 450 g. To calculate how many balls you’ll need you first need to know how many grams are in 1 ball (25g, 50g or 100g). This information is available if you click on the individual yarn quality on our pages. Divide the amount required with the amount of each ball. For example, if each ball is 50g (the most common amount), the calculation will be as follows: 450 / 50 = 9 balls.

The important thing when changing from one yarn to another is that the knitting/crochet tension remains the same. This is so that the measurements of the finished piece will be the same as on the sketch provided. It is easier to achieve the same knitting tension using yarns from the same yarn group. It is also possible to work with multiple strands of a thinner yarn to achieve the knitting tension of a thicker one. Please try our yarn converter. We recommend you to always work a test swatch.

Please NOTE: when changing yarn the garment might have a different look and feel to the garment in the photo, due to individual properties and qualities of each yarn.

See DROPS lesson: Can I use a different yarn than the one mentioned in the pattern?

All our yarns are categorised into yarn groups (from A to F) according to thickness and knitting tension – group A contains the thinnest yarns and group F the thickest. This makes it easier for you to find alternative yarns to our patterns, should you wish to switch yarn. All yarns within the same group have a similar knitting tension and can easily replace each other. However, different yarn qualities have different structures and properties which will give the finished work a unique look and feel.

Click here for an overview of the yarns in each yarn group

At the top of all our patterns you’ll find a link to our yarn calculator, which is a helpful tool should you wish to use a different yarn than suggested. By filling in the yarn quality you wish to replace, the amount (in your size) and number of strands, the calculator will present good alternative yarns with the same knitting tension. Additionally it will tell you how much you’ll require in the new qualities and whether you’ll need to work with multiple strands. Most skeins are 50g (some are 25g or 100g).

If the pattern is worked with multiple colours, every colour will have to be calculated separately. Similarly, if the pattern is worked with several strands of different yarns (for example 1 strand Alpaca and 1 strand Kid-Silk) you will have to find alternatives for each, individually.

Click here to see our yarn calculator

Since different yarns have different qualities and textures we have chosen to keep the original yarn in our patterns. However, you can easily find options among our available qualities by using our yarn calculator, or simply pick a yarn from the same yarn group.

It is possible that some retailers still have discontinued yarns in stock, or that someone has a few skeins at home that they would like to find patterns for.

The yarn calculator will provide both alternative yarn as well as required amount in the new quality.

If you think it's hard to decide what size to make, it can be a good idea to measure a garment you own already and like the size of. Then you can pick the size by comparing those measures with the ones available in the pattern's size chart.

You'll find the size chart at the bottom of the pattern.

See DROPS lesson: How to read size chart

The needle size provided in the pattern serves only as a guide, the important thing is to follow the knitting tension. And since knitting tension is very individual, you will have to adjust the needle size to ensure that YOUR tension is the same as in the pattern – maybe you’ll have to adjust 1, or even 2 needle sizes, up or down to achieve the correct tension. For this, we recommend that you work test swatches.

Should you work with a different knitting tension than the one provided, the measurements of the finished garment might deviate from the measurement sketch.

See DROPS lesson: How to measure your tension/gauge

See DROPS video: How to make a tension/gauge swatch

Working a garment top-down provides more flexibility and room for personal adjustment. For example it is easier to try the garment on while working, as well as making adjustments to length of yoke and shoulder caps.

The instructions are carefully explaining every step, in the correct order. Diagrams are adjusted to the knitting direction and are worked as usual.

The diagram depicts all rows/rounds, and every stitch seen from the right side. It is read from bottom to top, from right to left. 1 square = 1 stitch.

When working back and forth, every other row is worked from the right side and every other row is worked from the wrong side. When working from the wrong side, the diagram will have to be worked reversed: from left to right, knit stitches are purled, purl stitches are knit etc.

When working in the round every round is worked from the right side and the diagram are worked from right to left on all rounds.

See DROPS lesson: How to read knitting diagrams

The diagram depicts all rows/rounds, and every stitch seen from the right side. It is worked from bottom to top, from right to left.

When working back and forth every other row is worked from the right side: from right to left and every other row is worked from the wrong side: from left to right.

When working in the round, every row in the diagram are worked from the right side, from right to left.

When working a circular diagram you start in the middle and work your way outwards, counter clockwise, row by row.

The rows usually start with a given number of chain stitches (equivalent to the height of the following stitch), this will either be depicted in the diagram or explained in the pattern.

See DROPS lesson: How to read crochet diagrams

Instructions for working several diagrams after each other on the same row/round, will often be written like so: “work A.1, A.2, A.3 a total of 0-0-2-3-4 times". This means you work A.1 once, then A.2 is worked once, and A.3 is repeated (in width) the number of times provided for your size – in this case like so: S = 0 times, M = 0 times, L=2 times, XL= 3 times and XXL = 4 times.

The diagrams are worked as usual: begin with the first row in A.1, then work the first row in A.2 etc.

See DROPS lesson: How to read knitting diagrams

See DROPS lesson: How to read crochet diagrams

The total width of the garment (from wrist-to-wrist) will be larger in the larger sizes, despite the actual sleeves being shorter. The larger sizes have longer sleeve caps and wider shoulders, so there will be a good fit in all sizes.

The measurement sketch/schematic drawing provides information regarding the full length of the garment. If it’s a jumper or a jacket the length is measured from the highest point on the shoulder closest to the neckline, and straight down to the bottom of the garment. It is NOT measured from the tip of shoulder. Similarly, the length of yoke is measured from the highest point on the shoulder and down to where yoke is split into body and sleeves.

On a jacket measures are never taken along bands, unless specifically stated. Always measure inside band stitches when measuring the length.

See DROPS lesson: How to read a schematic drawing

Diagrams are often repeated on the round or in height. 1 repeat is the diagram the way it appears in the pattern. If it says to work 5 repeats of A.1 in the round, then you work A.1 a total of 5 times after/next to each other in the round. If it says to work 2 repeats of A.1 vertically/in height you work the entire diagram once, then begin again at the start and work the entire diagram one more time.

Chain stitches are slightly narrower than other stitches and to avoid working the cast-on edge too tight, we simply chain more stitches to begin with. The stitch count will be adjusted on the following row to fit the pattern and measurement sketch.

The rib edge is more elastic and will contract slightly compared to, for example, stocking stitch. By increasing before the rib edge, you avoid a visible difference in width between the rib edge and the rest of the body.

It’s very easy to cast off too tightly, and by making yarn overs while casting off (and simultaneously casting these off) you avoid a too tight cast off edge.

See DROPS video: How to bind off with yarn overs (yo)

To achieve an even increase (or decrease) you can increase on, for example: every 3rd and 4th row alternately, like so: work 2 rows and increase on the 3rd row, work 3 rows and increase on the 4th. Repeat this until the increase is complete.

See DROPS lesson: Increase or decrease 1 st on every 3rd and 4th row alternately

Should you prefer to work in the round instead of back and forth, you may of course adjust the pattern. You’ll need to add steeks mid-front (usually 5 stitches), and follow the instructions. When you would normally turn and work from the wrong side, simply work across the steek and continue in the round. At the end you’ll cut the piece open, pick up stitches to work bands, and cover the cut edges.

See DROPS video: How to knit steeks and cut open

Should you prefer to work back and forth instead of in the round, you may of course adjust the pattern so you work the pieces separately and then assemble them at the end. Divide the stitches for the body in 2, add 1 edge stitch in each side (for sewing) and work the front and back pieces separately.

See DROPS lesson: Can I adapt a pattern for circular needles into straight needles?

Pattern repeats can vary slightly in the different sizes, in order to get the correct proportions. If you’re not working the exact same size as the garment in the photo, yours might deviate slightly. This has been carefully developed and adjusted so that the complete impression of the garment is the same in all sizes.

Make sure to follow instructions and diagrams for your size!

If you have found a pattern you like which is available in women’s size it’s not very difficult to convert it to men’s size. The biggest difference will be the length of sleeves and body. Start working on the women size that you think would fit across the chest. The additional length will be worked right before you cast off for the armhole/sleeve cap. If the pattern is worked top-down you can add the length right after the armhole or before the first decrease on sleeve.

Regarding additional yarn amount, this will depend on how much length you add, but it is better with a skein too many than too few.

All yarns will have excess fibres (from production) that might come off as lint or shedding. Brushed yarns (ie hairier yarns) have more of these loose, excess fibres, causing more shedding.

Shedding also depends on what is worn under or over the garment, and whether this pulls at the yarn fibres. It’s therefore not possible to guarantee that there will be no shedding

Below are some tips on how to get the best result when working with hairier yarns:

1. When the garment is finished (before you wash it) shake it vigorously so the looser hairs come off. NOTE: do NOT use a lint roller, brush or any method that pulls at the yarn.

2. Place the garment in a plastic bag and put it in your freezer - the temperature will cause the fibres to become less attached to each other, and excess fibres will come off easier.

3. Leave in the freezer for a few hours before taking it out and shaking it again.

4. Wash the garment according to the instructions on the yarn label.

Pilling is a natural process that happens to even the most exclusive of fibers. It's a natural sign of wear and tear that is hard to avoid, and that is most visible in high friction areas of your garment like a sweater's arms and cuffs.

You can make your garment look as new by removing the pilling, using a fabric comb or a pill/lint remover.

Pořád se nemůžete dobrat odpovědi, kterou hledáte? Pak posuňte stránku dolů a napište nám svůj dotaz, naši specialisté se vám pokusí poradit. Obvykle to zvládneme během 5 až 10 pracovních dnů..
Mezitím si můžete pročíst otázky a odpovědi, které k tomuto modelu položili ostatní, nebo navštívit skupinu DROPS Workshop na Facebooku, kde vám může poradit některá spřízněná duše!

Mohly by se vám líbit...

Přidejte komentář k návodu DROPS 184-16

Rádi bychom věděli, co si o tomto modelu myslíte!

Pokud se chcete na něco zeptat, dbejte prosím na to, abyste ve formuláři níže vybrali správnou kategorii - díky tomu se dříve dozvíte, co potřebujete vědět. Povinná pole jsou označena *.

Komentáře / Otázky (11)

country flag Deborah wrote:

Hi! I just knitted the scarf as a beginner and it came out lovely so thank you for this pattern! I am just confused about the instructions for the hat. Firstly; is there a way I could adapt it to use straight needles instead of circular and then just sew it in the middle? Secondly; what does knitting 2 by 2 mean Thirdly; why do you knit the rib, then go to A.1. and then start knitting rib stitches again? doesn't the rib stay at the bottom? Thanks!

12.09.2019 - 12:19

DROPS Design answered:

Dear Deborah, you will find how to adapt a pattern into straight needles here - knit the stitches 2 by 2 together means you work K2 tog across. At the top of hat, before starting to decrease, you don't work pattern A.1 anymore but rib K1/P1 then start to decrease. Happy knitting!

12.09.2019 - 13:20

country flag Helena Maine wrote:

Hello This is a lovely pattern, however, in the photo it looks like the scarf has been knitted with the salvage stitch at the beginning of each row, I.e. the side edges of the scarf are very neat. It would have been good if you incorporated that technique in your demo of the pattern video.

09.08.2019 - 16:51

country flag Jennie wrote:

Var är a1 och a2? bild saknas

24.03.2019 - 05:47

DROPS Design answered:

Hej. Nu finns diagrammen längst ner på mönstret även på den svenska översättningen. Lycka till!

25.03.2019 - 11:30

country flag Bereaux wrote:

Bonjour, les explications du diagramme modèle 184-16 pour l'écharpe ne correspondent pas pour des rangs aller retour. Il me semble que tout se tricote à l'endroit sauf la maille double qui elle se tricote à l'envers lorsque l'on a fait un premier rang à l'endroit. Est-ce bien cela ?

31.01.2019 - 11:50

DROPS Design answered:

Bonjour Mme Bereaux, les diagrammes montrent les motifs, vus sur l'endroit, pour tricoter A.1 en rangs, on tricote sur l'endroit (rang1): 5 m end, 1 m double et sur l'envers: (on lit de gauche à droite: 1 m env, 5 m end. Bon tricot!

31.01.2019 - 13:21

country flag Marion Böhm wrote:

Wenn ich den Schal nach Anleitung und Diagramm A.1 stricke, entsteht kein Bild, das krausrechts ist. Die Hinreihen werden rechts, die Rückreihen links gestrickt. Das geht zumindest aus der Anleitung so hervor. So entsteht das Bild glattrechts. Ist das Diagramm falsch?

29.01.2019 - 14:08

DROPS Design answered:

Liebe Frau Böhm, die Diagramme zeigen alle Reihen, wie sie von der Vorderseite aussehen, wenn Sie in Reihen stricken, stricken Sie die 5 ersten Maschen in A.1 rechts (sie sehen wie links von der Vorderseite aus), diese 5 ersten Maschen in A.1 werden links in der Runde gestrickt. Viel Spaß beim stricken!

29.01.2019 - 16:31

country flag Josefine wrote:

Hej gør man det samme med at stikke højre pind igennem masken fra forrige omgang, når man strikker vanter?

09.10.2018 - 10:06

DROPS Design answered:

Hei Josefine. Ja, du strikker A.2 som anvist også på vottene. God fornøyelse.

16.10.2018 - 13:16

country flag Anita Heimpel wrote:

Vielen lieben dank

05.10.2018 - 12:02

country flag Anita Heimpel wrote:

Irgendwas mache ich beim Schal fals die Seiten rollen sich bei mir ein Danke für die hilfe

05.10.2018 - 11:03

DROPS Design answered:

Liebe Frau Heimpel, beim Schal stricken Sie die ersten 5 Maschen krausrechts (= immer rechts stricken) und die 5. Masche in A.1 soll bei der Hinreihe 1 Masche tiefer rechts gestrickt, und bei der Rückreihe links gestrickt. Viel Spaß beim stricken!

05.10.2018 - 11:54

country flag Anne wrote:

Forstår ikke: stik højre pind gennem masken fra forrige omgang----

06.03.2018 - 08:52

DROPS Design answered:

Hej Anne, se her:

How to knit a double stitch from Garnstudio Drops design on Vimeo.

06.03.2018 - 16:25

country flag Joanna wrote:

Witam, Nie jestem pewna, czy dobrze rozumiem wzór na szalik. Jeśli na końcu rzędu nieparzystego przerobię 5 oczek z sześciooczkowego okresu wzoru A1, to przy przerabianiu parzystego rzędu będę trafiać podwójnym oczkiem na jedno z oczek lewych, a oczka przerabiane na prawo w rzędach nieparzystych będą tworzyć jakieś niezależne paski. Czy to tak ma być? Nie widzę takich dodatkowych pasków na zdjęciu szalika.

03.01.2018 - 14:11

DROPS Design answered:

Witaj Joanno, w rzędzie parzystym przerabiasz schemat od lewej do prawej strony, tzn. zaczynasz od 5 pierwszych oczek schematu A.1 i dalej powtarzasz już cały 6-oczkowy schemat A.1. Pozdrawiam

04.01.2018 - 09:41