
Categorías populares
¿Buscas un hilo?


Comentarios / Preguntas (11)
![]() Deborah escribió:
Deborah escribió:
Hi! I just knitted the scarf as a beginner and it came out lovely so thank you for this pattern! I am just confused about the instructions for the hat. Firstly; is there a way I could adapt it to use straight needles instead of circular and then just sew it in the middle? Secondly; what does knitting 2 by 2 mean Thirdly; why do you knit the rib, then go to A.1. and then start knitting rib stitches again? doesn't the rib stay at the bottom? Thanks!
12.09.2019 - 12:19DROPS Design respondió:
Dear Deborah, you will find how to adapt a pattern into straight needles here - knit the stitches 2 by 2 together means you work K2 tog across. At the top of hat, before starting to decrease, you don't work pattern A.1 anymore but rib K1/P1 then start to decrease. Happy knitting!
12.09.2019 - 13:20
![]() Helena Maine escribió:
Helena Maine escribió:
Hello This is a lovely pattern, however, in the photo it looks like the scarf has been knitted with the salvage stitch at the beginning of each row, I.e. the side edges of the scarf are very neat. It would have been good if you incorporated that technique in your demo of the pattern video.
09.08.2019 - 16:51
![]() Jennie escribió:
Jennie escribió:
Var är a1 och a2? bild saknas
24.03.2019 - 05:47DROPS Design respondió:
Hej. Nu finns diagrammen längst ner på mönstret även på den svenska översättningen. Lycka till!
25.03.2019 - 11:30
![]() Bereaux escribió:
Bereaux escribió:
Bonjour, les explications du diagramme modèle 184-16 pour l'écharpe ne correspondent pas pour des rangs aller retour. Il me semble que tout se tricote à l'endroit sauf la maille double qui elle se tricote à l'envers lorsque l'on a fait un premier rang à l'endroit. Est-ce bien cela ?
31.01.2019 - 11:50DROPS Design respondió:
Bonjour Mme Bereaux, les diagrammes montrent les motifs, vus sur l'endroit, pour tricoter A.1 en rangs, on tricote sur l'endroit (rang1): 5 m end, 1 m double et sur l'envers: (on lit de gauche à droite: 1 m env, 5 m end. Bon tricot!
31.01.2019 - 13:21
![]() Marion Böhm escribió:
Marion Böhm escribió:
Wenn ich den Schal nach Anleitung und Diagramm A.1 stricke, entsteht kein Bild, das krausrechts ist. Die Hinreihen werden rechts, die Rückreihen links gestrickt. Das geht zumindest aus der Anleitung so hervor. So entsteht das Bild glattrechts. Ist das Diagramm falsch?
29.01.2019 - 14:08DROPS Design respondió:
Liebe Frau Böhm, die Diagramme zeigen alle Reihen, wie sie von der Vorderseite aussehen, wenn Sie in Reihen stricken, stricken Sie die 5 ersten Maschen in A.1 rechts (sie sehen wie links von der Vorderseite aus), diese 5 ersten Maschen in A.1 werden links in der Runde gestrickt. Viel Spaß beim stricken!
29.01.2019 - 16:31
![]() Josefine escribió:
Josefine escribió:
Hej gør man det samme med at stikke højre pind igennem masken fra forrige omgang, når man strikker vanter?
09.10.2018 - 10:06DROPS Design respondió:
Hei Josefine. Ja, du strikker A.2 som anvist også på vottene. God fornøyelse.
16.10.2018 - 13:16
![]() Anita Heimpel escribió:
Anita Heimpel escribió:
Vielen lieben dank
05.10.2018 - 12:02
![]() Anita Heimpel escribió:
Anita Heimpel escribió:
Irgendwas mache ich beim Schal fals die Seiten rollen sich bei mir ein Danke für die hilfe
05.10.2018 - 11:03DROPS Design respondió:
Liebe Frau Heimpel, beim Schal stricken Sie die ersten 5 Maschen krausrechts (= immer rechts stricken) und die 5. Masche in A.1 soll bei der Hinreihe 1 Masche tiefer rechts gestrickt, und bei der Rückreihe links gestrickt. Viel Spaß beim stricken!
05.10.2018 - 11:54
![]() Anne escribió:
Anne escribió:
Forstår ikke: stik højre pind gennem masken fra forrige omgang----
06.03.2018 - 08:52DROPS Design respondió:
Hej Anne, se her:
How to knit a double stitch from Garnstudio Drops design on Vimeo.
06.03.2018 - 16:25
![]() Joanna escribió:
Joanna escribió:
Witam, Nie jestem pewna, czy dobrze rozumiem wzór na szalik. Jeśli na końcu rzędu nieparzystego przerobię 5 oczek z sześciooczkowego okresu wzoru A1, to przy przerabianiu parzystego rzędu będę trafiać podwójnym oczkiem na jedno z oczek lewych, a oczka przerabiane na prawo w rzędach nieparzystych będą tworzyć jakieś niezależne paski. Czy to tak ma być? Nie widzę takich dodatkowych pasków na zdjęciu szalika.
03.01.2018 - 14:11DROPS Design respondió:
Witaj Joanno, w rzędzie parzystym przerabiasz schemat od lewej do prawej strony, tzn. zaczynasz od 5 pierwszych oczek schematu A.1 i dalej powtarzasz już cały 6-oczkowy schemat A.1. Pozdrawiam
04.01.2018 - 09:41
|
||||||||||
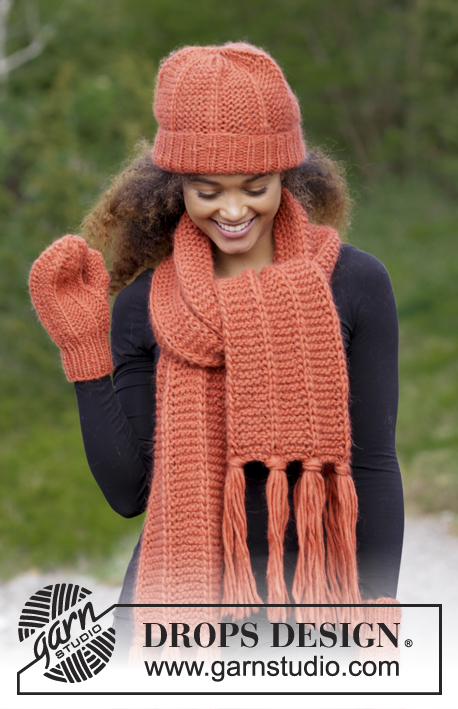
Tangerine#tangerineset |
||||||||||
 |
 |
|||||||||
Conjunto que consiste de: Bufanda, gorro y manoplas de punto con una variante del falso punto inglés y punto musgo. El conjunto es tejido en DROPS Snow.
DROPS 184-16 |
||||||||||
|
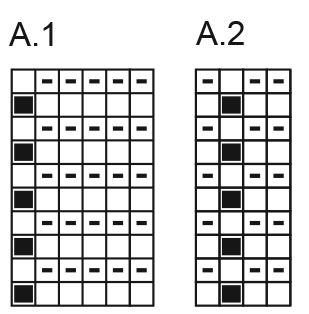
INFORMACIÓN PARA REALIZAR EL PATRÓN: PUNTO MUSGO (tejido en redondo): 1 surco = 2 vueltas. Tejer 1 vuelta de derecho y 1 vuelta de revés. PATRÓN: Ver diagramas A.1 y A.2. Los diagramas muestran todas las hileras del patrón vistas por el lado derecho. TIP PARA AUMENTAR: Aumentar 1 punto haciendo 1 lazada, en la hilera siguiente tejer las lazadas retorcidas (es decir, tejer por atrás del punto en vez de por el frente) para evitar agujeros. ----------------------------------------------------- BUFANDA: Tejer la pieza de ida y vuelta en aguja circular. Montar 35 puntos en aguja circular tamaño 9 mm. Tejer 1 hilera de derecho. Tejer A.1 sobre los primeros 30 puntos, terminar la hilera con los primeros 5 puntos de A.1. Continuar este patrón hasta que la pieza mida 150 cm. ¡RECORDARSE DE MANTENER LA MISMA TENSIÓN DE TEJIDO DE LA MUESTRA! Rematar. FLECOS: Cortar 6 hilos de 50 cm (= 1 fleco). Doblarlos en dos, pasar el bucle por el lado derecho entre cada punto en falso punto inglés en la parte de abajo de la bufanda. Después pasar las puntas de los hilos a través de los bucles y apretar. Sujetar un fleco en el punto más externo a cada lado de la bufanda = 7 flecos. Repetir en el otro lado de la bufanda. ----------------------------------------------------- GORRO: Tejer en redondo en una aguja circular corta. Cambiar a agujas de doble punta cuando sea necesario. Montar 54-60 puntos en una aguja circular corta tamaño 8 mm. Tejer en resorte (= 1 revés/1 derecho) toda la vuelta. Continuar con resorte hasta que la pieza mida 14 cm. ¡RECORDARSE DE MANTENER LA MISMA TENSIÓN DE TEJIDO DE LA MUESTRA! Después tejer de acuerdo a A.1 (= 9-10 repeticiones en la vuelta). Continuar con A.1 hasta que la pieza mida 27-28 cm. Ahora tejer en resorte (= 1 revés/1 derecho) sobre todos los puntos. Cuando la pieza mida 29-30 cm, tejer todos los puntos juntos de derecho, de 2 en 2 = 27-30 puntos. Tejer 1 vuelta de derecho, después tejer todos los puntos juntos de derecho, de 2 en 2 = 14-15 puntos. Cortar el hilo y pasarlo a través de los puntos restantes, fruncir y rematar bien. El gorro mide aprox 32-33 cm en total. ----------------------------------------------------- MANOPLAS: MANOPLA IZQUIERDA: La pieza se teje en redondo en agujas de doble punta. Montar 28-32 puntos en agujas de doble punta tamaño 5 mm con Snow. Tejer * 1 derecho, 1 revés *, repetir de *a* toda la vuelta. Continuar con resorte durante 6 cm. Después tejer A.2 sobre todos los puntos (= 7-8 repeticiones a lo ancho). ¡RECORDARSE DE MANTENER LA MISMA TENSIÓN DE TEJIDO DE LA MUESTRA! Cuando la pieza mida 12-13 cm, aumentar 1 punto a cada lado del primer punto de la vuelta para el refuerzo del pulgar - ¡LEER TIP PARA AUMENTAR! Aumentar a cada lado de los puntos aumentados a cada vuelta 4-5 veces en total (tejer los puntos aumentados en PUNTO MUSGO – ver explicación arriba) = 36-42 puntos. Después deslizar los 9-11 puntos del pulgar en 1 gancho auxiliar. Montar 1 nuevo punto por atrás de los puntos en el gancho auxiliar = 28-32 puntos. Continuar con A.2 hasta que la pieza mida aprox 22-24 cm, ajustar de modo que la vuelta siguiente sea una vuelta de derecho. Tejer los primeros 2 puntos de cada repetición de A.2 juntos de derecho = 21-24 puntos. Tejer 3 vueltas, en la vuelta siguiente tejer los últimos 2 puntos de cada repetición juntos de derecho = 14-16 puntos. Tejer 3 vueltas, en la vuelta siguiente tejer todos los puntos juntos de derecho, de 2 en 2 = 7-8 puntos restantes. Cortar el hilo y pasarlo a través de los puntos restantes, fruncir y rematar bien. PULGAR: Deslizar los 9-11 puntos del gancho auxiliar en las agujas de doble punta tamaño 5 mm y levantar, adicionalmente, 2 nuevos puntos por atrás de los puntos = 11-13 puntos distribuidos en las agujas de doble punta. Continuar en redondo en punto musgo hasta que el pulgar mida aprox 5-6 cm (medido a partir de donde los puntos fueron colocados de vuelta en las agujas de doble punta). En la vuelta siguiente, tejer todos los puntos juntos de derecho, de 2 en 2 = 6-7 puntos restantes en la aguja. Cortar el hilo y pasarlo a través de los puntos restantes, fruncir y rematar bien. MANOPLA DERECHA: Tejer como la manopla izquierda. |
||||||||||
Explicaciones del diagrama |
||||||||||
|
||||||||||
|
||||||||||
¿Terminaste este patrón?Entonces, etiqueta tus fotos con #dropspattern #tangerineset o envíalas a la galería #dropsfan. ¿Necesitas ayuda con este patrón?Encontrarás 24 videos tutoriales, un espacio para comentarios/preguntas y más visitando la página del patrón en garnstudio.com © 1982-2025 DROPS Design A/S. Todos los derechos reservados. Este documento, incluyendo todas sus sub-secciones, está protegido por los derechos de autor (copyright). Lee más acerca de lo que puedes hacer con nuestros patrones en la parte de abajo de cada patrón de nuestro sitio. |
||||||||||


Con más de 40 años en el diseño de modelos de punto y de ganchillo, DROPS Design ofrece una de las más vastas colecciones de patrones gratuitos en el internet - traducidos en 17 idiomas. Al día de hoy, contamos con 314 catálogos y 11822 patrones - de los cuales 11158 están traducidos en español.
Nosotros trabajamos con mucho esmero para brindarte lo mejor que las labores de punto y ganchillo tienen para ofrecer,inspiración y consejos, así como hilos de magnífica calidad a precios increíbles! Te gustaría usar nuestros patrones para otro fin además del uso personal? Puedes leer acerca de lo que estás permitida a hacer en el texto de Copyright en la parte de abajo de todos nuestros patrones. Felices labores!
Escribe un comentario sobre DROPS 184-16
¡Nos encantaría saber qué piensas acerca de este patrón!
Si quieres escribir una pregunta referente al patrón, por favor asegúrate de elegir la categoría correcta en el formulario debajo, para acelerar el proceso de respuesta. Los campos obligatorios están marcados con un *.