
Popular categories
Looking for a yarn?


Comments / Questions (23)
![]() ANNE B wrote:
ANNE B wrote:
Merci de votre prompte réponse, mais désolée ne vois pas comment arriver à ces 9 mailles? Où sont elles? Faut il répéter A1A et A1B pour obtenir même hauteur que diagrammes A2 et A3? Merci
29.04.2019 - 17:57DROPS Design answered:
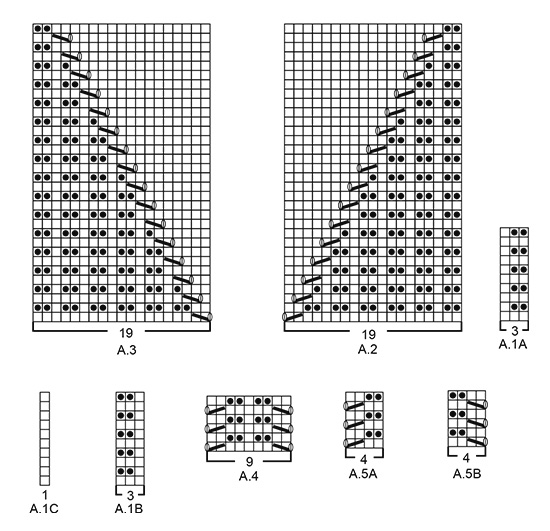
Bonjour Anne B, vous allez continuer A.2 et A.3 pour continuer les diagonales ajourées, le nombre de mailles entre A.2 et A.3 (= A.1, A.1B et A.1C) vont progressivement diminuer, "mangées" par A.2 et A.3, quand il restera 9 mailles en point texturé de chaque côté, tricotez alors A.4 sur ces 9 m. Bon tricot!
30.04.2019 - 09:48
![]() ANNE B wrote:
ANNE B wrote:
Bonjour, ai du mal à comprendre les 9 mailles restantes en texturé? le diagramme A4 n'a pas la même inclinaison que A2? et que faire avec A1 A ou B? Merci m'expliquer comment arriver à ces 9 mailles? Merci,
29.04.2019 - 15:40DROPS Design answered:
Bonjour Anne B, quand on a diminué le point texturé (avec A.2 et A.3) et qu'il reste 9 mailles, on va les tricoter comme dans A.4 (= 1 jeté, 1 m (diminution), point texturé sur 5 m, 1 dim, 1 jeté). La maille endroit au milieu de A.4 doit être la maille du milieu du côté = mettez un marqueur dans cette maille (= 2 marqueurs au total, 1 pour chaque côté). Bon tricot!
29.04.2019 - 15:59
![]() Karin Brinch-Nielsen wrote:
Karin Brinch-Nielsen wrote:
Tusind tak for hjælpen, men nu har jeg et nyt problem: Jeg er på forstykket ved v- udskæringen og har strikket højre halvdel. Hvordan skal jeg strikke venstre halvdel ? De 7 kantmasker retstrik mod midten er jo brugt brugt til højre halvdel. Skal der strikkes 7 nye kantmasker ? Jeg ser frem til svaret ! Mvh Karin Brinch-Nielsen
09.04.2019 - 21:41DROPS Design answered:
Hei Karin. Når du setter maskene fra tråden tilbake på pinnen skal du i tillegg strikke opp 1 maske i hver av de 7 kantmaskene mot midt foran (strikk opp på baksiden av maskene) slik at de 2 rillekantene vil overlappe hverandre helt nederst. God fornøyelse
10.04.2019 - 07:56
![]() Karin Brinch-Nielsen wrote:
Karin Brinch-Nielsen wrote:
Str M. Jeg er på forstykket efter de 4 pinde glatstrikning. 1 kantm i retstrik A.5A, 52 m glatstrik, sæt disse 57 m på en tråd. Det forstår jeg ikke. Hvordan kan 52 masker bliver til 57 m ?
25.03.2019 - 11:02DROPS Design answered:
Hei Karin. 1 kantmaske i rille + A.5A (4 masker) + 52 masker glattstrikk = 57 masker. Det er disse du setter på en tråd. God fornøyelse
02.04.2019 - 09:45
![]() Ani Leiggi wrote:
Ani Leiggi wrote:
Ganz herzlichen Dank für die schnelle Aufklärung, jetzt steht meinem ersten V-Ausschnitt nichts mehr im Wege. Top Service hier, so macht stricken richtig doll Spass.DANKE!
12.03.2019 - 19:15
![]() Ani Leiggi wrote:
Ani Leiggi wrote:
Guten Abend, meine Frage betrifft den V- Ausschnitt, ich stricke Grösse S. Habe die 52 M. der rechten Seite vor mir, stillgelegt. Auf der linken Nadel beginne ich nun direkt mit den mittigen 7 Krausmaschen, wie kann ich denn da vor 7 kraus rechten Maschen abnehmen: 2 Maschen vor den 7 kraus rechten Maschen beginnen und 2 Maschen rechts zusammenstricken? Ich hab da keine 2 Maschen davor?! Hab ich was falsch gemacht?
11.03.2019 - 20:31DROPS Design answered:
Liebe Frau Leiggi, die Abnahmen für den V-Ausschnitt wird beim linken Vorderteil nach den 7 Maschen Kraus rechts gestrickt (= bei einer Hinreihe). Die Hinreihe der Verteilung stricken Sie zuerst ohne Abnahme, dann bei der nächsten Hinreihe (die vom Halsausschnitt beginnt), beginnen Sie die Abnahmen. Beim rechten Vorderteil nehmen Sie dann vor den 7 Maschen kraus rechts (auch bei einer Hinreihe). Viel Spaß beim stricken!
12.03.2019 - 09:47
![]() Nicole Polzin wrote:
Nicole Polzin wrote:
Vielen, vielen Dank!!! Bin wirklich irgendwie nicht von selbst drauf gekommen 🙈. Aber jetzt klappt es. Eure kurzfristigen Antworten sind SUPER!!!!!! So konnte ich direkt weitermachen.
05.10.2018 - 19:33
![]() Nicole Polzin wrote:
Nicole Polzin wrote:
Stricke ich die Muster A.1A, A.1B und A.1C nur 1x in der Höhe (also 10 Runden) und dann über diese Maschen nur noch re Maschen oder solange bis ich die Muster A.2 und A.3 1x in der Höhe gestrickt habe?
05.10.2018 - 16:01DROPS Design answered:
Liebe Frau Polzin, Sie stricken im Muster mit A.1, A.2 und A.3 und die Maschen glatt rechts wie beschrieben, nach A.2 und A.3 einmal in der Höhe gestrickt wurden, wiederholen Sie diese Diagramme wie zuvor aber mit weniger Maschen im Muster und mehr Maschen glatt rechts. Viel Spaß beim stricken!
05.10.2018 - 16:08
![]() Nicole Polzin wrote:
Nicole Polzin wrote:
Aber ich habe doch die ganzen Maschen von A.1A u d A.2.B unter den Armen und die Maschena Zahl bleibt doch gleich. Hab ich irgendwie einen Denkfehler?
05.10.2018 - 13:06DROPS Design answered:
Liebe Frau Polzin, die Maschenanzahl der ganze Runde bleibt gleich, aber wegen A.2/A.3 gibt es immer mehr Maschen, die glatt gestrickt sind und weniger die im Muster gestrickt sind. - das Muster macht so ein Dreicke an beiden Seiten - siehe auch Foto. Viel Spaß beim stricken!
05.10.2018 - 14:38
![]() Nicole Polzin wrote:
Nicole Polzin wrote:
Ich verstehe folgendes nicht: „Wenn noch insgesamt 9 Maschen im Strukturmuster an beiden Seiten des Rumpfteils übrig sind, je 1 Markierungsfaden an der mittleren dieser 9 Maschen an beiden Seiten des Rumpfteils anbringen – die Markierungsfäden beim Stricken mitführen. Nun im Muster A.4 über die mittleren 9 Maschen an beiden Seiten des Rumpfteils stricken, die übrigen Maschen glatt rechts weiterstricken.“ Wo genau sollen die 9 Maschen übrig sein?
04.10.2018 - 21:54DROPS Design answered:
Liebe Frau Polzin, wegen A.2 und A.3 wir das Muster auf die Seiten verschoben (= immer mehr Maschen glatt rechts und dazu weniger Maschen im Muster), wenn dann nur noch 9 Maschen im Muster übrig sind (= unter beiden Ärmel), setzen Sie eine Markierung in die mittlere Masche an der Seite (= 4 M im Muster, 1 M im muster mit Markierer und 4 M im Muster). Jetzt stricken Sie A.4 über diese 9 Maschen (die mittlere M in A.4 = je die Masche mit der Markiereung). Viel Spaß beim stricken!
05.10.2018 - 07:52
|
||||||||||||||||
Morven#morvensweater |
||||||||||||||||
 |
 |
|||||||||||||||
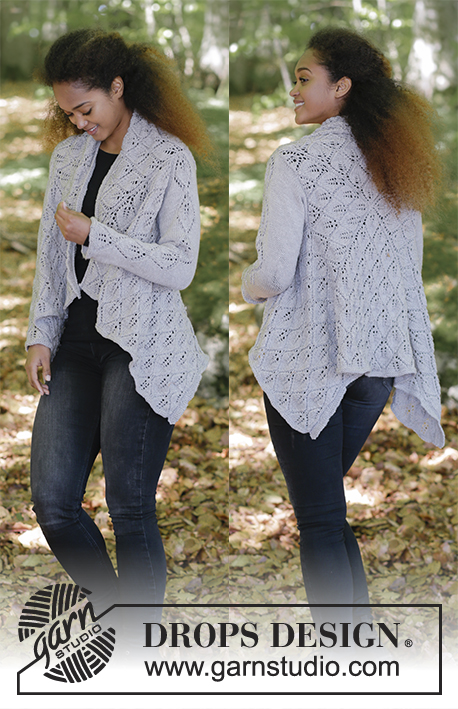
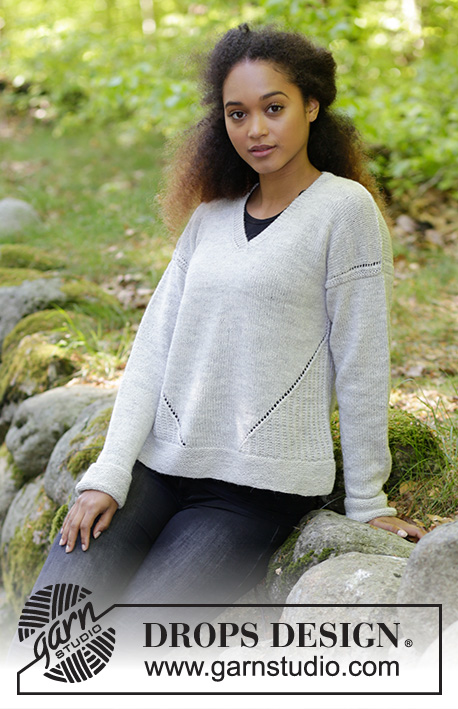
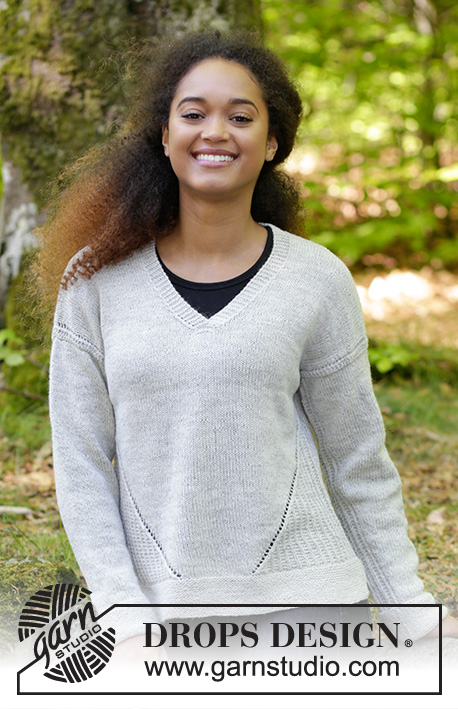
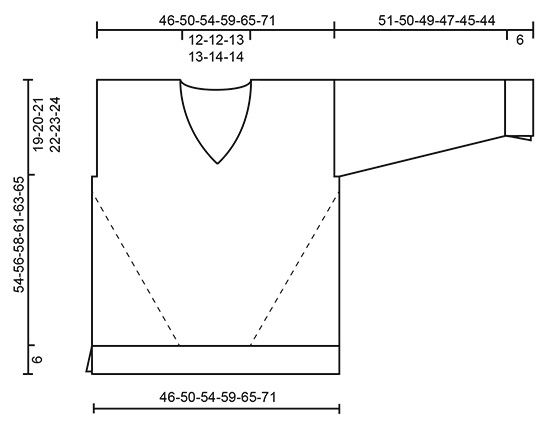
Knitted sweater with V-neck, texture and lace pattern. Size: S - XXXL Piece is knitted in DROPS Flora.
DROPS 184-28 |
||||||||||||||||
|
INFORMATION FOR PATTERN: GARTER STITCH (back and forth): 1 ridge = knit 2 rows. PATTERN: See diagrams A.1 to A.5. Diagrams show all rows in pattern seen from the right side. DECREASE TIP (applies to V-neck): Decrease for V-neck inside 7 edge stitches in garter stitch. All decreases are done from the right side. Decrease as follows after 7 edge stitches in garter stitch: Slip 1 stitch knitwise, knit 1, pass slipped stitch over stitch worked (= 1 stitch decreased). Decrease as follows before 7 edge stitches in garter stitch: Begin 2 stitches before the 7 edge stitches and knit 2 together (= 1 stitch decreased). INCREASE TIP (applies to mid under sleeve): Begin 5 stitches before stitch with marker thread, make 1 yarn over, knit 1, A.4 (= 9 stitches), knit 1, make 1 yarn over (= 2 stitches increased). On next round knit yarn overs twisted to avoid holes. ---------------------------------------------------------- SWEATER: Work from bottom up. Work front and back piece on circular needle in parts until after vent, then work piece in the round on circular needle up to armhole before working back and forth on circular needle in parts until finished measurements. Work sleeves back and forth on circular needle after vent, then work in the round on double pointed needles/short circular needle. BACK PIECE: Cast on 109-119-129-141-155-169 stitches on circular needle size 2.5 mm / US 1.5 with Flora. Work in GARTER STITCH - see explanation above, for 6 cm / 2⅜" (finish by knitting 1 row from wrong side). Put piece aside and work the front piece. FRONT PIECE: Cast on 109-119-129-141-155-169 stitches and work garter stitch as on back piece for 6 cm / 2⅜" (finish after knitting 1 row from wrong side). Now place the parts together as explained under BODY: BODY: Switch to circular needle size 3 mm / US 2.5. Knit the 109-119-129-141-155-169 stitches from front piece, cast on 1 new stitch on needle, knit the 109-119-129-141-155-169 stitches from back piece and cast on 1 new stitch on needle = 220-240-260-284-312-340 stitches. Knit 1 row over all stitches. Work next round as follows: Work A.1A over the first 24-27-30-33-33-36 stitches (= 8-9-10-11-11-12 repetitions of 3 stitches), A.2 (= 19 stitches), 23-27-31-37-51-59 stitches in stockinette stitch, A.3 (= 19 stitches), A.1B over the next 24-27-30-33-33-36 stitches (= 8-9-10-11-11-12 repetitions of 3 stitches), A.1C (= 1 stitch), A.1A over the next 24-27-30-33-33-36 stitches, A.2 (= 19 stitches), 23-27-31-37-51-59 stitches in stockinette stitch, A.3 (= 19 stitches), A.1B over the next 24-27-30-33-33-36 stitches and finish with A.1C (= 1 stitch). Continue pattern like this (A.2 and A.3 will be diagonal as triangles out towards each side and there will be more and more stockinette stitch mid front and mid back). REMEMBER THE GAUGE! When 9 stitches in textured pattern remain in each side of body, insert 1 marker thread in the middle of these 9 stitches in each side - move the marker threads upwards when working. Now work A.4 over the middle 9 stitches in each side, continue the other stitches in stockinette stitches. When piece measures 35-36-37-39-40-41 cm / 13¾"-14¼"-14½"-15¼"-15¾"-16", bind off 1 stitch in each side for armholes (i.e. Bind off stitch with marker thread). Cut the yarn. Then finish front and back piece separately. BACK PIECE: = 109-119-129-141-155-169 stitches. Purl 1 row from wrong side (continue pattern in each side as before) and cast AT THE SAME TIME on 1 new stitch in each side for seam = 111-121-131-143-157-171 stitches. Work next row as follows from right side: 1 edge stitch in garter stitch, A.5A (= 4 stitches), work in stockinette stitch until 5 stitches remain on row, work A.5B (= 4 stitches) and finish with 1 edge stitch in garter stitch. Continue pattern like this. When piece measures 52-54-56-59-61-63 cm / 20½"-21¼"-22"-23¼"-24"-24¾", bind off the middle 25-25-27-27-29-29 stitches for neck and finish each shoulder separately. Continue with stockinette stitch, A5 and 1 edge stitch in garter stitch towards the side. Cast in addition off 1 stitch for neck at beginning of the next 2 rows from neck = 41-46-50-56-62-69 stitches remain on the shoulder. Work until piece measures approx. 54-56-58-61-63-65 cm / 21¼"-22"-22¾"-24"-24¾"-25½", adjust so that next row is worked from wrong side. Knit 1 row from wrong side and bind off by knitting from right side but to avoid a tight bind-off edge make 1 yarn over after every 5th stitch while binding off (bind off yarn overs as regular stitches). Work the other shoulder the same way. FRONT PIECE: = 109-119-129-141-155-169 stitches. Purl 1 row from wrong side (continue pattern in each side as before) and cast AT THE SAME TIME on 1 new stitch in each side for seam = 111-121-131-143-157-171 stitches. Then work 4 rows in stockinette stitch with 1 edge stitch in garter stitch and A.5A/A.5B in each side - AT THE SAME TIME work the middle 7 stitches in garter stitch. Work next row from right side after the 2 ridges as follows: 1 edge stitch in garter stitch, A.5A (= 4 stitches), 47-52-57-63-70-77 stitches in stockinette stitch, slip these 52-57-62-68-75-82 stitches on 1 stitch holder or leave them on a needle, knit until 5 stitches remain on row, work A.5B (= 4 stitches) and finish with 1 edge stitch in garter stitch. Work back from wrong side with 1 edge stitch in garter stitch, A.5B (= 4 stitches) and purl until 7 stitches remain on row towards mid front, knit these 7 stitches. Continue back and forth like this with 7 edge stitches in garter stitch towards mid front, stockinette stitch, A.5B and 1 edge stitch in garter stitch towards the side. AT THE SAME TIME on first row from right side, decrease for V-neck - read DECREASE TIP. Decrease like this every other row (i.e. every row from right side) 5-5-6-6-7-7 times in total, on every 4th row 4 times in total in all sizes and then on every 6th row 2 times in total in all sizes = 48-53-57-63-69-76 stitches. Work until piece measures 54-56-58-61-63-65 cm / 21¼"-22"-22¾"-24"-24¾"-25½", adjust so that next row is worked from wrong side. Knit 1 row from wrong side and knit 1 row from right side over all stitches. On next row (wrong side), bind off the first 41-46-50-56-62-69 stitches for shoulder = 7 stitches remain on row, knit these stitches. Continue in garter stitch back and forth over the 7 stitches until edge in garter stitch measures approx. 7-7-8-8-8-8 cm / 2¾"-2¾"-3"-3"-3"-3" from shoulder and bind off (= neck edge). Slip stitches in the other side of piece back on circular needle size 3 mm / US 2.5 and pick in addition up 1 stitch in each of the 7 stitches in garter stitch towards mid front (pick up at the back of stitches). Work back and forth the same way as in the other side but continue A.5A towards armhole and decrease for V-neck before the 7 edge stitches towards mid front (from right side). When piece measures 54-56-58-61-63-65 cm / 21¼"-22"-22¾"-24"-24¾"-25½" and 1 row has been knitted from wrong side over all stitches, work next row as follows from right side: bind off the first 41-46-50-56-62-69 stitches = 7 stitches remain on row, knit these stitches. Continue in garter stitch back and forth over the 7 stitches until edge in garter stitch measures approx. 7-7-8-8-8-8 cm / 2¾"-2¾"-3"-3"-3"-3" from shoulder and bind off (= neck edge). SLEEVE: Cast on 51-53-55-57-59-61 stitches on circular needle size 2.5 mm / US 1.5 with Flora. Work in garter stitch back and forth on needle for 6 cm / 2⅜". Then work piece in the round, i.e. distribute the stitches on double pointed needles size 3 mm / US 2.5 - beginning of round, i.e. opening on edge in garter stitch = mid under sleeve. Work in stockinette stitch in the round with A.4 over the middle 9 stitches under sleeve. Insert 1 marker thread in the middle stitch of A.4 and move the marker thread upwards when working. When piece measures 8 cm / 3⅛", increase 2 stitches mid under sleeve - read INCREASE TIP. Increase 19-21-22-24-25-26 times in total, in S: On every 7th round, in M and L: On every 6th round, in XL: On every 5th round, in XXL: Alternately on every 4th and 5th round, in XXXL: On every 4th round = 89-95-99-105-109-113 stitches. When piece measures 51-50-49-47-45-44 cm / 20"-19¾"-19¼"-18½"-17¾"-17¼" bind off all stitches but to avoid a tight bind-off edge make 1 yarn over after every 5th stitch while binding off (bind off yarn overs as regular stitches). Work another sleeve the same way. ASSEMBLY: Sew shoulder seams inside bind-off edge so that there are 2 ridges mid on top of shoulder. Sew neck edge together mid back (seam should be in towards wrong side). Sew neck edge to neck line in the back of neck. Sew in sleeves inside 1 edge stitch. |
||||||||||||||||
Diagram explanations |
||||||||||||||||
|
||||||||||||||||
 |
||||||||||||||||
 |
||||||||||||||||
Have you finished this pattern?Tag your pictures with #dropspattern #morvensweater or submit them to the #dropsfan gallery. Do you need help with this pattern?You'll find 28 tutorial videos, a Comments/Questions area and more by visiting the pattern on garnstudio.com. © 1982-2026 DROPS Design A/S. We reserve all rights. This document, including all its sub-sections, has copyrights. Read more about what you can do with our patterns at the bottom of each pattern on our site. |
||||||||||||||||


With over 40 years in knitting and crochet design, DROPS Design offers one of the most extensive collections of free patterns on the internet - translated to 17 languages. As of today we count 325 catalogs and 12291 patterns - 12281 of which are translated into English (US/in).
We work hard to bring you the best knitting and crochet have to offer, inspiration and advice as well as great quality yarns at incredible prices! Would you like to use our patterns for other than personal use? You can read what you are allowed to do in the Copyright text at the bottom of all our patterns. Happy crafting!
Post a comment to pattern DROPS 184-28
We would love to hear what you have to say about this pattern!
If you want to leave a question, please make sure you select the correct category in the form below, to speed up the answering process. Required fields are marked *.