
Popular categories
Looking for a yarn?


Comments / Questions (9)
![]() Anna wrote:
Anna wrote:
Czy mogę użyć zamiast Drops Polaris, włóczki Drops Andes (2 nitki)? Czy muszę na coś dodatkowo zwrócić uwagę przy takiej zamianie?
21.12.2025 - 14:19DROPS Design answered:
Witaj Anno, możesz użyć włóczki Drops Andes, 2 nitki razem do tego projektu. Zawsze radzimy wykonać próbkę i dopasować rozmiar drutów. Powodzenia!
24.12.2025 - 00:06
![]() Susanne Gustafsson wrote:
Susanne Gustafsson wrote:
Hej! Kan man sticka ärmarna runt på rundsticka? Hur i så fall?
13.03.2022 - 16:36DROPS Design answered:
Hej Susanne, ja du kan godt sætte maskerne sammen og strikke rundt, da starter du omgangen imellem de 2 nye masker du har slået op i hver side :)
16.03.2022 - 11:27
![]() Tonje wrote:
Tonje wrote:
Hei, hva menes med at man skal strikke med 4 tråder med Drops air? Er det 4 tråder fra fire forskjellige nøster som skal strikkes samtidig? Skjønner ikke hvordan det skal gå opp med str M hvor det skal være 650 g garn til genseren.
22.05.2020 - 22:26DROPS Design answered:
Hej Tonje Ja det stämmer att det ska stickas med 4 trådar Air samtidigt (antingen från 4 olika nystan eller från 2 nystan där du tar tråd både från utsidan och insidan samtidigt). Mvh DROPS Design
28.05.2020 - 14:53
![]() PILAR wrote:
PILAR wrote:
Es precioso però no suelo trabajar en circular... Existe el patron para agujas normales? Gracias!!!!
15.10.2019 - 18:15
![]() Jola wrote:
Jola wrote:
Hallo, ich bin gerade über den Preis gestolpert, der zur Realität, in keinem Verhältnis steht. Auch bei der kleinsten Größe, gestrickt mit Polaris, kostet die Wolle, beim Angebotspreis (wenn die gewünschte Farbe Vorhanden): 72,00 Euro. NORMALPREIS 118,80Euro ob dann mit der Air oder Eskimo, fällt der Preis ähnlich aus. Wie kommt der oben genannte Preis zur Stande in höhe von 36€uro? Sie können das für diese Anleitung benötigte Garn ab 36.00€ erhalten.
12.09.2019 - 10:47DROPS Design answered:
Liebe Jola, in die 1. Größe brauchen Sie 1200 g Polaris/100 g = 12 Knâuel x 4.65 (Uni) beim normalen Preis sind 55.80 €. Zur zeit schlägt ein Laden Polaris à 3.00 (Uni) dann wird den Garn für den Pullover 36 € (uni) kosten - siehe Angebot unter Farbkarte oder in der Anleitung. Viel Spaß beim stricken!
12.09.2019 - 13:17
![]() Etienne Wouters Nickmans wrote:
Etienne Wouters Nickmans wrote:
Ik wil deze trui graag breien met breinaalden en niet met rondbreinaalden. Is daar ook een uitleg voor voorzien?
05.02.2019 - 19:41DROPS Design answered:
Dag Etienne,
Veel truien zijn inderdaad ook geschikt om met rechte naalden te breien. Hier is een les over geschreven; zie hier. Deze trui wordt wel van boven naar beneden gebreid, dus dan zou je steken op moeten zetten na de halsboord, de raglanlijnen op het einde aan elkaar moeten naaien met maassteken en op het einde steken voor de halsboord op moeten nemen om de halsboord te breien.
08.02.2019 - 16:46
![]() Linda wrote:
Linda wrote:
Quand vous décrivez la taille des aiguilles à tricoter, est-ce en grandeurs métriques ou américaines. Ex: vous conseillez des 15 Est-ce 15 américain ou 10 metric?
29.01.2019 - 14:52DROPS Design answered:
Bonjour Linda, la taille des aiguilles dans les modèles français est en système métrique , pour connaître l'équivalence en système US, changez la langue du modèle pour US-English - retrouvez également les équivalences ici. Bon tricot!
29.01.2019 - 16:39
![]() Anja wrote:
Anja wrote:
Ein wunderschönes Modell und endlich mal wieder eins aus Drops Polaris - da gibt es ja leider nicht so viel. Ich bin nur irritiert über die Preisangabe oben rechts: 102,00 € kostet es doch nie und nimmer, dieses Modell nachzustricken, nichtmal in der größten Größe, oder? Ist eigentlich geplant, die Farbpalette von Drops Polaris mal zu erweitern?
23.11.2017 - 21:05DROPS Design answered:
Liebe Anja, Danke für den Hinweis, Garnmenge wurde korrigiert, jetzt sehen Sie den richtigen Preis. Viel Spaß beim stricken!
24.11.2017 - 08:41
![]() Lorella wrote:
Lorella wrote:
Ho appena notato che una signora vende su un noto sito prodotti realizzati con i vostri modelli. cioè ha messo tutte le foto originali dei vostri modelli.
22.11.2017 - 18:35
|
||||||||||||||||
Mont Blanc#montblancsweater |
||||||||||||||||
 |
 |
|||||||||||||||
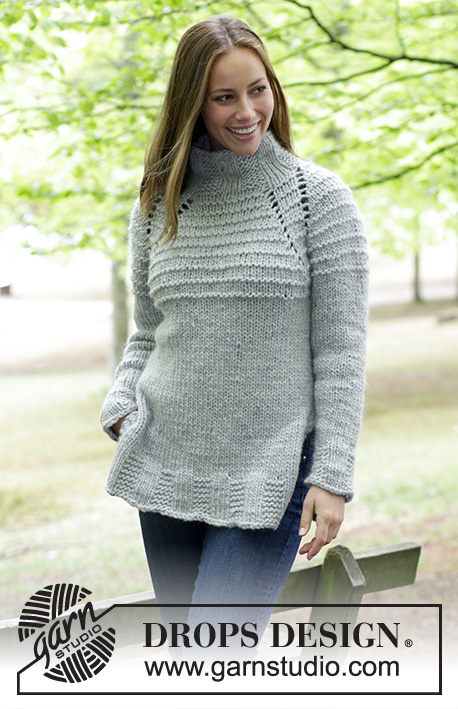
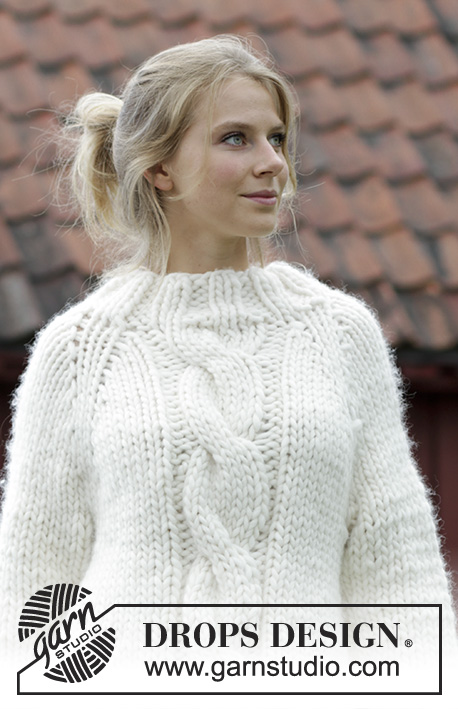
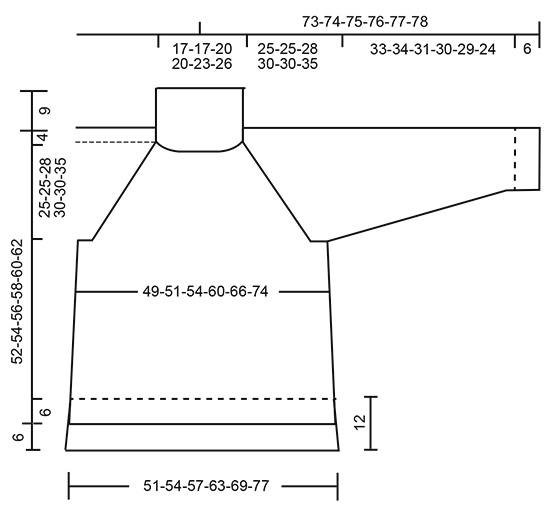
Knitted sweater with raglan, cables, high collar and split in sides, worked top down. Sizes S - XXXL. The piece is worked in 1 strand DROPS Polaris or 4 strands Air.
DROPS 183-18 |
||||||||||||||||
|
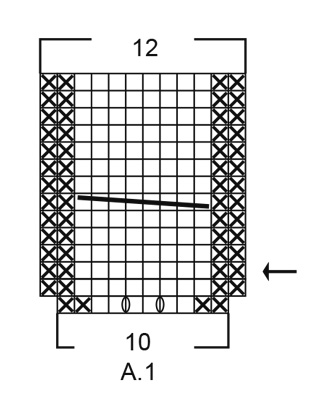
INFORMATION FOR THE PATTERN: CHANGING STRAND TIP (when working with Polaris): When changing balls with Polaris divide the old strand in two for the last 15 cm / 6" – cut off one part, do the same with the new strand. Lay the first and the last 15 cm / 6" over each other so that you get the normal thickness of the yarn and continue working – in this way you will not see the join. MAGIC LOOP: If you are working in the round with a circular needle which is too long for the number of stitches, you can do as follows: The circular needle should be long and with a flexible wire. Push the stitches to the middle of the wire. Divide the stitches in the middle and pull the wire out between the stitches. Push the stitches to the ends of the needle in each side, make sure the stitches are not twisted. The strand of yarn to be used is on the back needle and you begin working on the front needle. Pull the back needle out to work the stitches on the front needle. When the stitches on the front needle have been worked, turn and push the stitches back on the empty needle and work the other side in the same way. Continue in the round in this way; make sure you always pull the needle out on the side with the yarn. PATTERN: See diagram A.1. The diagram shows all the rows in the pattern seen from the right side. DECREASE TIP-1: Start 2 stitches before the marker thread, knit 2 stitches together, (the marker thread sits here), slip 1 stitch as if to knit, knit 1, pass the slipped stitch over. DECREASE TIP-2: NOTE: So that the decreases are worked on alternate left and right sides of the piece, work as follows: In sizes S, M and L decrease alternately at the start and end of the rows you are decreasing on. In sizes XL, XXL and XXXL decrease at the start of each row you are decreasing on. Decrease as follows from the right side: Knit 2 stitches together. Decrease as follows from the wrong side: Purl 2 stitches together. RAGLAN: Increase to raglan on each side of the marker threads (= 8 stitches increased on the round). Increase as follows, start 1 stitch before the marker thread: Make 1 yarn over, knit 2 stitches (the marker thread sits in the middle of these stitches), make 1 yarn over. On the next round, knit the yarn overs twisted to prevent holes. INCREASE TIP (for body): Increase 1 stitch by making a yarn over. On the next round, knit the yarn over twisted to prevent a hole. RIDGE/GARTER STITCH (worked back and forth): 1 ridge = Knit 2 rows. ---------------------------------------------------------- SWEATER: The piece is worked in the round with circular needle and top down. The sleeves are worked back and forth on a circular needle. Read CHANGING STRAND TIP (when working with Polaris)! YOKE: Cast on 40-40-44-44-48-52 stitches with circular needle size 15 mm / US 19 and 1 strand Polaris or 4 strands Air. Work rib (knit 2 / purl 2) for 9 cm / 3½". Insert 4 marker threads in the piece without working the stitches as follows: First marker thread at the beginning of the round, second marker thread after 14-14-16-16-18-20 stitches (= back piece), third marker thread after 6 new stitches (= sleeve), fourth marker thread after 14-14-16-16-18-20 new stitches (= front piece), there are now 6 stitches left to the first marker (= sleeve). Knit 1 round where you decrease 1 stitch on each side of each marker thread – read DECREASE TIP-1 = 32-32-36-36-40-44 stitches. NOTE: In our collection we do not have shorter circular needles than 60 cm / 24" in needle size 15mm/US 19. You have now decreased stitches so that the circumference of the piece is shorter than 60 or 80 cm / 24" or 32" in sizes S - XXL. Therefore, work MAGIC LOOP – see description above, until you have enough stitches to use circular needle 60 cm / 24". REMEMBER THE GAUGE! The next round is worked as follows: * Knit 1-1-2-2-3-4, PATTERN according to diagram A.1 (= 10 stitches on the first round), knit 1-1-2-2-3-4, (the marker thread sits here), knit 4 *, work from *-* 1 more time. On the next round begin the increases to RAGLAN - see description above. Increase in this way every 2nd round 8-10-10-11-12-14 times = 100-116-120-128-140-160 stitches (including the 4 stitches increased on round 1 in diagram A.1). Raglan increases in sizes M, L, XXL and XXXL are now finished. In sizes S and XL work 1 more round where you increase 1 stitch on the front and back piece in the same way (do not increase on sleeves) = 4 stitches increased. There are now 104-116-120-132-140-160 stitches on the round. The piece measures approx. 21-25-25-29-30-35 cm / 8¼"-9¾"-8¾"-11½"-11¾"-13¾" from after the rib and down. Continue the pattern without increases for 3-0-2-1-0-0 more rounds. The piece measures approx. 25-25-28-30-30-35 cm / 9¾"-9¾"-11"-11¾"-11¾"-13¾" from after the rib and down. The next round is worked as follows: Work 32-34-36-40-42-48 stitches (= back piece), place the next 20-24-24-26-28-32 stitches on a thread (= sleeve), cast on 4-4-4-4-6-6 stitches under the sleeve, work 32-34-36-40-42-48 stitches (= front piece), place the next 20-24-24-26-28-32 stitches on a thread (= sleeve), cast on 4-4-4-4-6-6 stitches under the sleeve. Insert a marker thread in the piece. THE PIECE IS NOW MEASURED FROM HERE! BODY: = 72-76-80-88-96-108 stitches. Continue with stockinette stitch and A.1 as before. Insert 1 marker thread in each side, in the middle of the new stitches cast on (= 2-2-2-2-3-3 new stitches on each side of the marker threads) and 36-38-40-44-48-54 stitches between the marker threads for the front and back pieces. When the piece measures 5 cm / 2" increase 1 stitch before each of the marker threads – read INCREASE TIP = 74-78-82-90-98-110 stitches. When the piece measures 10 cm / 4" increase 1 stitch after each marker thread = 76-80-84-92-100-112 stitches. Now the work varies in the different sizes: Sizes S, L, XL and XXL: Continue in the round with pattern and stockinette stitch until the piece measures 17-18-18-20 cm / 6¾"-7"-7"-8". Sizes M and XXXL: Continue in the round with pattern and stockinette stitch until the piece measures 19-17 cm / 7½"-6¾" and increase at the same time as follows: When the piece measures 14 cm / 5½" increase 1 stitch before each of the marker threads. When the piece measures 16 cm / 6¼" increase 1 stitch after each marker thread. ALL SIZES: There are now 76-84-84-92-100-116 stitches on the round. When the piece measures 17-19-18-18-20-17 cm / 6¾"-7½"-7"-7"-8"-6¾" place the 38-42-42-46-50-58 stitches on the back piece on a thread. Continue working rib back and forth over the 38-42-42-46-50-58 stitches on the front piece. Start from the right side and work as follows: 2 stitches GARTER STITCH – see description above, * knit 2, purl 2 *, work from *-* until there are 4 stitches left on the needle, knit 2 and finish with 2 stitches garter stitch. Continue in this way until the rib measures 6 cm / 2⅜" and the piece a total of 52-54-56-58-60-62 cm / 20½"-21¼"-22"-22¾"-23⅝"-24⅜" from the shoulder down. Loosely bind off with knit over knit and purl over purl. Place the stitches from the back piece back on the needle and work stockinette stitch and diagram A.1 as before with 2 edge stitches in garter stitch in each side for 6 cm / 2⅜". Then work rib back and forth in the same way as the front piece until the rib measures 6 cm / 2⅜". The split on the front piece is 6 cm / 2⅜" long; on the back piece it is 12 cm / 4¾" long. The piece measures a total of approx. 58-60-62-64-66-68 cm / 22¾"-23⅝"-24⅜"-25¼"-26"-26¾" from the shoulder and down on the back piece. SLEEVE: The sleeves are worked back and forth on circular needle and sewn together to finish. Place the 20-24-24-26-28-32 stitches from the thread back on circular needle size 15 mm / US 19 and cast on 2-2-2-2-3-3 new stitches in each side = 24-28-28-30-34-38 stitches. Work stockinette stitch back and forth over all stitches. When the piece measures 4-4-2-4-4-2 cm / 1½"-1½"-¾"-1½"-1½"-¾" decrease 1 stitch in the right side of the piece – read DECREASE TIP-2. Decrease on alternate right and left sides of the piece every 2nd-2nd-2nd-1st-1st-1st row 8-12-12-14-14-18 times (= 4-6-6-7-7-9 times in each side) = 16-16-16-16-20-20 stitches. When the piece measures 33-34-31-30-29-24 cm / 13"-13½"-12¼"-11¾"-11½"-9½" work rib (knit 2, purl 2) for 6 cm / 2⅜". Loosely bind off with knit over knit and purl over purl. Work the other sleeve in the same way. ASSEMBLY: Sew the seams under the sleeves in the outermost loop of the outermost stitch so that the seam is not thick. Sew the openings under the sleeves. |
||||||||||||||||
Diagram explanations |
||||||||||||||||
|
||||||||||||||||
 |
||||||||||||||||
 |
||||||||||||||||
Have you finished this pattern?Tag your pictures with #dropspattern #montblancsweater or submit them to the #dropsfan gallery. Do you need help with this pattern?You'll find 30 tutorial videos, a Comments/Questions area and more by visiting the pattern on garnstudio.com. © 1982-2026 DROPS Design A/S. We reserve all rights. This document, including all its sub-sections, has copyrights. Read more about what you can do with our patterns at the bottom of each pattern on our site. |
||||||||||||||||


With over 40 years in knitting and crochet design, DROPS Design offers one of the most extensive collections of free patterns on the internet - translated to 17 languages. As of today we count 324 catalogs and 12290 patterns - 12280 of which are translated into English (US/in).
We work hard to bring you the best knitting and crochet have to offer, inspiration and advice as well as great quality yarns at incredible prices! Would you like to use our patterns for other than personal use? You can read what you are allowed to do in the Copyright text at the bottom of all our patterns. Happy crafting!
Post a comment to pattern DROPS 183-18
We would love to hear what you have to say about this pattern!
If you want to leave a question, please make sure you select the correct category in the form below, to speed up the answering process. Required fields are marked *.