
Popular categories
Looking for a yarn?


Comments / Questions (31)
![]() Sabrina wrote:
Sabrina wrote:
Ich meinte bei meinem vorherigen Kommentar "Masche, Umschlag, Masche", nicht "Masche, Umschlag, Umschlag ", Entschuldigung
05.11.2025 - 22:17
![]() Sabrina wrote:
Sabrina wrote:
Ich verstehe "Umschlag zwischen zwei Maschen" in der 2. Reihe von z. B. "A. 6.C" nicht. Man soll "Masche, Umschlag, Umschlag" stricken, also zwei Maschen, aber durch die überzogene Abnahme in der Vorreihe ist dort doch nur eine Masche, die man stricken kann.
05.11.2025 - 22:11DROPS Design answered:
Liebe Sabrina, Sie stricken nicht "Masche, Umschlag, Umschlag", sondern "Masche, Umschlag, Masche". Die überzogen abgenommenen Maschen hinterlassen 2 Maschen, nicht eine: Sie heben 1 Masche ab, stricken 2 Maschen und ziehen die abgehobene Masche über. Von den 3 gestrickten Maschen haben Sie die übergezogene abgenommen. Zwischen den übrig gebliebenen 2 Maschen machen Sie in der nächsten Reihe den Umschlag. Viel Spaß beim Stricken!
07.11.2025 - 10:43
![]() Romana wrote:
Romana wrote:
Do I knit the shoulders short row first then decrease & bind off neck?
22.03.2025 - 22:58DROPS Design answered:
Dear Romana, in the back piece first you start the short rows for the shoulders. As you work these short rows, cast off the neck stitches as indicated. After finishing the neck, we finish off the shoulders. In the front piece first you slip the neck stitches to the stitch holder, then you cast off for the neck. As you cast off for the neck, you start the shoulder short rows as in the back piece. Happy knitting!
23.03.2025 - 20:22
![]() Romana Butt wrote:
Romana Butt wrote:
Hi, I’m stuck at the beginning. I’m knitting a size L. I’ve just finished the rib and the first line of knitting from A.1B-A.7B. I have 114st on the needle. How do I work on the wrong side since the nxt line reads, the next row is worked as follows from the right side: I’m confused with this part
16.02.2025 - 10:29DROPS Design answered:
Hi Romana, You work the rib (A.1A to A.7A) back and forth until the piece measures 8 cm, finishing after a row from the wrong side. Then you start the next section from the right side. Happy knitting!
17.02.2025 - 07:17
![]() Bridgit wrote:
Bridgit wrote:
Can I use drops daisy for this jumper
05.02.2025 - 20:13DROPS Design answered:
Dear Bridgit, this jumper is worked with DROPS Air which is yarn group C while Daisy belongs to yarn group B - find jumpers worked bottom up with cables and a yarn group B (use the yarn converter if needed) here, feel free to add/remove filters. Happy knitting!
06.02.2025 - 16:34
![]() Bridgit wrote:
Bridgit wrote:
Can I knit drops design in extra fine wool
05.02.2025 - 20:04
![]() Lily wrote:
Lily wrote:
Hi! i've re-started the back piece more than five times now because the rib isn't forming, and i have been following the pattern word for word. Please let me know what the problem could be; i'm stressed!
06.04.2024 - 14:49DROPS Design answered:
Dear Lily, since we cannot see you knitting, and you did not even tell me which size you are knitting, we can't know what you might be doing wrong. However, do not forget, that you can always ask for help (either on the phone or in person) in the store where you bought your DROPS yarn from. Happy knitting!
06.04.2024 - 20:25
![]() Katalin wrote:
Katalin wrote:
Hej! Går det att byta ut garnet till ett tjockare och vilka justeringar behöver man göra för att passformen ska bli rätt i sånna fall?
28.05.2023 - 19:06DROPS Design answered:
Hej Katalin, for at få pasformen som på billedet er du nødt til at overholde den strikkefasthed som står i opskriften. Lav en strikkeprøve :)
29.05.2023 - 11:49
![]() Ines wrote:
Ines wrote:
Vielen Dank ! Dank dem Video habe ich meinen Fehler entdeckt. :)
16.01.2023 - 19:11
![]() Ines wrote:
Ines wrote:
Guten Tag, ich stricke dieses Muster in der Grösse XXL und habe ein Problem mit der Maschenzahl . Wenn ich nach den 3 kraus rechts in den 5 M Rippenmuster ein Masche abnehme, fehlt mir eine M im Diagramm A.6C. Kann ich das Problem lösen, indem ich im Rippenmuster keine Masche abnehme, oder habe ich dann später zu viele Maschen?
16.01.2023 - 15:25DROPS Design answered:
Liebe Ines, in A.6B muss man 3 Maschen zunehmen- der Umschlag in A.6C gehört zu dem Zopf (siehe dieses Video) - vielleicht kommt es von hier?
16.01.2023 - 16:52
|
||||||||||||||||||||||||||||||||||
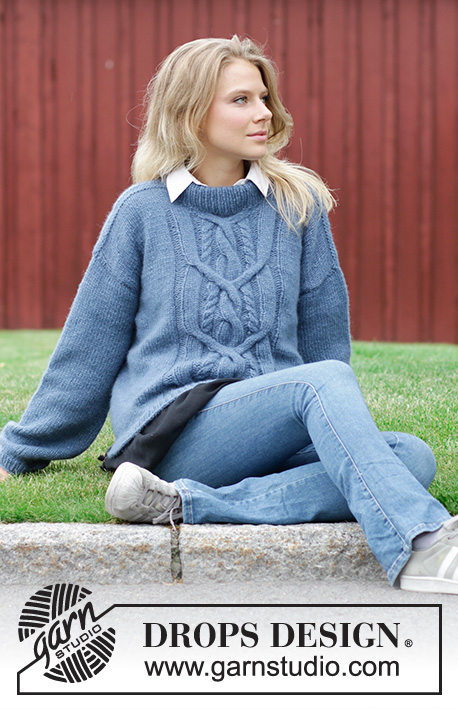
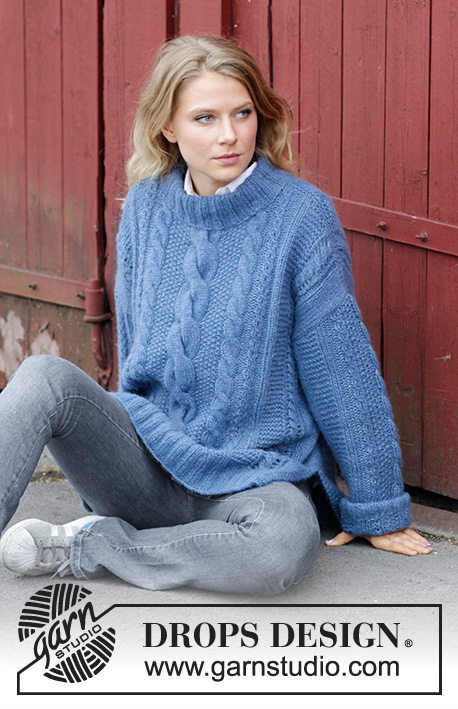
Midnight Cables#midnightcablessweater |
||||||||||||||||||||||||||||||||||
 |
 |
|||||||||||||||||||||||||||||||||
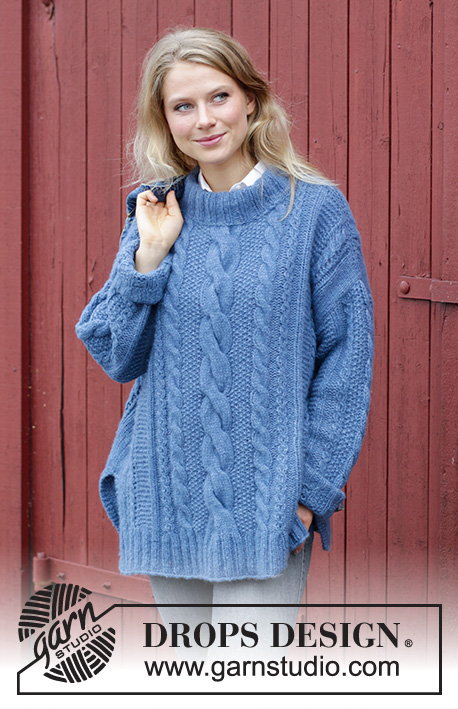
Knitted jumper with cables, lace pattern and split. Sizes S - XXXL. The piece is worked in DROPS Air.
DROPS 184-12 |
||||||||||||||||||||||||||||||||||
|
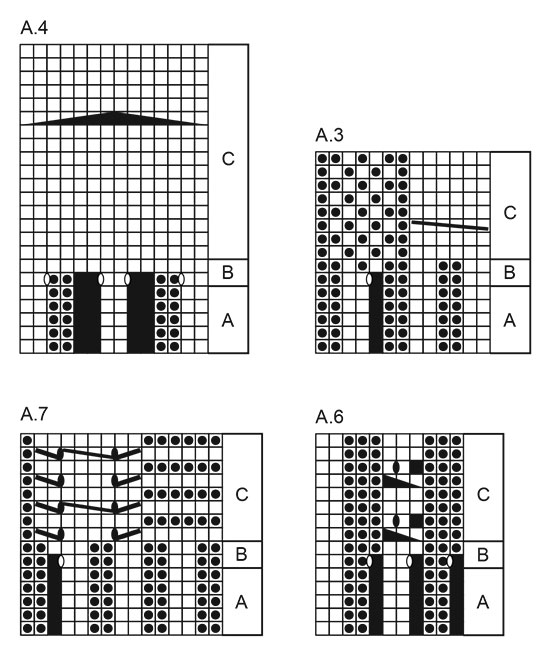
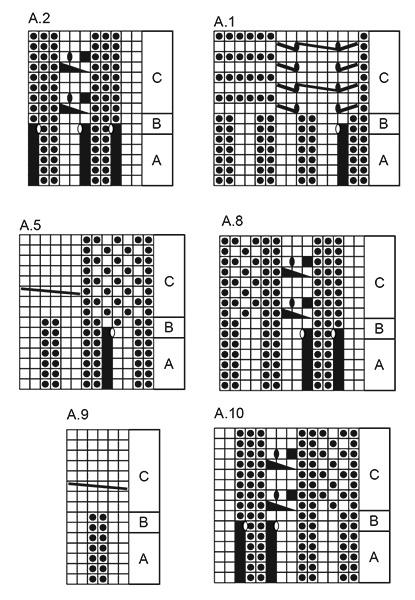
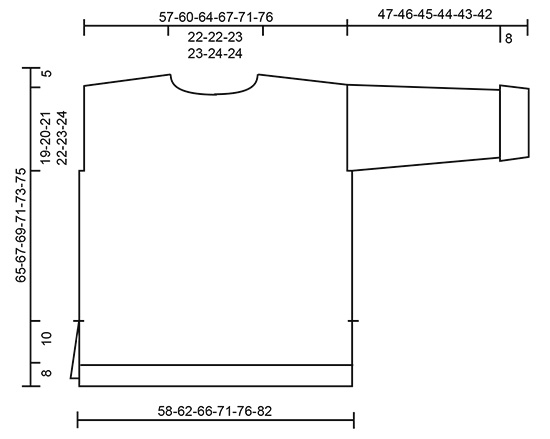
INFORMATION FOR THE PATTERN: RIDGE/GARTER STITCH (worked back and forth): 1 ridge = Knit 2 rows. PATTERN: See diagrams A.1 to A.10. The diagrams show all the rows in the pattern seen from the right side. INCREASE INFORMATION (for sleeve): Increase 1 stitch by making 1 yarn over, on the next row work the yarn overs twisted to prevent holes. Sizes S, M, L: The increased stitches are worked garter stitch as you go, until there are a total of 6 stitches garter stitch before A.8 and a total of 6 stitches garter stitch after A.10, then work these stitches stockinette stitch. Sizes XL,XXL and XXXL: The increased stitches are worked stockinette stitch as you go. ---------------------------------------------------------- JUMPER: The front and back pieces are worked back and forth with circular needle up to the split. Then the body is worked in the round as far as the armholes, when the front and back pieces are worked back and forth separately. The sleeves are worked back and forth with circular needle. BACK PIECE: Cast on 88-92-104-112-116-124 stitches with circular needle size 5 mm / US 8. Purl 1 row from the wrong side. The next row is worked as follows from the right side: Work 3 stitches GARTER STITCH - see description above, knit 2-0-2-2-0-0, * purl 2, knit 2 *, work from *-* a total of 0-1-2-3-4-5 times, A.1A (= 14 stitches), A.2A (= 8 stitches), A.3A (= 12 stitches), A.4A (= 10 stitches), A.5A (= 12 stitches), A.6A (= 8 stitches), A.7A (= 14 stitches), * knit 2, purl 2 *, work from *-* a total of 0-1-2-3-4-5 times, knit 2-0-2-2-0-0, 3 stitches garter stitch. Continue this pattern until the piece measures 8 cm / 3⅛". Change to circular needle size 6 mm / US 10. REMEMBER THE GAUGE! Now work as follows in the different sizes: SIZES S-M-L-XL: The next row is worked as follows from the right side: Work 3 stitches garter stitch, 2-4-10-14 stitches rib as before and decrease 0-0-2-3 stitches over these, work A.1B over A.1A, A.2B over A.2A, A.3B over A.3A, A.4B over A.4A, A.5B over A.5A, A.6B over A.6A, A.7B over A.7A, work 2-4-10-14 stitches rib as before and decrease 0-0-2-3 stitches over these and 3 stitches garter stitch. When A.1B-A.7B have been completed there are 102-106-114-120 stitches on the needle. The next row is worked as follows from the right side: Work 3 stitches garter stitch, 2-4-8-11 stitches stockinette stitch, A.1C over A.1B, A.2C over A.2B, A.3C over A.3B, A.4C over A.4B, A.5C over A.5B, A.6C over A.6B, A.7C over A.7B, work 2-4-8-11 stitches stockinette stitch and 3 stitches garter stitch. There are now 102-106-114-120 stitches on the needle. Continue this pattern until the piece measures 18 cm / 7" in all these sizes. Lay the piece to one side. SIZES XXL-XXXL: The next row is worked as follows from the right side: Work 3 stitches garter stitch, work 5-9 stitches rib as before and decrease 1-0 stitches over these, work A.6C (= 11 stitches), work A.1B over A.1A, A.2B over A.2A, A.3B over A.3A, A.4B over A.4A, A.5B over A.5A, A.6B over A.6A, A.7B over A.7A, work A.2C (= 11 stitches), work 5-9 stitches rib as before and decrease 1-0 stitches over these, 3 stitches garter stitch. When A.1B-A.7B have been completed there are 128-138 stitches on the needle. The next row is worked as follows from the right side: Work 3 stitches garter stitch, work 4-9 stitches stockinette stitch, continue A.6C (= 11 stitches), A.1C over A.1B, A.2C over A.2B, A.3C over A.3B, A.4C over A.4B, A.5C over A.5B, A.6C over A.6B, A.7C over A.7B, continue A.2C (= 11 stitches), work 4-9 stitches stockinette stitch and 3 stitches garter stitch. There are now 128-138 stitches on the needle. Continue this pattern until the piece measures 18 cm / 7" in both sizes. Lay the piece to one side. FRONT PIECE: Cast on and work as for the back piece. BODY: Place the 2 pieces together on the same circular needle size 6 mm / US 10 = 204-212-228-240-256-276 stitches. Insert 1 marker in each side and allow the markers to follow your work upwards. Continue by working in the round over all stitches as before, but the garter stitches in each side are worked in stockinette stitch from here. When the piece measures 41-42-43-44-45-46 cm / 16⅛"-16½"-17"-17¼"-17¾"-18" - adjust so that the next round is a round without yarn overs in the diagrams, decrease 2-2-4-6-8-10 stitches in each side (= 1-1-2-3-4-5 stitches on each side of each marker). Front and back pieces are now continued separately. BACK PIECE: = 100-104-110-114-120-128 stitches (including 1 edge stitch in each side). Start from the right side and continue the pattern back and forth as before but with 1 edge stitch in garter stitch in each side. When the piece measures 60-62-64-66-68-70 cm / 23⅝"-24⅜"-25¼"-26"-26¾"-27½" start the diagonal shoulder AT THE SAME TIME as, when the piece measures 63-65-67-69-71-73 cm / 24¾"-25½"-26⅜"-27⅛"-28"-28¾", you bind off for the neck. Work as follows: DIAGONAL SHOULDERS: ROW 1 (= from right side): Work until there are 6-6-6-7-7-8 stitches left on the needle (towards shoulder), turn and tighten the strand. ROW 2 (= from wrong side): Work until there are 6-6-6-7-7-8 stitches left on the needle (towards shoulder), turn and tighten the strand. Repeat rows 1 and 2 three more times: work until 6-6-6-7-7-8 stitches more remain on the needle than on previous row from the same side, turn (= 6-8-10-8-10-10 stitches left on the shoulder). Work 1 ridge over all the 30-32-34-36-38-42 stitches, bind off. NECK: When the piece measures 62-64-66-68-70-72 cm / 24⅜"-25¼"-26"-26¾"-27½"-28⅜" decrease 3 stitches over each cable of 6 stitches and decrease 7 stitches over the cable of 14 stitches. When the piece measures 63-65-67-69-71-73 cm / 24¾"-25½"-26⅜"-27⅛"-28"-28¾" bind off the middle 25-25-27-27-29-29 stitches for neck and each shoulder is finished separately. Bind off 1 stitch on the next row from the neck = 30-32-34-36-38-42 stitches left on the shoulder. Work the other shoulder in the same way. FRONT PIECE: = 100-104-110-114-120-128 stitches. Continue in the same way as the back piece until the piece measures 59-61-63-65-67-69 cm / 23¼"-24"-24¾"-25½"-26⅜"-27⅛". Now decrease 3 stitches over each cable of 6 stitches and decrease 7 stitches over the cable of 14 stitches. When the piece measures 60-62-64-66-68-70 cm / 23⅝"-24⅜"-25¼"-26"-26¾"-27½" place the middle 21-21-23-23-25-25 stitches on 1 thread for neck and each shoulder is finished separately AT THE SAME TIME as you work diagonal shoulders as for the back piece. Continue to bind off for the neck at the beginning of each row from the neck as follows: 2 stitches 1 time and 1 stitch 1 time = 30-32-34-36-38-42 stitches left on the shoulder. Work 1 ridge and bind off. Work the other shoulder in the same way. SLEEVE: The piece is worked back and forth with circular needle. Cast on 42-42-42-50-50-50 stitches (including 1 edge stitch in each side) with circular needle size 5 mm / US 8. Purl 1 row from the wrong side. The next row is worked as follows from the right side: Work 1 edge stitch in garter stitch, purl 1, * knit 2, purl 2 *, work from *-* a total of 1-1-1-2-2-2 times, work A.8A (= 12 stitches), A.9A (= 6 stitches), A.10A (= 12 stitches), * purl 2, knit 2 * work from *-* a total of 1-1-1-2-2-2 times, purl 1 and 1 edge stitch in garter stitch. Continue this pattern until the piece measures 8 cm / 3⅛". Change to circular needle size 6 mm / US 10. The next row is worked as follows from the right side: Work A.8B over A.8A, A.9B over A.9A, A.10B over A.10A, the remaining stitches are worked as before. When A.8B-A.10B have been completed there are 46-46-46-54-54-54 stitches on the needle. The next row is worked as follows from the right side: Work 1 edge stitch in garter stitch, 0-0-0-3-3-3 stitches stockinette stitch, 5-5-5-6-6-6 stitches garter stitch, work A.8C over A.8B, A.9C over A.9B and A.10C over A.10B, work 5-5-5-6-6-6 stitches garter stitch, 0-0-0-3-3-3 stitches stockinette stitch and 1 edge stitch in garter stitch. Continue this pattern. When the piece measures 13-15-14-12-15-13 cm / 5"-6"-5½"-4¾"-6"-5" increase 1 stitch in each side - read INCREASE INFORMATION above. Increase in this way every 4½-3½-2½-3-2½-2½ cm / 1¾"-1¼"-⅞"-1⅛"-⅞"-⅞" a total of 9-11-12-10-11-13 times = 64-68-70-74-76-80 stitches. Continue working until the piece measures 53-52-51-50-49-48 cm / 21"-20½"-20"-19¾"-19¼"-19" (shorter measurements in larger sizes because of broader shoulders). Now bind off for a small sleeve cap in each side as follows: bind off 7-7-8-8-9-9 stitches 2 times and bind off 6-8-7-9-8-10 stitches 1 time - decrease 1 stitch over each cable with holes and decrease 3 stitches over the cable of 6 stitches on the last bind off row. Bind off the remaining stitches. The piece measures approx. 55-54-53-52-51-50 cm / 21½"-21¼"-21"-20½"-20"-19¾" with the cuff turned up. Work another sleeve in the same way. ASSEMBLY: Sew the shoulder seams inside the bind-off edge so that you get 2 ridges on top of the shoulder. Sew in the sleeves inside the 1 edge stitch in garter stitch. Turn the cuffs up on the right side. NECKLINE: Knit up from the right side approx. 74-80 stitches around the neck (including the stitches from the thread in front) with short circular needle size 5 mm / US 8. Purl 1 round and adjust the number of stitches to 72-72-76-76-80-80 stitches. Then work rib in the round (= knit 2 / purl 2) for 10 cm / 4", bind off with knit over knit and purl over purl. Fold the neck double in towards the wrong side and fasten with small neat stitches - make sure the seam is not tight. |
||||||||||||||||||||||||||||||||||
Diagram explanations |
||||||||||||||||||||||||||||||||||
|
||||||||||||||||||||||||||||||||||
 |
||||||||||||||||||||||||||||||||||
 |
||||||||||||||||||||||||||||||||||
 |
||||||||||||||||||||||||||||||||||
Have you finished this pattern?Tag your pictures with #dropspattern #midnightcablessweater or submit them to the #dropsfan gallery. Do you need help with this pattern?You'll find 34 tutorial videos, a Comments/Questions area and more by visiting the pattern on garnstudio.com. © 1982-2026 DROPS Design A/S. We reserve all rights. This document, including all its sub-sections, has copyrights. Read more about what you can do with our patterns at the bottom of each pattern on our site. |
||||||||||||||||||||||||||||||||||


With over 40 years in knitting and crochet design, DROPS Design offers one of the most extensive collections of free patterns on the internet - translated to 17 languages. As of today we count 324 catalogs and 12290 patterns - 12280 of which are translated into English (US/in).
We work hard to bring you the best knitting and crochet have to offer, inspiration and advice as well as great quality yarns at incredible prices! Would you like to use our patterns for other than personal use? You can read what you are allowed to do in the Copyright text at the bottom of all our patterns. Happy crafting!
Post a comment to pattern DROPS 184-12
We would love to hear what you have to say about this pattern!
If you want to leave a question, please make sure you select the correct category in the form below, to speed up the answering process. Required fields are marked *.