
Popular categories
Looking for a yarn?


|
||||||||||||||||||||||||||||||||||
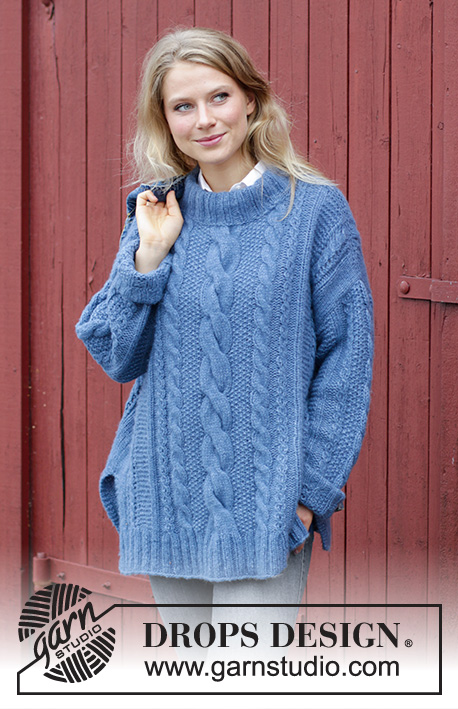
Midnight Cables |
||||||||||||||||||||||||||||||||||
 |
 |
|||||||||||||||||||||||||||||||||
Knitted jumper with cables, lace pattern and split. Sizes S - XXXL. The piece is worked in DROPS Air.
DROPS 184-12 |
||||||||||||||||||||||||||||||||||
|
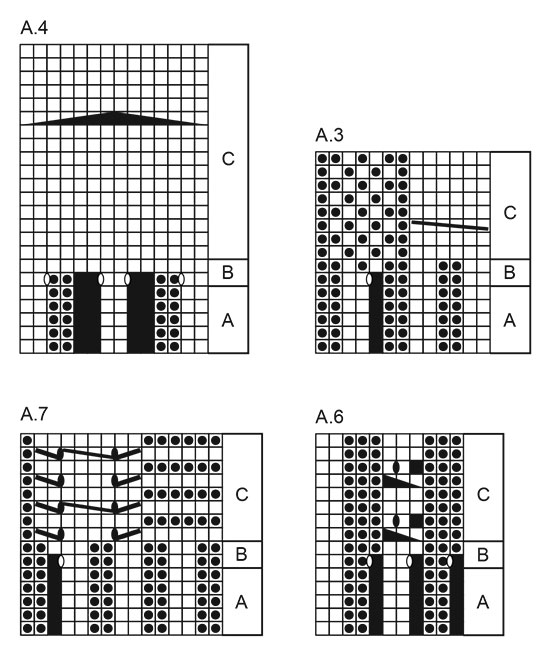
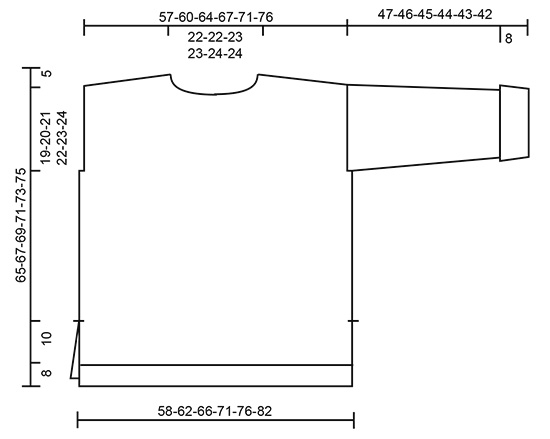
---------------------------------------------------------- INFORMATION FOR THE PATTERN: RIDGE/GARTER STITCH (worked back and forth): 1 ridge = Knit 2 rows. PATTERN: See diagrams A.1 to A.10. The diagrams show all the rows in the pattern seen from the right side. INCREASE INFORMATION (for sleeve): Increase 1 stitch by making 1 yarn over, on the next row work the yarn overs twisted to prevent holes. Sizes S, M and L: The increased stitches are worked garter stitch as you go, until there are a total of 6 stitches garter stitch before A.8 and a total of 6 stitches garter stitch after A.10, then work these stitches stocking stitch. Sizes XL, XXL and XXXL: The increased stitches are worked stocking stitch as you go. ---------------------------------------------------------- JUMPER: The front and back pieces are worked back and forth with circular needle up to the split. Then the body is worked in the round as far as the armholes, when the front and back pieces are worked back and forth separately. The sleeves are worked back and forth with circular needle. BACK PIECE: Cast on 88-92-104-112-116-124 stitches with circular needle size 5 mm. Purl 1 row from the wrong side. The next row is worked as follows from the right side: Work 3 stitches GARTER STITCH - see description above, knit 2-0-2-2-0-0, * purl 2, knit 2 *, work from *-* a total of 0-1-2-3-4-5 times, A.1A (= 14 stitches), A.2A (= 8 stitches), A.3A (= 12 stitches), A.4A (= 10 stitches), A.5A (= 12 stitches), A.6A (= 8 stitches), A.7A (= 14 stitches), * knit 2, purl 2 *, work from *-* a total of 0-1-2-3-4-5 times, knit 2-0-2-2-0-0, 3 stitches garter stitch. Continue this pattern until the piece measures 8 cm. Change to circular needle size 6 mm. REMEMBER THE KNITTING TENSION! Now work as follows in the different sizes: SIZES S-M-L-XL: The next row is worked as follows from the right side: Work 3 stitches garter stitch, 2-4-10-14 stitches rib as before and decrease 0-0-2-3 stitches over these, work A.1B over A.1A, A.2B over A.2A, A.3B over A.3A, A.4B over A.4A, A.5B over A.5A, A.6B over A.6A, A.7B over A.7A, work 2-4-10-14 stitches rib as before and decrease 0-0-2-3 stitches over these and 3 stitches garter stitch. When A.1B-A.7B have been completed there are 102-106-114-120 stitches on the needle. The next row is worked as follows from the right side: Work 3 stitches garter stitch, 2-4-8-11 stitches stocking stitch, A.1C over A.1B, A.2C over A.2B, A.3C over A.3B, A.4C over A.4B, A.5C over A.5B, A.6C over A.6B, A.7C over A.7B, work 2-4-8-11 stitches stocking stitch and 3 stitches garter stitch. There are now 102-106-114-120 stitches on the needle. Continue this pattern until the piece measures 18 cm in all these sizes. Lay the piece to one side. SIZES XXL-XXXL: The next row is worked as follows from the right side: Work 3 stitches garter stitch, work 5-9 stitches rib as before and decrease 1-0 stitches over these, work A.6C (= 11 stitches), work A.1B over A.1A, A.2B over A.2A, A.3B over A.3A, A.4B over A.4A, A.5B over A.5A, A.6B over A.6A, A.7B over A.7A, work A.2C (= 11 stitches), work 5-9 stitches rib as before and decrease 1-0 stitches over these, 3 stitches garter stitch. When A.1B-A.7B have been completed there are 128-138 stitches on the needle. The next row is worked as follows from the right side: Work 3 stitches garter stitch, work 4-9 stitches stocking stitch, continue A.6C (= 11 stitches), A.1C over A.1B, A.2C over A.2B, A.3C over A.3B, A.4C over A.4B, A.5C over A.5B, A.6C over A.6B, A.7C over A.7B, continue A.2C (= 11 stitches), work 4-9 stitches stocking stitch and 3 stitches garter stitch. There are now 128-138 stitches on the needle. Continue this pattern until the piece measures 18 cm in both sizes. Lay the piece to one side. FRONT PIECE: Cast on and work as for the back piece. BODY: Place the 2 pieces together on the same circular needle size 6 mm = 204-212-228-240-256-276 stitches. Insert 1 marker in each side and allow the markers to follow your work upwards. Continue by working in the round over all stitches as before, but the garter stitches in each side are worked in stocking stitch from here. When the piece measures 41-42-43-44-45-46 cm - adjust so that the next round is a round without yarn overs in the diagrams, decrease 2-2-4-6-8-10 stitches in each side (= 1-1-2-3-4-5 stitches on each side of each marker). Front and back pieces are now continued separately. BACK PIECE: = 100-104-110-114-120-128 stitches (including 1 edge stitch in each side). Start from the right side and continue the pattern back and forth as before but with 1 edge stitch in garter stitch in each side. When the piece measures 60-62-64-66-68-70 cm start the diagonal shoulder AT THE SAME TIME as, when the piece measures 63-65-67-69-71-73 cm, you cast off for the neck. Work as follows: DIAGONAL SHOULDERS: ROW 1 (= from right side): Work until there are 6-6-6-7-7-8 stitches left on the needle (towards shoulder), turn and tighten the strand. ROW 2 (= from wrong side): Work until there are 6-6-6-7-7-8 stitches left on the needle (towards shoulder), turn and tighten the strand. Repeat rows 1 and 2 three more times: work until 6-6-6-7-7-8 stitches more remain on the needle than on previous row from the same side, turn (= 6-8-10-8-10-10 stitches left on the shoulder). Work 1 ridge over all the 30-32-34-36-38-42 stitches, cast off. NECK: When the piece measures 62-64-66-68-70-72 cm decrease 3 stitches over each cable of 6 stitches and decrease 7 stitches over the cable of 14 stitches. When the piece measures 63-65-67-69-71-73 cm cast off the middle 25-25-27-27-29-29 stitches for neck and each shoulder is finished separately. Cast off 1 stitch on the next row from the neck = 30-32-34-36-38-42 stitches left on the shoulder. Work the other shoulder in the same way. FRONT PIECE: = 100-104-110-114-120-128 stitches. Continue in the same way as the back piece until the piece measures 59-61-63-65-67-69 cm. Now decrease 3 stitches over each cable of 6 stitches and decrease 7 stitches over the cable of 14 stitches. When the piece measures 60-62-64-66-68-70 cm place the middle 21-21-23-23-25-25 stitches on 1 thread for neck and each shoulder is finished separately AT THE SAME TIME as you work diagonal shoulders as for the back piece. Continue to cast off for the neck at the beginning of each row from the neck as follows: 2 stitches 1 time and 1 stitch 1 time = 30-32-34-36-38-42 stitches left on the shoulder. Work 1 ridge and cast off. Work the other shoulder in the same way. SLEEVE: The piece is worked back and forth with circular needle. Cast on 42-42-42-50-50-50 stitches (including 1 edge stitch in each side) with circular needle size 5 mm. Purl 1 row from the wrong side. The next row is worked as follows from the right side: Work 1 edge stitch in garter stitch, purl 1, * knit 2, purl 2 *, work from *-* a total of 1-1-1-2-2-2 times, work A.8A (= 12 stitches), A.9A (= 6 stitches), A.10A (= 12 stitches), * purl 2, knit 2 * work from *-* a total of 1-1-1-2-2-2 times, purl 1 and 1 edge stitch in garter stitch. Continue this pattern until the piece measures 8 cm. Change to circular needle size 6 mm. The next row is worked as follows from the right side: Work A.8B over A.8A, A.9B over A.9A, A.10B over A.10A, the remaining stitches are worked as before. When A.8B-A.10B have been completed there are 46-46-46-54-54-54 stitches on the needle. The next row is worked as follows from the right side: Work 1 edge stitch in garter stitch, 0-0-0-3-3-3 stitches stocking stitch, 5-5-5-6-6-6 stitches garter stitch, work A.8C over A.8B, A.9C over A.9B and A.10C over A.10B, work 5-5-5-6-6-6 stitches garter stitch, 0-0-0-3-3-3 stitches stocking stitch and 1 edge stitch in garter stitch. Continue this pattern. When the piece measures 13-15-14-12-15-13 cm increase 1 stitch in each side - read INCREASE INFORMATION above. Increase in this way every 4½-3½-2½-3-2½-2½ cm a total of 9-11-12-10-11-13 times = 64-68-70-74-76-80 stitches. Continue working until the piece measures 53-52-51-50-49-48 cm (shorter measurements in larger sizes because of broader shoulders). Now cast off for a small sleeve cap in each side as follows: Cast off 7-7-8-8-9-9 stitches 2 times and cast off 6-8-7-9-8-10 stitches 1 time - decrease 1 stitch over each cable with holes and decrease 3 stitches over the cable of 6 stitches on the last cast off row. Cast off the remaining stitches. The piece measures approx. 55-54-53-52-51-50 cm with the cuff turned up. Work another sleeve in the same way. ASSEMBLY: Sew the shoulder seams inside the cast-off edge so that you get 2 ridges on top of the shoulder. Sew in the sleeves inside the 1 edge stitch in garter stitch. Turn the cuffs up on the right side. NECKLINE: Knit up from the right side approx. 74-80 stitches around the neck (including the stitches from the thread in front) with short circular needle size 5 mm. Purl 1 round and adjust the number of stitches to 72-72-76-76-80-80 stitches. Then work rib in the round (= knit 2 / purl 2) for 10 cm, cast off with knit over knit and purl over purl. Fold the neck double in towards the wrong side and fasten with small neat stitches - make sure the seam is not tight. |
||||||||||||||||||||||||||||||||||
Diagram explanations |
||||||||||||||||||||||||||||||||||
|
||||||||||||||||||||||||||||||||||
|
||||||||||||||||||||||||||||||||||

|
||||||||||||||||||||||||||||||||||
|
||||||||||||||||||||||||||||||||||
|
Have you made this or any other of our designs? Tag your pictures in social media with #dropsdesign so we can see them! Do you need help with this pattern?You'll find tutorial videos, a Comments/Questions area and more by visiting the pattern on garnstudio.com. © 1982-2024 DROPS Design A/S. We reserve all rights. This document, including all its sub-sections, has copyrights. Read more about what you can do with our patterns at the bottom of each pattern on our site. |
||||||||||||||||||||||||||||||||||


With over 40 years in knitting and crochet design, DROPS Design offers one of the most extensive collections of free patterns on the internet - translated to 17 languages. As of today we count 304 catalogues and 11422 patterns - 11422 of which are translated into English (UK/cm).
We work hard to bring you the best knitting and crochet have to offer, inspiration and advice as well as great quality yarns at incredible prices! Would you like to use our patterns for other than personal use? You can read what you are allowed to do in the Copyright text at the bottom of all our patterns. Happy crafting!
Comments / Questions (25)
Hi! i've re-started the back piece more than five times now because the rib isn't forming, and i have been following the pattern word for word. Please let me know what the problem could be; i'm stressed!
06.04.2024 - 14:49DROPS Design answered:
Dear Lily, since we cannot see you knitting, and you did not even tell me which size you are knitting, we can't know what you might be doing wrong. However, do not forget, that you can always ask for help (either on the phone or in person) in the store where you bought your DROPS yarn from. Happy knitting!
06.04.2024 - 20:25Hej! Går det att byta ut garnet till ett tjockare och vilka justeringar behöver man göra för att passformen ska bli rätt i sånna fall?
28.05.2023 - 19:06DROPS Design answered:
Hej Katalin, for at få pasformen som på billedet er du nødt til at overholde den strikkefasthed som står i opskriften. Lav en strikkeprøve :)
29.05.2023 - 11:49Vielen Dank ! Dank dem Video habe ich meinen Fehler entdeckt. :)
16.01.2023 - 19:11Guten Tag, ich stricke dieses Muster in der Grösse XXL und habe ein Problem mit der Maschenzahl . Wenn ich nach den 3 kraus rechts in den 5 M Rippenmuster ein Masche abnehme, fehlt mir eine M im Diagramm A.6C. Kann ich das Problem lösen, indem ich im Rippenmuster keine Masche abnehme, oder habe ich dann später zu viele Maschen?
16.01.2023 - 15:25DROPS Design answered:
Liebe Ines, in A.6B muss man 3 Maschen zunehmen- der Umschlag in A.6C gehört zu dem Zopf (siehe dieses Video) - vielleicht kommt es von hier?
16.01.2023 - 16:52Firstly why are the pattern diagrams on different scales. Very confusing. Just started the sleeve… hopeless…. The pattern 8,9,10 is 30 sts, one has 42 or 50 sts on the ndls. No mention on pattern placement. Also the garter st on the side panels, only 6 sts ? Then stockingnet ??? And why incr by measuring???? Not one of your best patterns …
22.11.2021 - 15:35DROPS Design answered:
Dear Mrs Brown, maybe you could tell us which size you are working so that we could help you with the full detail of the first rows? And yes correct, increases are repeated in height when measuring (measure your work to get the number of rows you need to can of course work too).
22.11.2021 - 16:26Jeg er gået i stå inden jeg kom igang. \r\n1. Pind går op med diagrammet og mine 92 m (str M). Men når jeg skal til anden har jeg jo flere masker fordi jeg har slået om, hvordan skal jeg fortsætte diagrammerne i træk, når jeg har flere masker end anvist i diagrammerne?
19.10.2020 - 21:23Lovely pattern but I'm stuck at the diagonal shoulders instructions. I'm doing size L, and I don't understand the sentence "work until 6 stitches more remain on the needle more than on previous row from the same side, turn (= 10 stitches left on the shoulder)" I have 24 stitches on each shoulder, after doing rows 1 and 2 flour times. Puzzled!
18.04.2019 - 19:12DROPS Design answered:
Dear Chris, when working the diagonal shoulder, you are leaving unworked 6 sts more at the end of every row: at the end of 1st row there will be 6 sts left on one side, then on 2nd row 6 sts left on the other side, then 12 sts left at the end of next 2 rows, then 18 sts left at the end of next 2 rows and so on. When all short rows have been worked, 10 sts remain for shoulder. Now work 1 ridge over all stitches (also the one left unworked for the short rows). At the same time, you will shape neckline (decrease sts and cast off the middle stitches + 1 st towards neck). Happy knitting!
23.04.2019 - 11:53Könntet ihr bitte die Anleitung korrigieren: am Ende der Beschreibung für das Rückenteil fehlt der Hinweis auf die Krausrippen, dies konnte ich mir nur aus der Anleitung für das Vorderteil erschließen. Herzlichen Dank für alle tollen Anleitungen!
03.03.2019 - 23:16Hej. Diagram A7 viser over 4 felter en skrå streg, der går nedefra og op. Jeg kan ikke se i symbol forklaringen, hvad der skal strikkes. Jeg kan kun se i symbol forklaringen hvad der skal strikkes hvis stregen går oppe fra og ned.
24.02.2019 - 10:39DROPS Design answered:
Hej Diana, tak for info, vi tjekker om stregen vender fejl vej eller om vi skal lægge en mere symbol forklaring ud. Vi lægger en rettelse ud om nogle dage. :)
05.04.2019 - 12:07Bij A1c moet ik (volgens mij) bij de kabels een omslag maken en dus steken meerderen. Die nieuwe steken zie ik niet in het telpatroon terug. Bij A2c zou ik van 3 naar 1 steek moeten minderen, en op de volgende 1 steek door omslag vermeerderen., maar dan kom ik steken tekort. Ik vermoed dat ik iets over het hoofd zie, kan je mij helpen?
09.01.2019 - 09:37DROPS Design answered:
Dag Jacqueline,
Bij A.1c maak je inderdaad 2 omslagen, maar je mindert ook 2 steken (schuine streepjes), waardoor je weer op het zelfde aantal steken uitkomt. Bij A.2c minder je 1 steek: van 3 steken naar 2 steken (de afgehaalde steek over de 2 gebreide steken halen) en op de volgende naald maak je een omslag, zodat je weer op het zelfde aantal steken komt. 11.01.2019 - 11:44