
Popular categories
Looking for a yarn?


Comments / Questions (83)
![]() Julia G wrote:
Julia G wrote:
Ich habe ein paar Probleme mit der Strickschrift. Wird A2 bis A6 zuerst abgestrickt und danach A.x. Wiederholt? Und wird das A.x von A.2/A.4 EINMAL gestrickt, dann das A.x. Von A.5/A.6 EINMAL und diese beiden abwechselnd dann 24mal? Und wo sond die krausrechts-Randmaschen bei A.5 hin? Die Kästchen in A.4 am Rand sind auch nicht erklärt. Liebe Grüße
10.04.2018 - 12:08DROPS Design answered:
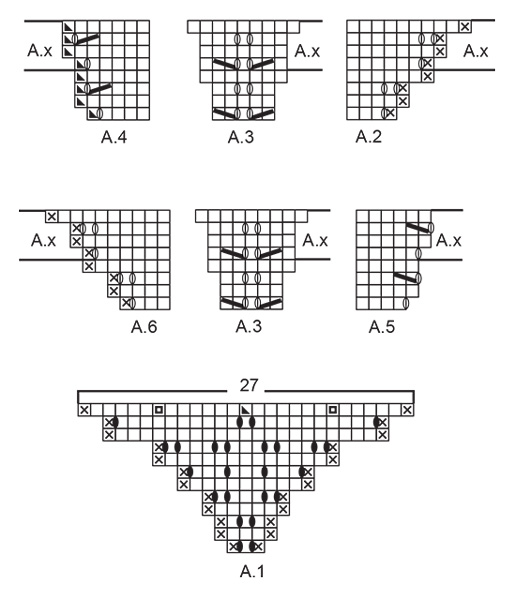
Liebe Julia, zuerst stricken Sie A.1 bis A.6 (= 9 Reihe), dann A.x in A.1 bis A.6 wiederholen (= 4 Reihen), A.x wird insgesamt 24 Mal gestrickt (25 Mal mit der ersten Mal A.1-A.6 in der Höhe) = 51 M + (12 Zunahme x 25) = 339 M. Die letzte M in A.4 = 4. Symbol unter Diagram Text. Die erste Masche in A.5 wird glatt re gestrickt. Die Randmaschen sind die 1. Masche in A.2 und die letzte M in A.6 (= Randmaschen = 5. Symbol). Viel Spaß beim stricken!
10.04.2018 - 13:29
![]() Louise wrote:
Louise wrote:
På varv 11 i diagram A.8 är det två ovala tecken som till skillnad från de dubbla omslagen saknar en vertikal linje i mitten, vad betyder dessa? Jag undrar även vad cirklarna (utan vertikala linjer i mitten) på varv 35 och 37 betyder?
16.03.2018 - 20:02DROPS Design answered:
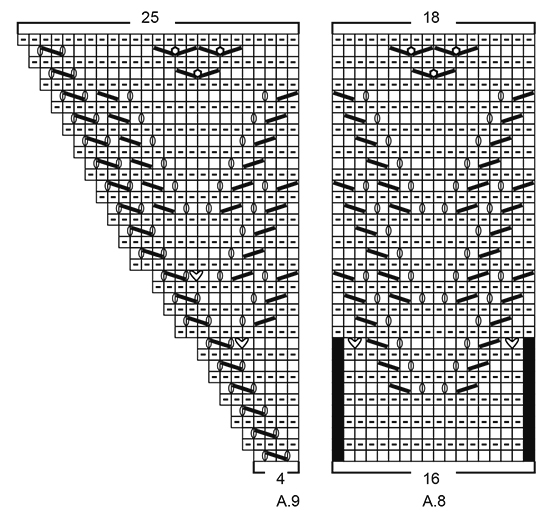
Hej Louise, det betyder också omslag men som skall stickas vridet på nästa varv, du ser at på detta varvet i A.8 ökas från 16 till 18 maskor. På varv 35 och 37 är det symbolen som betyder att du gör 3 omslag, se diagramtexten hur de stickas. Lycka till!
20.03.2018 - 10:08
![]() Gabriela Tzschentke wrote:
Gabriela Tzschentke wrote:
Fragen entstehen erst beim Stricken.
04.03.2018 - 21:03
![]() Gabriela Tzschentke wrote:
Gabriela Tzschentke wrote:
Kommentar habe ich schon geschrieben.
04.03.2018 - 21:01
![]() Gabriela Tzschentke wrote:
Gabriela Tzschentke wrote:
Tolles Tuch, würde es gerne für mich nach stricken, aber ohne Anleitung ist es schwierig. Die Anleitung kostenlos wäre super.
04.03.2018 - 20:59
![]() Gabriela Tzschentke wrote:
Gabriela Tzschentke wrote:
Tolles Tuch .....😊
04.03.2018 - 20:55
![]() Lyne Larouche wrote:
Lyne Larouche wrote:
Pour le rang des nope si je n'en veux pas en avoir je peux tricoter tout en endroit .ou bien je commence tout de suite le diagramme ligne 3 merci
27.02.2018 - 18:47DROPS Design answered:
Bonsoir, vous pouvez tricoter a l'endroit. Bon tricot!
27.02.2018 - 19:11
![]() Jozefien De Bruijn wrote:
Jozefien De Bruijn wrote:
Ik heb het helemaal uitgetekend en nu klopt het wel. Kan ik dat ergens naartoe mailen ?
25.02.2018 - 18:48DROPS Design answered:
Hallo Jozefien, Heb er nogmaals naar gekeken en het klopt toch, maar het is een kwestie van erg goed opletten waar je de minderingen maakt. Als je de steken gaat tellen in de telpatronen klopt het ook. Ik zal de voorgaande reacties even verwijderen, anders is het verwarrend. Dank voor het meedenken :)
25.02.2018 - 19:28
![]() Alie Booij wrote:
Alie Booij wrote:
Ook ik kom er niet uit volgens het patroon. Denk dat ik het gewoon ga breien en voor de eerste mindering 7 ipv 6 steken brei. En dat ook na de laatste mindering. Misschien ook een idee voor Jozefien
24.02.2018 - 19:16DROPS Design answered:
Hallo Alie, Na het maken van een proeflapje en de steken opnieuw te tellen, blijkt het telpatroon toch te kloppen. Je moet erg opletten waar je moet minderen en omslagen moet maken, maar als je het telpatroon precies volgt komt het goed.
25.02.2018 - 18:46
![]() Jozefien De Bruijn wrote:
Jozefien De Bruijn wrote:
Derde naald van schema A2 t/m A6: van het begin van de rechtse naald tot draad 1 worden 3 steken gemeerderd, van draad 1 tot draad 2 wordt 1 steek gemeerderd, van draad 2 tot draad 3 wordt 1 steek gemeerderd, van draad 3 tot het eind worden weer 3 steken gemeerderd. De averechtse naald geeft in de tekening steeds 2 steken aan tussen eind en draad 3, ook 2 steken tussen de draden 3 en 2, 2 steken tussen draden 2 en 1, en 2 steken tussen draad 1 en het begin van de naald.
20.02.2018 - 05:22DROPS Design answered:
25.02.2018 - 18:45
|
||||||||||||||||||||||||||||||||||||||||
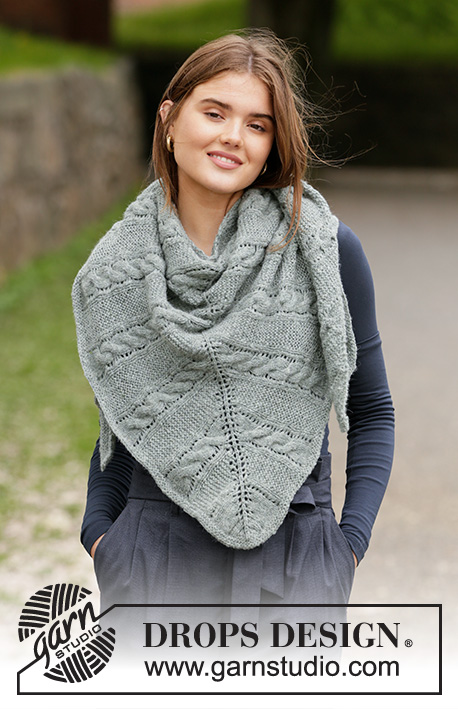
Wings of Love#wingsofloveshawl |
||||||||||||||||||||||||||||||||||||||||
 |
 |
|||||||||||||||||||||||||||||||||||||||
Knitted shawl with lace pattern in stockinette stitch and garter stitch. The piece is worked in DROPS Lace.
DROPS 181-4 |
||||||||||||||||||||||||||||||||||||||||
|
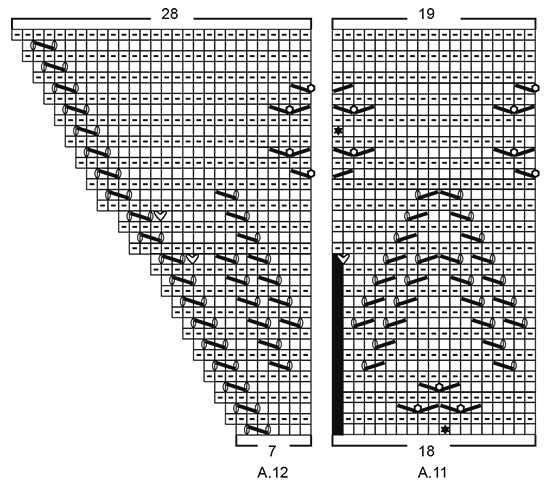
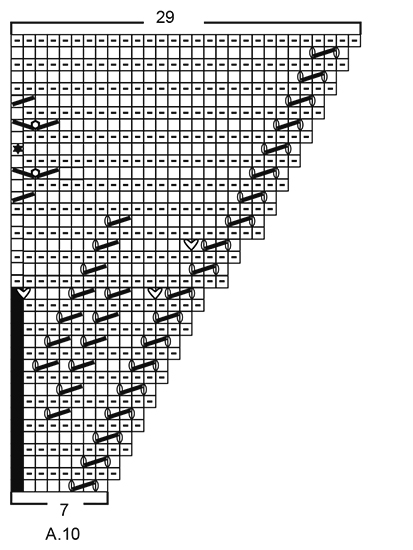
INFORMATION FOR THE PATTERN: RIDGE/GARTER STITCH (worked back and forth): 1 ridge = Knit 2 rows. PATTERN: See diagrams A.1 to A.12. The diagram shows all the rows in the pattern seen from the right side. Row 1 = right side. SHAPING: If you are using another yarn from yarn group A, you do not need to stretch the shawl to the right measurements, but dampen it and carefully lay it flat in the right shape. Allow it to dry. Repeat the process every time the shawl is washed. BINDING OFF TIP: To avoid the bind-off edge being tight, you can bind off with a needle a ½ size larger. ---------------------------------------------------------- SHAWL: The piece is worked back and forth with circular needle, top down. Work from the middle of the top edge with stockinette stitch and lace pattern and finish at the bottom with a border of lace pattern and garter stitch. Cast on 3 stitches with circular needle size 3 mm / US 2.5 and Lace - read KNITTING GAUGE above. Work according to diagram A.1 (= 3 stitches) - read PATTERN above. On the last row, insert 3 markers as shown in the diagram. When the whole of diagram A.1 has been completed in height, there are 27 stitches on the needle. WORK ACCORDING TO DIAGRAMS A.2 TO A.6 AS FOLLOWS FROM THE RIGHT SIDE: Work A.2 (= 4 stitches), A.3 (= 5 stitches – the first marker sits in the middle of A.3), A.4 (= 5 stitches – the second marker sits in the last stitch of A.4), A.5 (= 4 stitches), A.3 (= 5 stitches – the third marker sits in the middle of A.3) and A.6 (= 4 stitches). When the whole of diagrams A.2 to A.6 have been completed in height, there are 51 stitches on the needle. Repeat the increases as shown in A.x onwards – increase alternately 4 and 8 stitches on each row from the right side (i.e. 12 increased stitches for every repeat of A.x in height), the increased stitches are worked in stockinette stitch on each side of A.3. Repeat as shown in A.x 24 times in total in height = 339 stitches on the needle. The piece measures approx. 36 cm / 14¼". On the next row from the right side, work and increase 4 stitches as shown on the first row of A.x = 343 stitches. Purl 1 row from the wrong side (the edge stitch in each side is worked in GARTER STITCH – see description above, throughout the whole piece). Knit 1 row from the right side and increase 1 stitch inside the edge stitch in garter stitch in each side and increase 1 stitch only by the mid-stitch (= 3 stitches increased) = 346 stitches on the needle and purl 1 row from the wrong side. You do not need the 3 markers from here. WORK ACCORDING TO DIAGRAMS A.7 TO A.9 AS FOLLOWS FROM THE RIGHT SIDE: Work 1 edge stitch in garter stitch, A.7 over 4 stitches, repeat A.8 until there are 5 stitches left on the needle (= 21 repeats of 16 stitches), A.9 over 4 stitches and 1 edge stitch in garter stitch. NOTE! On the 11th row in the diagram, increase 2 stitches in each repeat of A.7, A.8 and A.9. On the 17th row increase 2 stitches in each of A.7 and A.9. When the whole of diagrams A.7 to A.9 have been completed in height, there are 430 stitches on the needle. WORK ACCORDING TO DIAGRAMS A.10 TO A.12 AS FOLLOWS FROM THE RIGHT SIDE: Work 1 edge stitch in garter stitch, A.10 over 7 stitches, repeat A.11 until there are 8 stitches left on the needle (= 23 repeats of 18 stitches), A.12 over 7 stitches and 1 edge stitch in garter stitch. NOTE! On the 17th row in the diagram increase 3 stitches in A.10, 1 stitch in A.11 and 2 stitches in A.12. On the 21st row increase 2 stitches in A.10 and in A.12. When the whole of diagrams A.10 to A.12 have been completed in height, there are 496 stitches on the needle – loosely bind off on the last row from the wrong side - read BINDING OFF TIP above. STRETCHING: Lay the shawl in lukewarm water until it is thoroughly wet. Carefully press the water out of the shawl – it must not be twisted, then roll the shawl in a towel and press again to remove more water – the shawl will now just be damp. If you are using another yarn from yarn group A - read SHAPING above. Lay the shawl on a floor rug or mattress – pull it carefully into shape and use pins to fasten it in place. Allow the shawl to dry. Repeat the process every time the shawl is washed. |
||||||||||||||||||||||||||||||||||||||||
Diagram explanations |
||||||||||||||||||||||||||||||||||||||||
|
||||||||||||||||||||||||||||||||||||||||
 |
||||||||||||||||||||||||||||||||||||||||
 |
||||||||||||||||||||||||||||||||||||||||
 |
||||||||||||||||||||||||||||||||||||||||
 |
||||||||||||||||||||||||||||||||||||||||
 |
||||||||||||||||||||||||||||||||||||||||
Have you finished this pattern?Tag your pictures with #dropspattern #wingsofloveshawl or submit them to the #dropsfan gallery. Do you need help with this pattern?You'll find 22 tutorial videos, a Comments/Questions area and more by visiting the pattern on garnstudio.com. © 1982-2026 DROPS Design A/S. We reserve all rights. This document, including all its sub-sections, has copyrights. Read more about what you can do with our patterns at the bottom of each pattern on our site. |
||||||||||||||||||||||||||||||||||||||||


With over 40 years in knitting and crochet design, DROPS Design offers one of the most extensive collections of free patterns on the internet - translated to 17 languages. As of today we count 325 catalogs and 12298 patterns - 12288 of which are translated into English (US/in).
We work hard to bring you the best knitting and crochet have to offer, inspiration and advice as well as great quality yarns at incredible prices! Would you like to use our patterns for other than personal use? You can read what you are allowed to do in the Copyright text at the bottom of all our patterns. Happy crafting!
Post a comment to pattern DROPS 181-4
We would love to hear what you have to say about this pattern!
If you want to leave a question, please make sure you select the correct category in the form below, to speed up the answering process. Required fields are marked *.