Wings of Love

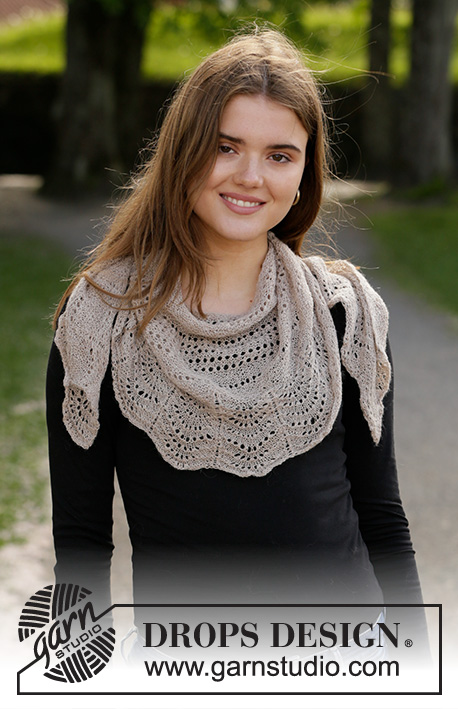
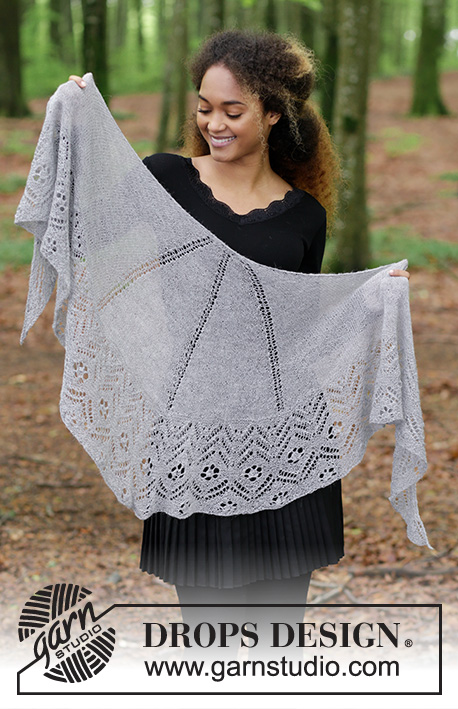
Knitted shawl with lace pattern in stockinette stitch and garter stitch. The piece is worked in DROPS Lace.

DROPS 181-4
DROPS Design: Pattern no la-035
Yarn group A
-----------------------------------------------------------
Measurements: approx. 52 cm / 20½" mid back and approx. 207 cm / 82" along the top edge after stretching.
Materials:
DROPS LACE from Garnstudio (belongs to yarn group A)
100 g color 0501, light gray

The piece can also be knitted with yarn from:
"Alternative yarn (Yarn Group A)" – see the link below.

DROPS CIRCULAR NEEDLE (80 cm / 32") SIZE 3 mm/US 2.5 – or the size needed to get 24 stitches and 32 rows stockinette stitch on 10 cm / 4" in width and 10 cm / 4" in height.

KNITTING GAUGE:
The shawl will be dampened and stretched to the correct measurements at the end, so the knitting gauge is not too important, but to get an idea of whether you are knitting too tightly or too loosely, work a trial patch with needle size 3 mm / US 2.5 and check that you get approx. 24 stitches and 32 rows stockinette stitch on 10 cm / 4" in width and 10 cm / 4" in height.

-------------------------------------------------------

Alternative Yarn – See how to change yarns here
Yarn Groups A to F – Use the same pattern and change the yarn here
Yarn usage using an alternative yarn – Use our yarn converter here

-------------------------------------------------------

Pattern instructions

NOTE: This pattern is written in American English. All measurements in charts are in cm. For conversion from inches to cm - click here. There are different terms for crocheting in American and British English. If this pattern includes crochet, click for "crochet terms" here. For this pattern in British English, please click here.
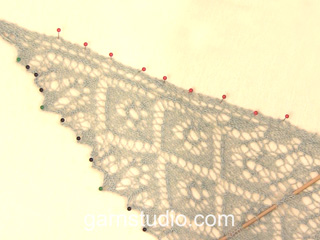
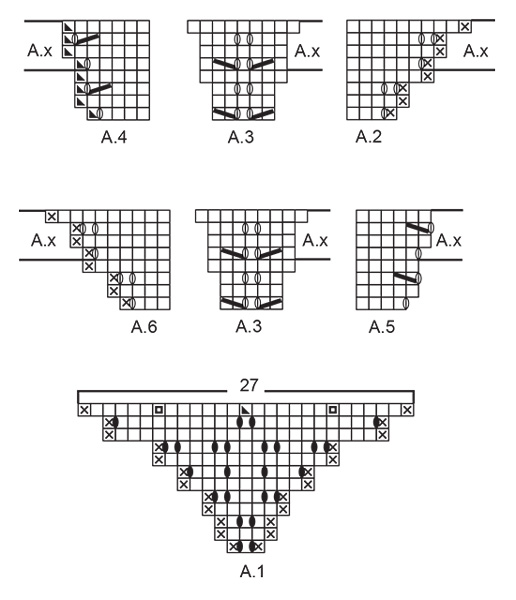
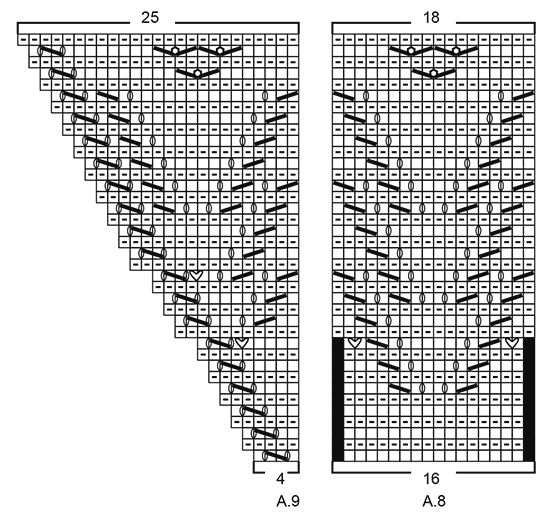
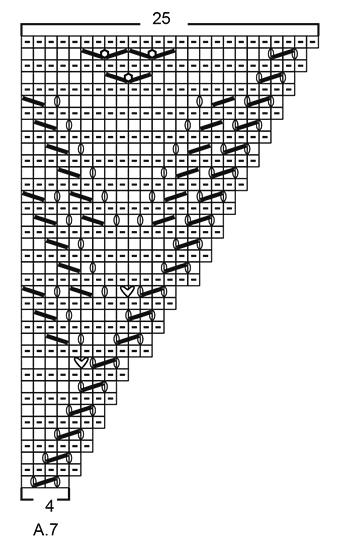
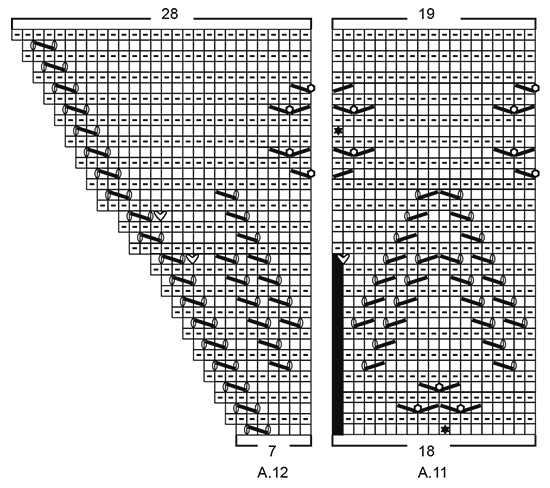
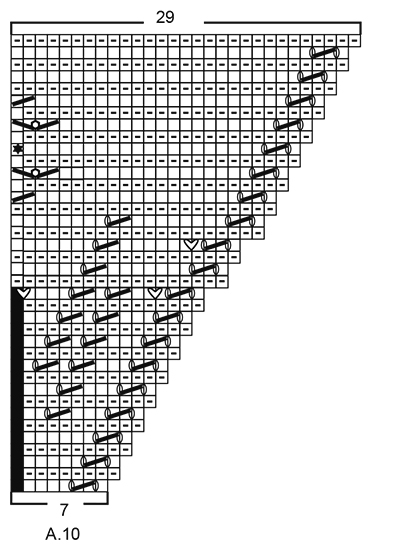
INFORMATION FOR THE PATTERN:

RIDGE/GARTER STITCH (worked back and forth):
1 ridge = Knit 2 rows.

PATTERN:
See diagrams A.1 to A.12. The diagram shows all the rows in the pattern seen from the right side. Row 1 = right side.

SHAPING:
If you are using another yarn from yarn group A, you do not need to stretch the shawl to the right measurements, but dampen it and carefully lay it flat in the right shape. Allow it to dry. Repeat the process every time the shawl is washed.

BINDING OFF TIP:
To avoid the bind-off edge being tight, you can bind off with a needle a ½ size larger.
----------------------------------------------------------

SHAWL:
The piece is worked back and forth with circular needle, top down. Work from the middle of the top edge with stockinette stitch and lace pattern and finish at the bottom with a border of lace pattern and garter stitch.

Cast on 3 stitches with circular needle size 3 mm / US 2.5 and Lace - read KNITTING GAUGE above. Work according to diagram A.1 (= 3 stitches) - read PATTERN above. On the last row, insert 3 markers as shown in the diagram. When the whole of diagram A.1 has been completed in height, there are 27 stitches on the needle.

WORK ACCORDING TO DIAGRAMS A.2 TO A.6 AS FOLLOWS FROM THE RIGHT SIDE:
Work A.2 (= 4 stitches), A.3 (= 5 stitches – the first marker sits in the middle of A.3), A.4 (= 5 stitches – the second marker sits in the last stitch of A.4), A.5 (= 4 stitches), A.3 (= 5 stitches – the third marker sits in the middle of A.3) and A.6 (= 4 stitches). When the whole of diagrams A.2 to A.6 have been completed in height, there are 51 stitches on the needle.
Repeat the increases as shown in A.x onwards – increase alternately 4 and 8 stitches on each row from the right side (i.e. 12 increased stitches for every repeat of A.x in height), the increased stitches are worked in stockinette stitch on each side of A.3. Repeat as shown in A.x 24 times in total in height = 339 stitches on the needle. The piece measures approx. 36 cm / 14¼".
On the next row from the right side, work and increase 4 stitches as shown on the first row of A.x = 343 stitches. Purl 1 row from the wrong side (the edge stitch in each side is worked in GARTER STITCH – see description above, throughout the whole piece). Knit 1 row from the right side and increase 1 stitch inside the edge stitch in garter stitch in each side and increase 1 stitch only by the mid-stitch (= 3 stitches increased) = 346 stitches on the needle and purl 1 row from the wrong side. You do not need the 3 markers from here.

WORK ACCORDING TO DIAGRAMS A.7 TO A.9 AS FOLLOWS FROM THE RIGHT SIDE:
Work 1 edge stitch in garter stitch, A.7 over 4 stitches, repeat A.8 until there are 5 stitches left on the needle (= 21 repeats of 16 stitches), A.9 over 4 stitches and 1 edge stitch in garter stitch. NOTE! On the 11th row in the diagram, increase 2 stitches in each repeat of A.7, A.8 and A.9. On the 17th row increase 2 stitches in each of A.7 and A.9. When the whole of diagrams A.7 to A.9 have been completed in height, there are 430 stitches on the needle.

WORK ACCORDING TO DIAGRAMS A.10 TO A.12 AS FOLLOWS FROM THE RIGHT SIDE:
Work 1 edge stitch in garter stitch, A.10 over 7 stitches, repeat A.11 until there are 8 stitches left on the needle (= 23 repeats of 18 stitches), A.12 over 7 stitches and 1 edge stitch in garter stitch. NOTE! On the 17th row in the diagram increase 3 stitches in A.10, 1 stitch in A.11 and 2 stitches in A.12. On the 21st row increase 2 stitches in A.10 and in A.12. When the whole of diagrams A.10 to A.12 have been completed in height, there are 496 stitches on the needle – loosely bind off on the last row from the wrong side - read BINDING OFF TIP above.

STRETCHING:
Lay the shawl in lukewarm water until it is thoroughly wet. Carefully press the water out of the shawl – it must not be twisted, then roll the shawl in a towel and press again to remove more water – the shawl will now just be damp. If you are using another yarn from yarn group A - read SHAPING above. Lay the shawl on a floor rug or mattress – pull it carefully into shape and use pins to fasten it in place. Allow the shawl to dry. Repeat the process every time the shawl is washed.

This pattern has been corrected.

Updated online: 01.06.2018
Diagram A.7, A.8, A.9, A.10, A.11 and A.12 has been edited. Wrong diagram on 11th and 17th row.
Updated online: 28.06.2019
New charts: A.3, A.4 and A.5.
Updated online: 13.05.2022
Diagram A.5 updated

Diagram

All measurements in charts are in cm.

symbols = knit from right side, purl from wrong side
symbols = knit from wrong side
symbols = insert 1 marker in this stitch and allow the marker to follow the piece onwards in the piece to mark the middle of A.3, the stitch is knitted from the right side, purled from the wrong side
symbols = insert 1 marker in this stitch and allow the marker to follow the piece onwards (= mid-stitch), knitted from the right side and purled from the wrong side
symbols = edge stitch, knitted from the right side, knitted from the wrong side
symbols = between 2 stitches make 1 yarn over, on the next row purl the yarn overs (= hole)
symbols = between 2 stitches make 2 yarn overs, on the next row work the one yarn over and slip the other from the needle (= hole)
symbols = between 2 stitches make 1 yarn over, on the next row purl the yarn over twisted (= no hole)
symbols = between 2 stitches make 3 yarn overs, on the next row purl the first yarn, purl the second yarn over twisted and slip the third yarn over from the needle (= hole)
symbols = BUBBLE: Knit 1, 1 yarn over, knit 1, 1 yarn over, knit 1 in the same stitch (= 5 stitches), turn the piece. Work 4 rows stocking stitch back and forth over these 5 stitches. Then pass the second stitch on the right-hand needle over the first stitch, pass the third stitch over the first stitch, pass the fourth stitch over the first stitch and finally pass the fifth stitch over the first stitch (= 1 stitch left)
symbols = knit 2 together
symbols = slip 1 stitch as if to knit, knit 1, pass the slipped stitch over the knitted stitch
symbols = no stitch
diagram
diagram
diagram
diagram
diagram
Do you have a question? See a list of frequently asked questions (FAQ)

Knitting tension is what determines the final measurements of your work, and is usually measured per 10 x 10 cm. It is provided like so: number of stitches in width x number of rows in height - eg: 19 stitches x 26 rows = 10 x 10 cm.

The knitting tension is very individual; some people knit/crochet loosely while others work tightly. You adjust the knitting tension with the needle size, which is why the suggested needle size only serve as a guide! You need to adjust this (up or down) to ensure that YOUR knitting tension matches the knitting tension provided in the pattern. If you work with a different knitting tension than provided you will have a different yarn consumption, and your work will have different measurements than what the pattern suggests.

The knitting tension also determines which yarns can replace each other. As long as you achieve the same knitting tension you can replace one yarn with another.

See DROPS lesson: How to measure your tension/gauge

See DROPS video: How to make a gauge tension swatch

The required amount of yarn is provided in grams, eg: 450 g. To calculate how many balls you’ll need you first need to know how many grams are in 1 ball (25g, 50g or 100g). This information is available if you click on the individual yarn quality on our pages. Divide the amount required with the amount of each ball. For example, if each ball is 50g (the most common amount), the calculation will be as follows: 450 / 50 = 9 balls.

The important thing when changing from one yarn to another is that the knitting/crochet tension remains the same. This is so that the measurements of the finished piece will be the same as on the sketch provided. It is easier to achieve the same knitting tension using yarns from the same yarn group. It is also possible to work with multiple strands of a thinner yarn to achieve the knitting tension of a thicker one. Please try our yarn converter. We recommend you to always work a test swatch.

Please NOTE: when changing yarn the garment might have a different look and feel to the garment in the photo, due to individual properties and qualities of each yarn.

See DROPS lesson: Can I use a different yarn than the one mentioned in the pattern?

All our yarns are categorised into yarn groups (from A to F) according to thickness and knitting tension – group A contains the thinnest yarns and group F the thickest. This makes it easier for you to find alternative yarns to our patterns, should you wish to switch yarn. All yarns within the same group have a similar knitting tension and can easily replace each other. However, different yarn qualities have different structures and properties which will give the finished work a unique look and feel.

Click here for an overview of the yarns in each yarn group

At the top of all our patterns you’ll find a link to our yarn converter, which is a helpful tool should you wish to use a different yarn than suggested. By filling in the yarn quality you wish to replace, the amount (in your size) and number of strands, the converter will present good alternative yarns with the same knitting tension. Additionally it will tell you how much you’ll require in the new qualities and whether you’ll need to work with multiple strands. Most skeins are 50g (some are 25g or 100g).

If the pattern is worked with multiple colours, every colour will have to be converted separately. Similarly, if the pattern is worked with several strands of different yarns (for example 1 strand Alpaca and 1 strand Kid-Silk) you will have to find alternatives for each, individually.

Click here to see our yarn converter

Since different yarns have different qualities and textures we have chosen to keep the original yarn in our patterns. However, you can easily find options among our available qualities by using our yarn converter, or simply pick a yarn from the same yarn group.

It is possible that some retailers still have discontinued yarns in stock, or that someone has a few skeins at home that they would like to find patterns for.

The yarn converter will provide both alternative yarn as well as required amount in the new quality.

If you think it's hard to decide what size to make, it can be a good idea to measure a garment you own already and like the size of. Then you can pick the size by comparing those measures with the ones available in the pattern's size chart.

You'll find the size chart at the bottom of the pattern.

See DROPS lesson: How to read size chart

The needle size provided in the pattern serves only as a guide, the important thing is to follow the knitting tension. And since knitting tension is very individual, you will have to adjust the needle size to ensure that YOUR tension is the same as in the pattern – maybe you’ll have to adjust 1, or even 2 needle sizes, up or down to achieve the correct tension. For this, we recommend that you work test swatches.

Should you work with a different knitting tension than the one provided, the measurements of the finished garment might deviate from the measurement sketch.

See DROPS lesson: How to measure your tension/gauge

See DROPS video: How to make a gauge tension swatch

Working a garment top-down provides more flexibility and room for personal adjustment. For example it is easier to try the garment on while working, as well as making adjustments to length of yoke and shoulder caps.

The instructions are carefully explaining every step, in the correct order. Diagrams are adjusted to the knitting direction and are worked as usual.

The diagram depicts all rows/rounds, and every stitch seen from the right side. It is read from bottom to top, from right to left. 1 square = 1 stitch.

When working back and forth, every other row is worked from the right side and every other row is worked from the wrong side. When working from the wrong side, the diagram will have to be worked reversed: from left to right, knit stitches are purled, purl stitches are knit etc.

When working in the round every round is worked from the right side and the diagram are worked from right to left on all rounds.

See DROPS lesson: How to read knitting diagrams

The diagram depicts all rows/rounds, and every stitch seen from the right side. It is worked from bottom to top, from right to left.

When working back and forth every other row is worked from the right side: from right to left and every other row is worked from the wrong side: from left to right.

When working in the round, every row in the diagram are worked from the right side, from right to left.

When working a circular diagram you start in the middle and work your way outwards, counter clockwise, row by row.

The rows usually start with a given number of chain stitches (equivalent to the height of the following stitch), this will either be depicted in the diagram or explained in the pattern.

See DROPS lesson: How to read crochet diagrams

Instructions for working several diagrams after each other on the same row/round, will often be written like so: “work A.1, A.2, A.3 a total of 0-0-2-3-4 times". This means you work A.1 once, then A.2 is worked once, and A.3 is repeated (in width) the number of times provided for your size – in this case like so: S = 0 times, M = 0 times, L=2 times, XL= 3 times and XXL = 4 times.

The diagrams are worked as usual: begin with the first row in A.1, then work the first row in A.2 etc.

See DROPS lesson: How to read knitting diagrams

See DROPS lesson: How to read crochet diagrams

The total width of the garment (from wrist-to-wrist) will be larger in the larger sizes, despite the actual sleeves being shorter. The larger sizes have longer sleeve caps and wider shoulders, so there will be a good fit in all sizes.

The measurement sketch/schematic drawing provides information regarding the full length of the garment. If it’s a jumper or a jacket the length is measured from the highest point on the shoulder (usually closest to the neckline), and straight down to the bottom of the garment. It is NOT measured from the tip of shoulder. Similarly, the length of yoke is measured from the highest point on the shoulder and down to where yoke is split into body and sleeves.

See DROPS lesson: How to read a schematic drawing

Diagrams are often repeated on the round or in height. 1 repeat is the diagram the way it appears in the pattern. If it says to work 5 repeats of A.1 in the round, then you work A.1 a total of 5 times after/next to each other in the round. If it says to work 2 repeats of A.1 vertically/in height you work the entire diagram once, then begin again at the start and work the entire diagram one more time.

Chain stitches are slightly narrower than other stitches and to avoid working the cast-on edge too tight, we simply chain more stitches to begin with. The stitch count will be adjusted on the following row to fit the pattern and measurement sketch.

The rib edge is more elastic and will contract slightly compared to, for example, stocking stitch. By increasing before the rib edge, you avoid a visible difference in width between the rib edge and the rest of the body.

It’s very easy to cast off too tightly, and by making yarn overs while casting off (and simultaneously casting these off) you avoid a too tight cast off edge.

See DROPS video: How to bind off with yarn overs (yo)

To achieve an even increase (or decrease) you can increase on, for example: every 3rd and 4th row alternately, like so: work 2 rows and increase on the 3rd row, work 3 rows and increase on the 4th. Repeat this until the increase is complete.

See DROPS lesson: Increase or decrease 1 st on every 3rd and 4th row alternately

Should you prefer to work in the round instead of back and forth, you may of course adjust the pattern. You’ll need to add steeks mid-front (usually 5 stitches), and follow the instructions. When you would normally turn and work from the wrong side, simply work across the steek and continue in the round. At the end you’ll cut the piece open, pick up stitches to work bands, and cover the cut edges.

See DROPS video: How to knit steeks and cut open

Should you prefer to work back and forth instead of in the round, you may of course adjust the pattern so you work the pieces separately and then assemble them at the end. Divide the stitches for the body in 2, add 1 edge stitch in each side (for sewing) and work the front and back pieces separately.

See DROPS lesson: Can I adapt a pattern for circular needles into straight needles?

Pattern repeats can vary slightly in the different sizes, in order to get the correct proportions. If you’re not working the exact same size as the garment in the photo, yours might deviate slightly. This has been carefully developed and adjusted so that the complete impression of the garment is the same in all sizes.

Make sure to follow instructions and diagrams for your size!

If you have found a pattern you like which is available in women’s size it’s not very difficult to convert it to men’s size. The biggest difference will be the length of sleeves and body. Start working on the women size that you think would fit across the chest. The additional length will be worked right before you cast off for the armhole/sleeve cap. If the pattern is worked top-down you can add the length right after the armhole or before the first decrease on sleeve.

Regarding additional yarn amount, this will depend on how much length you add, but it is better with a skein too many than too few.

All yarns will have excess fibres (from production) that might come off as lint or shedding. Brushed yarns (ie hairier yarns) have more of these loose, excess fibres, causing more shedding.

Shedding also depends on what is worn under or over the garment, and whether this pulls at the yarn fibres. It’s therefore not possible to guarantee that there will be no shedding

Below are some tips on how to get the best result when working with hairier yarns:

1. When the garment is finished (before you wash it) shake it vigorously so the looser hairs come off. NOTE: do NOT use a lint roller, brush or any method that pulls at the yarn.

2. Place the garment in a plastic bag and put it in your freezer - the temperature will cause the fibres to become less attached to each other, and excess fibres will come off easier.

3. Leave in the freezer for a few hours before taking it out and shaking it again.

4. Wash the garment according to the instructions on the yarn label.

Pilling is a natural process that happens to even the most exclusive of fibers. It's a natural sign of wear and tear that is hard to avoid, and that is most visible in high friction areas of your garment like a sweater's arms and cuffs.

You can make your garment look as new by removing the pilling, using a fabric comb or a pill/lint remover.

Still can't find the answer you need? Then scroll down and leave your question so one of our experts can try to help you. This will be done normally within 5 to 10 working days.
In the meantime, you can read the questions and answers that others have left to this pattern or join the DROPS Workshop on Facebook to get help from fellow knitters/crocheters!

You might also like...

Post a comment to pattern DROPS 181-4

We would love to hear what you have to say about this pattern!

If you want to leave a question, please make sure you select the correct category in the form below, to speed up the answering process. Required fields are marked *.

Comments / Questions (79)

country flag Decamps Marina wrote:

Et à quel moment je dois-je integré le diagramme A7 ? bien à vous

01.08.2018 - 15:46

DROPS Design answered:

Bonjour Mme Decamps, quand vous avez 346 m (après avoir répété A.2-A.6 et augmenté comme indiqué), vous tricotez A.7 à A.9 comme indiqué au paragraphe suivant: 1 m point mousse, A.7, on répète 21 fois A.8 , A.9, 1 m point mousse. Bon tricot!

01.08.2018 - 16:02

country flag Decamps Marina wrote:

MERCI POUR VOTRE RéPONSE ET VOTRE RAPIDIté

01.08.2018 - 15:39

country flag Decamps Marina wrote:

Bonjour je suis bloqué après le diagramme A6 . J\\\\\\\'AI 51 MAILES ET JE NE SAIS PAS PAR QUOI JE DOIS RECOMMENCER LE RANG SUIVANT AVEC QUEL DIAGRAMME . BIEN àVOUS

01.08.2018 - 15:22

DROPS Design answered:

Bonjour Mme Decamps, quand vous avez tricoté A.2 à A.6 1 fois en hauteur et que vous avez 51 mailles, vous répétez maintenant les rangs indiqués dans A.X = les 4 derniers rangs des diagrammes A.2-A.6. Vous allez ainsi augmenter alternativement 4 et 8 mailles tous les rangs sur l'endroit = vous augmentez 12 mailles au total à chaque fois que A.x est tricoté en hauteur. Continuez ainsi jusqu'à ce que vous ayez tricoté 24 fois A.x, vous avez alors 339 mailles sur l'aiguille. Bon tricot!

01.08.2018 - 15:27

country flag Victoria Moshanova wrote:

Could you please check what happened to the diagrams after the last corrections. I don\'t see them any more.\r\nThank you!

04.06.2018 - 08:17

DROPS Design answered:

Dear Mrs Moshanova, thanks for your feedback, diagrams should be soon available. Happy knitting!

04.06.2018 - 09:53

country flag Jolivot Anne wrote:

Merci d'avance car je ne peux pas continuer le modéle sans les symboles qui manquent sur les diagrammes . J'attends avec impatience

15.05.2018 - 05:42

country flag Jolivot Anne wrote:

Bonjour ,jusque là pas de soucis ,mais en regardant les légendes des diagrammes ,je ne trouve pas le symboles 8 (le coeur ) et le symbole 13 ( le grand triangle noir) sur les diagrammes . Merci le modéle est magnifique

12.05.2018 - 06:37

DROPS Design answered:

Bonjour Mme Jolivot, merci pour votre retour, nos stylistes vont vérifier, merci d'avance pour votre patience.

14.05.2018 - 09:29

country flag Julia G wrote:

Ich habe ein paar Probleme mit der Strickschrift. Wird A2 bis A6 zuerst abgestrickt und danach A.x. Wiederholt? Und wird das A.x von A.2/A.4 EINMAL gestrickt, dann das A.x. Von A.5/A.6 EINMAL und diese beiden abwechselnd dann 24mal? Und wo sond die krausrechts-Randmaschen bei A.5 hin? Die Kästchen in A.4 am Rand sind auch nicht erklärt. Liebe Grüße

10.04.2018 - 12:08

DROPS Design answered:

Liebe Julia, zuerst stricken Sie A.1 bis A.6 (= 9 Reihe), dann A.x in A.1 bis A.6 wiederholen (= 4 Reihen), A.x wird insgesamt 24 Mal gestrickt (25 Mal mit der ersten Mal A.1-A.6 in der Höhe) = 51 M + (12 Zunahme x 25) = 339 M. Die letzte M in A.4 = 4. Symbol unter Diagram Text. Die erste Masche in A.5 wird glatt re gestrickt. Die Randmaschen sind die 1. Masche in A.2 und die letzte M in A.6 (= Randmaschen = 5. Symbol). Viel Spaß beim stricken!

10.04.2018 - 13:29

country flag Louise wrote:

På varv 11 i diagram A.8 är det två ovala tecken som till skillnad från de dubbla omslagen saknar en vertikal linje i mitten, vad betyder dessa? Jag undrar även vad cirklarna (utan vertikala linjer i mitten) på varv 35 och 37 betyder?

16.03.2018 - 20:02

DROPS Design answered:

Hej Louise, det betyder också omslag men som skall stickas vridet på nästa varv, du ser at på detta varvet i A.8 ökas från 16 till 18 maskor. På varv 35 och 37 är det symbolen som betyder att du gör 3 omslag, se diagramtexten hur de stickas. Lycka till!

20.03.2018 - 10:08

country flag Gabriela Tzschentke wrote:

Fragen entstehen erst beim Stricken.

04.03.2018 - 21:03

country flag Gabriela Tzschentke wrote:

Kommentar habe ich schon geschrieben.

04.03.2018 - 21:01