
Popular categories
Looking for a yarn?


Comments / Questions (83)
![]() Patricia wrote:
Patricia wrote:
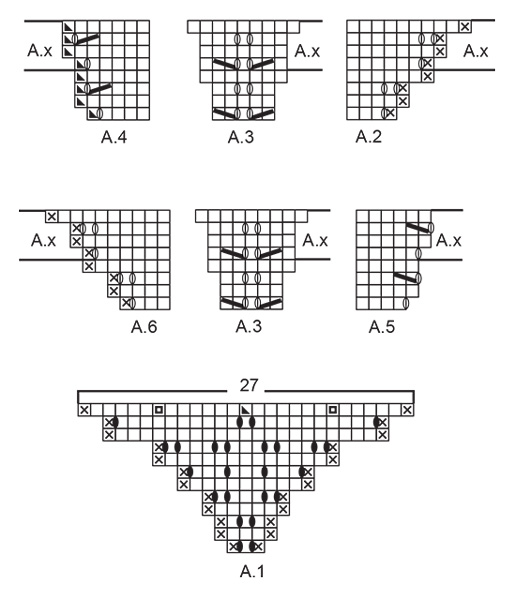
Bonjour, Après les 339 mailles tricotées on me dit de faire 4 augmentations comme au premier rang Ax mais il n'y a pas 4 augmentations (A2 - A3 - A4) mais bien 8 puisqu'il y a le reste (A5 - A3 - A6) qui représente de l'autre côté du châle où il y a bien 4 autres augmentations cela fait bien 8 augmentations? Là j'avoue que je ne comprends pas trop bien vos explications !!!!🤔
15.12.2020 - 00:16DROPS Design answered:
Bonjour Patricia, au 1er rang de A.X vous augmentez 4 mailles seulement: 1 maille dans A.2, 1 maille dans A.4, puis 1 maille dans A.5 et 1 maille dans A.6. Dans A.3 vous n'augmentez pas de mailles au 1er rang car les 2 jetés sont compensés par des diminutions. Bon tricot!
15.12.2020 - 08:38
![]() Annelie Gustafsson wrote:
Annelie Gustafsson wrote:
Hej! Jag har stickat så långt att jag har gjort A1-A6 och har nu 339 maskor. Sen har jag stickat det aviga och det räta varvet där jag ökat 4 maskor = 343 maskor och sen det aviga varvet, inget konstigt. Men sen förstår jag inte... Hur ska jag öka enbart 1 maska vid mittmaskan? Kan ju inte göra ett omslag på bara ena sidan? Ska jag göra en vanlig ökning i mittmaskan utan omslag, alltså sticka två maskor av mittmaskan?
08.06.2020 - 13:18DROPS Design answered:
Hei Annelie. Jo, du gjør bare 1 kast på den ene siden av midtmasken = 346 masker på pinnen og deretter strikkes 1 pinne vrang fra vrangen. Nå skal du ikke benytte deg av de 3 merkene. Du trenger ikke merket for midtmaske og da gjør det ikke noe at man bare øker på den ene siden av midtmasken. God Fornøyelse!
15.06.2020 - 08:32
![]() Regine wrote:
Regine wrote:
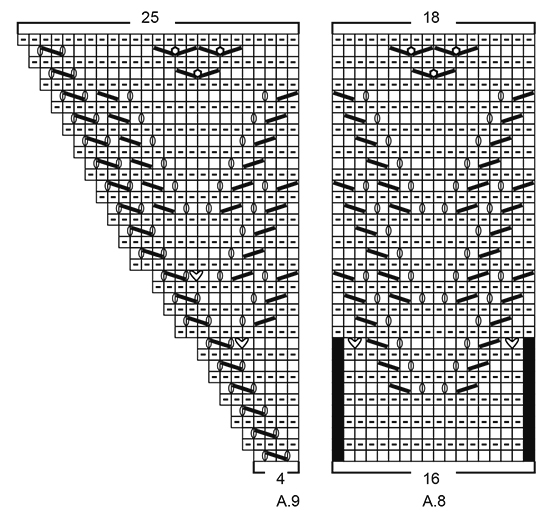
Ich komme nach A7 bis A9 nicht auf 430 Maschen. Eigentlich nehme ich doch in jeder zweiten Reihe nur 2 Maschen am Rand zu. Dazu kommen die Zunahmen in Reihe 11 und 17. Aber am Ende nehme ich doch in den Raporten sogar wieder ab. Wo ist da mein Denkfehler?
18.05.2020 - 15:03DROPS Design answered:
Liebe Regine, wenn die Diagramme fertig sind sind es: 25 M in A.7, 18 M in jede von den 21 A.8 und 25 M in A.9 = 1 Randmasche + 25 + 18 M x 21 + 25 + 1 Randmasche = 430 Maschen.Viel Spaß beim stricken!
18.05.2020 - 15:46
![]() Julie wrote:
Julie wrote:
Er kommet til A.x , men iflg diagram bliver der taget 18 nye m ud, og ikke 12 m, som i opskriften. Hvis jeg skal gentage A.x 24 gang i højden, får jeg ialt 483 m og ikke 339m, som i opskriften. Hvis jeg skal følge diagram A.x med 18 x 24 m, og resten af opskriften ikke har flere fejl, ender jeg med 640 m, og ikke 496 m, som i opskriften. Det er en voldsom forskel og undre mig over at I ikke har rette dette, selvom en anden har gjort jer opmærksom på dette i januar 2019.
29.01.2020 - 11:41DROPS Design answered:
Hej Julie, Husker du indtagningerne? Jette som kommenterede det i januar fandt selv ud af det, hun havde glemt indtagningerne.....
10.02.2020 - 16:37
![]() Uleo wrote:
Uleo wrote:
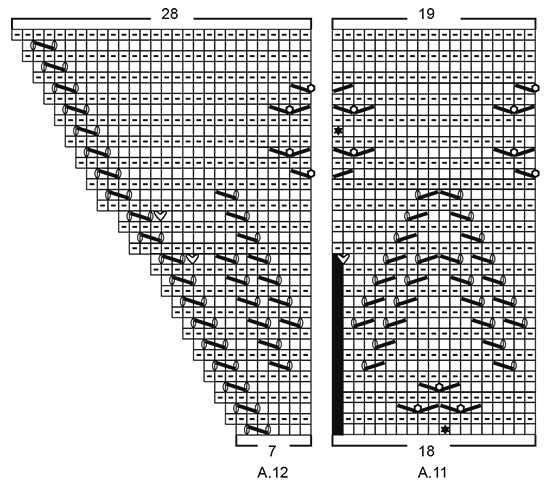
Ich stricke gerade Drops 181-4. Bei dem Raport A 8 und A 11 sind schwarze Felder am Rand, wie muss ich diese Stricken?
09.01.2020 - 18:14DROPS Design answered:
Liebe Uleo, die schwarze Kästchen in A.8 und A.11 bedeuten keine Maschen = A.8 wird über 16 Maschen und A.11 über 18 Maschen gestrickt. Bei der 11. Reihe werden Sie 2 Maschen in jedem A.8 und 1 Masche in A.11 (8. Symbol) zunehmen = A.8 wird dann über 19 Maschen und A.11 über 19 Maschen gestrickt. Viel Spaß beim stricken!
10.01.2020 - 08:33
![]() Eva Szücs wrote:
Eva Szücs wrote:
Hallo , ich stricke gerade A 11.Habe festgestellt, dass die Noppe nicht mittig sitzt. Ich habe nach der Zeichnung gestrickt aber die Noppe sitzt nicht in die Mitte der “Blume”. Ist das mit Absicht so?Liebe Grüsse und vielen Dank Eva
12.10.2019 - 00:49DROPS Design answered:
Liebe Frau Zsücs, die Noppe kann nicht genau in der Mitte sein, denn das Diagramm über 18 M gestrickt wird, aber diese 1 Masche-Verschiebung wird nicht sichtbar. Viel Spaß beim stricken!
14.10.2019 - 11:45
![]() Eva wrote:
Eva wrote:
Hallo, ich habe eine Frage.Ich stricke gerade A7-A9. Die Rückreie wird rechts gestrickt also mit Krause. Auch die Umschläge und die Muster rechts?So erscheinen mir die zusammenstrickte Maschen nicht so schön, ich kann die Muster nicht so gut erkennen. Vielen Dank und liebe Grüsse Eva
25.09.2019 - 05:09DROPS Design answered:
Liebe Eva, die Umschläge (= 7. Symbol) werden nur als 1 Umschlag bei der Rückreihe rechts gestrickt (= Loch); die Umschläge (= 8. Symbol) werden rechts verschränkt (= kein Loch) - un die Umschläge (= 9. Symbol) werden links/links verschränkt gestrickt. Viel Spaß beim stricken!
25.09.2019 - 08:34
![]() Yvonne wrote:
Yvonne wrote:
Sorry en de hele zwarte hokjes in A 10 en 11
29.07.2019 - 13:12DROPS Design answered:
Dag Yvonne,
De zwarte hokjes zijn geen steek. Je kunt gewoon doorgaan met de volgende steek in het (tel)patroon of in de beschrijving.
11.08.2019 - 16:24
![]() Yvonne wrote:
Yvonne wrote:
Hallo , ik heb een vraag over patroon A4, wat is de laatste steek met het schuine driehoekje? Ik kan het niet vinden in de beschrijving van de steken. Dank voor uw antwoord.m
28.07.2019 - 14:43DROPS Design answered:
Dag Yvonne,
Je bedoelt waarschijnlijk het hartje-symbool die over 2 steken gaat (..?) In de symboolverklaring is dit de zesde van onderen: maak 1 omslag tussen 2 steken, brei op de volgende toer de omslag gedraaid (= geen gaatje)
11.08.2019 - 16:22
![]() Sofia wrote:
Sofia wrote:
Hej Undrar över ökningarna när Ax är färdigstickad, innan man börjar med A7-A9, ska de ökningarna stickas så det blir hål också? Mvh Sofia
17.06.2019 - 23:37DROPS Design answered:
Hei Sofia. Ja, du kan strikke dem slik at det blir hull. God fornøyelse
18.06.2019 - 11:28
|
||||||||||||||||||||||||||||||||||||||||
Wings of Love#wingsofloveshawl |
||||||||||||||||||||||||||||||||||||||||
 |
 |
|||||||||||||||||||||||||||||||||||||||
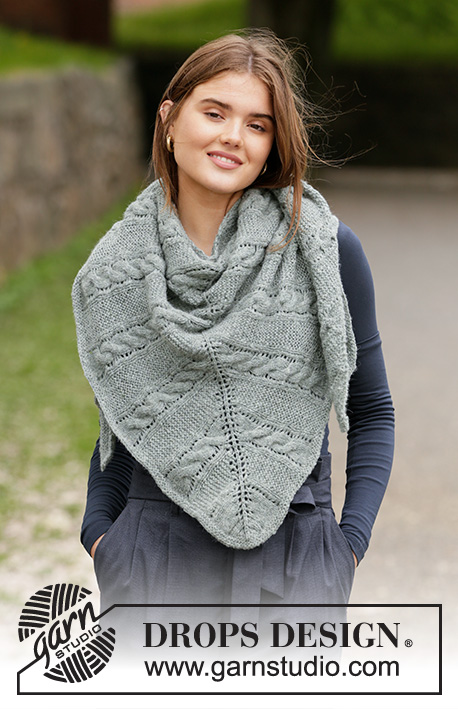
Knitted shawl with lace pattern in stockinette stitch and garter stitch. The piece is worked in DROPS Lace.
DROPS 181-4 |
||||||||||||||||||||||||||||||||||||||||
|
INFORMATION FOR THE PATTERN: RIDGE/GARTER STITCH (worked back and forth): 1 ridge = Knit 2 rows. PATTERN: See diagrams A.1 to A.12. The diagram shows all the rows in the pattern seen from the right side. Row 1 = right side. SHAPING: If you are using another yarn from yarn group A, you do not need to stretch the shawl to the right measurements, but dampen it and carefully lay it flat in the right shape. Allow it to dry. Repeat the process every time the shawl is washed. BINDING OFF TIP: To avoid the bind-off edge being tight, you can bind off with a needle a ½ size larger. ---------------------------------------------------------- SHAWL: The piece is worked back and forth with circular needle, top down. Work from the middle of the top edge with stockinette stitch and lace pattern and finish at the bottom with a border of lace pattern and garter stitch. Cast on 3 stitches with circular needle size 3 mm / US 2.5 and Lace - read KNITTING GAUGE above. Work according to diagram A.1 (= 3 stitches) - read PATTERN above. On the last row, insert 3 markers as shown in the diagram. When the whole of diagram A.1 has been completed in height, there are 27 stitches on the needle. WORK ACCORDING TO DIAGRAMS A.2 TO A.6 AS FOLLOWS FROM THE RIGHT SIDE: Work A.2 (= 4 stitches), A.3 (= 5 stitches – the first marker sits in the middle of A.3), A.4 (= 5 stitches – the second marker sits in the last stitch of A.4), A.5 (= 4 stitches), A.3 (= 5 stitches – the third marker sits in the middle of A.3) and A.6 (= 4 stitches). When the whole of diagrams A.2 to A.6 have been completed in height, there are 51 stitches on the needle. Repeat the increases as shown in A.x onwards – increase alternately 4 and 8 stitches on each row from the right side (i.e. 12 increased stitches for every repeat of A.x in height), the increased stitches are worked in stockinette stitch on each side of A.3. Repeat as shown in A.x 24 times in total in height = 339 stitches on the needle. The piece measures approx. 36 cm / 14¼". On the next row from the right side, work and increase 4 stitches as shown on the first row of A.x = 343 stitches. Purl 1 row from the wrong side (the edge stitch in each side is worked in GARTER STITCH – see description above, throughout the whole piece). Knit 1 row from the right side and increase 1 stitch inside the edge stitch in garter stitch in each side and increase 1 stitch only by the mid-stitch (= 3 stitches increased) = 346 stitches on the needle and purl 1 row from the wrong side. You do not need the 3 markers from here. WORK ACCORDING TO DIAGRAMS A.7 TO A.9 AS FOLLOWS FROM THE RIGHT SIDE: Work 1 edge stitch in garter stitch, A.7 over 4 stitches, repeat A.8 until there are 5 stitches left on the needle (= 21 repeats of 16 stitches), A.9 over 4 stitches and 1 edge stitch in garter stitch. NOTE! On the 11th row in the diagram, increase 2 stitches in each repeat of A.7, A.8 and A.9. On the 17th row increase 2 stitches in each of A.7 and A.9. When the whole of diagrams A.7 to A.9 have been completed in height, there are 430 stitches on the needle. WORK ACCORDING TO DIAGRAMS A.10 TO A.12 AS FOLLOWS FROM THE RIGHT SIDE: Work 1 edge stitch in garter stitch, A.10 over 7 stitches, repeat A.11 until there are 8 stitches left on the needle (= 23 repeats of 18 stitches), A.12 over 7 stitches and 1 edge stitch in garter stitch. NOTE! On the 17th row in the diagram increase 3 stitches in A.10, 1 stitch in A.11 and 2 stitches in A.12. On the 21st row increase 2 stitches in A.10 and in A.12. When the whole of diagrams A.10 to A.12 have been completed in height, there are 496 stitches on the needle – loosely bind off on the last row from the wrong side - read BINDING OFF TIP above. STRETCHING: Lay the shawl in lukewarm water until it is thoroughly wet. Carefully press the water out of the shawl – it must not be twisted, then roll the shawl in a towel and press again to remove more water – the shawl will now just be damp. If you are using another yarn from yarn group A - read SHAPING above. Lay the shawl on a floor rug or mattress – pull it carefully into shape and use pins to fasten it in place. Allow the shawl to dry. Repeat the process every time the shawl is washed. |
||||||||||||||||||||||||||||||||||||||||
Diagram explanations |
||||||||||||||||||||||||||||||||||||||||
|
||||||||||||||||||||||||||||||||||||||||
 |
||||||||||||||||||||||||||||||||||||||||
 |
||||||||||||||||||||||||||||||||||||||||
 |
||||||||||||||||||||||||||||||||||||||||
 |
||||||||||||||||||||||||||||||||||||||||
 |
||||||||||||||||||||||||||||||||||||||||
Have you finished this pattern?Tag your pictures with #dropspattern #wingsofloveshawl or submit them to the #dropsfan gallery. Do you need help with this pattern?You'll find 22 tutorial videos, a Comments/Questions area and more by visiting the pattern on garnstudio.com. © 1982-2026 DROPS Design A/S. We reserve all rights. This document, including all its sub-sections, has copyrights. Read more about what you can do with our patterns at the bottom of each pattern on our site. |
||||||||||||||||||||||||||||||||||||||||


With over 40 years in knitting and crochet design, DROPS Design offers one of the most extensive collections of free patterns on the internet - translated to 17 languages. As of today we count 325 catalogs and 12298 patterns - 12288 of which are translated into English (US/in).
We work hard to bring you the best knitting and crochet have to offer, inspiration and advice as well as great quality yarns at incredible prices! Would you like to use our patterns for other than personal use? You can read what you are allowed to do in the Copyright text at the bottom of all our patterns. Happy crafting!
Post a comment to pattern DROPS 181-4
We would love to hear what you have to say about this pattern!
If you want to leave a question, please make sure you select the correct category in the form below, to speed up the answering process. Required fields are marked *.