
Popular categories
Looking for a yarn?


Comments / Questions (39)
![]() Sheila Lebleu wrote:
Sheila Lebleu wrote:
Dear Dropsteam Thank you for answering my question. Unfortunately I have another... In what stitch has the cable to be done please. You can answer in Dutch. Thank you.
12.12.2017 - 21:57DROPS Design answered:
Hoi Sheila, De kabel wordt gemaakt in tricotsteeek.
13.12.2017 - 08:48Sheila Lebleu wrote:
How do I do the cables? Do I turn every 2 needles or do I have to do it in another way?
11.12.2017 - 17:41DROPS Design answered:
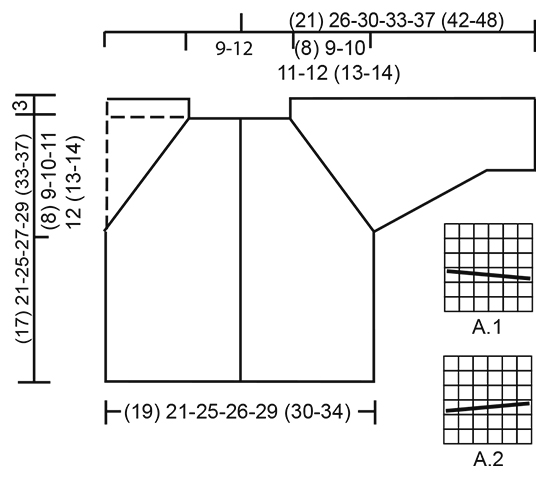
Dear Mrs Lebleu, you will cross the sts in diagrams every 6th row (= last 4 rows in A.1/A.2 + first 2 rows in A.1/A.2). Happy knitting!
12.12.2017 - 07:52
![]() Stefanie wrote:
Stefanie wrote:
Liebes DROPS-Team, danke für das Video vom 29.11., das hat schon mal sehr geholfen! Aber im Gegensatz zu diesem Video werden ja in der Anleitung für die Babyjacke die Ärmel nicht schon rund gestrickt, sondern in Hin- und Rückreihen und dann zusammengenäht, oder? Könnte man sie nicht auch so wie im Video schon rund auf einem Nadelspiel stricken oder spricht etwas dagegen? Besten Dank für eine Antwort!
05.12.2017 - 17:46DROPS Design answered:
Liebe Stefanie, die Ärmel dieser Jacke sind kraus rechts gestrickt, deshalb werden Sie hin und zurückgestrickt, dh immer mit rechten Maschen, aber gerne können Sie sie rund stricken (dann sollen Sie abwechslungsweise 1 Runde mit rechten Maschen, 1 Runde mit linken Maschen stricken - siehe Video). Viel Spaß beim stricken!
06.12.2017 - 09:06
![]() Steffi wrote:
Steffi wrote:
Liebes Drops-Team, Ich bin unsicher bei den Reglanzunahmen. Bedeutet jede zweite Reihe jede Hinreihe oder jede zweite Hinreihe? Danke
07.11.2017 - 23:31DROPS Design answered:
Liebe Steffi, in jede 2. Reihe bedeutet in jede Hinreihe (= 1 Hinreihe mit Zunahmen, 1 Rückreihe), von (bis) wiederholen - in jede 4. Reihe bedeutet in jede 2. Hinreihe (= 1 Hinreihe mit Zunahmen, 3 Reihen ohne Zunahmen), von (bis) wiederholen. Viel Spaß beim stricken!
08.11.2017 - 08:58
![]() Hanna wrote:
Hanna wrote:
Hej! På fjärde varvet står det att man ska öka med 8 maskor, var ska dessa ökningar ske?
20.10.2017 - 09:10DROPS Design answered:
Hej, dessa ökningar ska göras jämnt fördelat på varvet, dvs i t.ex. stl 0/1 mån med 9 m mellanrum.
23.10.2017 - 13:47
![]() Paola Natal wrote:
Paola Natal wrote:
Ho messo 80 maglie sul primo ferro, poi??? non ho capito...
15.10.2017 - 23:08DROPS Design answered:
Buongiorno Paola. Deve lavorare 2 coste a legaccio, quindi 4 ferri a diritto e durante l'ultimo di questi 4 ferri aumenta 8 maglie a intervalli regolari. Inizia poi a lavorare i diagrammi come indicato. Si ricordi di prevedere le asole sul bordo davanti. Buon lavoro!
16.10.2017 - 08:31
![]() Ilka wrote:
Ilka wrote:
Liebes Drops-Team, ich habe gerade die erste Zopf-runde gestrickt. Ist es richtig, dass die Rückrunde auch nur in rechten Maschen gestrickt wird? Und nach wievielen Runden kommt der nächste Zopf und nach den Raglanzunahmen an welcher Stelle? Danke für eure Hilfe und viele Grüße!
03.10.2017 - 11:51DROPS Design answered:
Liebe Ilka, beim A.1 und A.2 werden die Rückreihe links gestrickt (siehe 1. Symbol) - der Zopf wird bei der 3. Reihe in A.1 und A.2 gestrickt, dann Diagram bis zur Ende fertig stricken, und von der 1. Reihe wiederholen, dh es sind 5 Reihe zwischen den Zöpfen. Sie stricken die 1. Reihe in A.1/A.2 wie beschrieben, dann die Rückreihe, und bei der nächsten Hinreihe fangen Sie mit den Zunahmen der Raglan an (= Reihe 3 in A.1/A.2). Viel Spaß beim stricken!
03.10.2017 - 13:25
![]() Ilka wrote:
Ilka wrote:
Liebes Drops-Team, ich habe gerade die erste Zopf-runde gestrickt. Ist es richtig, dass die R
03.10.2017 - 10:41
![]() Maria wrote:
Maria wrote:
Hallo Vielen Dank für die süße Anleitung. Ich habe heute mit dem stricken begonnen und habe eine Frage zu den Zöpfen, bzw. der Reihenfolge. Ist A1, A2, A2, A1 nicht die logischere Reihenfolge, da dann beide Schultern gleich aussehen? Liebe Grüße Maria
04.07.2017 - 15:42DROPS Design answered:
Liebe Maria, die Zöpfen werden so A1, A2, A1, A2 gestrickt, so sind Sie spiegelverkehrt. Viel Spaß beim stricken!
05.07.2017 - 08:32
|
||||||||||
Little Explorer#littleexplorerjacket |
||||||||||
|
|
||||||||||
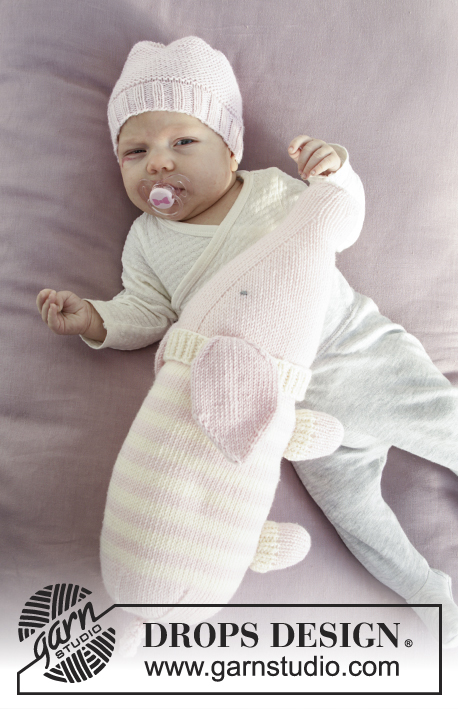
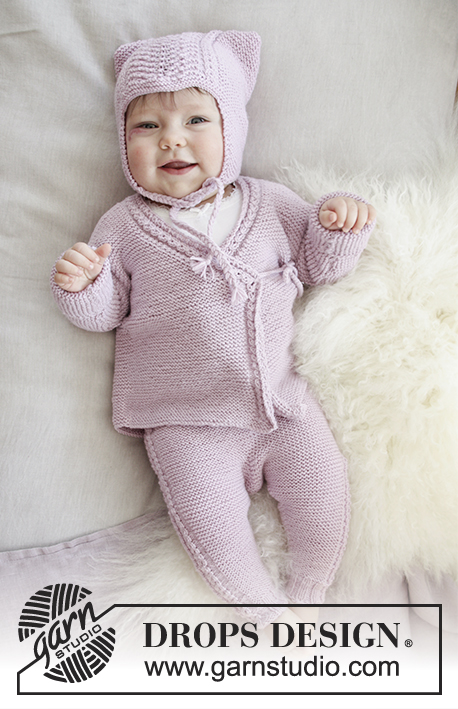
Knitted baby jacket with cables, garter stitch and raglan, worked top down. Sizes: premature – 4 years. The piece is worked in DROPS BabyMerino.
DROPS Baby 29-12 |
||||||||||
|
INFORMATION FOR THE PATTERN: RIDGE/GARTER STITCH (worked back and forth): 1 ridge = Knit 2 rows. PATTERN: See diagrams A.1 and A.2. The diagrams show all the rows in the pattern seen from the right side. RAGLAN: All the increases are made from the right side. Increase 8 stitches on a row as follows: Work to the first A.1, 1 yarn over, work A.1, 1 yarn over. Repeat by all A.1 and A.2 (= 2 stitches increased by each cable = 8 stitches in total on the row). On the next row, the yarn overs are knitted twisted to prevent holes. DECREASE TIP (for the sleeves): All decreases are made from the right side! Decrease 1 stitch in each side of the piece as follows: Work 1 stitch in garter stitch, slip 1 stitch as if to knit, knit 1, pass the slipped stitch over (= 1 stitch decreased), work in garter stitch until there are 3 stitches left, knit 2 together (= 1 stitch decreased) and finish with 1 stitch in garter stitch (= a total of 2 stitches decreased). BUTTONHOLES: The first buttonhole is made when the piece measures approx. 1 cm / ⅜", then make the next (3) 4-4-4-5 (5-5) with approx. 4 cm / 1½" between them. Decrease from the right side for the buttonholes on the right band (when the garment is worn) as follows: Work until there are 4 stitches left on the needle, make 1 yarn over, knit 2 together and knit 2. On the next row, knit the yarn overs. There will be holes. ---------------------------------------------------------- JACKET: The jacket is worked top down, back and forth on circular needle from mid front. The sleeves are worked back and forth on circular needle and are sewn together at the end. YOKE: Cast on (72) 72-80-80-80 (80-84) stitches (including 4 band stitches in each side towards mid front) with circular needle size 3 mm / US 2.5 and Baby Merino. Work 2 RIDGES – see description above and increase 8 stitches on the last row = (80) 80-88-88-88 (88-92) stitches. The next row is worked as follows from the right side – remember BUTTONHOLES on the band – see description above: Work (11) 11-13-13-13 (13-14) stitches in garter stitch (= left front piece), A.1 (= 6 stitches), work 10 stitches garter stitch (= left sleeve), A.2 (= 6 stitches), work (14) 14-18-18-18 (18-20) stitches in garter stitch (= back piece), A.1 over the next 6 stitches, work 10 stitches in garter stitch (= right sleeve), A.2 over the next 6 stitches, work (11) 11-13-13-13 (13-14) stitches in garter stitch (= right front piece). Work 1 row from the wrong side. Increase to RAGLAN – see description above – on each side of every A.1 and A.2 as follows: Increase 1 stitch on every 2nd row (0) 4-5-7-11 (12-16) times, then 1 stitch every 4th row (9) 8-9-9-8 (9-8) times = (152) 176-200-216-240 (256-284) stitches. REMEMBER THE GAUGE! The piece measures approx. (8) 9-10-11-12 (13-14) cm / (3") 3½"-4"-4⅜"-4¾" (5⅛"-5½") from the cast-on edge. The next row from the right side is worked as follows: (23) 26-30-32-35 (37-41) stitches in garter stitch, place the next (34) 40-44-48-54 (58-64) stitches on a thread for the sleeve, cast on 7 stitches under the sleeve, work (38) 44-52-56-62 (66-74) stitches in garter stitch, place the next (34) 40-44-48-54 (58-64) stitches on a thread for the sleeve, cast on 7 stitches under the sleeve, work (23) 26-30-32-35 (37-41) stitches in garter stitch = (98) 110-126-134-146 (154-170) stitches. Insert 1 marker in the piece, THE PIECE IS NOW MEASURED FROM HERE! Work garter stitch until the piece measures (9) 12-15-16-17 (20-23) cm / (3½") 4¾"-6"-6¼"-6¾" (8"-9") from the marker. Bind off. SLEEVE: Place the (34) 40-44-48-54 (58-64) stitches from the thread back on circular needle size 3 mm / US 2.5. Insert 1 marker in the piece, THE PIECE IS NOW MEASURED FROM HERE! Cast on 4 stitches at the end of the next 2 rows (= 4 new stitches in each side of the piece) = (42) 48-52-56-62 (66-72) stitches. Work garter stitch back and forth. When the piece measures 2 cm / ¾" from the separation, decrease 1 stitch in each side of the piece – READ DECREASE TIP. Decrease in this way every (10th) 8th-8th-6th-6th (8th-8th) row a total of (3) 5-7-9-11 (12-14) times = (36) 38-38-38-40 (42-44) stitches. Continue with garter stitch until the sleeve measures (10) 14-17-18-21 (24-29) cm / (4") 5½"-6¾"-7"-8¼" (9½"-11½"). Bind off. Work the other sleeve in the same way. ASSEMBLY: Sew together the sleeve seams inside the 1 edge stitch. Sew together the opening under the sleeves. Sew the buttons on to the left front piece. CROCHET EDGE: Crochet an edge along the entire opening of the jacket with hook size 3 mm / C as follows, begin mid back on neck: * 1 single crochet, 1 chain stitch, skip forward approx.0.5 cm / ¼" *, repeat from *-* and finish with 1 slip stitch in the first single crochet. |
||||||||||
Diagram explanations |
||||||||||
|
||||||||||
 |
||||||||||
Have you finished this pattern?Tag your pictures with #dropspattern #littleexplorerjacket or submit them to the #dropsfan gallery. Do you need help with this pattern?You'll find 24 tutorial videos, a Comments/Questions area and more by visiting the pattern on garnstudio.com. © 1982-2026 DROPS Design A/S. We reserve all rights. This document, including all its sub-sections, has copyrights. Read more about what you can do with our patterns at the bottom of each pattern on our site. |
||||||||||


With over 40 years in knitting and crochet design, DROPS Design offers one of the most extensive collections of free patterns on the internet - translated to 17 languages. As of today we count 325 catalogs and 12298 patterns - 12288 of which are translated into English (US/in).
We work hard to bring you the best knitting and crochet have to offer, inspiration and advice as well as great quality yarns at incredible prices! Would you like to use our patterns for other than personal use? You can read what you are allowed to do in the Copyright text at the bottom of all our patterns. Happy crafting!
Post a comment to pattern DROPS Baby 29-12
We would love to hear what you have to say about this pattern!
If you want to leave a question, please make sure you select the correct category in the form below, to speed up the answering process. Required fields are marked *.