
Popular categories
Looking for a yarn?


Comments / Questions (88)
![]() Plasman Dominique wrote:
Plasman Dominique wrote:
Bonjour, encore une petite question concernant ce bonnet . Je dois terminer de tricoter A1 à 16 cm de hauteur (taille 1 an). Je mesure où ? (au milieu de mon tricot, à l'endroit le plus "long " du motif j'ai bien 16 cm, mais sur la partie centrale j'ai un cm de moins et sur les côtés, 2 cm de moins. A quel endroit dois je mesurer la hauteur avant de tricoter les 2 côtes mousse. Merci pour ce modèle et pour votre aide.
18.11.2021 - 16:47DROPS Design answered:
Bonjour Mme Plasman, mesurez au plus court, la partie qui descend un peu sur le front - si vous en avez la possibilité, n'hésitez pas à essayer pour ajuster la longueur si besoin. bon tricot!
24.11.2021 - 09:53
![]() Dominique Plasman wrote:
Dominique Plasman wrote:
Bonjour, pour le bonnet j'ai bien tricoté 3 cm de points mousse après avoir monté les mailles. Sur la photo de votre modèle j'ai l'impression que ce bord mousse es beaucoup plus petit (2 cm ?) Je me trompe ? Cordialement
16.11.2021 - 12:25DROPS Design answered:
Bonjour Mme Plasman, le bonnet se tricote de haut en bas, on ne voit pas vraiment bien les 3 premiers cm du haut sur la photo - il se termine par 2 côtes mousse (que l'on voit bien sur la photo côté front/visage, juste avant les cache-oreilles. Bon tricot!
16.11.2021 - 13:36
![]() MaryEvensen wrote:
MaryEvensen wrote:
Måles fra vrangbord eller fra opplegg . Når man skal øke på buksa i skritte .synes det var kort 16cm
01.11.2021 - 22:47DROPS Design answered:
Hei Mary. Du måler fra oppleggskanten, OG fra forstykket. Når du er ferdig med økningene måler arbeidet 21 cm (om du strikker str. 6/9 mnd). mbh DROPS Design
08.11.2021 - 11:49
![]() Maike wrote:
Maike wrote:
Hallo, ich würde gerne die Babyhose "Hello Kitten", Modell bm-072-by stricken. Die Strickanleitung wird ja so angezeigt; aber das Diagramm nicht. Kann mir das jemand zur Verfügung stellen? Vielen Dank schon mal. Maike
13.10.2021 - 14:10DROPS Design answered:
Liebe Maike, Wir hatten einige Probleme mit der Anzeige der Bilder, aber jetzt ist alles behoben. Vielen Dank für Ihre Geduld, viel Spaß beim Stricken!
14.10.2021 - 09:10
![]() Siggi wrote:
Siggi wrote:
Hallo! Ich stricke gerade die Hose für 1/3 Monate. Ab einer Länge von 13cm soll zugenommen werden. Berechne ich beim Messen das Bündchen mit oder erst an der Stelle bei der ich kraus rechts stricke?
01.10.2021 - 12:43DROPS Design answered:
Liebe Siggi, diese 13 cm werden am vorderen Mitte gemessen und ab Anschlagsrand (= gesamte Höhe ohne die verkürzten Reihen). Viel Spaß beim stricken!
01.10.2021 - 16:08
![]() Eve wrote:
Eve wrote:
Hello, When measuring the overall length of the piece, is the measure taken from the garter stitch section or the middle lace section? I have a 2cm difference between the two so I'm not sure which one to measure. Many thanks!
05.09.2021 - 12:17DROPS Design answered:
Dear Eve, I'm not sure which garment of the three you are referring to. In any case, unless otherwise specified, the overall length would be from the cast on edge. Happy knitting!
05.09.2021 - 17:47
![]() Kiers wrote:
Kiers wrote:
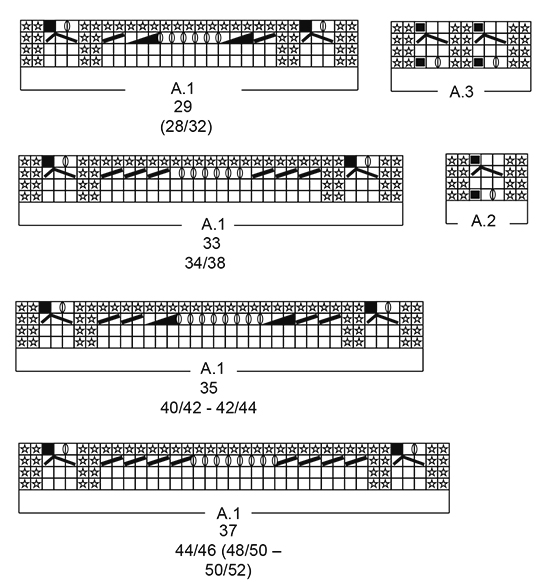
Betreffende patroon DROPS BABY 29/9 telpatroon A2: in de 2e rij wordt er 1 afhaling, 2 st recht en de afgehaalde steek over de gebreide steek gedaan n steek 3, 4 en 5 dat geeft een mindering van 1 steek, maar in de 3e rij van het telpatroon staan weer gewoon de 7 steken van het patroon, terwijl er maar 6 st op de naald staan. Pas in rij 4 is er in het midden een omslag tussen 2 steken Graag uw uitleg
21.06.2021 - 13:12DROPS Design answered:
Dag Kiers,
Het zwarte hokje geeft aan dat er geen steek is, dus in die naald brei je in patroon A.2 2 averecht aan de goede kant (recht aan de verkeerde kant), 2 recht aan de goede kant (averecht aan de verkeerde kant en weer 2 averecht aan de goede kant (recht aan de verkeerde kant.
24.06.2021 - 10:24
![]() Irina wrote:
Irina wrote:
Sorry..korrekt soll es in meinem Kommentar heißen 17 Maschen, Diagramm 14 Maschen, 34 Maschen, 14 Diagramm, 17 Maschen
19.01.2021 - 10:19
![]() Irina wrote:
Irina wrote:
Guten Morgen, ja da haben sie recht mit der erste Reihe im Diagramm A3. So habe ich es auch gestrickt. Nur es kommt mit den 19 Maschen, 10 Maschen, 38 Maschen, 10 Maschen, 19 Maschen nicht hin.Dann würde das Diagramm mit rechten Maschen anfangen. Deswegen habe ich 17 Maschen, Diagramm 16 Maschen, 34 Maschen ,Diagramm 16 Maschen, 17 Maschen. Dann ist das Diagramm etwas breiter sieht aber auch ganz toll aus. LG
19.01.2021 - 10:15DROPS Design answered:
Liebe Irina, wenn Sie A.3 stricken nehmen Sie 2 Maschen in jedem Diagram zu bei der 1. Reihe, diese Maschen werden bei den 3. Reihe abgenommen (so ein Zopf stricken Sie), dh es sind immer 19 M vor A.3 am Anfang der Runde, 38 M zwischen beide A.3 und 19 M nach 2. A.3 bis Sie die Zunahmen beginnen. Hoffentlich kann es Ihnen helfen. Viel Spaß beim stricken!
19.01.2021 - 14:14
![]() Irina wrote:
Irina wrote:
Moin , habe jetzt die Hose in Größe 0-1 (96 Maschen) nach der Erhöhung ab Mitte hinten so angefangen. 17 Maschen rechts, 14 Maschen Diagramm A 3, 34 Maschen rechts, 14 Maschen Diagramm A 3, 17 Maschen rechts. Dann kommt es mit dem Muster in der Größe hin. Das Diagramm sieht dann so aus 2 linke Maschen 2rechts2links2rechts2links2rechts 2links . L G
18.01.2021 - 09:02DROPS Design answered:
Liebe Irina, in die Größe 0/1 und 96 M stricken Sie 19 M Kraus rechts, A.3 (= 10 M), 38 M kraus rechts, A.3 über 10 Maschen, 19 Maschen kraus rechts. Bei der 1. Reihe in A.3 stricken Sie: 2 li, 1 re, 1 Umschlag, 1 re, 2 li, 1 re, 1 Umschlag, 1 re, 2 li (= es sind jetzt 3 M in jedem 2-re-M Partien, diese 3. Masche wird bei der 3. Reihe abgenommen werden). Viel Spaß beim stricken!
18.01.2021 - 11:01
|
||||||||||||||||||||||
Hello Kitten#hellokittenset |
||||||||||||||||||||||
 |
 |
|||||||||||||||||||||
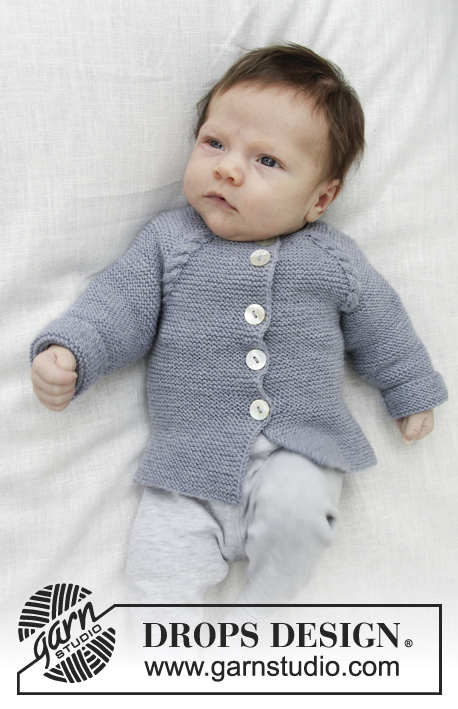
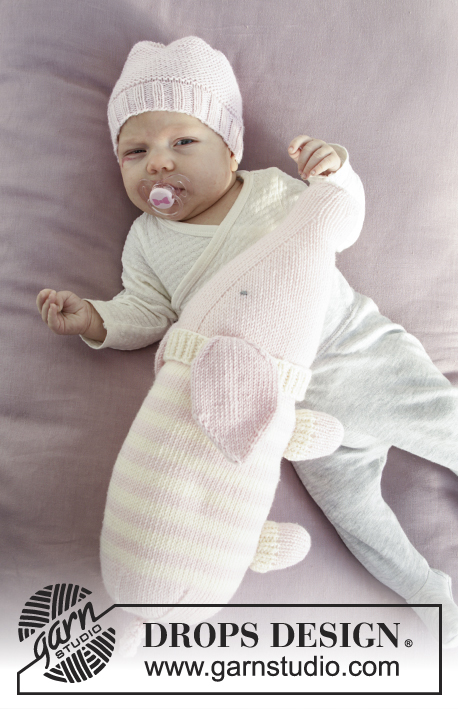
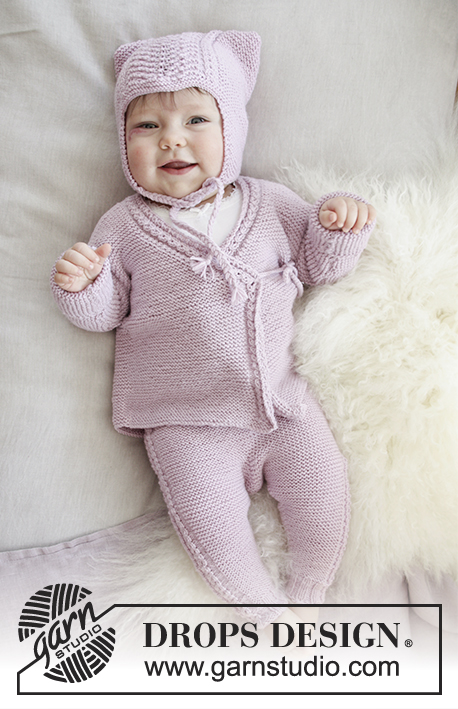
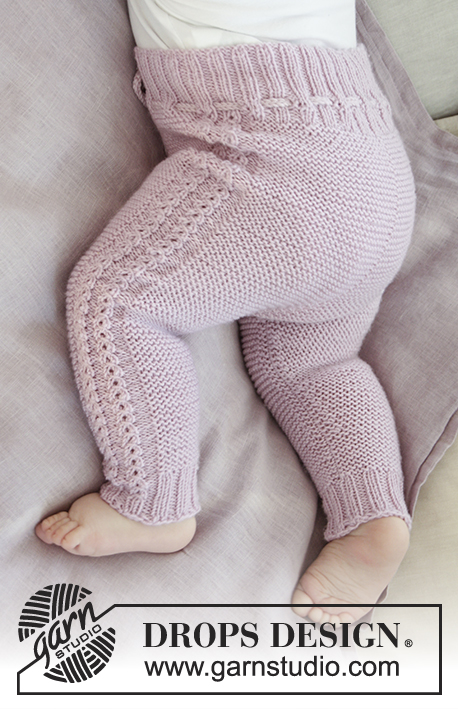
The set consists of: Hat for baby with garter stitch, wave pattern and earflaps. Wrap-around jacket and pants with garter stitch and lace pattern. Sizes premature – 4 years. The set is knitted in DROPS BabyMerino.
DROPS Baby 29-9 |
||||||||||||||||||||||
|
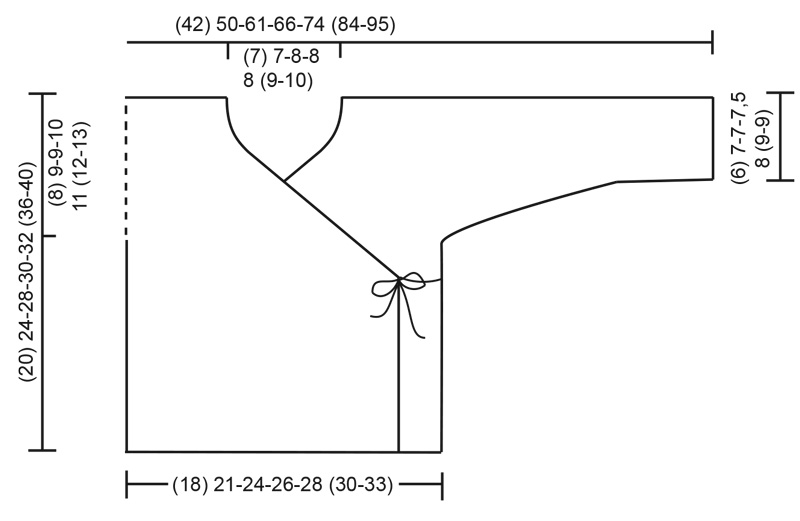
INFORMATION FOR THE PATTERN: RIDGE/GARTER STITCH (back and forth): 1 ridge = knit 2 rows. PATTERN: Hat: See diagram A.1. Jacket: See diagram A.2. Pants: See diagram A.3. The diagrams show all the rows in the patterns seen from the right side. Choose the diagram for your size. DECREASE TIP-1 (for hat): All decreases are made from the right side! Decrease as follows: Work 1 edge stitch in garter stitch, slip 1 stitch as if to knit, knit 1, pass the slipped stitch over (= 1 stitch decreased), work garter stitch until there are 3 stitches left, knit 2 stitches together (= 1 stitch decreased), 1 edge stitch in garter stitch. DECREASE TIP-2 (for jacket): All decreases are made from the right side! Decrease as follows after the 1 edge stitch and A.2 (for the right front piece): Slip 1 stitch as if to knit, knit 1, pass the slipped stitch over (= 1 stitch decreased). Decrease as follows before the 1 edge stitch and A.2 (for the left front piece): Knit 2 together (= 1 stitch decreased). DECREASE TIP-3 (for the pants): Work until there are 3 stitches left before the marker, then knit 2 stitches together (= 1 stitch decreased), work 2 stitches (the marker sits between these 2 stitches) and then knit 2 stitches twisted together (= 1 stitch decreased). INCREASE TIP (for the pants): Increase 2 stitches by making 1 yarn over on each side of 2 stitches, on the next round, the yarn overs are knitted twisted to prevent holes. ---------------------------------------------------------- HAT: The hat is worked back and forth, top down. Cast on (79) 89-99-103-107 (115-121) stitches with circular needle size 3 mm / US 2.5 and Baby Merino. Work GARTER STITCH – see description above, until the piece measures 3 cm / 1". Then work as follows: (25) 28-32-34-35 (39-42) stitches in garter stitch, A.1 over (29) 33-35-35-37 (37-37) stitches and work (25) 28-32-34-35(39-42) stitches in garter stitch. REMEMBER THE GAUGE! Work in this way until the piece measures (14) 14-15-16-16 (18-19) cm / (5½") 5½"-6"-6¼"-6¼" (7"-7½"). Work 2 ridges. On the next row from the right side, bind off for the earflaps as follows: bind off the first (5) 8-10-10-9(11-12) stitches, knit the next (20) 20-22-24-26 (28-30) stitches (= first earflap) and place these stitches on a thread, bind off the next (29) 33-35-35-37 (37-37) stitches, knit over the next (20) 20-22-24-26 (28-30) stitches (= 2nd earflap) and place these stitches on a thread, bind off the last (5) 8-10-10-9 (11-12) stitches. Cut the strand. EARFLAPS: = (20) 20-22-24-26 (28-30) stitches. Place the stitches from one of the threads back on the needle, work garter stitch and decrease 1 stitch inside 1 edge stitch in each side of the piece – READ DECREASE TIP-1, as follows: Decrease 1 stitch in each side of the piece every 4th row a total of (6) 6-5-5-6 (6-7) times and 1 stitch in each side of the piece every 2nd row a total of (2) 2-4-5-5 (6-6) times = 4 stitches. The earflap measure approx. (6) 6-6-6-7 (8-8) cm / (2½") 2½"-2½"-2½"-2¾" (3"-3"). Bind off and fasten the strand. Repeat on the other earflap. ASSEMBLY: Sew the sides together, sewing edge to edge in the outermost stitch. Fold the hat so that this seam is mid back and then sew the cast-on edge together the same way. TIE CORD: Cut 6 strands of approx. 60 cm / 23½" and thread them halfway through the tip of the earflap, in other words, there will be 12 strands to plait. Plait 1 plait. Tie 1 knot at the bottom. Do the same in the other earflap. --------------------------------------------------------- JACKET: The piece is worked back and forth on circular needle. Start with one of the front pieces, cast on stitches for the sleeve and work up to the shoulder. Work the other front piece, work the 2 front pieces together and work down the back piece. RIGHT FRONT PIECE: LOOSELY cast on (34) 37-44-48-52 (55-62) stitches with circular needle size 3 mm / US 2.5 and Baby Merino and work 3 RIDGES – see description above (first row = right side). Work as follows from the right side: Work 1 edge stitch in garter stitch, A.2 over 6 stitches and work garter stitch to end of row. Continue pattern in this way until the piece measures (9) 12-16-16-17 (20-23) cm / (3½") 4¾"-6¼"-6¼"-6¾" (8"-9") – adjust so that the next row is worked from the right side. Work 1 short row (starting from the right side) as follows: Work 1 edge stitch in garter stitch, A.2, turn the piece, tighten the strand and work back from the wrong side as before. Turn the piece. READ THE WHOLE OF THE FOLLOWING SECTION BEFORE CONTINUING! YOU BIND OFF FOR THE NECK AT THE SAME TIME AS YOU CAST ON STITCHES FOR THE SHOULDER/SLEEVE. DECREASE FOR NECK: Decrease 1 stitch for the neck inside 1 edge stitch and A.2 at the beginning of the row – READ DECREASE TIP-2. Decrease in this way every 2nd row a total of (18) 18-22-24-26 (28-32) times, then decrease every 4th row a total of 2 times. SHOULDER/SLEEVE: When the piece measures (12) 15-19-20-21 (24-27) cm / (4¾") 6"-7½"-8"-8¼" (9½"-10½") cast on new stitches at the end of each row from the right side (= towards the side) for the sleeve as follows: Cast on (3) 4-6-6-6 (6-6) stitches a total of (4) 4-4-5-6 (7-8) times and (16) 19-19-18-19 (23-26) stitches a total of 1 time. After all increases and decreases there are (42) 52-63-70-79 (90-102) stitches on the row for the shoulder/sleeve. Continue with garter stitch and A.2 until the piece measures (20) 24-28-30-32 (36-40) cm / (8") 9½"-11"-11¾"-12½" (14¼"-15¾") – adjust so that you finish with the 4th row in A.2, now continue by working garter stitch over all stitches. Insert 1 marker = mid top of shoulder. Cast on 2 new stitches at the end of the row towards the neck (= from the wrong side) a total of 2 times = (46) 56-67-74-83 (94-106) stitches (last row = wrong side). Place all the stitches on a thread. LEFT FRONT PIECE: LOOSELY cast on (34) 37-44-48-52 (55-62) stitches with circular needle size 3 mm / US 2.5 and Baby Merino and work 3 ridges (first row = right side). Continue as follows from the right side: Work garter stitch until there are 7 stitches left on the needle, A.2 over 6 stitches and 1 edge stitch in garter stitch. Continue the pattern in this way until the piece measures (9) 12-16-16-17 (20-23) cm / (3½") 4¾"-6¼"-6¼"-6¾" (8"-9") – adjust so that the next row is worked from the wrong side. Work 1 short row (starting from the wrong side) as follows: Work 1 edge stitch in garter stitch, A.2, turn the piece, tighten the strand and work back from the right side. Turn the piece and work back from the wrong side. REMEMBER THE GAUGE! READ THE WHOLE OF THE NEXT SECTION BEFORE CONTINUING! YOU DECREASE FOR THE NECK AT THE SAME TIME AS YOU CAST ON STITCHES FOR THE SHOULDER/SLEEVE. DECREASE FOR THE NECK: Decrease 1 stitch for the neck before A.2 and 1 edge stitch at the end of the row. Decrease in this way every 2nd row a total of (18) 18-22-24-26 (28-32) times, then decrease every 4th row a total of 2 times. SHOULDER/SLEEVE: When the piece measures (12) 15-19-20-21 (24-27) cm / (4¾") 6"-7½"-8"-8¼" (9½"-10½") cast on new stitches at the end of each row from the wrong side (= towards the side) for the sleeve as follows: Cast on (3) 4-6-6-6 (6-6) stitches a total of (4) 4-4-5-6 (7-8) times and (16) 19-19-18-19 (23-26) stitches a total of 1 time. After all increases and decreases there are (42) 52-63-70-79 (90-102) stitches on the row for shoulder/sleeve. Continue with garter stitch and A.2 until the piece measures (20) 24-28-30-32 (36-40) cm / (8") 9½"-11"-11¾"-12½" (14¼"-15¾") – adjust so that you finish with the 4th row in A.2, now continue by working garter stitch over all stitches. Insert 1 marker = mid top of shoulder. Cast on 2 new stitches at the end of the row towards the neck (= from the right side) a total of 2 times = (46) 56-67-74-83 (94-106) stitches. Knit 1 row from the wrong side. BACK PIECE: Knit over the left front piece from the right side (= (46) 56-67-74-83 (94-106) stitches), cast on (8) 8-10-10-12 (14-16) new stitches (= back of neck) and knit the right front piece on to the circular needle (= knit from the right side) = (100) 120-144-158-178 (202-228) stitches. THE PIECE IS NOW MEASURED FROM THE MARKERS ON THE SHOULDERS. Continue with garter stitch back and forth on the needle. When the piece measures (6) 7-7-7½-8 (9-9) cm / (2½") 2¾"-2¾"-2⅞"-3" (3½"-3½") bind off sleeve stitches as follows: bind off at the beginning of each row in each side of the piece as follows: (16) 19-19-18-19 (23-26) stitches 1 time and (3) 4-6-6-6 (6-6) stitches a total of (4) 4-4-5-6 (7-8) times = (44) 50-58-62-68 (72-80) stitches. Continue working until the piece measures approx. (20) 24-28-30-32 (36-40) cm / (8") 9½"-11"-11¾"-12½" (14¼"-15¾") – fold the piece double at the markers on the shoulders and make sure that the front and back pieces are the same length – the loosely bind off. ASSEMBLY: Sew side and sleeve seams edge to edge in the outermost loop of the outermost stitch. CROCHET EDGE: Crochet with hook size 2.5 MM = US 1.5 around the whole opening of the jacket as follows (from the right side): Work 1 single crochet in the first stitch, * 1 chain stitch, skip approx. 2 stitches/rows, 1 single crochet in the next stitch *, repeat from *-* around the whole jacket, but in each of the corners (where the decreases for the neck start on the front pieces) work the tie cord as follows: 1 single crochet in the tip, work chain stitches for approx. 20-25 cm = 8"-9¾", turn and work back with 1 slip stitch in each chain stitch, work 1 single crochet in the tip of the front piece again. The round is finished with 1 slip stitch in the first single crochet. Make 2 loose tie cords: Work chains for approx 20-25 cm = 8"-9¾", turn and work back with 1 slip stitch in each chain stitch. Cut the strand and make 1 more tie cord the same way. Fasten 1 tie cord on the inside on right side and 1 tie cord on the outside on the left side. Make sure to place the ties at the same height as the tie on the outside. --------------------------------------------------------- TROUSERS: The piece is worked in the round, top down. The round starts mid back. Cast on (88) 96-104-120-128 (136-144) stitches with circular needle size 2.5 MM = US 1.5 and Baby Merino. Insert 1 marker at the beginning of the round (= mid back) and 1 marker after (44) 48-52-60-64 (68-72) stitches (= mid front). Work rib as follows from mid back: knit 1, * purl 2, knit 2 *, repeat from *-* and finish with purl 2 and knit 1. When the rib section measures 4 cm = 1½" work a row of holes for the tie cord as follows: * knit 1, 1 yarn over, purl 2 together, knit 2, 1 yarn over, purl 2 together, knit 1 *, repeat from *-* the whole round. Work 1 round of rib with knit 2 / purl 2. Work an elevation at the back of the rib section as follows: Work (7) 7-9-9-9 (9-9) stitches, turn, tighten the strand, work (14) 14-18-18-18 (18-18) stitches back, turn, tighten the strand, work (20) 20-26-26-26 (26-26) stitches, turn, tighten the strand, work (26) 26-34-34-34 (34-34) stitches back. Continue in this way by working (6) 6-8-8-8 (8-8) more stitches each time you turn until you have worked a total of (50) 50-66-66-82 (82-82) stitches. Turn. Change to circular needle size 3 MM = US 2.5. Work as follows from mid back: Work (17) 19-21-25-27 (29-31) stitches in GARTER STITCH – see description above, A.3 (= 10 stitches), work (34) 38-42-50-54 (58-62) stitches in garter stitch, A.3 over 10 stitches, work (17) 19-21-25-27 (29-31) stitches in garter stitch. REMEMBER THE KNITTING GAUGE! When the piece measures (12) 14-15-18-17 (18-19) cm = (4¾") 5½"-6"-7"-6¾" (7"-7½") from cast-on edge mid front, increase 1 stitch on each side of the 2 middle stitches at the front and back – READ INCREASE TIP (= 4 stitches increased). Increase in this way every 2nd round a total of (8) 8-8-8-12 (12-12) times = (120) 128-136-152-176 (184-192) stitches. After last increase, piece measures approx. (15) 17-18-21-22 (23-24) cm = (6") 6¾"-7"-8¼"-8¾" (9"-9½") from cast-on edge mid front. On the next round of knit, bind off stitches for the gusset as follows: Start mid back and bind off the first (4) 4-4-4-5 (5-5) stitches, work garter stitch until there are (4) 4-4-4-5 (5-5)stitches left before the marker in front and bind off (8) 8-8-8-10 (10-10) stitches, work garter stitch until there are (4) 4-4-4-5 (5-5)) stitches left on the round, bind off the last (4) 4-4-4-5 (5-5) stitches. Cut the yarn. Place the stitches for one of the legs on a thread and finish each leg separately. LEG: The piece is worked in the round with double pointed needles. = (52) 56-60-68-78 (82-86) stitches. Divide the stitches on to double pointed needles size 3 MM = US 2.5 and insert 1 marker at the beginning of the round (= inside leg). Continue with garter stitch and A.3 in the side as before for 1 cm = ⅜" – adjust so that the next round is 1 round of knit. Decrease 1 stitch on each side of the marker – READ DECREASE TIP-3, as follows: Size premature – 0/1 month and 1/3 months: On every 4th round. Size 6/9 months and 12/18 months: On every 6th round. Size 2 years: On every 8th round. Size ¾ years: On every 10th round. Decrease like this a total of (10) 12-12-14-15 (15-15) = (32) 32-36-40-48 (52-56) stitches. Work until the piece measures (24) 28-32-38-42 (48-55) cm = (9½") 11"-12½"-15"-16½" (19"-21⅝") from cast-on edge on mid front, now continue with A.3 as before but the garter stitches are worked in rib with knit 2/purl 2 until the piece measures approx. (26) 30-34-40-44 (50-57) cm = (10¼") 11¾"-13⅜"-15¾"-17¼" (19¾"-22½") from the cast-on edge on mid front – adjust so that the last round is the 4th round in A.3. Work rib over all stitches until the piece measures (27) 31-35-41-45 (51-58) cm = (10⅝") 12¼"-13¾"-16⅛"-17¾" (20"-22¾") from cast-on edge. Bind off with knit over knit and purl over purl. Place the stitches from the other leg back on double pointed needles size 3 MM = US 2.5 and work as for the first leg. ASSEMBLY: Sew the (8) 8-8-8-10 (10-10) stitches bind off between the legs, to each other – front piece and back piece together. TIE CORD: Crochet a tie cord on the waist with hook size 2.5 MM = US 1.5 as follows: Work chain stitches for approx. 110 cm = 43⅜", turn and work back with 1 slip stitch in each chain stitch, cut and fasten the strand. Tread the tie cord through the holes made in the rib and tie it at the front. |
||||||||||||||||||||||
Diagram explanations |
||||||||||||||||||||||
|
||||||||||||||||||||||
 |
||||||||||||||||||||||
 |
||||||||||||||||||||||
 |
||||||||||||||||||||||
 |
||||||||||||||||||||||
Have you finished this pattern?Tag your pictures with #dropspattern #hellokittenset or submit them to the #dropsfan gallery. Do you need help with this pattern?You'll find 39 tutorial videos, a Comments/Questions area and more by visiting the pattern on garnstudio.com. © 1982-2026 DROPS Design A/S. We reserve all rights. This document, including all its sub-sections, has copyrights. Read more about what you can do with our patterns at the bottom of each pattern on our site. |
||||||||||||||||||||||


With over 40 years in knitting and crochet design, DROPS Design offers one of the most extensive collections of free patterns on the internet - translated to 17 languages. As of today we count 325 catalogs and 12298 patterns - 12288 of which are translated into English (US/in).
We work hard to bring you the best knitting and crochet have to offer, inspiration and advice as well as great quality yarns at incredible prices! Would you like to use our patterns for other than personal use? You can read what you are allowed to do in the Copyright text at the bottom of all our patterns. Happy crafting!
Post a comment to pattern DROPS Baby 29-9
We would love to hear what you have to say about this pattern!
If you want to leave a question, please make sure you select the correct category in the form below, to speed up the answering process. Required fields are marked *.