
Popular categories
Looking for a yarn?


|
||||||||||||||||||||||
Hello Kitten |
||||||||||||||||||||||
 |
 |
|||||||||||||||||||||
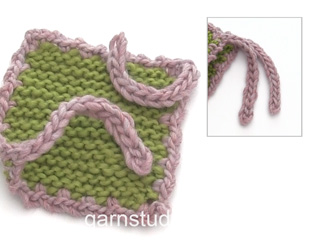
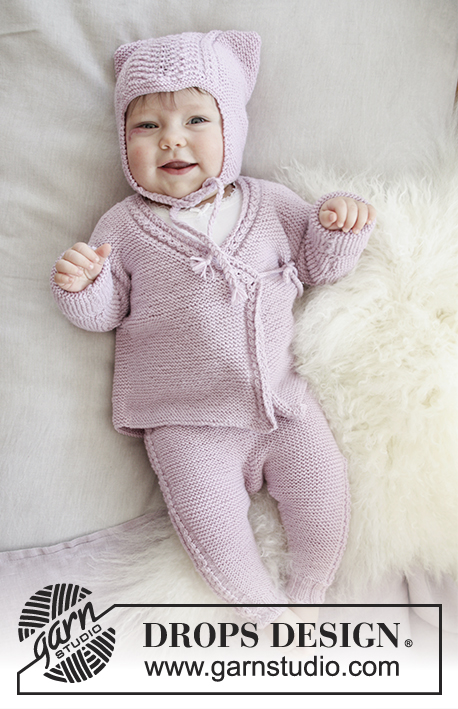
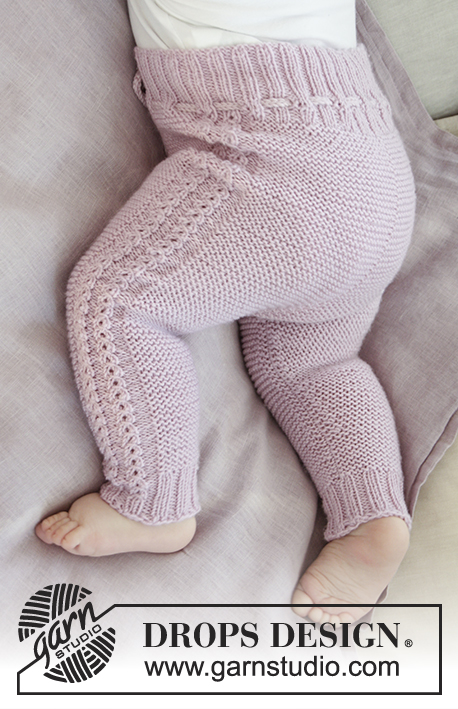
The set consists of: Hat for baby with garter stitch, wave pattern and earflaps. Wrap-around jacket and trousers with garter stitch and lace pattern. Sizes premature – 4 years. The set is knitted in DROPS BabyMerino.
DROPS Baby 29-9 |
||||||||||||||||||||||
|
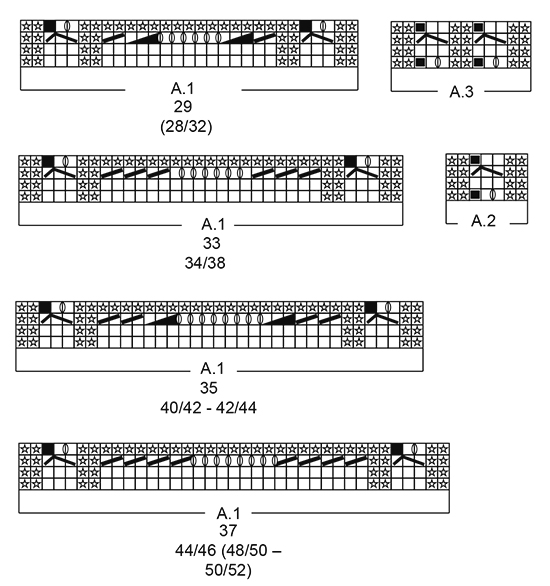
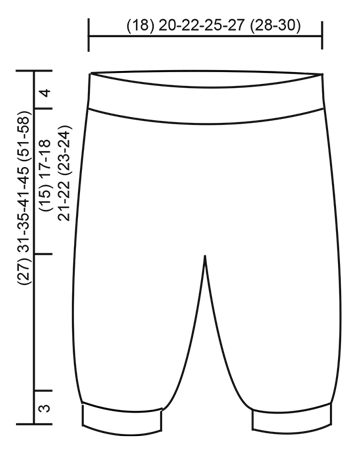
INFORMATION FOR THE PATTERN: RIDGE/GARTER STITCH (back and forth): 1 ridge = knit 2 rows. PATTERN: Hat: See diagram A.1. Jacket: See diagram A.2. Trousers: See diagram A.3. The diagrams show all the rows in the patterns seen from the right side. Choose the diagram for your size. DECREASE TIP-1 (for hat): All decreases are made from the right side! Decrease as follows: Work 1 edge stitch in garter stitch, slip 1 stitch as if to knit, knit 1, pass the slipped stitch over (= 1 stitch decreased), work garter stitch until there are 3 stitches left, knit 2 stitches together (= 1 stitch decreased), 1 edge stitch in garter stitch. DECREASE TIP-2 (for jacket): All decreases are made from the right side! Decrease as follows after the 1 edge stitch and A.2 (for the right front piece): Slip 1 stitch as if to knit, knit 1, pass the slipped stitch over (= 1 stitch decreased). Decrease as follows before the 1 edge stitch and A.2 (for the left front piece): Knit 2 together (= 1 stitch decreased). DECREASE TIP-3 (for the trousers): Work until there are 3 stitches left before the marker, then knit 2 stitches together (= 1 stitch decreased), work 2 stitches (the marker sits between these 2 stitches) and then knit 2 stitches twisted together (= 1 stitch decreased). INCREASE TIP (for the trousers): Increase 2 stitches by making 1 yarn over on each side of 2 stitches, on the next round, the yarn overs are knitted twisted to prevent holes. ---------------------------------------------------------- HAT: The hat is worked back and forth, top down. Cast on (79) 89-99-103-107 (115-121) stitches with circular needle size 3 mm and Baby Merino. Work GARTER STITCH – see description above, until the piece measures 3 cm. Then work as follows: (25) 28-32-34-35 (39-42) stitches in garter stitch, A.1 over (29) 33-35-35-37 (37-37) stitches and work (25) 28-32-34-35(39-42) stitches in garter stitch. REMEMBER THE KNITTING TENSION! Work in this way until the piece measures (14) 14-15-16-16 (18-19) cm. Work 2 ridges. On the next row from the right side, cast off for the earflaps as follows: Cast off the first (5) 8-10-10-9(11-12) stitches, knit the next (20) 20-22-24-26 (28-30) stitches (= first earflap) and place these stitches on a thread, cast off the next (29) 33-35-35-37 (37-37) stitches, knit over the next (20) 20-22-24-26 (28-30) stitches (= 2nd earflap) and place these stitches on a thread, cast off the last (5) 8-10-10-9 (11-12) stitches. Cut the strand. EARFLAPS: = (20) 20-22-24-26 (28-30) stitches. Place the stitches from one of the threads back on the needle, work garter stitch and decrease 1 stitch inside 1 edge stitch in each side of the piece – READ DECREASE TIP-1, as follows: Decrease 1 stitch in each side of the piece every 4th row a total of (6) 6-5-5-6 (6-7) times and 1 stitch in each side of the piece every 2nd row a total of (2) 2-4-5-5 (6-6) times = 4 stitches. The earflap measure approx. (6) 6-6-6-7 (8-8) cm. Cast off and fasten the strand. Repeat on the other earflap. ASSEMBLY: Sew the sides together, sewing edge to edge in the outermost stitch. Fold the hat so that this seam is mid back and then sew the cast-on edge together the same way. TIE CORD: Cut 6 strands of approx. 60 cm and thread them halfway through the tip of the earflap, in other words, there will be 12 strands to plait. Plait 1 plait. Tie 1 knot at the bottom. Do the same in the other earflap. --------------------------------------------------------- JACKET: The piece is worked back and forth on circular needle. Start with one of the front pieces, cast on stitches for the sleeve and work up to the shoulder. Work the other front piece, work the 2 front pieces together and work down the back piece. RIGHT FRONT PIECE: LOOSELY cast on (34) 37-44-48-52 (55-62) stitches with circular needle size 3 mm and Baby Merino and work 3 RIDGES – see description above (first row = right side). Work as follows from the right side: Work 1 edge stitch in garter stitch, A.2 over 6 stitches and work garter stitch to end of row. Continue pattern in this way until the piece measures (9) 12-16-16-17 (20-23) cm – adjust so that the next row is worked from the right side. Work 1 short row (starting from the right side) as follows: Work 1 edge stitch in garter stitch, A.2, turn the piece, tighten the strand and work back from the wrong side as before. Turn the piece. READ THE WHOLE OF THE FOLLOWING SECTION BEFORE CONTINUING! YOU CAST OFF FOR THE NECK AT THE SAME TIME AS YOU CAST ON STITCHES FOR THE SHOULDER/SLEEVE. DECREASE FOR NECK: Decrease 1 stitch for the neck inside 1 edge stitch and A.2 at the beginning of the row – READ DECREASE TIP-2. Decrease in this way every 2nd row a total of (18) 18-22-24-26 (28-32) times, then decrease every 4th row a total of 2 times. SHOULDER/SLEEVE: When the piece measures (12) 15-19-20-21 (24-27) cm cast on new stitches at the end of each row from the right side (= towards the side) for the sleeve as follows: Cast on (3) 4-6-6-6 (6-6) stitches a total of (4) 4-4-5-6 (7-8) times and (16) 19-19-18-19 (23-26) stitches a total of 1 time. After all increases and decreases there are (42) 52-63-70-79 (90-102) stitches on the row for the shoulder/sleeve. Continue with garter stitch and A.2 until the piece measures (20) 24-28-30-32 (36-40) cm – adjust so that you finish with the 4th row in A.2, now continue by working garter stitch over all stitches. Insert 1 marker = mid top of shoulder. Cast on 2 new stitches at the end of the row towards the neck (= from the wrong side) a total of 2 times = (46) 56-67-74-83 (94-106) stitches (last row = wrong side). Place all the stitches on a thread. LEFT FRONT PIECE: LOOSELY cast on (34) 37-44-48-52 (55-62) stitches with circular needle size 3 mm and Baby Merino and work 3 ridges (first row = right side). Continue as follows from the right side: Work garter stitch until there are 7 stitches left on the needle, A.2 over 6 stitches and 1 edge stitch in garter stitch. Continue the pattern in this way until the piece measures (9) 12-16-16-17 (20-23) cm – adjust so that the next row is worked from the wrong side. Work 1 short row (starting from the wrong side) as follows: Work 1 edge stitch in garter stitch, A.2, turn the piece, tighten the strand and work back from the right side. Turn the piece and work back from the wrong side. REMEMBER THE KNITTING TENSION! READ THE WHOLE OF THE NEXT SECTION BEFORE CONTINUING! YOU DECREASE FOR THE NECK AT THE SAME TIME AS YOU CAST ON STITCHES FOR THE SHOULDER/SLEEVE. DECREASE FOR THE NECK: Decrease 1 stitch for the neck before A.2 and 1 edge stitch at the end of the row. Decrease in this way every 2nd row a total of (18) 18-22-24-26 (28-32) times, then decrease every 4th row a total of 2 times. SHOULDER/SLEEVE: When the piece measures (12) 15-19-20-21 (24-27) cm cast on new stitches at the end of each row from the wrong side (= towards the side) for the sleeve as follows: Cast on (3) 4-6-6-6 (6-6) stitches a total of (4) 4-4-5-6 (7-8) times and (16) 19-19-18-19 (23-26) stitches a total of 1 time. After all increases and decreases there are (42) 52-63-70-79 (90-102) stitches on the row for shoulder/sleeve. Continue with garter stitch and A.2 until the piece measures (20) 24-28-30-32 (36-40) cm – adjust so that you finish with the 4th row in A.2, now continue by working garter stitch over all stitches. Insert 1 marker = mid top of shoulder. Cast on 2 new stitches at the end of the row towards the neck (= from the right side) a total of 2 times = (46) 56-67-74-83 (94-106) stitches. Knit 1 row from the wrong side. BACK PIECE: Knit over the left front piece from the right side (= (46) 56-67-74-83 (94-106) stitches), cast on (8) 8-10-10-12 (14-16) new stitches (= back of neck) and knit the right front piece on to the circular needle (= knit from the right side) = (100) 120-144-158-178 (202-228) stitches. THE PIECE IS NOW MEASURED FROM THE MARKERS ON THE SHOULDERS. Continue with garter stitch back and forth on the needle. When the piece measures (6) 7-7-7½-8 (9-9) cm cast off sleeve stitches as follows: Cast off at the beginning of each row in each side of the piece as follows: (16) 19-19-18-19 (23-26) stitches 1 time and (3) 4-6-6-6 (6-6) stitches a total of (4) 4-4-5-6 (7-8) times = (44) 50-58-62-68 (72-80) stitches. Continue working until the piece measures approx. (20) 24-28-30-32 (36-40) cm – fold the piece double at the markers on the shoulders and make sure that the front and back pieces are the same length – the loosely cast off. ASSEMBLY: Sew side and sleeve seams edge to edge in the outermost loop of the outermost stitch. CROCHET EDGE: Crochet with hook size 2.5 mm around the whole opening of the jacket as follows (from the right side): Work 1 double crochet in the first stitch, * 1 chain stitch, skip approx. 2 stitches/rows, 1 double crochet in the next stitch *, repeat from *-* around the whole jacket, but in each of the corners (where the decreases for the neck start on the front pieces) work the tie cord as follows: 1 double crochet in the tip, work chain stitches for approx. 20-25 cm, turn and work back with 1 slip stitch in each chain stitch, work 1 double crochet in the tip of the front piece again. The round is finished with 1 slip stitch in the first double crochet. Make 2 loose tie cords: Work chains for approx 20-25 cm, turn and work back with 1 slip stitch in each chain stitch. Cut the strand and make 1 more tie cord the same way. Fasten 1 tie cord on the inside on right side and 1 tie cord on the outside on the left side. Make sure to place the ties at the same height as the tie on the outside. --------------------------------------------------------- TROUSERS: The piece is worked in the round, top down. The round starts mid back. Cast on (88) 96-104-120-128 (136-144) stitches with circular needle size 2.5 mm and Baby Merino. Insert 1 marker at the beginning of the round (= mid back) and 1 marker after (44) 48-52-60-64 (68-72) stitches (= mid front). Work rib as follows from mid back: knit 1, * purl 2, knit 2 *, repeat from *-* and finish with purl 2 and knit 1. When the rib section measures 4 cm work a row of holes for the tie cord as follows: * knit 1, 1 yarn over, purl 2 together, knit 2, 1 yarn over, purl 2 together, knit 1 *, repeat from *-* the whole round. Work 1 round of rib with knit 2 / purl 2. Work an elevation at the back of the rib section as follows: Work (7) 7-9-9-9 (9-9) stitches, turn, tighten the strand, work (14) 14-18-18-18 (18-18) stitches back, turn, tighten the strand, work (20) 20-26-26-26 (26-26) stitches, turn, tighten the strand, work (26) 26-34-34-34 (34-34) stitches back. Continue in this way by working (6) 6-8-8-8 (8-8) more stitches each time you turn until you have worked a total of (50) 50-66-66-82 (82-82) stitches. Turn. Change to circular needle size 3 mm. Work as follows from mid back: Work (17) 19-21-25-27 (29-31) stitches in GARTER STITCH – see description above, A.3 (= 10 stitches), work (34) 38-42-50-54 (58-62) stitches in garter stitch, A.3 over 10 stitches, work (17) 19-21-25-27 (29-31) stitches in garter stitch. REMEMBER THE KNITTING TENSION! When the piece measures (10) 12-13-16-15 (16-17) cm mid front, increase 1 stitch on each side of the 2 middle stitches at the front and back – READ INCREASE TIP (= 4 stitches increased). Increase in this way every 2nd round a total of (8) 8-8-8-12 (12-12) times = (120) 128-136-152-176 (184-192) stitches. When the piece measures (15) 17-18-21-22 (23-24) cm mid front (you should now have finished the increases) cast off stitches for the gusset on the next round of knit as follows: Start mid back and cast of the first (6) 6-6-6-8 (8-8) stitches, work garter stitch until there are (6) 6-6-6-8 (8-8) stitches left before the marker in front and cast off (12) 12-12-12-16 (16-16) stitches, work garter stitch until there are (6) 6-6-6-8 (8-8) stitches left on the round, cast off the last (6) 6-6-6-8 (8-8) stitches. Place the stitches for one of the legs on a thread and finish each leg separately. LEG: The piece is worked in the round with double pointed needles. = (48) 52-56-64-72 (76-80) stitches. Divide the stitches on to 4 double pointed needles size 3 mm and insert 1 marker at the beginning of the round (= inside leg). Continue with garter stitch and A.3 in the side as before for (1) 1-1-2-2 (2-3) cm – adjust so that the next round is 1 round of knit. Decrease 1 stitch on each side of the marker – READ DECREASE TIP-3, as follows: SIZE PREMATURE - 12/18 MONTHS: On every 4th round. SIZE 2 YEARS: On every 6th round. SIZE 3/4 YEARS: On every 8th round a total of (8) 10-10-12-12 (12-12) times = (32) 32-36-40-48 (52-56) stitches. Work until the piece measures (24) 28-32-38-42 (48-55) cm, now continue with A.3 as before but the garter stitches are worked in rib with knit 2/purl 2 until the piece measures approx. (26) 30-34-40-44 (50-57) cm from the cast-on edge – adjust so that the last round is the 4th round in A.3. Work rib over all stitches until the piece measures (27) 31-35-41-45 (51-58) cm from cast-on edge. Cast off with knit over knit and purl over purl. Place the stitches from the other leg back on double pointed needles size 3 mm and work as for the first leg. ASSEMBLY: Sew the (12) 12-12-12-16 (16-16) stitches cast off between the legs, to each other. TIE CORD: Crochet a tie cord on the waist with hook size 2.5 mm as follows: Work chain stitches for approx. 110 cm, turn and work back with 1 slip stitch in each chain stitch, cut and fasten the strand. Tread the tie cord through the holes made in the rib and tie it at the front. |
||||||||||||||||||||||
Diagram explanations |
||||||||||||||||||||||
|
||||||||||||||||||||||
|
||||||||||||||||||||||

|
||||||||||||||||||||||
|
||||||||||||||||||||||
|
Have you made this or any other of our designs? Tag your pictures in social media with #dropsdesign so we can see them! Do you need help with this pattern?You'll find tutorial videos, a Comments/Questions area and more by visiting the pattern on garnstudio.com. © 1982-2024 DROPS Design A/S. We reserve all rights. This document, including all its sub-sections, has copyrights. Read more about what you can do with our patterns at the bottom of each pattern on our site. |
||||||||||||||||||||||


With over 40 years in knitting and crochet design, DROPS Design offers one of the most extensive collections of free patterns on the internet - translated to 17 languages. As of today we count 304 catalogues and 11415 patterns - 11415 of which are translated into English (UK/cm).
We work hard to bring you the best knitting and crochet have to offer, inspiration and advice as well as great quality yarns at incredible prices! Would you like to use our patterns for other than personal use? You can read what you are allowed to do in the Copyright text at the bottom of all our patterns. Happy crafting!
Comments / Questions (67)
Bonjour, je viens de finir le gilet, merci pour vos réponses toujours très rapides ! Mes coutures côtés sont très bien en revanche mes coutures sous les manches sont très laides, du au fait qu'on augmente 4 mailles par 4 mailles et que cela fait des escaliers... alors que de l'autre côté (celui où l'on rabat cela est plus joli) j'ai beau chercher je n'ai pas trouvé de solution de couture satisfaisante.... auriez vous une astuce ou un tuto ? Merci beaucoup !
05.12.2023 - 21:45DROPS Design answered:
Bonjour Marjolaine, pour la couture sous les manches, vous pouvez assembler les mailles en suivant l'une des 2 techniques que l'on montre dans cette vidéo. Bon tricot!
06.12.2023 - 08:19Bonjour, je suis en train de réaliser le modèle en taille 1/3 mois et j\\\'arrive à la fin du devant droit. Vous dites qu\\\'il doit rester 52 mailles quand toutes les augmentations et diminutions sont faites mais j\\\'en compte 54 (37 mailles de montage -18 diminutions + 35 augmentations = 54) ou alors je fais une erreur quelque part ? \\r\\nMerci pour votre réponse ^^ marjolaine
21.11.2023 - 23:43DROPS Design answered:
Bonjour Marjolaine, notez que la taille 1/3 mois est la 3ème taille, autrement dit vous devriez monter 44 mailles, les 37 mailles sont pour la taille 0/1 mois; vous montez ainsi 37 mailles et diminuez 20 mailles pour l'encolure (soit 18 fois tous les 2 rangs + 2 fois tous les 4 rangs) et montez 35 mailles au total = 52 mailles. Bon tricot!
22.11.2023 - 09:27I can't get the image of the pattern, for A1, A2 or A3 to load. Can you help?
16.10.2023 - 17:05DROPS Design answered:
Dear Mrs Taylor, it might have been a temporary bug, diagrams should be visible, try to refresh the page (with ctrl + F5 for example). Happy knitting!
17.10.2023 - 09:07Puedo hacer el gorrito con agujas rectas?,. Gracias
29.01.2023 - 11:50DROPS Design answered:
Hola Ana, en principio puedes usar agujas rectas. La aguja circular se utiliza para trabajar más cómodamente con un alto número de puntos.
29.01.2023 - 20:34Je pourrais avoir l'explication en français svp
30.11.2022 - 09:09DROPS Design answered:
Bonjour Mme Bonnardel, volontiers, tous nos modèles sont disponibles en français, cliquez sur le menu déroulant sous la photo pour changer la langue et ainsi trouver les explications en français. Bon tricot!
30.11.2022 - 11:50Drops Baby 29-9 \\r\\nHue , Kan overhovedet ikke løse gåde ! \\r\\nJeg syr huen sammen , flette de 2stk snore ? Bindebånd ?\\r\\nSkal ørene bare stritte ud \\r\\nVh . Grete Rasmussen
10.09.2022 - 20:07Jeg er i gang med at strikke bukserne, og kan simpelthen ikke finde ud af om jeg stadig skal strikke rundt, efter ribben, eller om jeg skal strikke frem og tilbage?
08.03.2022 - 12:01DROPS Design answered:
Hei Natalie. Når du skal strikke forhøyningen bak, strikkes det frem og tilbake over de maskene det står i oppskriften. Når forhøyningen er ferdig strikkes byttes det til rundpinne 3 og det strikkes rundt igjen. mvh DROPS Design
14.03.2022 - 10:34J'ai bien tricoté le bonnet, mais je n'arrive pas à le monter, comment faut-il procéder?
13.02.2022 - 16:33DROPS Design answered:
Bonjour Francine, vous allez assembler le bonnet au milieu dos, autrement dit les côtés du bonnet doivent être cousus entre eux de haut en bas (du rang de montage jusqu'aux mailles rabattues), puis vous pliez le bonnet pour que cette couture soit au milieu dos du bonnet. Et vous assemblez maintenant les mailles du montage entre elles (comme pour une couture d'épaules). Bonne continuation!
14.02.2022 - 10:33Bonjour, encore une petite question concernant ce bonnet . Je dois terminer de tricoter A1 à 16 cm de hauteur (taille 1 an). Je mesure où ? (au milieu de mon tricot, à l'endroit le plus "long " du motif j'ai bien 16 cm, mais sur la partie centrale j'ai un cm de moins et sur les côtés, 2 cm de moins. A quel endroit dois je mesurer la hauteur avant de tricoter les 2 côtes mousse. Merci pour ce modèle et pour votre aide.
18.11.2021 - 16:47DROPS Design answered:
Bonjour Mme Plasman, mesurez au plus court, la partie qui descend un peu sur le front - si vous en avez la possibilité, n'hésitez pas à essayer pour ajuster la longueur si besoin. bon tricot!
24.11.2021 - 09:53Bonjour, pour le bonnet j'ai bien tricoté 3 cm de points mousse après avoir monté les mailles. Sur la photo de votre modèle j'ai l'impression que ce bord mousse es beaucoup plus petit (2 cm ?) Je me trompe ? Cordialement
16.11.2021 - 12:25DROPS Design answered:
Bonjour Mme Plasman, le bonnet se tricote de haut en bas, on ne voit pas vraiment bien les 3 premiers cm du haut sur la photo - il se termine par 2 côtes mousse (que l'on voit bien sur la photo côté front/visage, juste avant les cache-oreilles. Bon tricot!
16.11.2021 - 13:36