
Popular categories
Looking for a yarn?


Comments / Questions (41)
![]() Sonja wrote:
Sonja wrote:
For og bakstykke:Til arbeidet måler 51-53-55... osv... er det nå ca 349-373-379 osv... Dette stemmer ikke. Mellom f.eks str M og L er det bare 6 masker forskjell, men 2 cm!?! Man øker jo 6 masker hver rette omgang, så dette stemmer ikke. Jeg strikker etter antall cm fordi jeg ikke vil ha for kort jakke, men er spent på hva skjer når jeg får en del flere masker enn det som står. Vil tro forskjellen blir enda større på største størrelse.
29.08.2017 - 20:21DROPS Design answered:
Hej Sonja, strikker du i DROPS Baby Alpaca Silk? Overholder du strikkefastheden i din strikkeprøve? Hvis du får flere pinde på 10 cm end hvad vi får, så bliver dit arbejde mindre en hvad vi skriver i opskriften. Det er derfor vigtigt at overholde strikkefastheden. God fornøjelse!
05.09.2017 - 16:07
![]() Alice wrote:
Alice wrote:
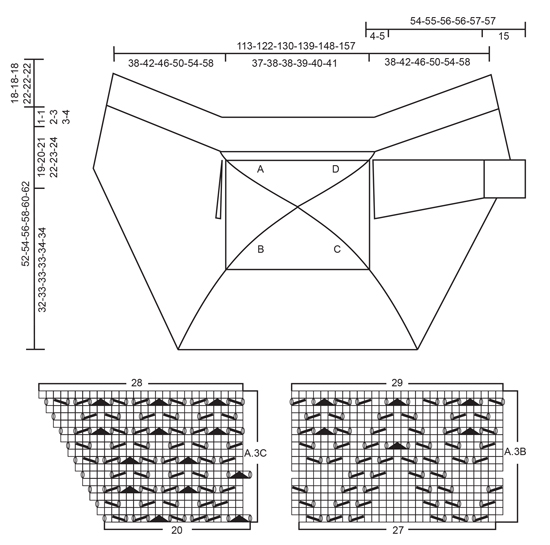
Hej Beskrivning för fram-och bakstycke: öka efter hörnmaskan, sticka slätstickning fram till hörnmaskan vid markör D, ..Fortsätt fram och tillbaka så till arbetet mäter ca 51-53-55-57-59-61 cm från nacken och ner.. Var sätter man markör D? Den åkte av i avmaskningen. Ska den sitta vid start av de nya maskorna? 53 cm från nacken och till vad? Som det ser ut just nu på stickorna är det en "kupol" och är svårt att avgöra vad som är vad.
14.08.2017 - 21:04DROPS Design answered:
Hej Alice, titta på måttskissen längst ner i mönstret, här ser du en klar översikt över markörer och alla måtten enligt beskrivningen.
18.08.2017 - 11:09
![]() Kristine wrote:
Kristine wrote:
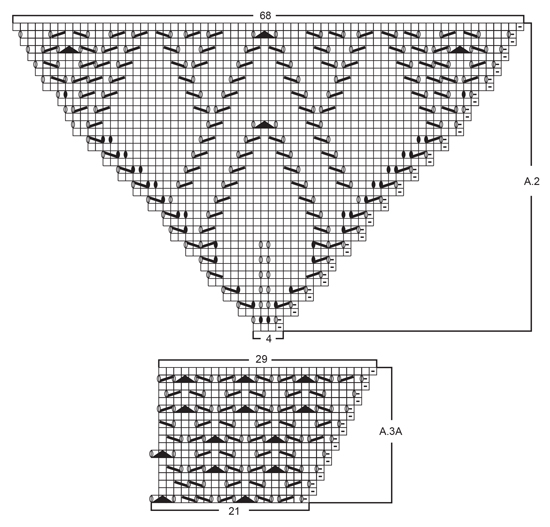
Siste rad på retten i a3a a3b og a3c har kast mot hverandre mellom a, b og c. Er dette en feil? Om det skal være sånn hvordan strikkes det? 2 kast på pinnen? Mvh Kristine
31.07.2017 - 21:50DROPS Design answered:
Hei Kristine, Hvis du leser alle 3 mønster fra høyre til venstre får du bare 1 kast mellom mønstrene, på slutten av A.3A og A.3C. Neste rad strikkes vrangt eller rett og du strikker kasten vrangt eller rett slik at det blir hull. God fornøyelse!
01.08.2017 - 11:16
![]() Anna Strubel wrote:
Anna Strubel wrote:
Hallo , kun je mij helpen ? Bij de start van dit patroon ga je op 4 rondbreipennen beginnen met A.1. op regel twee van het telpatroon wordt aangegeven maak 1 omslag tussen twee steken . moet je dan die twee steken samen breien ? Op A.2 staat op regel 2. 4 X dat er een omslag moet komen maar dan krijg je toch teveel steken ? Met vriendelijke groet A.strubel
30.07.2017 - 13:36DROPS Design answered:
Hoi Anna, Je begint met 4 breinaalden zonder knop en als je genoeg steken op de naalden hebt, kun je over gaan naar de rondbreinaald. 1 omslag tussen 2 steken betekent: 1 steek, 1 omslag, 1 steek. Het klopt dat er op toer 2 4 omslagen gemaakt moeten worden, op de volgende regel heb je dan 8 steken in totaal.
01.08.2017 - 19:13
![]() Anja wrote:
Anja wrote:
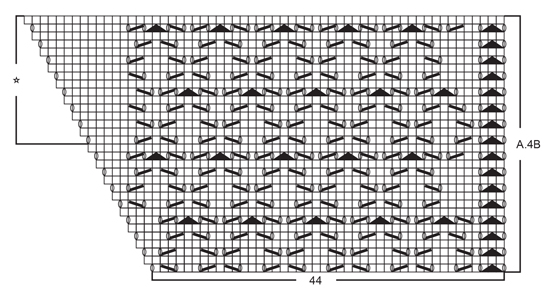
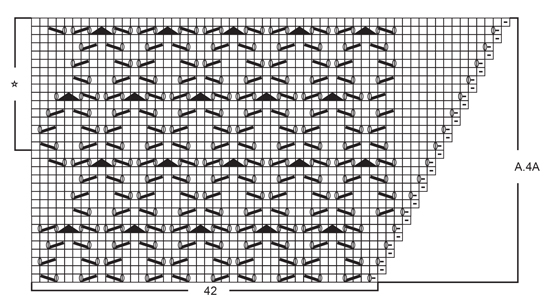
Vielen Dank für die schnelle Antwort. Verstehe ich das richtig A.4 ist die gleiche wie A.4A. Sorry ich möchte mich nur nochmal absichern. Viele Grüße Anja
30.06.2017 - 19:58DROPS Design answered:
Liebe Anja, Wenn Sie 308M haben, dann stricken Sie glatt rechts, rechts verschränkt und Umschläge und A.4 (= A.4A und A.4B) wie beschrieben. Viel Spaß beim stricken!
03.07.2017 - 08:50
![]() Anja wrote:
Anja wrote:
Hilfe, leider kann ich die Strickschrift A4 nicht finden wie in der Anleitung beschrieben. Danke für die Hilfe, das Modell ist sehr schön.
30.06.2017 - 08:28DROPS Design answered:
Liebe Anja, die Strickschrifte A.4 finden Sie ganz unten, nach dem Maßskizze. Viel Spaß beim stricken!
30.06.2017 - 09:24
![]() Sheybani Catherine wrote:
Sheybani Catherine wrote:
Bonjour! dans la réalisation des côtés,il est dit de tricoter une maille en moins tous les 2 rangs.Puis de tourner l'ouvrage et de serrer le fil.Qu'est ce que je fais de ces mailles non tricotées lorsque je commence le rang suivant? Je vous remercie par avance pour votre réponse. Catherine
24.06.2017 - 21:41DROPS Design answered:
Bonjour Mme Sheybani, on tricote ici des rangs raccourcis: tricotez les mailles indiquées et laissez les autres sur l'aiguille (sans les tricoter). On aura ainsi plus de rangs sur un côté et moins sur l'autre. Cette vidéo montre comment faire des rangs raccourcis. Bon tricot!
26.06.2017 - 09:10Louise Rasmussen wrote:
Jeg har vist fundet en fejl i diagram a.3a, 3. Linie, jeg har en maske mere efter første linie, i forhold til hvad der fremgår i diagrammet. Jeg har talt efter og det virker som om der er blevet glemt en maske.
17.06.2017 - 17:30
![]() Marialuisa Caporizzo wrote:
Marialuisa Caporizzo wrote:
Salve, ho realizzato il modello ma il bordo sul davanti e sul collo si arrotola verso l'esterno. Come posso rimediare? Forse lavorando più ferri a legaccio alla fine o cambiando il numero dei ferri? Grazie.
04.05.2017 - 16:53DROPS Design answered:
Buonasera Maria Luisa. Può provare a bloccarlo, può provare a fare un bordo picot all’uncinetto o una riga a coste 1 m dir/ 1 m rov prima di intrecciare le maglie . Buon lavoro!
04.05.2017 - 18:48
![]() Andree wrote:
Andree wrote:
Pour le patron Drops 117-32 , apres avoir tricot A.1 et A.3 on me dit que je dois avoir 308 mailles mais j'ai un total de 300 mailles soit 64-86-64-86 mailles .
23.02.2017 - 21:02DROPS Design answered:
Bonjour Andrée, le diagramme A.1 a été corrigé, merci. Bon tricot!
09.03.2017 - 14:02
|
||||||||||||||||||||||||||||
Altair#altaircardigan |
||||||||||||||||||||||||||||
 |
 |
|||||||||||||||||||||||||||
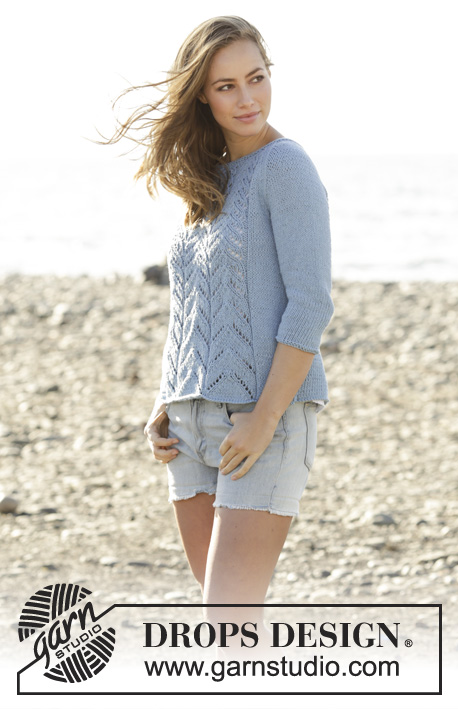
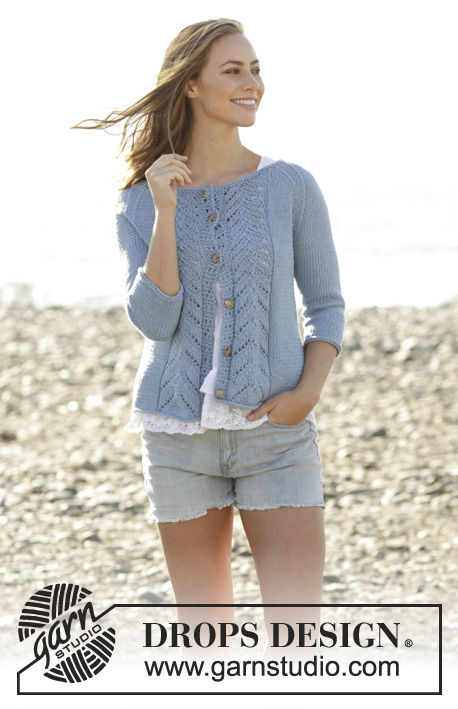
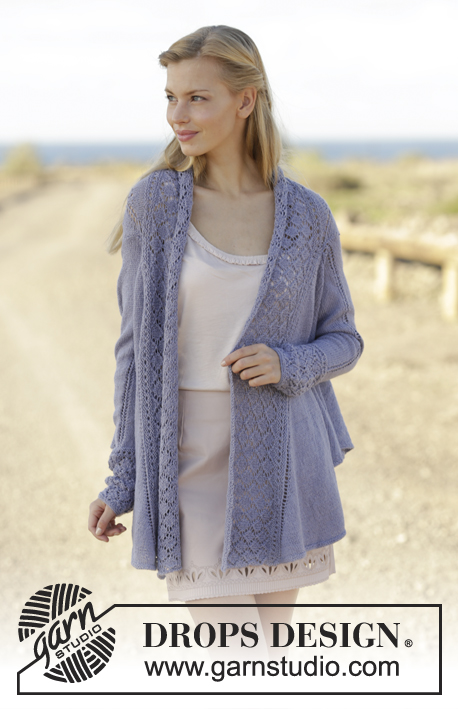
Knitted jacket worked in a square with lace pattern on the back in DROPS BabyAlpaca Silk. Size: S - XXXL
DROPS 177-32 |
||||||||||||||||||||||||||||
|
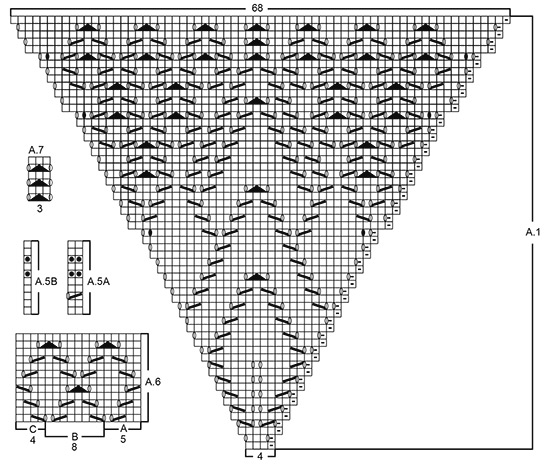
GARTER STITCH (back and forth): 1 ridge = knit 2 rows. GARTER STITCH (worked in the round): 1 ridge = 2 rounds. Knit 1 round and purl 1 round. PATTERN: See diagrams A.1 to A.7. Diagrams show all rows in pattern seen from the right side. INCREASE TIP-1: To calculate how to increase evenly, use the total number of stitches on row (e.g. 49 stitches) and divide stitches by number of increases to be done (e.g. 3) = 16.3. In this example increase after approx. every 16th stitch. Increase 1 stitch by making 1 yarn over, on next row work yarn over twisted to avoid holes. INCREASE TIP-2 (applies to mid under sleeve): Increase on each side of the 5 middle stitches under sleeve as follows: Begin 1 stitch before A.7, make 1 yarn over, knit 1, A.7, knit 1, make 1 yarn over (= 2 stitches increased). On next round knit yarn overs twisted to avoid holes. ---------------------------------------------------------- BODY: Work jacket as a square from mid back on the back and outwards. Work in the round on double pointed needles. Switch to circular needle when needed. When square has been worked, work down the back piece and outwards in each side for front pieces. Finish with a continuous neck edge/band before sleeves are worked. SQUARE: Cast on 8 stitches on 1 double pointed needle size 3 mm / US 2.5 with BabyAlpaca Silk (let the yarn end be approx. 20 cm / 8"; used for assembly). ROW 1 (= wrong side): Purl all stitches. ROW 2 (= right side): * Knit 1 twisted, make 1 yarn over, knit 1, make 1 yarn over *, repeat from *-* 4 times in total = 16 stitches. Distribute stitches on 4 double pointed needles size 3 mm / US 2.5 with 4 stitches on each needle (this is done without working the stitches). Insert 1 marker thread in first stitch on first double pointed needle (= marker thread A = beginning of round), insert in addition 1 marker thread in first stitch on each of the 3 next double pointed needles (= marker thread B, marker thread C and marker thread D). There is now 1 marker thread in each corner - move the marker threads upwards when working. Work in the round as follows: A.1 (= 4 stitches), A.2 (= 4 stitches), A.1 (= 4 stitches) and A.2 (= 4 stitches). Continue pattern like this and increase as shown in diagrams. REMEMBER THE KNITTING GAUGE When A.2 has been worked, work as follows over stitches between marker thread B and C and marker thread D and A. Work A.3A (= 21 stitches), A.3B (= 27 stitches) and then A.3C (= 20 stitches). When A.3 has been worked, A.1 is also done vertically and there are 308 stitches on needle in all sizes (67 stitches between marker thread A and B and between marker thread C and D, 85 stitches between marker thread B and C and between marker thread D and A and 4 corner stitches). Then work in the round in stockinette stitch with A.4 only between marker thread B and C as follows: Knit corner stitch twisted, increase with 1 yarn over, work in stockinette stitch until marker thread B, increase with 1 yarn over, work A.4A (= 42 stitches – increase after corner stitch is shown in diagram), work A.4B (= 44 stitches – increase before corner stitch is shown in diagram), knit corner stitch twisted, increase with 1 yarn over, work in stockinette stitch until marker thread D, increase with 1 yarn over, knit corner stitch twisted, increase with 1 yarn over, work in stockinette stitch until marker thread A and increase 1 yarn over = 316 stitches on needle in all sizes. Continue to increase at the corner stitches on every 2nd round until 2-4-6-8-10-12 rounds have been worked in total in A.4 (work all of the increased stitches in stockinette stitch). There are now 316-324-332-340-348-356 stitches on needle. ARMHOLES: Then work back and forth on circular needle but do not work stitches up towards the neck (i.e. between marker thread D and A). Begin from right side at marker thread A (= left shoulder back), knit corner stitch twisted as before, LOOSELY bind off the next 46-48-50-52-56-58 stitches for armhole, work in stockinette stitch until marker thread B, increase before corner stitch as before, continue A.4A and A.4B between marker thread B and C as before, knit corner stitch twisted, increase after corner stitch as before, work in stockinette stitch until 46-48-50-52-56-58 stitches remain before marker thread D, loosely bind off the next 46-48-50-52-56-58 stitches for armhole and knit corner stitch twisted as before. The remaining 87-89-91-93-95-97 stitch between marker thread D and marker thread A (= up towards the neck) are resting on the needle or slipped on a stitch holder. Cut the yarn used to work with and then slip the corner stitch at marker thread A and marker thread D on separate safety pins = 139-141-143-145-143-145 stitches remain on needle. Begin from wrong side and work back and forth as before over these stitches in stockinette stitch, A.4A and A.4B between marker thread B and C down at the back and increase on each side of the 2 corner stitches (on every row from right side) until 7 rows in total have been worked after decrease for armhole and last row is worked from wrong side, cut the yarn – NOTE: Work lace pattern in A.4 as shown in diagram, and repeat it down the back until finished measurements, i.e.. the pattern itself goes over the same number of stitches the entire time, but there are more and more stitches in stockinette stitch in each side towards corner stitches. Slip stitch from safety pin at marker thread A back on needle. Knit this stitch twisted, increase after corner stitch as before, cast on 46-48-50-52-56-58 new stitch on needle for armhole, work in stockinette stitch until marker B, increase before corner stitch as before, continue A.4A and A.4B between marker thread B and C as before, increase after corner stitch as before, work in stockinette stitch over the remaining stitches, cast on 46-48-50-52-56-58 new stitches for armhole, increase before corner stitch as before, slip stitch on safety pin back on needle and knit this stitch twisted = 251-257-263-269-275-281 stitches on needle. Work from wrong side and AT THE SAME TIME cast on 1 new stitch in each side (= edge stitch) = 253-259-265-271-277-283 stitches on needle. FRONT AND BACK PIECE: Continue back and forth on circular needle as before, i.e. work next row as follows from right side: 1 edge stitch in GARTER STITCH – see explanation above, knit corner stitch twisted, increase after corner stitch, work in stockinette stitch until corner stitch at marker thread B, increase before corner stitch, continue A.4A and A.4B between marker thread B and C (with increases as before), increase after corner stitch, work in stockinette stitch until corner stitch at marker thread D, increase before corner stitch, knit corner stitch twisted and finish with 1 edge stitch in garter stitch. Purl from wrong side but knit edge stitch in each side and purl the 4 corner stitches twisted as before. Continue back and forth like this until piece measures approx. 51-53-55-57-59-61 cm / 20"-21"-21⅝"-22½"-23¼"-24" from the neck down - finish after 1 row from wrong side. If the knitting gauge is correct vertically there are now 349-373-379-385-409-415 stitches on needle. Slip stitches between marker thread B and C (including corner stitches) on a stitch holder (= approx. 129-139-141-143-151-153 stitches along bottom edge on jacket). Slip the remaining stitches between marker thread C and to and with marker thread D on another stitch holder (= approx. 110-117-119-121-129-131 stitches on right front piece). LEFT FRONT PIECE: Insert 1 marker, NOW MEASURE PIECE FROM HERE! Work as follows over stitch from and with marker thread A and until marker thread B (first row = right side): 1 edge stitch in garter stitch, knit corner stitch twisted, increase after corner stitch as before, work in stockinette stitch until 1 stitch remains on row, turn piece, tighten yarn and work in stockinette stitch from wrong side, purl corner stitch twisted and 1 edge stitch in garter stitch. Turn piece, work as before until 2 stitches remain on row, turn piece, tighten yarn and work from wrong side as before. Continue like this by working 1 stitch less towards marker thread B on every turn until piece measures approx. 37-41-45-49-53-57 cm / 14½"-16"-17¾"-19¼"-21"-22½" from marker (finish after 1 row from wrong side). Put all stitches on left front piece on a stitch holder. RIGHT FRONT PIECE: Slip stitch from stitch holder between marker thread C and D back on circular needle size 3 mm / US 2.5. Insert 1 marker - NOW MEASURE PIECE FROM HERE and work as follows (first row = right side). Work in stockinette stitch until corner stitch, increase before corner stitch as before, knit corner stitch twisted and finish with 1 edge stitch in garter stitch. Turn piece, work from wrong side with 1 edge stitch in garter stitch, purl corner stitch twisted and work in stockinette stitch until 1 stitch remain on row, turn piece, tighten yarn and work from right side with stockinette stitch, increase before corner stitch, knit corner stitch twisted and 1 edge stitch in garter stitch. Turn, work from wrong side until 2 stitches remain on row, turn piece, tighten yarn and work from right side as before. Continue like this by working 1 stitch less towards marker thread C on every turn until piece measures approx. 37-41-45-49-53-57 cm / 14½"-16"-17¾"-19¼"-21"-22½" from marker (finish after 1 row from wrong side). EDGE IN GARTER STITCH: Slip stitches along right front piece, bottom edge and left front piece onto same circular needle size 2.5 mm / US 1.5 = approx. 467-505-523-541-579-597 stitches. Work 2 ridges back and forth over all stitches. Switch to circular needle size 3 mm / US 2.5 and bind off but to avoid a tight bind-off edge make 1 yarn over after every 6th stitch while binding off (bind off yarn overs as stitches). NECK EDGE AND BANDS: Work an edge at the top of garment up along right front piece, over stitches in the back of neck and down along left front piece as follows: Pick up from right side inside 1 edge stitch in garter stitch approx. 307-331-355-379-403-427 stitches on circular needle size 3 mm / US 2.5 (if you pick up more/fewer stitches adjust to correct number of stitch on first row). Knit 3 rows back and forth. Work next row as follows from right side: 1 edge stitch in garter stitch, work A.5A until 2 stitches remain on row, work A.5B (= 1 stitch) and finish with 1 edge stitch in garter stitch. When A.5 has been worked vertically, work next row as follows from right side: 1 edge stitch in garter stitch, A.6A (= 5 stitches), repeat A.6B until 5 stitches remain on row (= 37-40-43-46-49-52 repetitions of 8 stitches), work A.6C (= 4 stitches) and finish with 1 edge stitch in garter stitch. Continue pattern like this until entire edge measures approx. 18-18-18-22-22-22 cm / 7"-7"-7"-8¾"-8¾"-8¾", finish after one whole repetition vertically. Work 1 ridge back and forth over all stitches and bind off but to avoid a tight bind-off edge make 1 yarn over after every 4th stitch while binding off (bind off yarn overs as stitches). SLEEVE: Worked in the round on double pointed needles. Switch to a short circular needle when needed. Cast on 49-49-49-57-57-57 stitches on double pointed needles size 2.5 mm / US 1.5 with BabyAlpaca Silk. Work 2 ridges in GARTER STITCH in the round - see explanation above. Switch to double pointed needles size 3 mm / US 2.5 and work as follows: A.6A (= 5 stitches), repeat A.6B over the next 40-40-40-48-48-48 stitches (= 5-5-5-6-6-6 repetitions of 8 stitches) and finish with A.6C (= 4 stitches). Continue pattern like this. When piece measures approx. 12 cm / 4¾", adjust after one whole repetition vertically, knit 1 round while increasing 3-5-7-1-3-5 stitches evenly - READ INCREASE TIP-1 = 52-54-56-58-60-62 stitches on needle. Switch to double pointed needles size 2.5 mm / US 1.5 and work 2 ridges in the round. Then work A.5A in the round. When A.5 has been worked, switch back to double pointed needles size 3 mm / US 2.5. Work next round as follows: Work A.7 (= 3 stitches), 23-24-25-26-27-28 stitches in stockinette stitch, A.7 (= 3 stitches) and 23-24-25-26-27-28 stitches in stockinette stitch. Continue pattern like this with stockinette stitch and A.7 mid on top and mid under sleeve. AT THE SAME TIME when piece measures 16 cm / 6¼", increase 2 stitches mid under sleeve - READ INCREASE TIP-2. Increase 17-19-20-20-22-23 times in total in S: Every 2 cm / ¾", in M, L and XL: Alternately every 2 and 1½ cm / ¾" ½" and in XXL and XXXL: Every 1½ cm / ½" = 86-92-96-98-104-108 stitches on row. When piece measures 50-51-52-51-52-52 cm / 19¾"-20"-20½"-20"-20½"-20½", work sleeve cap back and forth on a short circular needle AT THE SAME TIME bind off at the beginning of every row in each side as follows: 3 stitches 1 time, 2 stitches 1 time and 1 stitch 2 times. Then bind off 2 stitches in each side until piece measures 53-54-55-55-56-56 cm / 21"-21¼"-21½"-21½"-22"-22", then bind off 3 stitches 1 time in each side. Bind off the remaining stitches, sleeve measures approx. 54-55-56-56-57-57 cm / 21¼"-21½"-22"-22"-22½"-22½". Work another sleeve the same way. ASSEMBLY: Sew in sleeves. Use yarn end from beginning of piece to sew small stitches up and down around the hole in the middle of square. Pull the yarn to tighten the hole and fasten. |
||||||||||||||||||||||||||||
Diagram explanations |
||||||||||||||||||||||||||||
|
||||||||||||||||||||||||||||
 |
||||||||||||||||||||||||||||
 |
||||||||||||||||||||||||||||
 |
||||||||||||||||||||||||||||
 |
||||||||||||||||||||||||||||
 |
||||||||||||||||||||||||||||
Have you finished this pattern?Tag your pictures with #dropspattern #altaircardigan or submit them to the #dropsfan gallery. Do you need help with this pattern?You'll find 32 tutorial videos, a Comments/Questions area and more by visiting the pattern on garnstudio.com. © 1982-2026 DROPS Design A/S. We reserve all rights. This document, including all its sub-sections, has copyrights. Read more about what you can do with our patterns at the bottom of each pattern on our site. |
||||||||||||||||||||||||||||


With over 40 years in knitting and crochet design, DROPS Design offers one of the most extensive collections of free patterns on the internet - translated to 17 languages. As of today we count 325 catalogs and 12298 patterns - 12288 of which are translated into English (US/in).
We work hard to bring you the best knitting and crochet have to offer, inspiration and advice as well as great quality yarns at incredible prices! Would you like to use our patterns for other than personal use? You can read what you are allowed to do in the Copyright text at the bottom of all our patterns. Happy crafting!
Post a comment to pattern DROPS 177-32
We would love to hear what you have to say about this pattern!
If you want to leave a question, please make sure you select the correct category in the form below, to speed up the answering process. Required fields are marked *.