
Popular categories
Looking for a yarn?


Comments / Questions (78)
![]() Lisbeth wrote:
Lisbeth wrote:
Vil gerne stikke denne vest
22.04.2026 - 14:16
![]() Michel Françoise wrote:
Michel Françoise wrote:
Bonjour, Pouvez-vous me donner les explications avec l Des aiguilles normales numéro 7 D’avance merci
11.03.2026 - 17:01DROPS Design answered:
Bonjour Mme Michel, ce modèle se tricote en allers et retours sur aiguille circulaire, en 2 parties séparées (dos et devant) pour avoir suffisamment de place pour y loger toutes les mailles, vous pouvez donc simplement les tricoter sur des aiguilles droites. Pour le col, faites d'abord la couture d'une seule des épaules, relevez les mailles et tricotez le col, puis terminer par la couture du col et de la 2ème épaule. Retrouvez ici plus d'infos sur les aiguilles circulaires. Bon tricot!
12.03.2026 - 09:32
![]() Sussi Bach wrote:
Sussi Bach wrote:
Jeg er nybegynder og forstår ikke skulder indtagning og det med at sætte på tråd. Hvad med kantmaskerne? Hvad gør jeg med skulderen?
16.02.2026 - 14:25DROPS Design answered:
Hei Sussi. I str. S. Når arb måler 63 cm settes de ytterste m på beg av hver p i hver side på 1 tråd. Strikk 7 m inkl kantm, sett disse m på 1 tråd. Strikk pinnen ut, snu og strikk 7 m. Sett disse m på en ny tråd. Du har nå satt de 7 ytterste m i hver side på hver sin tråd. Gjenta dette 1 gang til = 14 m på hver tråd, gjenta 1 gang til, men da 8 m, istedefor 7 m = 22 m på hver sin tråd. Men når arb måler 65 cm felles de 16 midterse m av til hals og hver skulder strikkes hver for seg. mvh DROPS Design
23.02.2026 - 11:46
![]() Lilian wrote:
Lilian wrote:
Vil gerne strikke denne vest
26.01.2026 - 14:33
![]() Hanne wrote:
Hanne wrote:
Jeg vil meget gerne strikke denne vest 😊
18.12.2025 - 11:51
![]() Birte Helene wrote:
Birte Helene wrote:
Ønsker at strikke denne vedt
15.12.2025 - 12:41
![]() Marianne wrote:
Marianne wrote:
Ihre Anleitungen und Anregungen sind immer sehr hilfreich und gut beschrieben. Sehr gut .
04.12.2025 - 09:20
![]() Dorthe wrote:
Dorthe wrote:
Vil gerne strikke denne til min femte morsom bor på plejehjem og tøjet maskin vaskes Hvilket garn alternativ kan jeg vælge ?
10.11.2025 - 06:20DROPS Design answered:
Hei Dorthe. Ville nok ha valgt et ull garn som er superwash behandlet, men vi har dessverre ikke den tykkelsen som er superwash som det trengs i den oppskriften. Om du ikke må ha ull, kan du strikke den med 2 tråder DROPS Paris (bomull), men da blir plagget litt tungt. mvh DROPS Design
17.11.2025 - 19:10
![]() Lis Buchholdt Andersen wrote:
Lis Buchholdt Andersen wrote:
Jeg ønsker opskriften på den flotte vest
05.10.2025 - 10:58
![]() Josje wrote:
Josje wrote:
Waar is het telpatroon? Ik had dit patroon opgeslagen met telpatroon en nu zie ik doe niet meer…
27.05.2025 - 08:29DROPS Design answered:
Dag Josje,
Bij dit patroon zit geen telpatroon. Alles staat beschreven in de tekst. Er is wel een maattekening onderaan de beschrijving.
28.05.2025 - 20:53
|
|
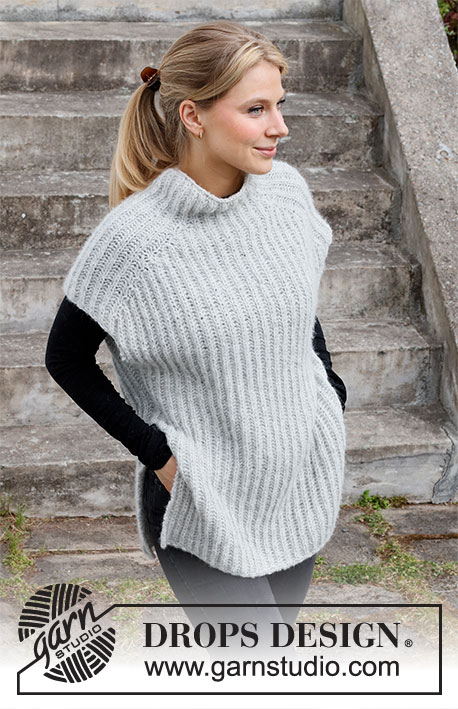
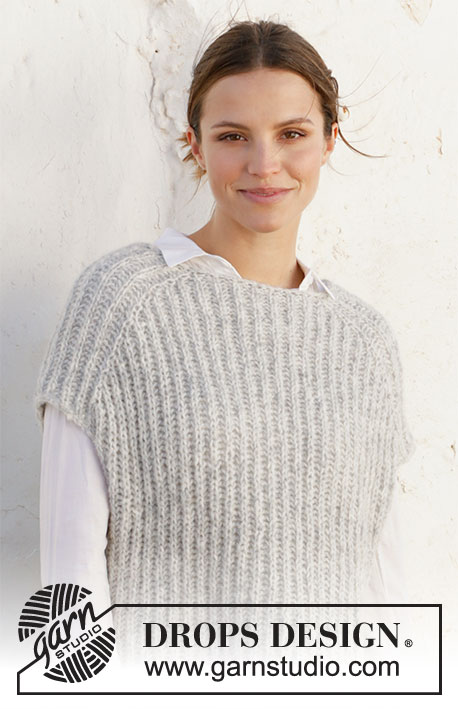
Winter is Coming#winteriscomingslipover |
|
 |
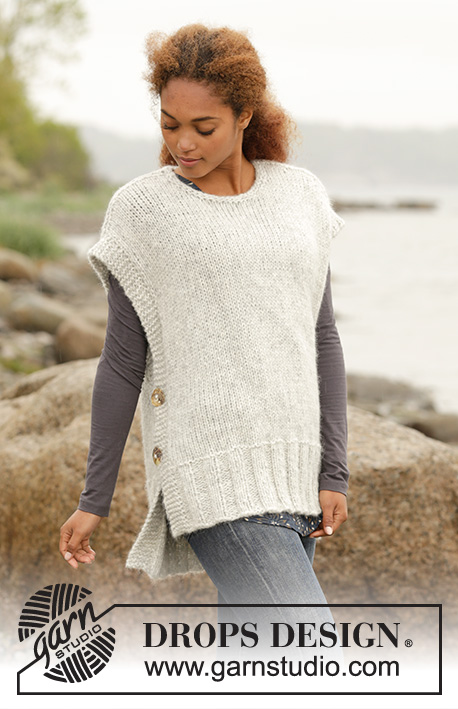 |
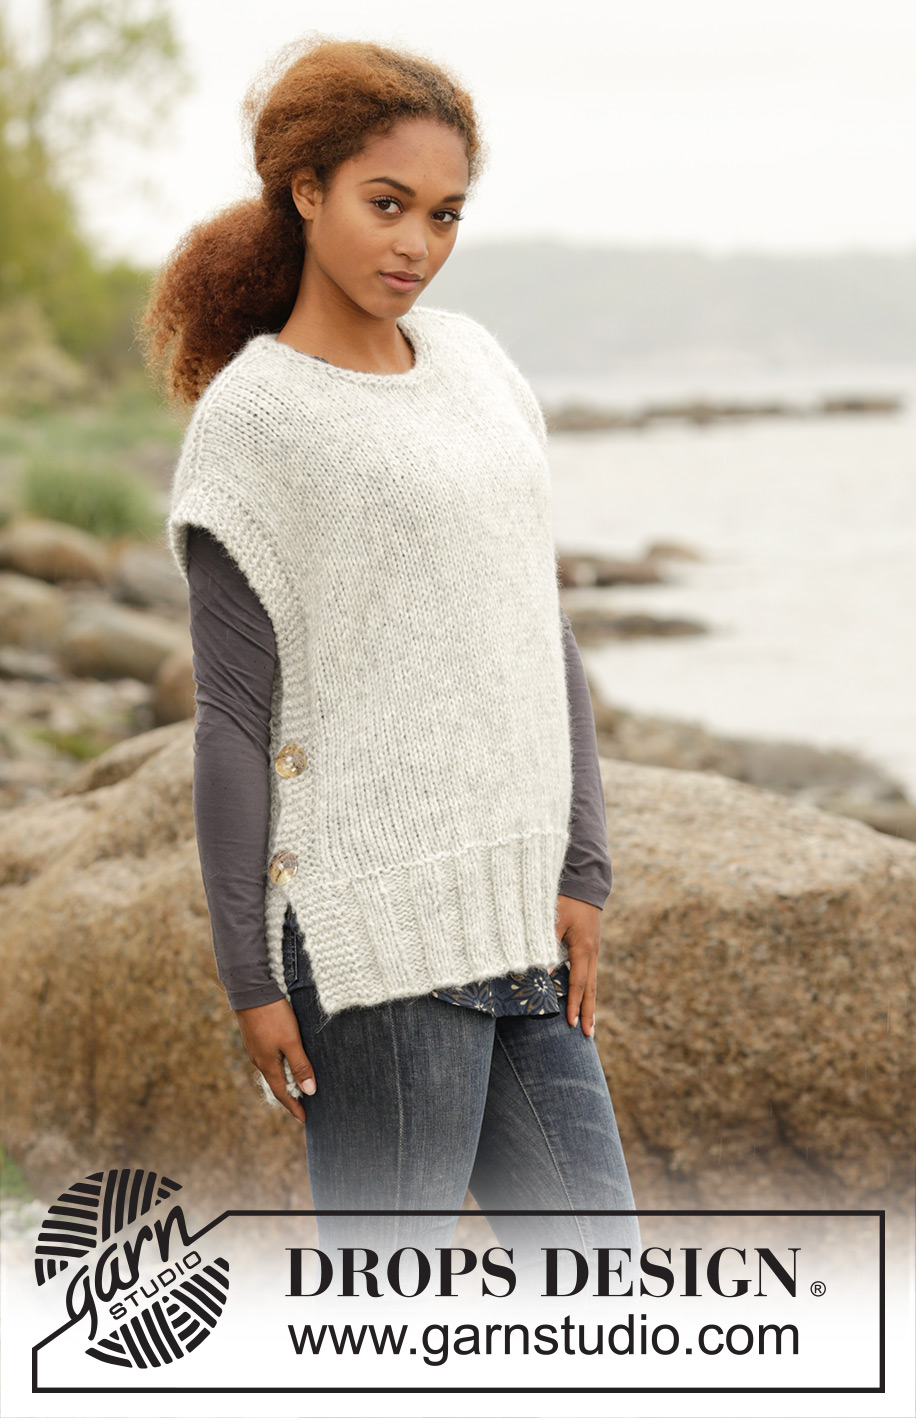
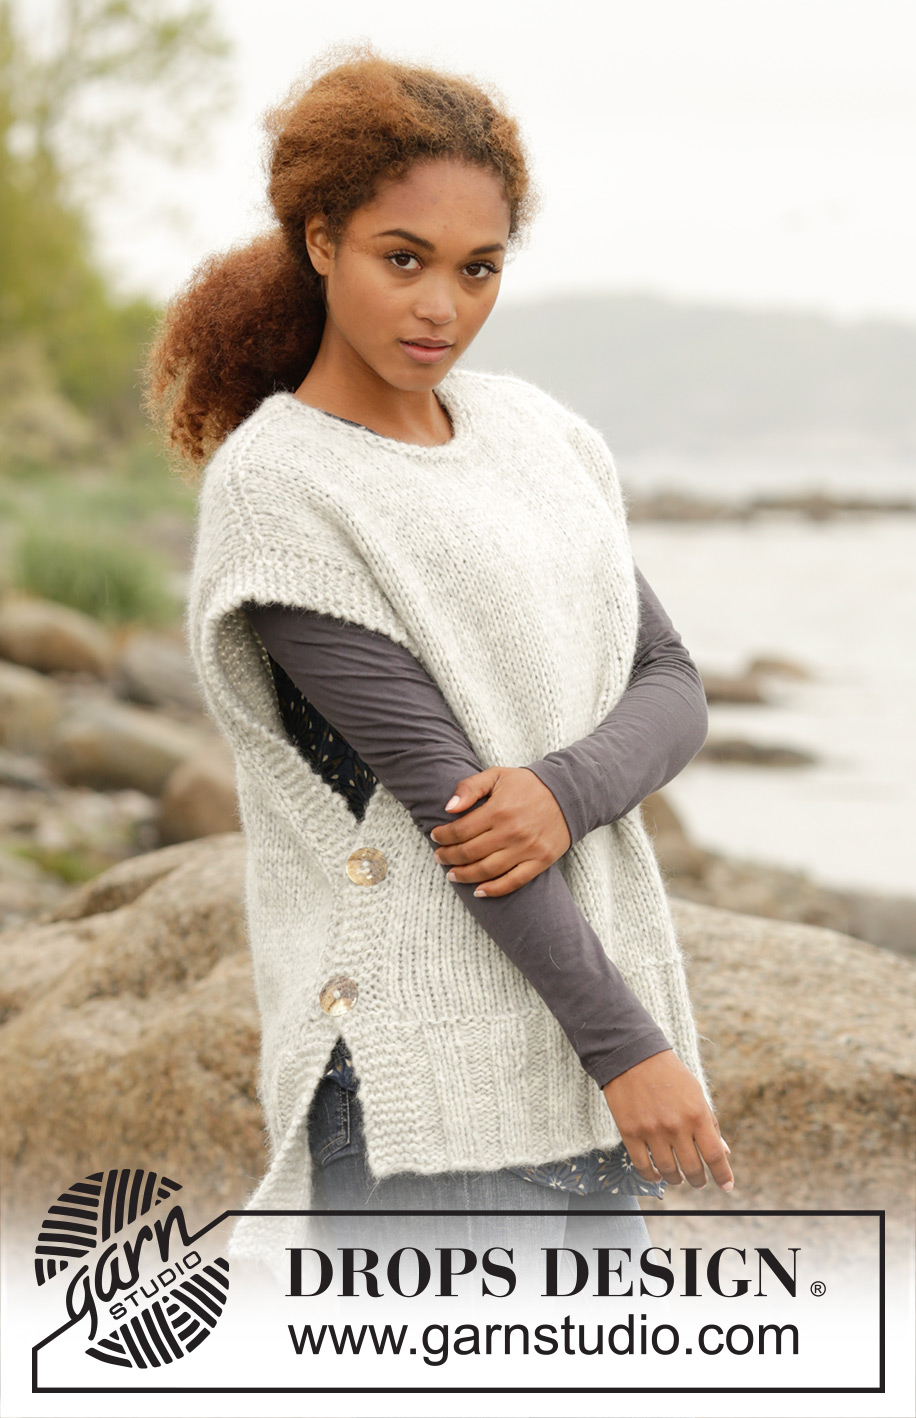
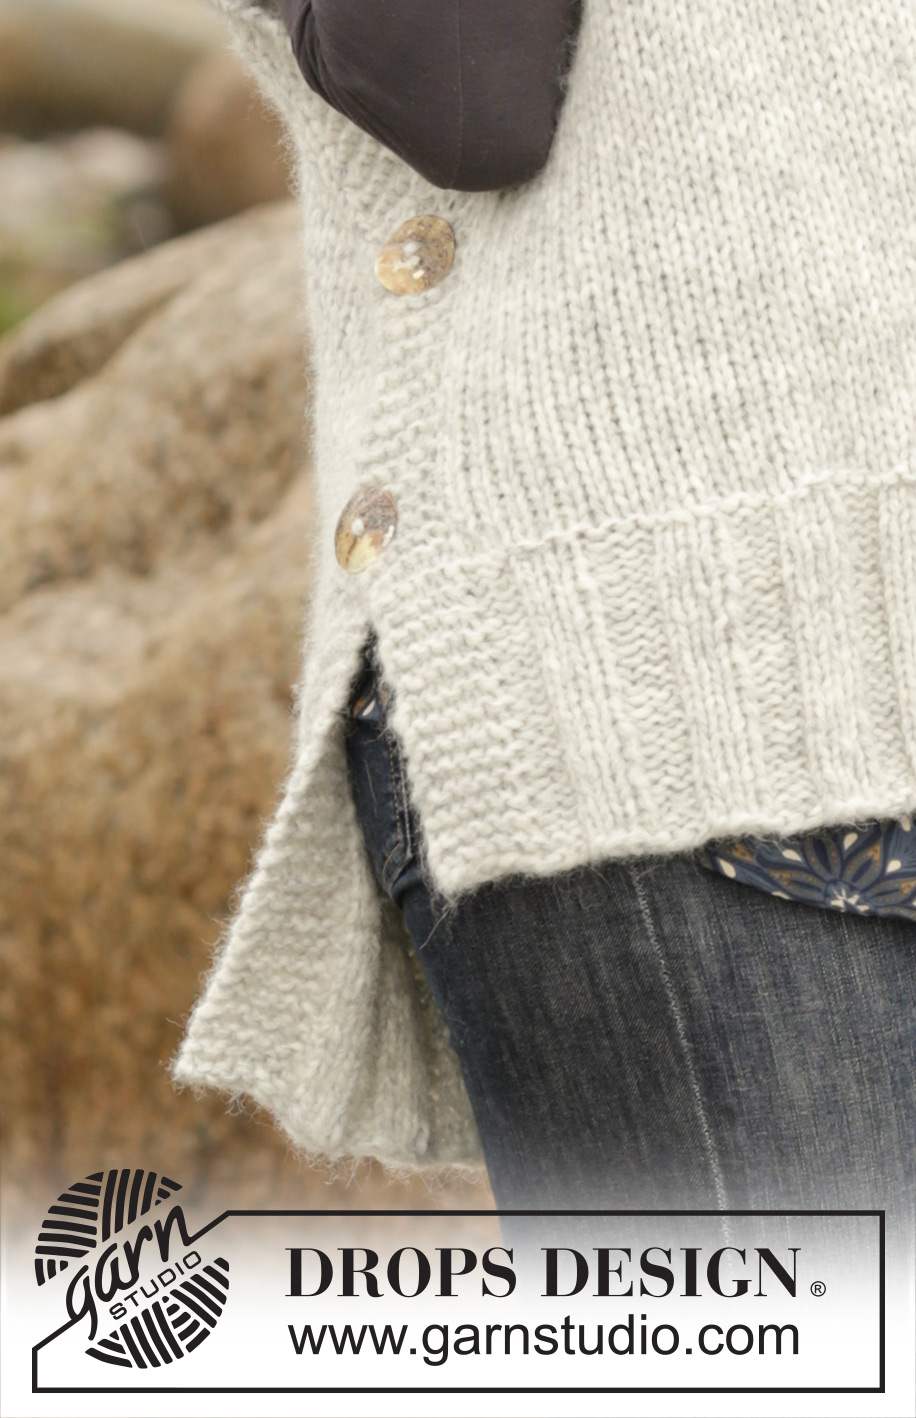
Knitted DROPS vest with vents in the side and round neck in 1 thread Cloud, 1 thread Wish or 2 threads Air. Size S-XXXL.
DROPS 173-47 |
|
|
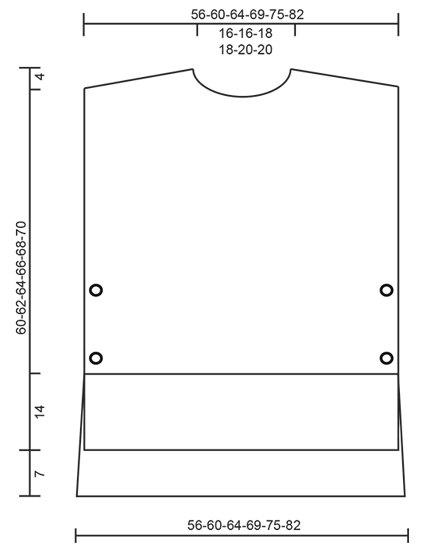
GARTER ST (back and forth): K all rows. 1 ridge = K2 rows. DECREASE TIP: To calculate how often dec should be done, use the total no of sts on row (e.g. 75 sts), minus edge sts (e.g. 12 sts) and divide the remaining sts by no of dec to be done (e.g. 13) = 4.8. I.e. in this example work approx. every 4th and 5th st tog (and do not dec of edge sts). BUTTONHOLES: bind off for 2 buttonholes in each side on front piece. 1 buttonhole = bind off third and fourth st from edge and cast on 2 new sts on next row over these sts. bind off for buttonholes when piece measures 16 and 26 cm / 6¼" and 10¼" in all sizes (or desired length). ---------------------------------------------------------- VEST: Worked back and forth on circular needle in 2 parts and sewn tog on the shoulder. BACK PIECE: Cast on 75-81-87-93-99-105 sts (includes 6 edge st in each side) on circular needle size 7 mm / US 10.75 with 1 thread Cloud, 1 thread Wish or 2 threads Air. P 1 row from WS. Work next row as follows from RS: 6 edge st in GARTER ST - see explanation above - * P 3, K 3 *, repeat from *-* until 9 sts remain on needle and finish with P 3 and 6 edge sts in garter st. Continue rib like this until piece measures 21 cm / 8¼". On next row from WS, switch to circular needle size 8 mm = US 11, at the same time, dec 13-15-17-17-17-15 sts evenly - READ DECREASE TIP = 62-66-70-76-82-90 sts. Work in stockinette st with 6 edge st in garter st in each side. REMEMBER THE KNITTING GAUGE When piece measures 63-65-67-69-71-73 cm / 24¾"-25½"-26⅜"-27⅛"-28"-28¾", slip the outermost sts at beg of every row in each side on 1 stitch holder for diagonal shoulder as follows (NOTE: To avoid cutting the yarn being used, work the sts before slipping them on the stitch holder): Slip 7-8-8-9-10-11 sts 2-3-2-2-3-2 times in total and 8-0-9-10-0-12 sts 1-0-1-1-0-1 time on stitch holder in each side. AT THE SAME TIME when piece measures 65-67-69-71-73-75 cm / 25½"-26⅜"-27⅛"-28"-28¾"-29½", bind off the middle 16-16-18-18-20-20 sts for neck and finish each shoulder separately. Bind off 1 st on next row from neck. When all sts have been dec/put on a stitch holder, there are 22-24-25-28-30-34 sts on stitch holder for shoulder and back piece measures approx. 67-69-71-73-75-77 cm / 26⅜"-27⅛"-28"-28¾"-29½"-30⅜" from the top of shoulder and down. Slip sts from stitch holder on circular needle size 7 mm / US 10.75. K 1 row from WS (to avoid holes in transitions where sts were slipped on stitch holder put loop between 2 sts on needle and K twisted tog with next st on needle). Then LOOSELY bind off with K from RS. Repeat on the other shoulder. FRONT PIECE: Cast on and work as back piece, but when rib measures 14 cm / 5½", dec evenly as on back piece (front piece is 7 cm / 2¾" shorter than back piece). Work as back piece but when piece measures 16 and 26 cm / 6¼" and 10¼" , dec for BUTTONHOLE in each side - see explanation above! Continue to work until piece measures 53-55-57-58-60-62 cm / 21"-21½"-22½"-22¾"-23½"-24½". Now slip the middle 10-10-12-12-14-14 sts on 1 stitch holder for neck and finish each shoulder separately. Continue to bind off for neck at beg of every row from neck as follows: bind off 2 sts 1 time and 1 st 2 times. AT THE SAME TIME when piece measures 56-58-60-62-64-66 cm / 22"-22¾"-23⅝"-24⅜"-25¼"-26", slip sts on a stitch holder for diagonal shoulder as on back piece. When all sts have been put on a stitch holder/bind off, there are 22-24-25-28-30-34 sts on stitch holder for shoulder and front piece measures approx. 60-62-64-66-68-70 cm / 23⅝"-24⅜"-25¼"-26"-26¾"-27½" from the top of shoulder and down. Slip sts from stitch holder on circular needle size 7 mm / US 10.75 and K 1 row from WS as on back piece before binding off with K from RS. Repeat on the other shoulder. ASSEMBLY: Sew shoulder seams inside bind-off edge - make sure the seam is not tight. Place edge in garter st with buttonholes (front piece) in one side of piece over edge in garter st on back piece and sew on buttons. Repeat in the other side. NECK EDGE: Pick up from RS approx. 46 to 58 around the neck (includes sts on stitch holder at the front) on a short circular needle size 7 mm / US 10.75 with 1 thread Cloud, 1 thread Wish or 2 threads Air. P 1 round, K 1 round and P 1 round before LOOSELY binding off with K. |
|
 |
|
Have you finished this pattern?Tag your pictures with #dropspattern #winteriscomingslipover or submit them to the #dropsfan gallery. Do you need help with this pattern?You'll find 20 tutorial videos, a Comments/Questions area and more by visiting the pattern on garnstudio.com. © 1982-2026 DROPS Design A/S. We reserve all rights. This document, including all its sub-sections, has copyrights. Read more about what you can do with our patterns at the bottom of each pattern on our site. |
|


With over 40 years in knitting and crochet design, DROPS Design offers one of the most extensive collections of free patterns on the internet - translated to 17 languages. As of today we count 324 catalogs and 12290 patterns - 12280 of which are translated into English (US/in).
We work hard to bring you the best knitting and crochet have to offer, inspiration and advice as well as great quality yarns at incredible prices! Would you like to use our patterns for other than personal use? You can read what you are allowed to do in the Copyright text at the bottom of all our patterns. Happy crafting!
Post a comment to pattern DROPS 173-47
We would love to hear what you have to say about this pattern!
If you want to leave a question, please make sure you select the correct category in the form below, to speed up the answering process. Required fields are marked *.