DROPS Cloud
DROPS Cloud
72% alpaka, 21% polyamid, 7% vlna
Výroba ukončena
najít náhradu

Winter is Coming

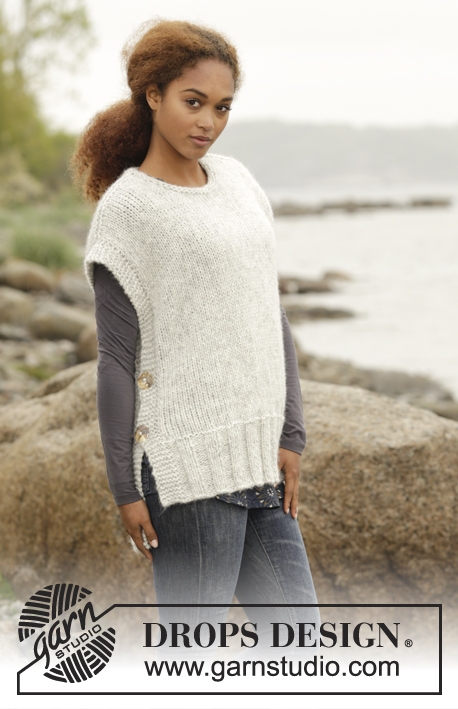
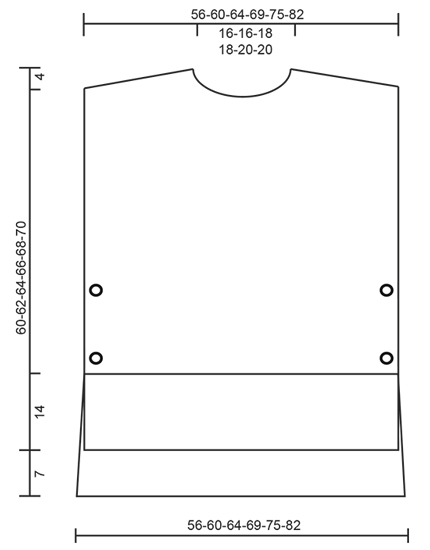
DROPS vesta / tunika s postranními rozparky a kulatým výstřihem pletená z jednoduché příze DROPS Cloud, jednoduché příze DROPS Wish nebo dvojité příze DROPS Air. Velikost: S-XXXL.

DROPS 173-47
DROPS design: model č. co-033
Skupina přízí: E nebo C + C
----------------------------------------------------------
Velikost: S - M - L - XL - XXL - XXXL

Materiál: DROPS CLOUD firmy Garnstudio
450-450-500-550-600-700 g, barva č. 03, perlově šedá

nebo:

DROPS WISH firmy Garnstudio
550-550-600-650-700-800 g, barva č. 03, světlá šedá

nebo:

DROPS AIR firmy Garnstudio
500-500-550-600-650-750 g, barva č. 03, perlově šedá

DROPS KRUHOVÁ JEHLICE (60 nebo 80 cm) č. 8 – nebo velikosti potřebné k upletení zkušebního vzorku o rozměrech 11 ok x 15 řad lícovým žerzejem = 10 x 10 cm.

DROPS KRUHOVÉ JEHLICE (40 + 60 nebo 80 cm) č. 7 na lemy – nebo velikosti potřebné k upletení zkušebního vzorku o rozměrech 12 ok x 16 řad lícovým žerzejem = 10 x 10 cm.

DROPS PERLEŤOVÝ KNOFLÍK Vypouklý (bílý) č.540: 4 ks pro všechny velikosti.

-------------------------------------------------------

Náhradní příze – Podívejte se, jak změnit přízi
Skupina přízí A až F – Neměňte návod, změňte přízi
Spotřeba příze při použití náhradní příze – Využijte náš převodník

-------------------------------------------------------

DROPS Cloud
DROPS Cloud
72% alpaka, 21% polyamid, 7% vlna
Výroba ukončena
najít náhradu

DROPS Super Sale

SAVE 30% on 6 cotton favourites!
Platí do 12.04.2024

Návod

VROUBKOVÝ VZOR:
Pleteme stále hladce, lícové i rubové řady. 1 vroubek = 2 řady hladce.

TIP - UJÍMÁNÍ:
Abychom vypočítali, jak často musíme ujímat, odečteme od celkového počtu ok v řadě (např. 75 ok) oka postranních lemů (tj. 12 ok) a výsledek vydělíme počtem ok, která potřebujeme ujmout (tj. 13), takže 75-12 = 63:13 = 4,8. V tomto případě tedy splétáme hladce dohromady každé zhruba 4. a 5. oko (splétáme mimo oka bočních lemů).

KNOFLÍKOVÉ DÍRKY:
Na každé straně předního dílu vypleteme v postranním lemu 2 knoflíkové dírky. 1 dírka = uzavřeme 3. a 4. oko od okraje dílu a v následující řadě nahodíme na tomtéž místě 2 oka nová.
Knoflíkové dírky vyplétáme ve výši 16 a 26 cm – platí pro všechny velikosti.
----------------------------------------------------------

VESTA:
Pleteme v řadách na kruhové jehlici ve dvou dílech, které nakonec na ramenou sešijeme.

ZADNÍ DÍL:
Na kruhovou jehlici č.7 nahodíme 1 vláknem příze Cloud, 1 vláknem příze Wish nebo 2 vlákny příze Air 75-81-87-93-99-105 ok (včetně 6 ok postranního lemu na každé straně) a upleteme 1 rubovou řadu obrace. Následující lícovou řadu pleteme takto: 6 krajních ok vroubkovým vzorem – viz výše - *3 oka obrace, 3 oka hladce*, *-* opakujeme až po posledních 9 ok v řadě a končíme 3 oky obrace a 6 krajními oky vroubkovým vzorem. Takto pleteme pružný lem až do výše 21 cm. V následující lícové řadě ujmeme rovnoměrně 13-15-17-17-17-15 ok – viz TIP - UJÍMÁNÍ = 62-66-70-76-82-90 ok. Pleteninu převedeme na kruhovou jehlici č.8 a pleteme lícovým žerzejem se 6 krajními oky vroubkovým vzorem na každé straně. Ve výši 63-65-67-69-71-73 cm odložíme na začátku každé řady (tj. na obou stranách dílu) krajní oka na pomocnou jehlici (= zešikmení náramenic; POZN.: abychom nemuseli stříhat přízi, oka před odložením na pomocnou jehlici upleteme): na každé straně dílu odložíme 2-3-2-2-3-2x 7-8-8-9-10-11ok a 1-0-1-1-0-1x 8-0-9-10-0-12 ok.
SOUČASNĚ ve výši 65-67-69-71-73-75 cm uzavřeme prostředních 16-16-18-18-20-20 ok (= průkrčník) a obě náramenice dokončíme odděleně. V následující řadě uzavřeme na obou stranách průkrčníku ještě 1 oko. Po dokončení veškerého ujímání/odkládání ok máme na pomocné jehlici 22-24-25-28-30-34 ok každé náramenice a zadní díl měří asi 67-69-71-73-75-77 cm (od vrcholku ramene k dolnímu okraji). Odložená oka převedeme na kruhovou jehlici č.7 a upleteme 1 rubovou řadu hladce (abychom předešli vzniku dírek v místech přechodu mezi odkládanými skupinami ok, nabereme v těchto místech na jehlici příčnou nit mezi 2 oky a spleteme ji hladce za zadní nit s následujícím okem z jehlice). Poté všechna oka VOLNĚ hladce z lícové strany uzavřeme. Stejným způsobem uzavřeme i oka druhé náramenice.

PŘEDNÍ DÍL:
Nahodíme na kruhovou jehlici č.7 a pleteme stejně jako zadní díl, ale rovnoměrně ujmeme už ve chvíli, kdy je pružný lem vysoký 14 cm (přední díl je o 7 cm kratší než zadní). Pleteninu převedeme na kruhovou jehlici č.8 a pleteme stejně jako zadní díl, jen ve výši 16 a 26 cm vypleteme na každé straně dílu KNOFLÍKOVÉ DÍRKY – viz výše! Pokračujeme do výše 53-55-57-58-60-62 cm. Nyní odložíme prostředních 10-10-12-12-14-14 ok na pomocnou jehlici (= průkrčník) a obě náramenice dokončíme odděleně. Průkrčník dále tvarujeme – uzavřeme na obou jeho okrajích (vždy na začátku řady) 1x 2 oka a 2x 1 oko. SOUČASNĚ ve výši 56-58-60-62-64-66 cm odkládáme oka pro zešikmení náramenic, stejně jako u zadního dílu. Když máme všechna oka odložena na pomocných jehlicích/uzavřena, zbývá nám 22-24-25-28-30-34 ok každé náramenice a přední díl měří asi 60-62-64-66-68-70 cm (od vrcholku ramene k dolnímu okraji). Odložená oka převedeme na kruhovou jehlici č.7 a upleteme 1 rubovou řadu hladce, pak všechna oka z lícové strany hladce uzavřeme. Stejným způsobem uzavřeme i oka druhé náramenice.

DOKONČENÍ:
Sešijeme náramenice – dbáme na to, aby šev nebyl příliš stažený. Na postranní lemy zadního dílu přišijeme knoflíky.

LEM PRŮKRČNÍKU:
Krátkou kruhovou jehlicí č.7 nabereme z lícové strany 1 vláknem příze Cloud, 1 vláknem příze Wish nebo 2 vlákny příze Air z okraje průkrčníku asi 46 až 58 ok (včetně odložených ok z pomocné jehlice) a upleteme 1 kruhovou řadu obrace, 1 hladce a 1 obrace. Pak všechna oka VOLNĚ hladce uzavřeme.

Schéma

diagram measurements

Každý náš návod je doprovázen speciálními video-ukázkami, které vás navedou.

Chcete se na něco zeptat? Projděte si seznam nejčastějších otázek (FAQ).

Knitting tension is what determines the final measurements of your work, and is usually measured per 10 x 10 cm. It is provided like so: number of stitches in width x number of rows in height - eg: 19 stitches x 26 rows = 10 x 10 cm.

The knitting tension is very individual; some people knit/crochet loosely while others work tightly. You adjust the knitting tension with the needle size, which is why the suggested needle size is only meant as a guide! You need to adjust this (up or down) to ensure that YOUR knitting tension matches the knitting tension provided in the pattern. If you work with a different knitting tension than provided you will have a different yarn consumption, and your work will have different measurements than what the pattern suggests.

The knitting tension also determines which yarns can replace each other. As long as you achieve the same knitting tension you can replace one yarn with another.

See DROPS lesson: How to measure your tension/gauge

See DROPS video: How to make a gauge tension swatch

The required amount of yarn is provided in grams, eg: 450 g. To calculate how many balls you’ll need you first need to know how many grams are in 1 ball (25g, 50g or 100g). This information is available if you click on the individual yarn quality on our pages. Divide the amount required with the amount of each ball. For example, if each ball is 50g (the most common amount), the calculation will be as follows: 450 / 50 = 9 balls.

The important thing when changing from one yarn to another is that the knitting/crochet tension remains the same. This is so that the measurements of the finished piece will be the same as on the sketch provided. It is easier to achieve the same knitting tension using yarns from the same yarn group. It is also possible to work with multiple strands of a thinner yarn to achieve the knitting tension of a thicker one. Please try our yarn converter. We recommend you to always work a test swatch.

Please NOTE: when changing yarn the garment might have a different look and feel to the garment in the photo, due to individual properties and qualities of each yarn.

See DROPS lesson: Can I use a different yarn than the one mentioned in the pattern?

All our yarns are categorised into yarn groups (from A to F) according to thickness and knitting tension – group A contains the thinnest yarns and group F the thickest. This makes it easier for you to find alternative yarns to our patterns, should you wish to switch yarn. All yarns within the same group have a similar knitting tension and can easily replace each other. However, different yarn qualities have different structures and properties which will give the finished work a unique look and feel.

Click here for an overview of the yarns in each yarn group

At the top of all our patterns you’ll find a link to our yarn calculator, which is a helpful tool should you wish to use a different yarn than suggested. By filling in the yarn quality you wish to replace, the amount (in your size) and number of strands, the calculator will present good alternative yarns with the same knitting tension. Additionally it will tell you how much you’ll require in the new qualities and whether you’ll need to work with multiple strands. Most skeins are 50g (some are 25g or 100g).

If the pattern is worked with multiple colours, every colour will have to be calculated separately. Similarly, if the pattern is worked with several strands of different yarns (for example 1 strand Alpaca and 1 strand Kid-Silk) you will have to find alternatives for each, individually.

Click here to see our yarn calculator

Since different yarns have different qualities and textures we have chosen to keep the original yarn in our patterns. However, you can easily find options among our available qualities by using our yarn calculator, or simply pick a yarn from the same yarn group.

It is possible that some retailers still have discontinued yarns in stock, or that someone has a few skeins at home that they would like to find patterns for.

The yarn calculator will provide both alternative yarn as well as required amount in the new quality.

If you think it's hard to decide what size to make, it can be a good idea to measure a garment you own already and like the size of. Then you can pick the size by comparing those measures with the ones available in the pattern's size chart.

You'll find the size chart at the bottom of the pattern.

See DROPS lesson: How to read size chart

The needle size provided in the pattern serves only as a guide, the important thing is to follow the knitting tension. And since knitting tension is very individual, you will have to adjust the needle size to ensure that YOUR tension is the same as in the pattern – maybe you’ll have to adjust 1, or even 2 needle sizes, up or down to achieve the correct tension. For this, we recommend that you work test swatches.

Should you work with a different knitting tension than the one provided, the measurements of the finished garment might deviate from the measurement sketch.

See DROPS lesson: How to measure your tension/gauge

See DROPS video: How to make a tension/gauge swatch

Working a garment top-down provides more flexibility and room for personal adjustment. For example it is easier to try the garment on while working, as well as making adjustments to length of yoke and shoulder caps.

The instructions are carefully explaining every step, in the correct order. Diagrams are adjusted to the knitting direction and are worked as usual.

The diagram depicts all rows/rounds, and every stitch seen from the right side. It is read from bottom to top, from right to left. 1 square = 1 stitch.

When working back and forth, every other row is worked from the right side and every other row is worked from the wrong side. When working from the wrong side, the diagram will have to be worked reversed: from left to right, knit stitches are purled, purl stitches are knit etc.

When working in the round every round is worked from the right side and the diagram are worked from right to left on all rounds.

See DROPS lesson: How to read knitting diagrams

The diagram depicts all rows/rounds, and every stitch seen from the right side. It is worked from bottom to top, from right to left.

When working back and forth every other row is worked from the right side: from right to left and every other row is worked from the wrong side: from left to right.

When working in the round, every row in the diagram are worked from the right side, from right to left.

When working a circular diagram you start in the middle and work your way outwards, counter clockwise, row by row.

The rows usually start with a given number of chain stitches (equivalent to the height of the following stitch), this will either be depicted in the diagram or explained in the pattern.

See DROPS lesson: How to read crochet diagrams

Instructions for working several diagrams after each other on the same row/round, will often be written like so: “work A.1, A.2, A.3 a total of 0-0-2-3-4 times". This means you work A.1 once, then A.2 is worked once, and A.3 is repeated (in width) the number of times provided for your size – in this case like so: S = 0 times, M = 0 times, L=2 times, XL= 3 times and XXL = 4 times.

The diagrams are worked as usual: begin with the first row in A.1, then work the first row in A.2 etc.

See DROPS lesson: How to read knitting diagrams

See DROPS lesson: How to read crochet diagrams

The total width of the garment (from wrist-to-wrist) will be larger in the larger sizes, despite the actual sleeves being shorter. The larger sizes have longer sleeve caps and wider shoulders, so there will be a good fit in all sizes.

The measurement sketch/schematic drawing provides information regarding the full length of the garment. If it’s a jumper or a jacket the length is measured from the highest point on the shoulder closest to the neckline, and straight down to the bottom of the garment. It is NOT measured from the tip of shoulder. Similarly, the length of yoke is measured from the highest point on the shoulder and down to where yoke is split into body and sleeves.

On a jacket measures are never taken along bands, unless specifically stated. Always measure inside band stitches when measuring the length.

See DROPS lesson: How to read a schematic drawing

Diagrams are often repeated on the round or in height. 1 repeat is the diagram the way it appears in the pattern. If it says to work 5 repeats of A.1 in the round, then you work A.1 a total of 5 times after/next to each other in the round. If it says to work 2 repeats of A.1 vertically/in height you work the entire diagram once, then begin again at the start and work the entire diagram one more time.

Chain stitches are slightly narrower than other stitches and to avoid working the cast-on edge too tight, we simply chain more stitches to begin with. The stitch count will be adjusted on the following row to fit the pattern and measurement sketch.

The rib edge is more elastic and will contract slightly compared to, for example, stocking stitch. By increasing before the rib edge, you avoid a visible difference in width between the rib edge and the rest of the body.

It’s very easy to cast off too tightly, and by making yarn overs while casting off (and simultaneously casting these off) you avoid a too tight cast off edge.

See DROPS video: How to bind off with yarn overs (yo)

To achieve an even increase (or decrease) you can increase on, for example: every 3rd and 4th row alternately, like so: work 2 rows and increase on the 3rd row, work 3 rows and increase on the 4th. Repeat this until the increase is complete.

See DROPS lesson: Increase or decrease 1 st on every 3rd and 4th row alternately

Should you prefer to work in the round instead of back and forth, you may of course adjust the pattern. You’ll need to add steeks mid-front (usually 5 stitches), and follow the instructions. When you would normally turn and work from the wrong side, simply work across the steek and continue in the round. At the end you’ll cut the piece open, pick up stitches to work bands, and cover the cut edges.

See DROPS video: How to knit steeks and cut open

Should you prefer to work back and forth instead of in the round, you may of course adjust the pattern so you work the pieces separately and then assemble them at the end. Divide the stitches for the body in 2, add 1 edge stitch in each side (for sewing) and work the front and back pieces separately.

See DROPS lesson: Can I adapt a pattern for circular needles into straight needles?

Pattern repeats can vary slightly in the different sizes, in order to get the correct proportions. If you’re not working the exact same size as the garment in the photo, yours might deviate slightly. This has been carefully developed and adjusted so that the complete impression of the garment is the same in all sizes.

Make sure to follow instructions and diagrams for your size!

If you have found a pattern you like which is available in women’s size it’s not very difficult to convert it to men’s size. The biggest difference will be the length of sleeves and body. Start working on the women size that you think would fit across the chest. The additional length will be worked right before you cast off for the armhole/sleeve cap. If the pattern is worked top-down you can add the length right after the armhole or before the first decrease on sleeve.

Regarding additional yarn amount, this will depend on how much length you add, but it is better with a skein too many than too few.

All yarns will have excess fibres (from production) that might come off as lint or shedding. Brushed yarns (ie hairier yarns) have more of these loose, excess fibres, causing more shedding.

Shedding also depends on what is worn under or over the garment, and whether this pulls at the yarn fibres. It’s therefore not possible to guarantee that there will be no shedding

Below are some tips on how to get the best result when working with hairier yarns:

1. When the garment is finished (before you wash it) shake it vigorously so the looser hairs come off. NOTE: do NOT use a lint roller, brush or any method that pulls at the yarn.

2. Place the garment in a plastic bag and put it in your freezer - the temperature will cause the fibres to become less attached to each other, and excess fibres will come off easier.

3. Leave in the freezer for a few hours before taking it out and shaking it again.

4. Wash the garment according to the instructions on the yarn label.

Pilling is a natural process that happens to even the most exclusive of fibers. It's a natural sign of wear and tear that is hard to avoid, and that is most visible in high friction areas of your garment like a sweater's arms and cuffs.

You can make your garment look as new by removing the pilling, using a fabric comb or a pill/lint remover.

Pořád se nemůžete dobrat odpovědi, kterou hledáte? Pak posuňte stránku dolů a napište nám svůj dotaz, naši specialisté se vám pokusí poradit. Obvykle to zvládneme během 5 až 10 pracovních dnů..
Mezitím si můžete pročíst otázky a odpovědi, které k tomuto modelu položili ostatní, nebo navštívit skupinu DROPS Workshop na Facebooku, kde vám může poradit některá spřízněná duše!

Mohly by se vám líbit...

Přidejte komentář k návodu DROPS 173-47

Rádi bychom věděli, co si o tomto modelu myslíte!

Pokud se chcete na něco zeptat, dbejte prosím na to, abyste ve formuláři níže vybrali správnou kategorii - díky tomu se dříve dozvíte, co potřebujete vědět. Povinná pole jsou označena *.

Komentáře / Otázky (55)

country flag Sharon Hunt wrote:

Am Even more confused am making the largest size and it says am supposed to have 34 sts for the neck.

05.09.2023 - 12:08

DROPS Design answered:

Dear Mrfs Hunt, oh the largest size will be then worked as follows (sorry numbers below were for L), seen from right side (back piece): (11+11+12 = 34 sts for first shoulder) + (1+22+1 = 24 sts cast off for neck) + (12+11+11 = 34 sts for 2nd shoulder) = 90 sts in total for XXXL. The 34 sts are for each shoulder, not for neck, for neck you will first cast off the middle 20 stitches then cast off 1 stitch at the beginning of next row from neck towards shoulder (from RS on left shoulder/from WS on right shoulder). Happy knitting!

05.09.2023 - 13:54

country flag Sharon Hunt wrote:

Am having som problems with the back. The instructions says to: Slip 7-8-8-9-10-11 sts 2-3-2-2-3-2 times in total and 8-0-9-10-0-12 sts 1-0-1-1-0-1 …. I am making the largest size. I slipped the sts as instructed I think and I have 34 sts on stitch holder for the shoulder but there are 34 sts left to cast off for the nec not 20 as per pattern. 😟. What am I doing wrong here. Thanks for your quick response. Need to finish this vest to wear i 2 weeks. Thanks so much.

04.09.2023 - 19:43

DROPS Design answered:

Dear Mrs Hunt, you will slip the stitches for shoulder on a thread and at the same time cast off for neck, so that you should have (seen from right side): (8+8+9 sts =25 sts for shoulder) + (1+18+1 =20 sts cast off for neck) and (9+8+8 = 25 sts for shoulder) = 70 sts in total. Happy knitting!

05.09.2023 - 12:02

country flag Sharon Hunt wrote:

Hi, am up to the shoulders where I have divided with 11 + 11 +12 on both sides. Instruction says to slip these stitches to a size 7 needles knit one row from wrong side. Am I supposed to cut the yarn, re-attach so the front is facing me and knit one row even or re-attach the yarn so the wrong side is facing and knit one row? Will be doing a 3 needle bind off for the shoulder. Assuming That’s ok.

03.09.2023 - 01:26

DROPS Design answered:

Dear Sharon, you don't need to cut the yarn. When slipping the stitches of the shoulder to the circular needle the next row should be from the wrong side, so the thread is already prepared. You need to add a new thread to work the other shoulder. And yes, you can cast off as you indicated. Happy knitting!

03.09.2023 - 23:37

country flag Sharon Hunt wrote:

Thanks for the response. Starting all over again but That’s ok. It appears there is a ridge after the knit 3 purl 3 ribbing. The instruction says yo decrease on the right side and the start stockinett sts. I did not have a ridge on my ripped out project ☹️. Since am starting over I want to get it right this time. Should I knit the wrong side after the decreases. Did not see that in this part of the pattern. Thanks 🙏 so much.

28.08.2023 - 01:49

DROPS Design answered:

Dear Mrs Hunt, you mean at the beginnning of the pattern at the transition between ribbing edge and stocking stitch? Then decrease from RS as explained and knit 1 row from wrong side before starting stocking stitch to get this rib (as on the picture, but you are right, missing in the pattern). Happy knitting!

28.08.2023 - 14:27

country flag Sharon Hunt wrote:

Hi , I have a last question.😔. Slip sts from stitch holder on circular needle size 7 mm. K 1 row from WS (to avoid holes in transitions where sts were … Since am knitting from the wrong side am assuming I would purl not knit. Is this correct? Thanks. Sharon

25.08.2023 - 21:03

DROPS Design answered:

Dear Sharon, no, it's a knit row, so you knit the stitches. This is to make a ridge in garter stitch, so you knit all rows. Happy knitting!

28.08.2023 - 00:20

country flag Sharon Hunt wrote:

Hi! AT THE SAME TIME when piece measures 65-67-69-71-73-75 cm, cast off the middle 16-16-18-18-20-20 sts for neck and finish each shoulder separately. Cast off 1 st on next row from neck. When all sts have been dec/put on a stitch holder, there are 22-24-25-28-30-34 sts on stitch. Do I decrease the 2 extra stitches with one stitch from the shoulder sts on each side. 🙏 Sharon

25.08.2023 - 12:37

DROPS Design answered:

Dear Mrs Hunt, the 2 extra stitches for neck are cast off at the beginning of next row from neck (1 st on each side), this means on left shoulder back piece at the beg of a row from wrong side and for right shoulder back at the beg of a row from right side (= towards neck, this means on the opposite side of the stitches of the thread for diagonal shoulder). Happy knitting!

25.08.2023 - 13:53

country flag Sharon Hunt wrote:

Hi am not understanding or should I say am nog sure I do: Slip 7-8-8-9-10-11 sts 2-3-2-2-3-2 times in total and 8-0-9-10-0-12 sts 1-0-1-1-0-1 time on stitch holder in each side. Am making the second size give which had 66 after the decreases. Sm I supposed to have 24 stitches on stitch holder for each sleeve?

25.08.2023 - 01:49

DROPS Design answered:

Dear Mrs Hunt, yes, in 2nd size you will have a total of 24 sts for each shoulder: slip 8 sts at the beg of each row from armhole a total of 3 times, and at the same time, cast off the middle 16 sts + 1 st at the beg of next row from neck so that you have: 8 sts 3 times on a thread, 18 sts for neck (1+16+1) and 8 sts 3 times on a thread = 66 sts. Happy knitting!

25.08.2023 - 08:29

country flag Augusta Jensen wrote:

Hej, på opskriften står der "RETSTRIK (strikkes frem og tilbage): Strik ret på hver p." - Der tror jeg at retstrik er strik ret hver anden pind. M.v.h. Augusta

15.05.2023 - 10:00

country flag Stevie Shreve wrote:

This is the first garment I am trying to knit, the instructions for the top neck portion are a little confusing for me.

25.11.2022 - 14:16

DROPS Design answered:

Dear Mr Shreve, maybe you can tell me which section is confusing you? are you working on back piece or front piece? Which size are you working. Thanks for all these informations.

25.11.2022 - 15:25

country flag Jane wrote:

Rib: skal hver pind starte med vrang (efter d 6 kantmasker)? Eller skal det kun være hver anden gang? Så jeg starter og slutter med retmasker på hver anden pind?

16.10.2022 - 19:33

DROPS Design answered:

Hei Jane. Etter de 6 kantmaskene strikker du 3 vrang og 3 rett fra retten, dette strikker du til det gjenstår 9 masker. Strikk 3 masker vrang og deretter 6 kantmasker. På neste pinne strikkes det 6 kantmasker, deretter 3 rett og 3 vrang fra vrangen og dette strikkes til det gjenstår 9 masker. Strikk 3 masker rett og så 6 kantmasker. Strikk slik til arbeidet måler 21 cm. Du har da en vrangbord med 3 vrang/3rett og med 6 kantmasker i hver siden. mvh DROPS Design

24.10.2022 - 13:42