
Popular categories
Looking for a yarn?


Comments / Questions (23)
![]() Jeanette Held wrote:
Jeanette Held wrote:
Hallo, ich stricke die Mütze mit 83 Maschen ich habe jetzt die Marker für die Abnahmen Gesetz nach jeder 11 Masche . Das wären 6 Maschen weniger pro Runde a 3 Wiederholungen . Da bleiben aber keine 71 Maschen.
15.02.2025 - 17:04DROPS Design answered:
Liebe Frau Held, man wird nur 2 Mal in jeder 2. Rune abnehmen, so sind es 83-12=71 Maschen übrig. Viel Spaß beim Stricken!
17.02.2025 - 08:16
![]() Dorte Christensen wrote:
Dorte Christensen wrote:
Opskriften til hals kan jeg godt følge at jeg skal tage ind hver 6 cm. Skiftevis først og sidst på glatstrikning. Så jeg til sidst ender på 130 masker når arbejdet måler 24 cm. Men når arbejdet måler 30 cm, så er der pludselig kun 110 masker hvor og hvordan tager jeg 20 masker ind på de 6 cm
07.01.2022 - 20:16DROPS Design answered:
Hej Dorte, når arbejdet måler 26 cm strikkes A.5, du tager ind ifølge 3. og 7.p i A.5. God fornøjelse!
17.01.2022 - 09:16
![]() Cinzia wrote:
Cinzia wrote:
Mille grazie per il favoloso supporto !
25.11.2019 - 13:12
![]() Cinzia wrote:
Cinzia wrote:
E di nuovo Buongiorno ! Forse ci sono arrivata da sola,dopo una attenta lettura più volte ,ho capito che bisogna specificare nelle spiegazioni che lo schema A2 va lavorato fino ad un'altezza di 15-16 cm è da lì che iniziano le diminuzioni! giusto? Io ho rifatto il lavoro! Speriamo sia giusto😉
24.11.2019 - 06:22DROPS Design answered:
Buongiorno Cinzia. Sì è corretto. Lavora il diagramma A.2 fino a 15-16 cm, poi diminuisce come indicato. Quando ha 71-83 m, verifica di aver lavorato tutte e quattro le righe di A2; lavora poi il diagramma A3 continuando a diminuire ogni 2 giri per 6 volte. Buon lavoro!
25.11.2019 - 09:23
![]() Cinzia wrote:
Cinzia wrote:
Buongiorno eccomi di nuovo! Non sono chiare le spiegazioni Sono ferma! ho lavorato tutto lo schema 3 senza diminuire, a detta delle spiegazioni bisogna diminuire a 15-16 cm dal lavoro. ( io sono a 9cm finito lo schema A3 Ma poi dice diminuire dallo schema A2 (non capisco) inoltre che sequenza seguire sugli schemi? quante volte va lavorato lo schema A2 ? Grazie infinite siete gentilissimi
23.11.2019 - 02:05
![]() Cinzia Mastromatteo wrote:
Cinzia Mastromatteo wrote:
Buongiorno non mi è chiara la spiegazione dello schema A1 mi rimane una maglia in più con 95 punti forse lo schema a1 lo devo lavorare solo sulle prime 17 maglie? Grazie
21.11.2019 - 08:03DROPS Design answered:
Buongiorno Cinzia. Sì, lavora il diagramma A.1 solo sulle prime 17 maglie; lavora le altre maglie a coste 2 m dir / 2 m rov e finisce il giro con 2 m dir. Buon lavoro!
21.11.2019 - 08:22
![]() Anna wrote:
Anna wrote:
Buongiorno, sto facendo il berretto, seguendo il vostro schema. Al momento delle diminuzioni mi viene fuori una antiestetica riga obliqua (diminuzioni) sul lato anteriore del berretto a sinistra del diagramma n.2. Potreste darmi un suggerimento affinché le diminuzioni in questione abbiano un risultato simmetrico? All'inizio delle spiegazioni mettete come occorrente anche dei ferri a doppia punta, poiché non è chiaro, a che punto dovrei usarli? Grazie molte
24.01.2019 - 16:08DROPS Design answered:
Buongiorno Anna. Potrebbe provare a mettere il primo e l'ultimo segnapunti a distanza uguale dal motivo centrale (p.es a 5 maglie a destra e a sinistra) e posizionare gli altri segnapunti sulle restanti maglie a intervalli regolari. Potrebbe preferire lavorare con i ferri a doppia punta la parte finale del berretto, quando il numero delle maglie è basso. Buon lavoro!
24.01.2019 - 17:00
![]() Lea wrote:
Lea wrote:
Für die Fäustlinge habe ich noch keine maschenprobe gemacht, aber sollte ich da auch eine größere Nadel brauchen wovon ich ausgehe muss ich dann fürs Bündchen einfach eine halbe Nr. kleiner nehmen? zb wenn ich für die Fäustlinge ne Nadel 6 ermittel dann fürs Bündchen ne 5,5 nadel nehmen?
12.01.2019 - 15:59DROPS Design answered:
Liebe Lea, also am besten stricken Sie Ihre Maschenprobe, so sind Sie mit der Nadelgrösse sicher, aber wenn Sie 19 M x 25 Reihe glatt gestrickt mit Nadelgrösse 6 bekommen, dann brauchen Sie wahrscheinlich Nadelgrösse 5,5 für das Bündchen. Viel Spaß beim stricken!
14.01.2019 - 10:13
![]() Lea wrote:
Lea wrote:
Ich brauche laut probe für die Mütze und den schal die Nadeln 6 und 6,5 ändert sich durch die Größeren Nadeln der Wollverbrauch oder bleibt der für die Mütze bei 100g und für den schal bei 200g?
12.01.2019 - 15:59
![]() Mary wrote:
Mary wrote:
Ciao..Prima di eseguire il diagramma A.3 bisogna lavorare per intero nuovamente 1 volta il diagramma A.2 e poi proseguire con lo schema A3 e fare le diminuzioni per 6 volte?
16.11.2018 - 03:14DROPS Design answered:
Buongiorno Mary, deve lavorare 1 volta il diagramma A.2 e poi proseguire con A.3. Buon lavoro!
16.11.2018 - 08:50
|
||||||||||||||||
Malin#malinset |
||||||||||||||||
 |
 |
|||||||||||||||
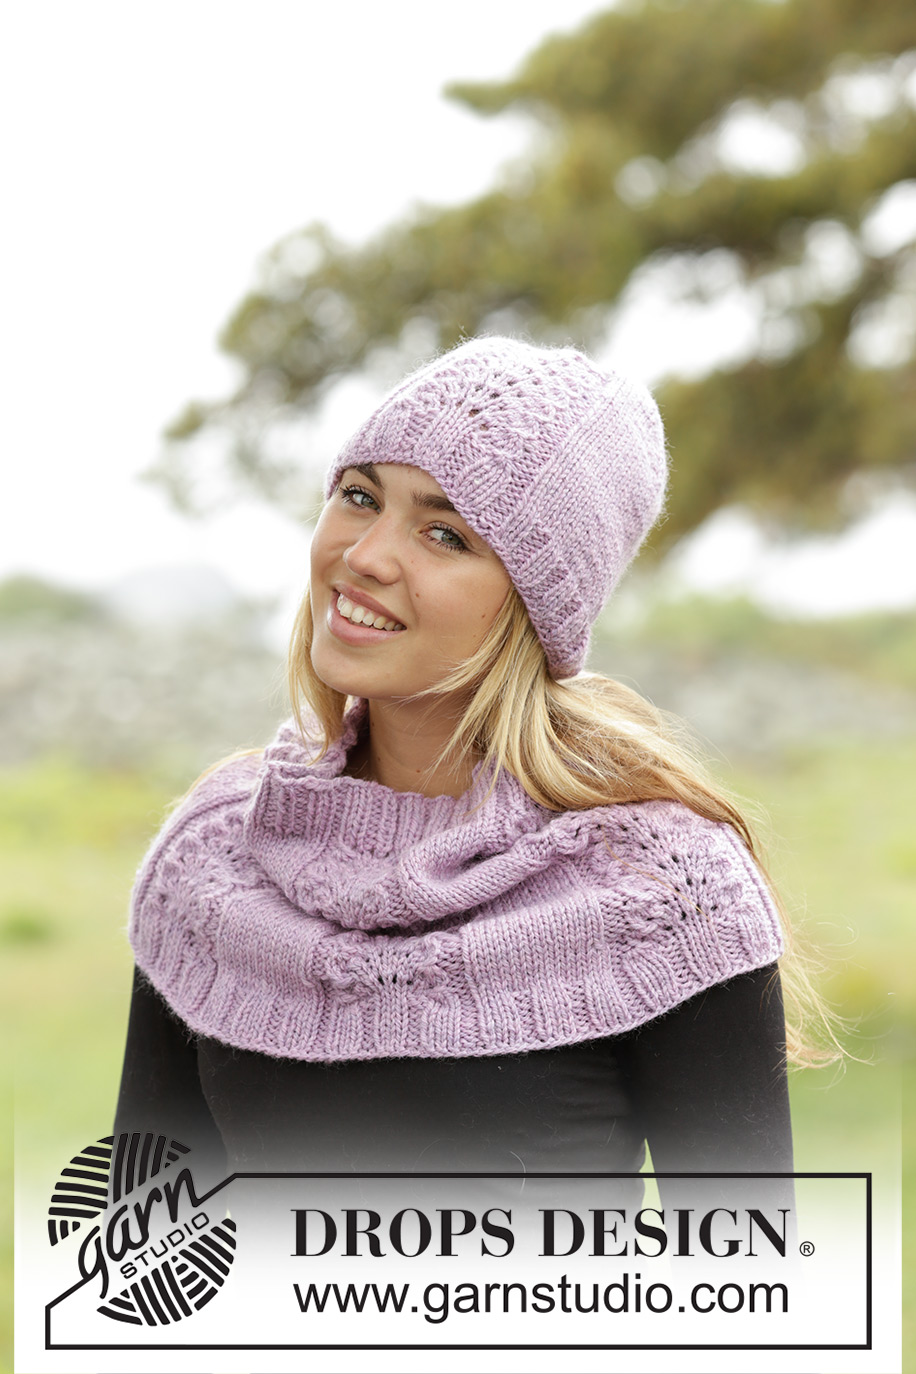
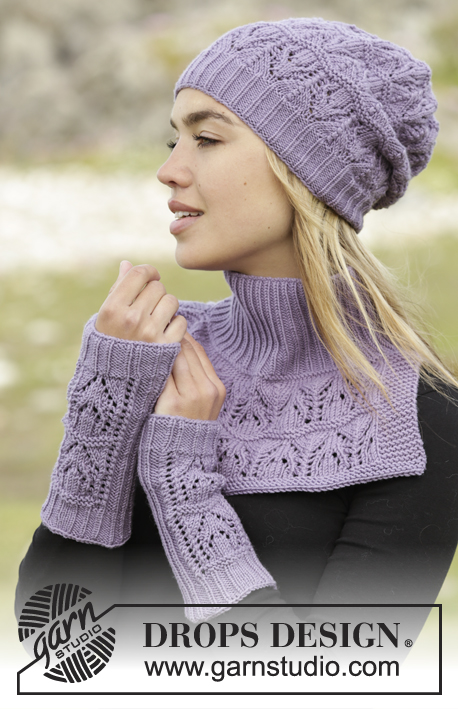
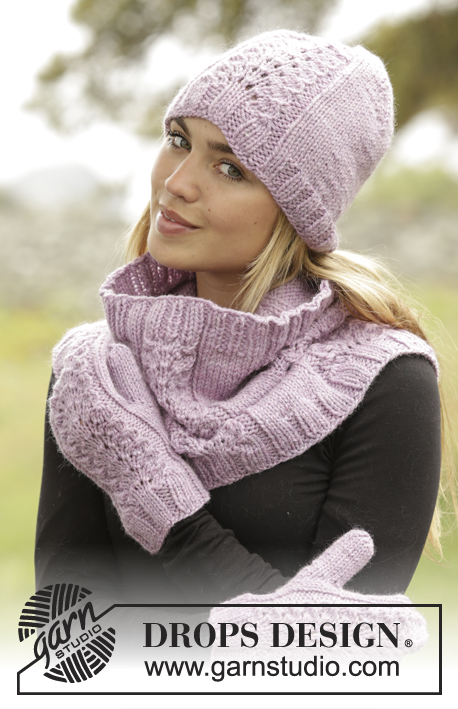
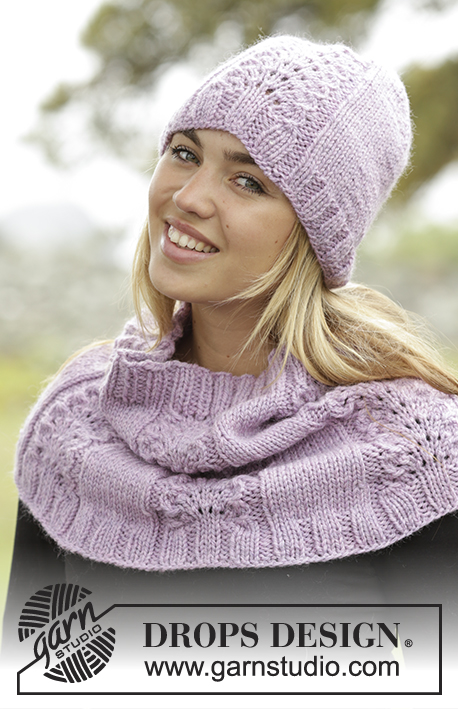
Set consists of: Knitted DROPS hat, mittens and neck warmer with lace pattern and rib in ”Alaska”.
DROPS 171-56 |
||||||||||||||||
|
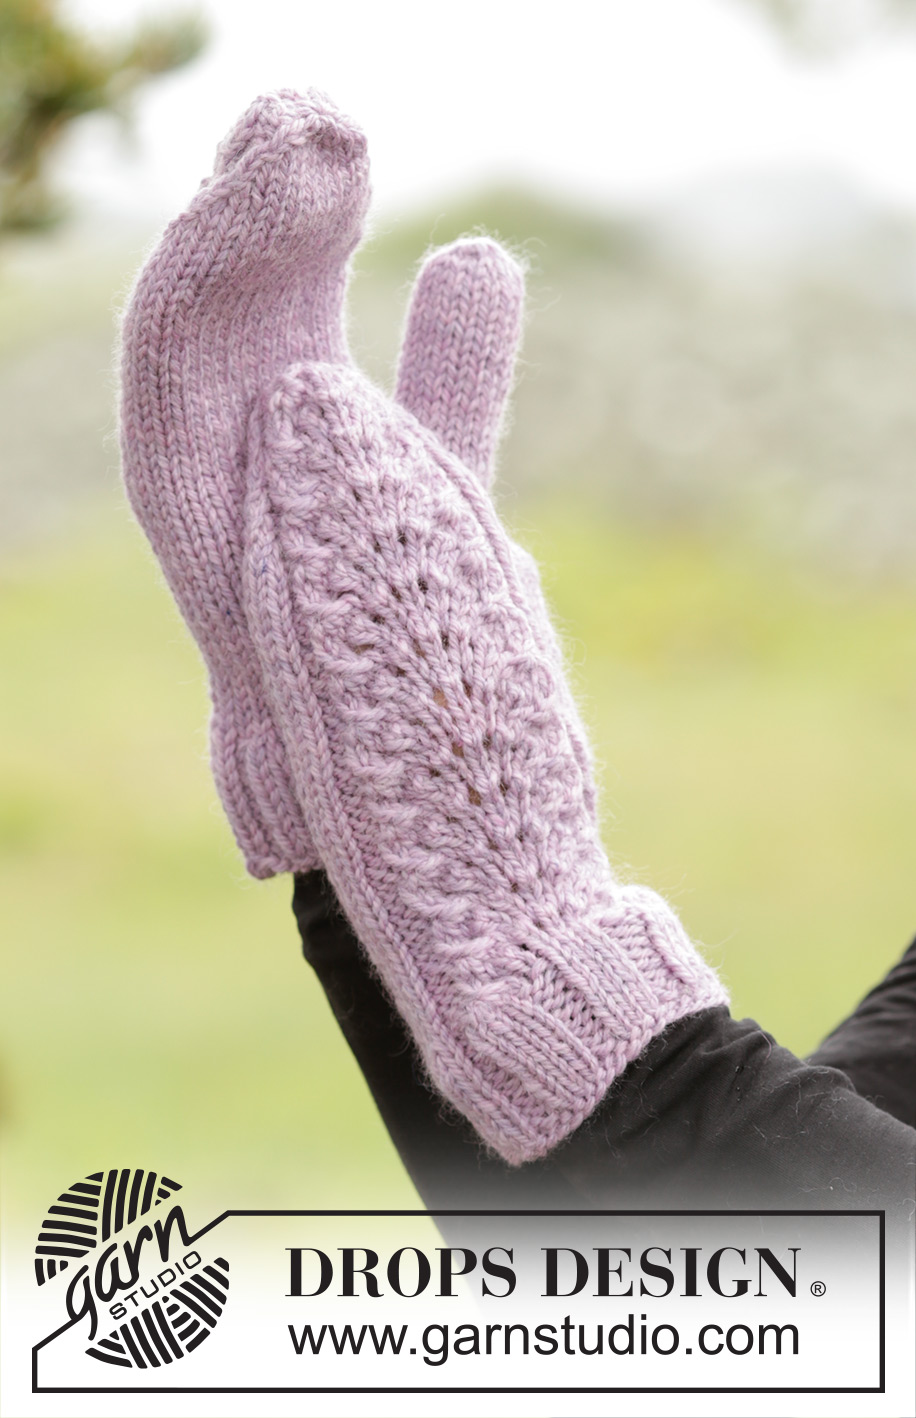
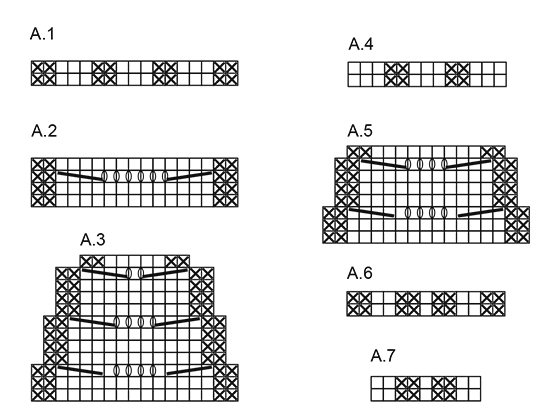
PATTERN: See diagrams A.1 to A.7. INCREASE TIP (applies to mittens): Inc 1 st by making 1 YO, on next row K YO twisted to avoid holes. DECREASE TIP-1 (applies to mittens): Dec as follows before first marker: Beg 2 sts before marker, K 2 sts tog. Dec as follows after marker: Beg 2 sts before marker, Slip 1 st as if to K, K 1, psso DECREASE TIP-2 (applies to neck warmer): Dec at beg of stockinette st section as follows: Slip 1 st as if to K, work next st, psso. Dec at end of stockinette st section as follows: Work until 2 sts in stockinette st remain, K 2 tog. ---------------------------------------------------------- HAT: Cast on 83-95 sts on circular needle size 4.5 mm / US 7 with Alaska. K 1 round, then work as follows: A.1 (= 17 sts), * K 2, P 2 *, repeat from *-* over the next 64-76 sts, finish with 2 K. Continue like this until piece measures 4 cm / 1½''. Switch to circular needle size 5 mm / US 8. Then work A.2 over sts in A.1 (= 17 sts), and work in stockinette st over the remaining 66-78 sts. REMEMBER THE KNITTING GAUGE When piece measures 15-16 cm / 6"-6 1/4", insert 6 markers in piece as follows: Insert first marker in first st in stockinette st after A.2, then insert the next 5 markers with 10-12 sts apart (= 10-12 sts after last marker). Continue in stockinette st and A.2, AT THE SAME TIME dec 1 st after every marker (K st with marker tog with next st), dec every other round 2 times (= 71-83 sts), then work A.3 over sts in A.2 (adjust after one whole repetition of A.2), continue with dec in stockinette st every other round 6 more times, dec in A.3 until A.3 has been worked = 27-39 sts remain on round. K all sts tog 2 by 2, cut the yarn, pull it through the remaining sts and tighten. Fasten the strand. Piece measures approx. 23-24 cm / 9"-9½''. ---------------------------------------------------------- MITTENS: LEFT MITTEN: Worked in the round on double pointed needles. Cast on 43-47 sts on double pointed needles size 3.5 mm / US 4 with Alaska and K 1 round. Then work as follows: K 1-2, A.1 (= 17 sts), * K 2, P 2 *, repeat from *-* over the next 24-28 sts, finish with 1-0 K. When piece measures 4 cm / 1½'', switch to double pointed needles size 4 mm / US 6. Continue as follows: K 1-2, A.1, K the remaining sts AT THE SAME TIME dec 7 sts over these sts = 36-40 sts. Then work as follows: K 1-2, A.2 (= 17 sts), K the remaining sts. REMEMBER THE KNITTING GAUGE When piece measures 8 cm / 3 1/8'', inc 1 st on each side of the 34th-38th st on round for thumb (= 2 sts inc) - READ INCREASE TIP. Repeat inc on each side of the inc sts on every other round a total of 5 times = 46-50 sts. Now slip the 11 thumb sts on 1 stitch holder. Work in stockinette st and A.2 in the round AT THE SAME TIME cast on 1 new st behind thumb on next round = 36-40 sts. Continue in stockinette st and A.2 in the round until piece measures 21-22 cm / 8 1/4"-8 3/4''. Insert 1 marker at beg of round and 1 marker after 19-21 sts. Continue with A.3 over A.2, AT THE SAME TIME dec 1 st before first marker and 1 st after the second marker - READ DECREASE TIP-1 (= 2 sts dec). Repeat dec every other round 6 more times = 14-18 sts remain on needle. Work all sts tog 2 by 2. Cut the yarn and pull it through the remaining sts, tighten tog and fasten. THUMB: Slip the 11 thumb sts back on double pointed needles size 4 mm / US 6. In addition pick up 4-5 sts behind thumb = 15-16 sts. Work in stockinette st until the thumb itself measures approx. 4½-5 cm / 1 3/4"-2"' (try on the mitten, approx. ½ cm / ½'' remains until finished measurements). K 2 rounds AT THE SAME TIME K all sts tog 2 by 2 on both rounds. Cut the yarn and pull it through the remaining sts, tighten tog and fasten. RIGHT MITTEN: Cast on and work as left but inc for thumb on each side of the 21st-23rd st. ---------------------------------------------------------- NECK WARMER: Cast on 150 sts on circular needle size 4.5 mm / US 7 with Alaska. K 1 round, then work as follows: * A.1 (= 17 sts), A.4 (= 13 sts) *, repeat from *-* 5 times in total. When piece measures 4 cm / 1½'', switch to circular needle size 5 mm / US 8 and work as follows: * A.2 (= 17 sts), stockinette st over the next 13 sts *, repeat from *-* 5 times in total. Continue pattern like this. REMEMBER THE KNITTING GAUGE. When piece measures 6 cm / 2 3/8'', dec 1 st on beg of each stockinette st section - READ DECREASE TIP-2 = 145 sts. Dec alternately at beg and end of stockinette st sections every 6 cm / 2 3/8'' 4 times in total = 130 sts. When piece measures 26 cm / 10 1/4'', continue with A.5 over all A.2, continue the remaining sts in stockinette st. Work A.5 1 time vertically (piece measures approx. 30 cm / 11 3/4'' and there are 110 sts on round). Switch to circular needle size 4.5 mm / US 7 and continue as follows: * A.6 (= 13 sts), A.7 (= 9 sts) *, repeat from *-* 5 times in total. Work A.6 and A.7 for 4 cm / 1½'', then bind off with K over K and P over P, piece measures 34 cm / 13½''. |
||||||||||||||||
Diagram explanations |
||||||||||||||||
|
||||||||||||||||
 |
||||||||||||||||
Have you finished this pattern?Tag your pictures with #dropspattern #malinset or submit them to the #dropsfan gallery. Do you need help with this pattern?You'll find 22 tutorial videos, a Comments/Questions area and more by visiting the pattern on garnstudio.com. © 1982-2026 DROPS Design A/S. We reserve all rights. This document, including all its sub-sections, has copyrights. Read more about what you can do with our patterns at the bottom of each pattern on our site. |
||||||||||||||||


With over 40 years in knitting and crochet design, DROPS Design offers one of the most extensive collections of free patterns on the internet - translated to 17 languages. As of today we count 324 catalogs and 12278 patterns - 12268 of which are translated into English (US/in).
We work hard to bring you the best knitting and crochet have to offer, inspiration and advice as well as great quality yarns at incredible prices! Would you like to use our patterns for other than personal use? You can read what you are allowed to do in the Copyright text at the bottom of all our patterns. Happy crafting!
Post a comment to pattern DROPS 171-56
We would love to hear what you have to say about this pattern!
If you want to leave a question, please make sure you select the correct category in the form below, to speed up the answering process. Required fields are marked *.