


Komentáře / Otázky (24)
![]() Jeanette Held napsala:
Jeanette Held napsala:
Hallo, ich stricke die Mütze mit 83 Maschen ich habe jetzt die Marker für die Abnahmen Gesetz nach jeder 11 Masche . Das wären 6 Maschen weniger pro Runde a 3 Wiederholungen . Da bleiben aber keine 71 Maschen.
15.02.2025 - 17:04Odpověď DROPS Design :
Liebe Frau Held, man wird nur 2 Mal in jeder 2. Rune abnehmen, so sind es 83-12=71 Maschen übrig. Viel Spaß beim Stricken!
17.02.2025 - 08:16
![]() Dorte Christensen napsala:
Dorte Christensen napsala:
Opskriften til hals kan jeg godt følge at jeg skal tage ind hver 6 cm. Skiftevis først og sidst på glatstrikning. Så jeg til sidst ender på 130 masker når arbejdet måler 24 cm. Men når arbejdet måler 30 cm, så er der pludselig kun 110 masker hvor og hvordan tager jeg 20 masker ind på de 6 cm
07.01.2022 - 20:16Odpověď DROPS Design :
Hej Dorte, når arbejdet måler 26 cm strikkes A.5, du tager ind ifølge 3. og 7.p i A.5. God fornøjelse!
17.01.2022 - 09:16
![]() Cinzia napsala:
Cinzia napsala:
Mille grazie per il favoloso supporto !
25.11.2019 - 13:12
![]() Cinzia napsala:
Cinzia napsala:
E di nuovo Buongiorno ! Forse ci sono arrivata da sola,dopo una attenta lettura più volte ,ho capito che bisogna specificare nelle spiegazioni che lo schema A2 va lavorato fino ad un'altezza di 15-16 cm è da lì che iniziano le diminuzioni! giusto? Io ho rifatto il lavoro! Speriamo sia giusto😉
24.11.2019 - 06:22Odpověď DROPS Design :
Buongiorno Cinzia. Sì è corretto. Lavora il diagramma A.2 fino a 15-16 cm, poi diminuisce come indicato. Quando ha 71-83 m, verifica di aver lavorato tutte e quattro le righe di A2; lavora poi il diagramma A3 continuando a diminuire ogni 2 giri per 6 volte. Buon lavoro!
25.11.2019 - 09:23
![]() Cinzia napsala:
Cinzia napsala:
Buongiorno eccomi di nuovo! Non sono chiare le spiegazioni Sono ferma! ho lavorato tutto lo schema 3 senza diminuire, a detta delle spiegazioni bisogna diminuire a 15-16 cm dal lavoro. ( io sono a 9cm finito lo schema A3 Ma poi dice diminuire dallo schema A2 (non capisco) inoltre che sequenza seguire sugli schemi? quante volte va lavorato lo schema A2 ? Grazie infinite siete gentilissimi
23.11.2019 - 02:05
![]() Cinzia napsala:
Cinzia napsala:
Grazie mille per la Vostra cortese risposta,ma ho un'altra domanda,(sono alle prime armi scusate) come si fa una maglia gettata tra due maglie? Sono arrivata allo schema A2 non riesco a capire dal video tutorial mi sembra quasi una maglia al rovescio Grazie infinite per la pazienza !
21.11.2019 - 19:41Odpověď DROPS Design :
Buongiorno Cinzia. Per fare un gettato, deve avvolgere il filo intorno al ferro. Le alleghiamo due video. Il primo spiega come fare un gettato. Il secondo può aiutarla per lavorare il diagramma A.3: anche qui si vede come fare i gettati. Ci riscriva se ancora in difficoltà. Buon lavoro!
22.11.2019 - 08:47
![]() Cinzia Mastromatteo napsala:
Cinzia Mastromatteo napsala:
Buongiorno non mi è chiara la spiegazione dello schema A1 mi rimane una maglia in più con 95 punti forse lo schema a1 lo devo lavorare solo sulle prime 17 maglie? Grazie
21.11.2019 - 08:03Odpověď DROPS Design :
Buongiorno Cinzia. Sì, lavora il diagramma A.1 solo sulle prime 17 maglie; lavora le altre maglie a coste 2 m dir / 2 m rov e finisce il giro con 2 m dir. Buon lavoro!
21.11.2019 - 08:22
![]() Anna napsala:
Anna napsala:
Buongiorno, sto facendo il berretto, seguendo il vostro schema. Al momento delle diminuzioni mi viene fuori una antiestetica riga obliqua (diminuzioni) sul lato anteriore del berretto a sinistra del diagramma n.2. Potreste darmi un suggerimento affinché le diminuzioni in questione abbiano un risultato simmetrico? All'inizio delle spiegazioni mettete come occorrente anche dei ferri a doppia punta, poiché non è chiaro, a che punto dovrei usarli? Grazie molte
24.01.2019 - 16:08Odpověď DROPS Design :
Buongiorno Anna. Potrebbe provare a mettere il primo e l'ultimo segnapunti a distanza uguale dal motivo centrale (p.es a 5 maglie a destra e a sinistra) e posizionare gli altri segnapunti sulle restanti maglie a intervalli regolari. Potrebbe preferire lavorare con i ferri a doppia punta la parte finale del berretto, quando il numero delle maglie è basso. Buon lavoro!
24.01.2019 - 17:00
![]() Lea napsala:
Lea napsala:
Für die Fäustlinge habe ich noch keine maschenprobe gemacht, aber sollte ich da auch eine größere Nadel brauchen wovon ich ausgehe muss ich dann fürs Bündchen einfach eine halbe Nr. kleiner nehmen? zb wenn ich für die Fäustlinge ne Nadel 6 ermittel dann fürs Bündchen ne 5,5 nadel nehmen?
12.01.2019 - 15:59Odpověď DROPS Design :
Liebe Lea, also am besten stricken Sie Ihre Maschenprobe, so sind Sie mit der Nadelgrösse sicher, aber wenn Sie 19 M x 25 Reihe glatt gestrickt mit Nadelgrösse 6 bekommen, dann brauchen Sie wahrscheinlich Nadelgrösse 5,5 für das Bündchen. Viel Spaß beim stricken!
14.01.2019 - 10:13
![]() Lea napsala:
Lea napsala:
Ich brauche laut probe für die Mütze und den schal die Nadeln 6 und 6,5 ändert sich durch die Größeren Nadeln der Wollverbrauch oder bleibt der für die Mütze bei 100g und für den schal bei 200g?
12.01.2019 - 15:59
|
||||||||||||||||
Malin#malinset |
||||||||||||||||
 |
 |
|||||||||||||||
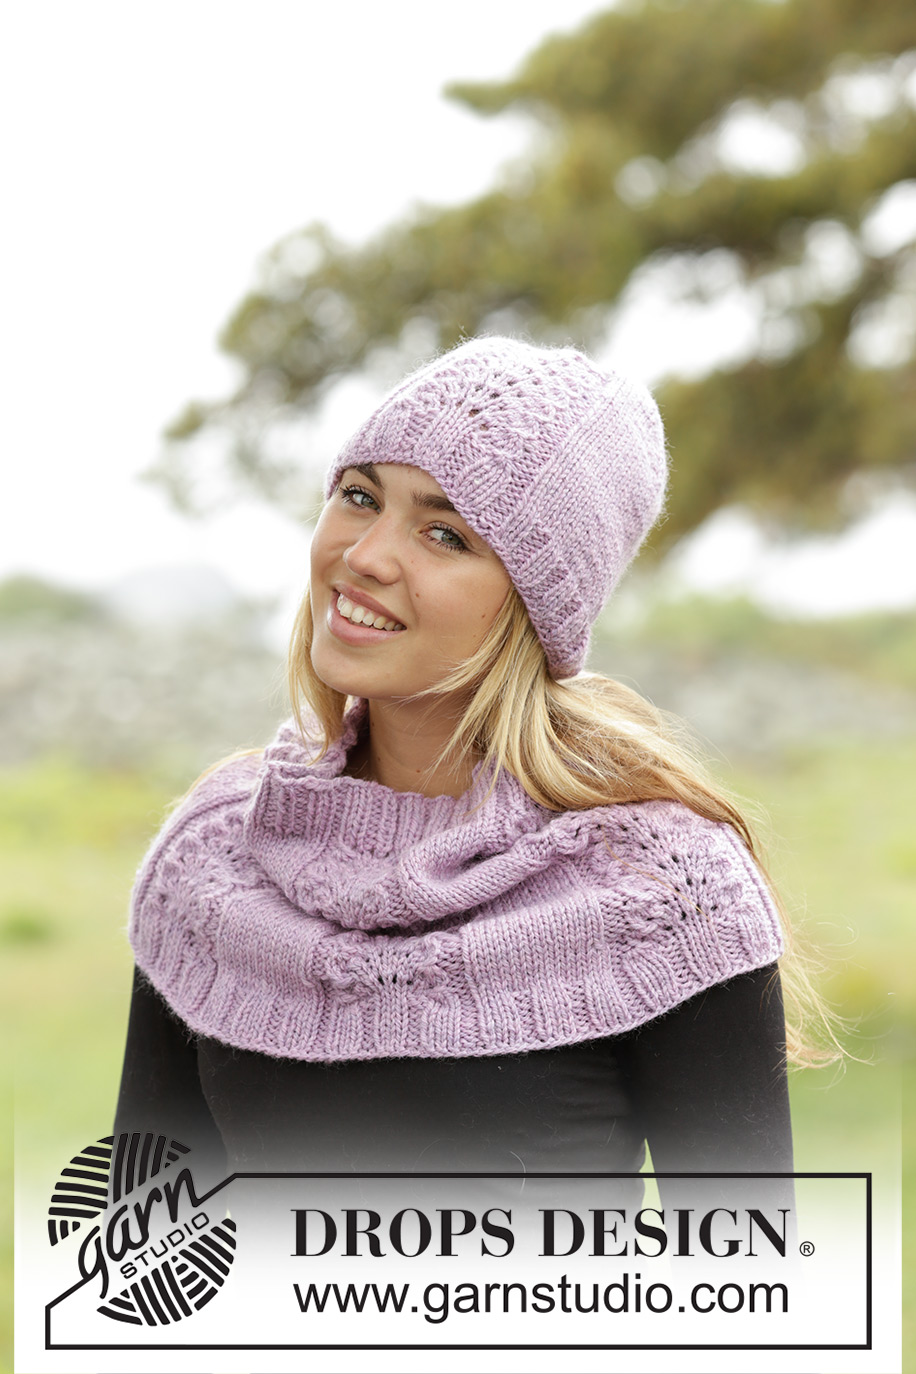
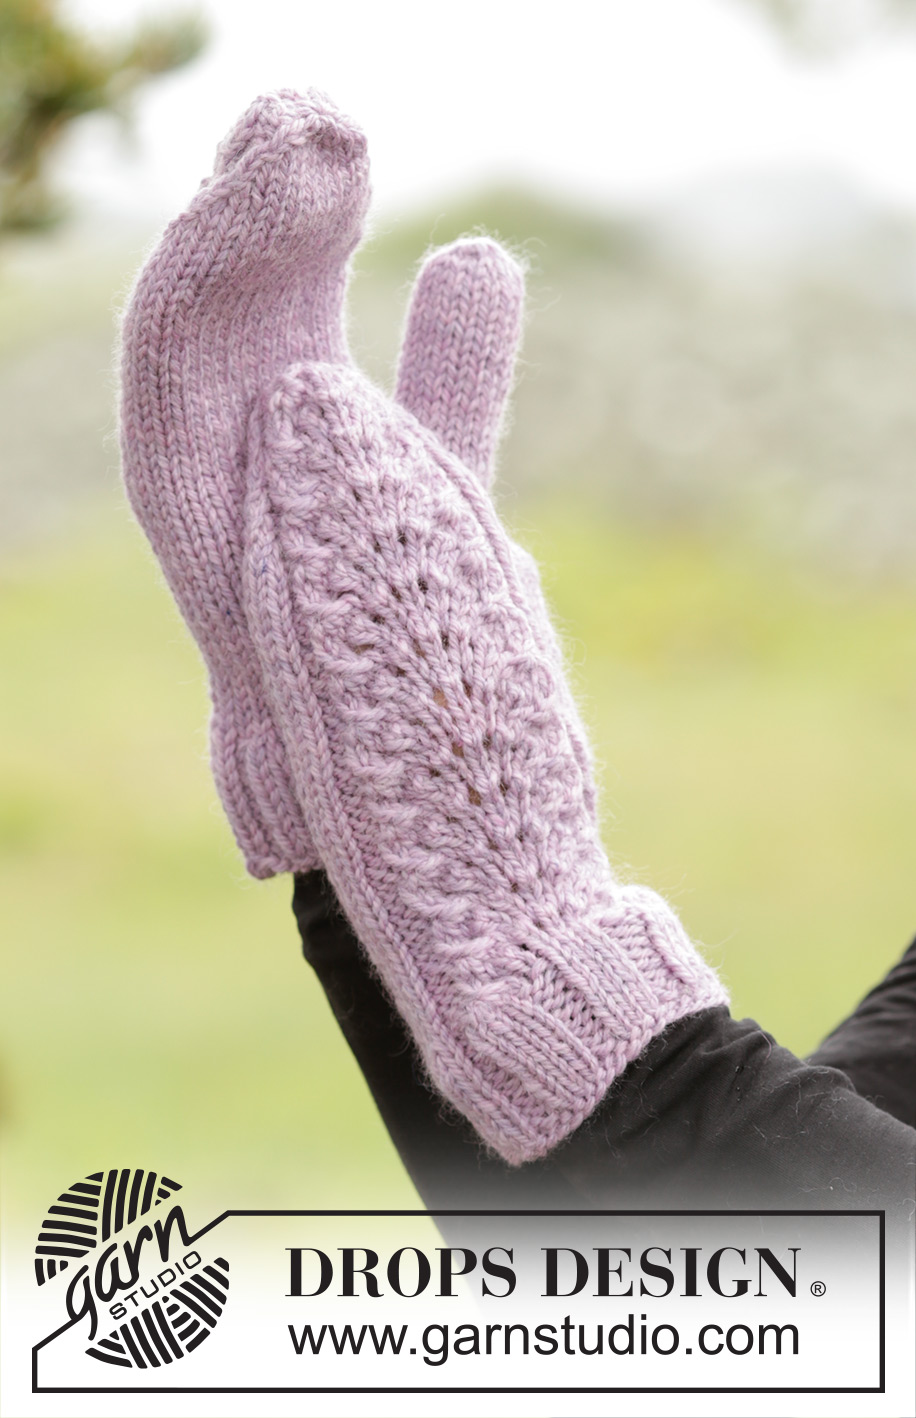
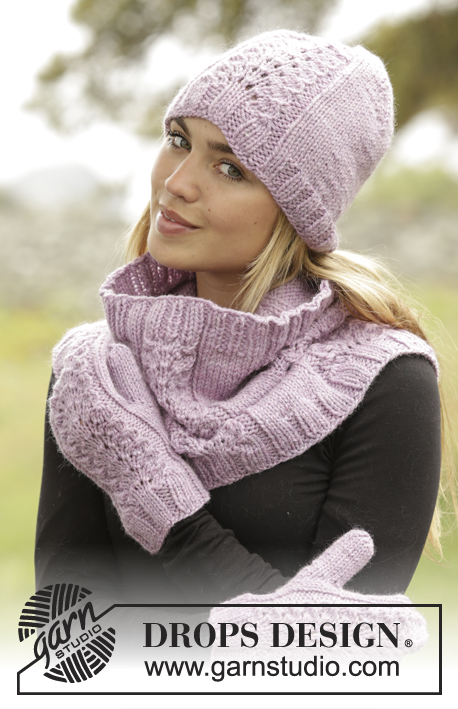
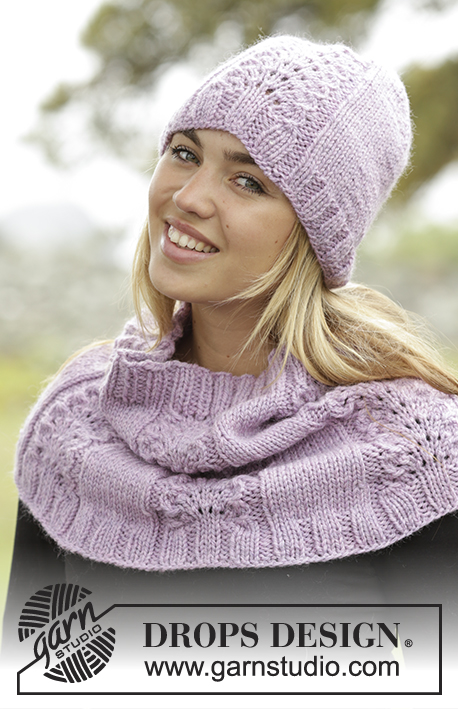
DROPS souprava: čepice, rukavice – palčáky a nákrčník s ažurovým vzorem pletené z příze "Alaska".
DROPS 171-56 |
||||||||||||||||
|
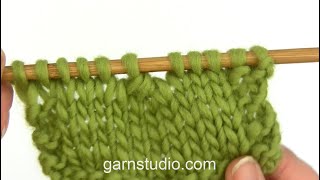
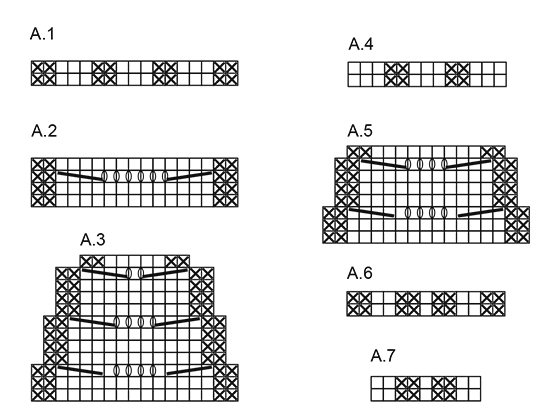
VZOR: Viz schémata A.1 až A.7. TIP – PŘIDÁVÁNÍ (rukavice): Přidáváme nahozením; v následující řadě pleteme nahození hladce za zadní nit, aby se v pletenině netvořily dírky. TIP – UJÍMÁNÍ 1 (rukavice): PŘED značkou spleteme 2 oka hladce. ZA značkou ujímáme přetažením, tj. 1 oko sejmeme hladce, 1 upleteme hladce a sejmuté přes ně přetáhneme. TIP – UJÍMÁNÍ 2 (nákrčník): Na začátku úseku pleteného lícovým žerzejem ujímáme přetažením, tj. 1 oko sejmeme hladce, 1 upleteme hladce a sejmuté přes ně přetáhneme. Na konci úseku pleteného lícovým žerzejem spleteme 2 oka hladce, takto: pleteme po poslední 2 oka lícovým žerzejem, tato 2 oka spleteme hladce. ---------------------------------------------------------- ČEPICE: Pleteme v kruhových řadách na kruhové jehlici, podle potřeby převedeme pleteninu na ponožkové jehlice. Na kruhovou jehlici č.4,5 nahodíme přízí Alaska 83-95 ok a upleteme 1 kruhovou řadu hadce. Pokračujeme pružným vzorem takto: vzor A.1 (= 17 ok), *2 oka hladce, 2 obrace*, *-* opakujeme nad následujícími 64-76 oky, končíme 2 oky hladce. Ve výši 4 cm převedeme pleteninu na kruhovou jehlici č.5. Nyní pleteme namísto vzoru A.1 vzor A.2, zbylých 66-78 ok pleteme lícovým žerzejem. Ve výši 15-16 cm vložíme do pleteniny 6 značek, takto: 1. značkou označíme 1. oko lícovým žerzejem za vzorem A.2, každou z 5 dalších značek pak vkládáme vždy po 10-12 okách (= za poslední značkou leží 10-12 ok). Pleteme lícovým žerzejem a vzorem A.2 a SOUČASNĚ ujmeme 1 oko za každou značkou (= oko se značkou spleteme hladce s okem následujícím); takto ujímáme v každé 2. kruhové řadě celkem 2x (= 71-83 ok). Pak pleteme namísto vzoru A.2 vzor A.3 (končíme dopletením 1 celé sekvence vzoru A.2), nadále ujímáme v lícovém žerzeji v každé 2. kruhové řadě ještě 6x, ve vzoru A.3 ujímáme tak dlouho, dokud není vzor A.3 dokončen = v kruhové řadě zbývá 27-39 ok. V následující kruhové řadě splétáme každá 2 oka hladce. Pak přízi odstřihneme, protáhneme zbylými oky, stáhneme a zapošijeme. Čepice je vysoká asi 23-24 cm. ---------------------------------------------------------- RUKAVICE: LEVÁ RUKAVICE: Pleteme v kruhových řadách na ponožkových jehlicích. Na ponožkové jehlice č.3,5 nahodíme přízí Alaska 43-47 ok a upleteme 1 kruhovou řadu hladce. Pokračujeme takto: 1-2 oka hladce, vzor A.1 (= 17 ok), *2 oka hladce, 2 obrace*, *-* opakujeme nad následujícími 24-28 oky, končíme 1-0 okem hladce. Ve výši 4 cm převedeme pleteninu na ponožkové jehlice č.4 a pleteme takto: 1-2 oka hladce, vzor A.1, zbylá oka hladce - SOUČASNĚ ujmeme nad těmito oky 7 ok = 36-40 ok. Pokračujeme následovně: 1-2 oka hladce, vzor A.2 (= 17 ok), zbylá oka hladce. Ve výši 8 cm přidáme 1 oko na každé straně 34.-38. oka v kruhové řadě (= přidali jsme 2 oka, palec) - viz TIP - PŘIDÁVÁNÍ. Toto přidávání opakujeme na každé straně přidaných ok (tj. mezi přidáními máme vždy o 2 oka více = klínek pro palec) v každé 2. kruhové řadě, celkem 5x = 46-50 ok. Nyní odložíme 11 ok palce na pomocnou jehlici. Pleteme v kruhových řadách lícovým žerzejem a vzorem A.2 a SOUČASNĚ v následující kruhové řadě nahodíme za těmito odloženými oky 1 oko nové = 36-40 ok. Pokračujeme v kruhových řadách lícovým žerzejem a vzorem A.2 až do výše 21-22 cm. Označíme si začátek kruhové řady a 2. značku umístíme za 19.-21. oko. Namísto vzoru A.2 pleteme nyní vzor A.3 a SOUČASNĚ ujmeme 1 oko PŘED 1. značkou a 1 oko ZA 2. značkou - viz TIP – UJÍMÁNÍ 1 (= ujmeme 2 oka). Toto ujímání opakujeme v každé 2. kruhové řadě ještě 6x = na jehlicích zbývá 14-18. V následující kruhové řadě spleteme každá 2 oka hladce. Pak přízi odstřihneme, protáhneme zbylými oky, stáhneme a zapošijeme. PALEC: Odložených 11 ok palce vrátíme zpět na ponožkové jehlice č.4 a navíc nabereme 4-5 ok z okraje za nimi = 15-16 ok. Pleteme lícovým žerzejem v kruhových řadách do výše asi 4,5-5 cm (rukavici si můžeme vyzkoušet, do výsledných rozměrů zbývá doplést asi 0,5 cm výšky). Upleteme 2 kruhové řady hladce a SOUČASNĚ splétáme v každé z těchto kruhových řad každá 2 oka hladce. Pak přízi odstřihneme, protáhneme zbylými oky, stáhneme a zapošijeme. PRAVÁ RUKAVICE: Pleteme stejně jako levou rukavici, jen pro klínek pro palec přidáváme na každé straně 21.-23. oka oka. ---------------------------------------------------------- NÁKRČNÍK: Pleteme v kruhových řadách na kruhové jehlici. Na kruhovou jehlici č.4,5 nahodíme přízí Alaska 150 ok a upleteme 1 kruhovou řadu hladce. Pokračujeme takto: *vzor A.1 (= 17 ok), vzor A.4 (= 13 ok)*, *-* opakujeme celkem 5x. Ve výši 4 cm převedeme pleteninu na kruhovou jehlici č.5 a pleteme takto: *vzor A.2 (= 17 ok), následujících 13 ok lícovým žerzejem*, *-* opakujeme celkem 5x. Takto pokračujeme. Ve výši 6 cm ujmeme 1 oko na začátku každého úseku pleteného lícovým žerzejem – viz TIP – UJÍMÁNÍ 2 = 145 ok. Ujímáme střídavě na začátku a na konci úseků pletených lícovým žerzejem, a to vždy po 6 cm výšky, celkem 4x = 130 ok. Ve výši 26 cm pleteme namísto celého vzoru A.2 vzor A.5, ostatní oka pleteme lícovým žerzejem. Upleteme 1 celou sekvenci vzoru A.5 (na výšku), díl měří asi 30 cm a v kruhové řadě máme 110 ok. Pleteninu převedeme na kruhovou jehlici č.4,5 a pleteme takto: *vzor A.6 (= 13 ok), vzor A.7 (= 9 ok)*, *-* opakujeme celkem 5x. Upleteme 4 cm výšky vzorem A.6 a A.7, pak všechna oka uzavřeme (hladká hladce, obrácená obrace). Nákrčník je vysoký 34 cm. |
||||||||||||||||
Vysvětlivky ke schématu |
||||||||||||||||
|
||||||||||||||||
|
||||||||||||||||
Dokončili jste tento model?Pak označte své fotky tagem #dropspattern #malinset nebo je pošlete do galerie #dropsfan. Potřebujete s tímto návodem poradit?Otevřete-li si návod na stránce garnstudio.com, najdete tam 23 výukových video-ukázek, Komentáře/Dotazy a další užitečné informace. © 1982-2025 DROPS Design A/S. Vyhrazujeme si veškerá práva. Tento dokument, včetně všech jeho dílčích částí, podléhá autorským právům. Podrobnější komentář k možnostem užití našich návodů najdete dole pod každým návodem na našich stránkách. |
||||||||||||||||


V oblasti pletené a háčkované módy působí DROPS Design více než 40 let. Díky tomu vám můžeme nabídnout jednu z nejrozsáhlejších kolekcí modelů s bezplatnými návody dostupnými na internetu - navíc v 17 jazycích. K dnešnímu dni máme na 314 katalogů a 11822 návodů celkem - z nich je už 7048 dostupných v [češtině].
Přidejte komentář k návodu DROPS 171-56
Rádi bychom věděli, co si o tomto modelu myslíte!
Pokud se chcete na něco zeptat, dbejte prosím na to, abyste ve formuláři níže vybrali správnou kategorii - díky tomu se dříve dozvíte, co potřebujete vědět. Povinná pole jsou označena *.