
Popular categories
Looking for a yarn?


Comments / Questions (87)
![]() Laplus wrote:
Laplus wrote:
---6--- Je suis vos explications=> Je tricote en jersey??? les 14 ière mailles puis AM= début du tour Ensuite je glisse sans les tricoter les 53 mailles suivantes puis AM==> dois-je couper le fil puisque ces mailles ne doivent pas être tricotées Puis les 53 mailles suivantes => diagramme A2 en faisant correspondre avec les flèches de A1 celles de A2 ( ceci ok)
13.03.2016 - 00:28DROPS Design answered:
Bonjour Mme Laplus, vous tricotez les 14 premières m du tour, et placez un marqueur - puis, sans tricoter les mailles, placez un 2ème marqueur après 53 m, mais tricotez maintenant le tour suivant comme indiqué: A.2 sur ces 53 m entre les 2 nouveaux marqueurs (A.2 continue A.1), et tricotez les mailles restantes du tour en jersey en répartissant le nbe d'augmentations correspondant à votre taille.
14.03.2016 - 08:54
![]() Laplus wrote:
Laplus wrote:
---5--- tricoter les 77-83-93-103-117-129 m suivantes, glisser les 50-56-58-64-68-72 m suivantes sur un arrêt de mailles pour l'autre manche, monter 8 nouvelles m sous la manche (placer un marqueur au milieu de ces m, on a 4 nouvelles m de chaque côté du marqueur), tricoter les 14-17-22-25-32-38 m restantes du tour. On a maintenant 85-91-101-111-125-137 m pour le devant et pour le dos soit un total de 170-182-202-222-250-274 m.
13.03.2016 - 00:26
![]() Laplus wrote:
Laplus wrote:
---4--- Tricoter le tour suivant ainsi: point fantaisie comme avant sur les 49-49-49-53-53-53 premières m, 14-17-22-25-32-38 m jersey, glisser les 50-56-58-64-68-72 m suivantes sur un arrêt de mailles (= manche), monter 8 nouvelles m sous la manche (placer un marqueur au milieu de ces nouvelles m, on a 4 nouvelles m de chaque côté du marqueur),
13.03.2016 - 00:26
![]() Laplus wrote:
Laplus wrote:
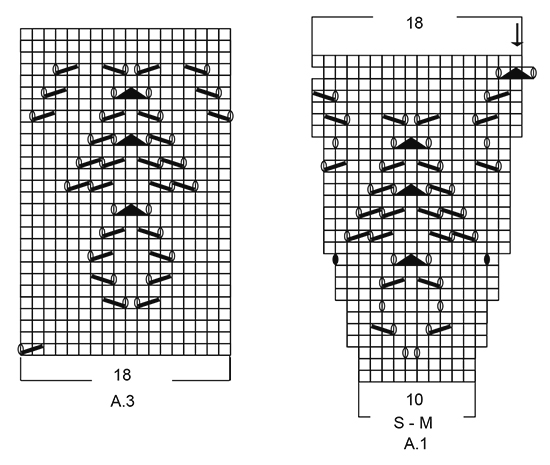
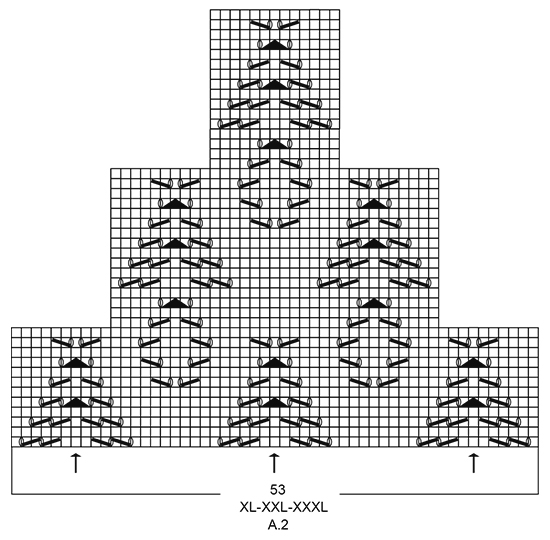
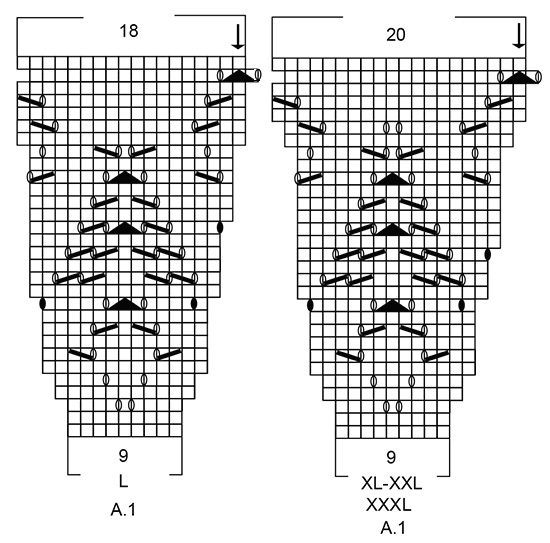
---3--- NOTE: A.2 doit se situer au-dessus de A.1: les mailles avec une flèche dans A.2 doivent être celles avec une flèche dans A.1, tricoter les mailles restantes en jersey, EN MÊME TEMPS, répartir 20-26-14-14-30-42 augmentations dans les mailles jersey = 254-278-302-334-370-402 m.
13.03.2016 - 00:25
![]() Laplus wrote:
Laplus wrote:
----2---- Placer maintenant 2 marqueurs pour la transition du point fantaisie du dos. Tricoter les 12-12-12-14-14-14 premières m et placer un marqueur ici, c'est maintenant le nouveau début des tours. Placer ensuite le 2ème marqueur après 49-49-49-53-53-53 m, sans les tricoter. Tricoter maintenant en point fantaisie - voir diagramme approprié à la taille, ainsi: A.2 (= 49-49-49-53-53-53 m)
13.03.2016 - 00:24
![]() Heidi Clara wrote:
Heidi Clara wrote:
Hej, hvor finder jeg mål på jeres størrelser? Jeg vil super gerne lave denne, men vil helst ikke ende med en for stor/lille kjole :) Venlig hilsen Heidi Clara
03.03.2016 - 19:04DROPS Design answered:
Hej. Du finder mål til denne kjole längst ned på oppskriften. Mvh DROPS Design
04.03.2016 - 08:35
![]() Anna Rosshagen wrote:
Anna Rosshagen wrote:
Hej! Jag är sugen att prova detta mönster, men undrar över hur jag ska välja rätt storlek- var hittar jag måttangivelser för respektive storlek? och vad betyder siffrorna på diagrambilden över de olika delarna för klänningen? är nytt för mig att läsa mönster på det här sättet, är "nygammal" stickare, stickade mkt för drygt 20 år sedan.. :)
03.03.2016 - 16:36DROPS Design answered:
Hej. Längst ner på mönstret hittar du en måttskiss. Där ser du mått i cm i de 6 olika storlekarna på olika ställen på klänningen. Mät på ett plagg du har sedan tidigare som passar dig för att se vilken storlek du ska göra. Lycka till!
04.03.2016 - 08:32
![]() Aurora wrote:
Aurora wrote:
I vostri modelli sono molto belli ma realizzati tutti top down. E chi non li sa realizzare con questa tecnica come puo' fare?
02.03.2016 - 17:15DROPS Design answered:
Buonasera Aurora, non tutti i modelli DROPS sono realizzati con la costruzione top down:alcuni sono realizzati a partire dal basso, altri ancora a pezzi separati e poi cuciti alla fine. In ogni caso non è necessario conoscere la tecnica per realizzarli, basta seguire le istruzioni, è spiegato tutto lì. Buon lavoro!
02.03.2016 - 19:07
![]() Monica Reinfjell wrote:
Monica Reinfjell wrote:
På Bolen står det "Når arbeidet måler 4 cm felles det 1 m på hver side av merket i hver side. Er det fra under armen? Arbeidet er jo ca 12 cm fra halsen ned til armen.
02.03.2016 - 15:07DROPS Design answered:
Hej Monica, Du måler fra den nye mærketråd under ærmet. God fornøjelse!
02.03.2016 - 15:24
![]() Susanne wrote:
Susanne wrote:
Hvordan skal ddt forstås, pilen ved a2 skal strikkes over maskerne i 1 ??
25.01.2016 - 11:09DROPS Design answered:
Hej Susanne. Mønsteret i A.2 skal passe over mønster A.1. Dvs, m med pilen i diag A.2 skal passe over m med pil i diag A.1. God fornøjelse!
26.01.2016 - 12:28
|
||||||||||||||||||||||
Beach Date#beachdatedress |
||||||||||||||||||||||
 |
 |
|||||||||||||||||||||
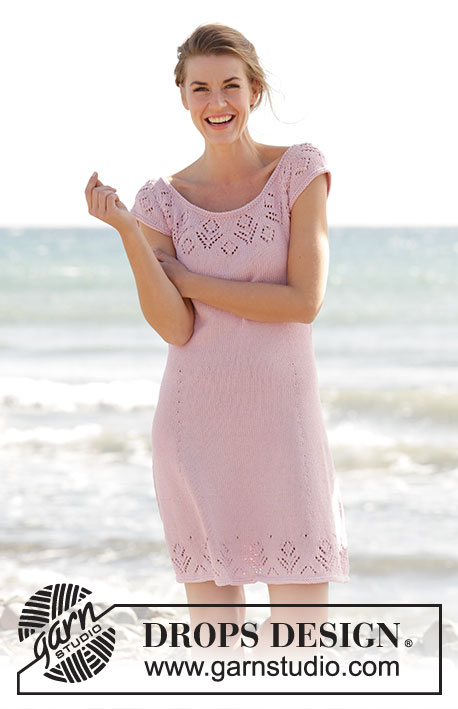
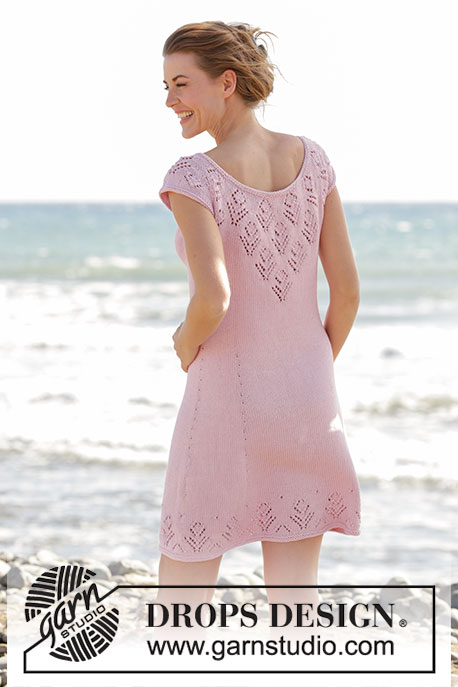
Knitted DROPS dress with round yoke and lace pattern, worked top down in ”Muskat”. Size: S - XXXL.
DROPS 167-1 |
||||||||||||||||||||||
|
GARTER ST (worked in the round): 1 ridge = 2 rounds. * K 1 round and P 1 round *, repeat from *-*. PATTERN: See diagrams A.1 to A.3. See diagram for correct size. INCREASE TIP: Inc 1 st by making a YO. On next round K YO twisted to avoid holes. Repeat inc alternately on right and left side of the four markers. DECREASE TIP: Work until 4 sts remain before marker and work: Slip 1 st as if to K, K 1, psso, K 4, K 2 tog = 2 sts dec. Repeat in the other side. ---------------------------------------------------------- DRESS: Worked in the round, top down. YOKE: Cast on 126-132-138-140-146-150 sts on circular needle size 3.5 mm / US 4 with Muskat. Work 2 ridges in GARTER ST - see explanation above. Switch to circular needle size 4 mm / US 6. Insert a marker at the beg of the round. Work 1 round in stockinette st while inc 4-8-6-4-7-12 sts evenly = 130-140-144-144-153-162 sts. Then work 0-0-0-0-2-2 more rounds in stockinette st. On next round work pattern A.1 - see diagram for correct size, 13-14-16-16-17-18 repetitions on round. REMEMBER THE KNITTING GAUGE When entire A.1 has been worked vertically, piece measures 11-11-12-12-13-13 cm / 4⅜"-4⅜"-4¾"-4¾"-5⅛"-5⅛" and there are 234-252-288-320-340-360 sts on round. Now insert 2 markers in piece which marks transition for pattern continued down the back. Work the first 12-12-12-14-14-14 sts and insert a marker here. This is now beg of round. Then insert the second marker after 49-49-49-53-53-53 sts without working them first. Now work pattern - see diagram for correct size, as follows: Work A.2 (= 49-49-49-53-53-53 sts). NOTE: Pattern in A.2 should fit over pattern A.1. I.e. st with arrow in diagram A.2 should fit over st with arrows in diagram A.1. Then work in stockinette st over the remaining sts on round AT SAME TIME inc 20-26-14-14-30-42 sts evenly over sts in stockinette st = 254-278-302-334-370-402 sts. Work next round as follows: Work pattern as before over the first 49-49-49-53-53-53 sts, 14-17-22-25-32-38 sts in stockinette st, slip the next 50-56-58-64-68-72 sts on a stitch holder (= sleeve), cast on 8 new sts under sleeve (insert a marker in the middle of these new sts, i.e. 4 new sts on each side of marker), work the next 77-83-93-103-117-129 sts, slip the next 50-56-58-64-68-72 sts on a stitch holder for sleeve, cast on 8 new sts under sleeve (insert a marker in the middle of these sts, i.e. 4 new sts on each side of marker), work the remaining 14-17-22-25-32-38 sts on round. There are now 85-91-101-111-125-137 sts for front and back piece = 170-182-202-222-250-274 sts in total. BODY: NOW MEASURE THE PIECE FROM HERE. Continue pattern on the back as before, and work in stockinette st over the remaining sts on round. NOTE: Continue in stockinette st on the back when the pattern has been worked. When piece measures 4 cm / 1½", dec 1 st on each side of marker in each side - READ DECREASE TIP. Repeat dec every 5-5½-5½-6-6½-7 cm / 2"-2¼"-2¼"-2⅜"-2½"-2¾" 3 more times = 154-166-186-206-234-258 sts. When piece measures 24-26-27-29-30-32 cm / 9½"-10¼"-10½"-11½"-11¾"-12½", insert 4 new markers in piece, beg from marker in the right side: NOTE: Remove the 2 markers on each side of the pattern on the back piece first! Work 16-17-19-21-24-27 sts, insert 1st marker, work 45-49-55-61-69-75 sts, insert 2nd marker, work 16-17-19-21-24-27 sts, marker in left side is here, work 16-17-19-21-24-27 sts, insert 3rd marker, work 45-49-55-61-69-75 sts, insert 4th marker, work the remaining 16-17-19-21-24-27 sts until marker in the right side. Move the markers upwards when working. On next round inc 1 st before all markers (= 6 sts inc) – see INCREASE TIP. Repeat inc every 6th round 1 more time, every 4th round 12-12-12-12-9-8 times, every 6th round 2-2-2-2-4-4 times = 250-262-282-302-324-342 sts. When piece measures 62-64-65-67-68-70 cm / 24½"-25¼"-25½"26½"-26¾"-27½"', inc 2-8-6-4-0-0 sts evenly = 252-270-288-306-324-342 sts. Then work pattern A.3 (= 18 sts) 14-15-16-17-18-19 repetitions in width. When entire A,3 has been worked vertically, switch to circular needle size 3.5 mm / US 4. Work 2 ridges and bind off. SLEEVE EDGE: Slip sts from stitch holder back on double pointed needles size 4 mm / US 6 (= 50-56-58-64-68-72 sts). Pick up 1 st in each of the 8 new sts cast on under sleeve = 58-64-66-72-76-80 sts. Work 1 round in stockinette st while dec 4 sts evenly = 54-60-62-68-72-76 sts. Continue with 2 rounds in stockinette st. Switch to double pointed needles size 3.5 mm / US 4 and work 2 ridges. Bind off. Repeat on the edge of the other sleeve. |
||||||||||||||||||||||
Diagram explanations |
||||||||||||||||||||||
|
||||||||||||||||||||||
 |
||||||||||||||||||||||
 |
||||||||||||||||||||||
 |
||||||||||||||||||||||
 |
||||||||||||||||||||||
 |
||||||||||||||||||||||
Have you finished this pattern?Tag your pictures with #dropspattern #beachdatedress or submit them to the #dropsfan gallery. Do you need help with this pattern?You'll find 26 tutorial videos, a Comments/Questions area and more by visiting the pattern on garnstudio.com. © 1982-2026 DROPS Design A/S. We reserve all rights. This document, including all its sub-sections, has copyrights. Read more about what you can do with our patterns at the bottom of each pattern on our site. |
||||||||||||||||||||||


With over 40 years in knitting and crochet design, DROPS Design offers one of the most extensive collections of free patterns on the internet - translated to 17 languages. As of today we count 324 catalogs and 12291 patterns - 12281 of which are translated into English (US/in).
We work hard to bring you the best knitting and crochet have to offer, inspiration and advice as well as great quality yarns at incredible prices! Would you like to use our patterns for other than personal use? You can read what you are allowed to do in the Copyright text at the bottom of all our patterns. Happy crafting!
Post a comment to pattern DROPS 167-1
We would love to hear what you have to say about this pattern!
If you want to leave a question, please make sure you select the correct category in the form below, to speed up the answering process. Required fields are marked *.