
Popular categories
Looking for a yarn?


Comments / Questions (45)
![]() Sandra wrote:
Sandra wrote:
Wie kommt man beim Rumpfteil in der Größe XXL auf 136 Maschen? Ich habe 2x30 für das Rückenteil und 60 für das Vorderteil. Das sind 120 Maschen. 55 Maschen für jeden Ärmel. Insgesamt 230 Maschen.
20.08.2025 - 17:42DROPS Design answered:
Liebe Sandra, vor der Aufteilung sind es 214 Maschen (XXL = 5. Größe) und so wird die Arbeit aufgeteilt: 30 M (halbes Rückenteil) + 8 Luftmaschen (47 M überspringen) + 60 M (Vorderteil) + 8 Luftmaschen (47 M überspringen) + 30 M (halbes-Rückenteil) = 30+47+60+47+30=214 vor Aufteilung und 30+8+60+8+30=136 Maschen nach der Aufteilung. Viel Spaß beim Häkeln!
22.08.2025 - 15:20
![]() Sandra wrote:
Sandra wrote:
Was ist mit hiermit gemeint? dann in jeder 2. Rd 2-3-2-2-2-0 x arb = 160-173-186-201-214 Was soll 2 mal gearbeitet werden?
13.08.2025 - 16:58DROPS Design answered:
Liebe Sandra, nach den Zunahmen in jeder Runde, nehmen Sie jetzt in jeder 2. Runde insgesamt 2 Mal, dh (1 Runde ohne Zunahme, 1 Runde mit Zunahmen) x 2. Viel Spaß beim Häkeln!
14.08.2025 - 08:46
![]() Hannah wrote:
Hannah wrote:
I think I may be reading this wrong. I did a test swatch and got the right gauge with a 6mm hook but when I made my first rows, it was big enough for me to put around my waist with room to spare, and that was only 90 stitches. Is that right that 90 stitches is the neck hole and its 238 at its widest? With my gauge, that's big enough for a family of four. Please can someone help me here?
15.11.2024 - 22:40DROPS Design answered:
Dear Hannah, the 90 loose stitches (for the largest size) should be 79 dc, which should be the width of your neck. These 79 dc should measure approx. 65cm for the neck. You can see in the jacket version of this pattern here: https://www.garnstudio.com/pattern.php?id=7094&cid=19, that the neck is very wide. 238 is the yoke, which includes the sleeves; the body should have 154 stitches, which are approx. 128 cm. Happy crochetting!
17.11.2024 - 23:27
![]() Amanda wrote:
Amanda wrote:
Hello 👋 I'm struggling with A.1 and A.2 How many stitches do you skip? 2 or 3? And then the next row you work dc into the ch3 space, correct? What is the correct stitch count after round 2 of the body in size XXL?
10.08.2024 - 22:19DROPS Design answered:
Dear Amanda, in this case, you can follow the pattern instructions; you don't need to interpret the charts if you find it difficult. You can find rounds 1 and 2 explained in the body section. Happy crochetting!
12.08.2024 - 00:27
![]() Pia Svane Christensen wrote:
Pia Svane Christensen wrote:
Hej Jeg forstår ikke hvad det er jeg skal gøre i bærestykket, skal jeg tage dobbelt ud i hveranden omgang. ? Med venlig hilsen Pia Nu tages der ud på skiftevis højre og venstre side af hver mærke. Gentag udtagningen på hver omg 9-9-11-12-13-16 gange til, og på hver 2.omg 2-3-2-2-2-0 gange = 160-173-186-201-214-238 st på omg.
29.08.2022 - 21:07DROPS Design answered:
Hej Pia, først tager du ud på hver omgang 9 gange og efter det tager du ud på hver 2.omgang 2 gange (i den mindste størrelse) :)
31.08.2022 - 13:45
![]() Melanie wrote:
Melanie wrote:
Hallo, Größe XXXL, 16 mal in Jeder Runde 8 Zun. erste Runde rechts, nächste Runde links, verstanden. Hier habe ich dann nach 16 Runden 230 Maschen. "dann in jeder 2. Rd 0 x arb = 238" Aber 0 Zunamen heißt ich habe nur 230 Maschen oder Runde 17. 8Znm und danach ohne Zunahmen weiter? Und nein mir helfen weder alle anderen Kommentare noch ein Video.
13.05.2022 - 09:06DROPS Design answered:
Liebe Melanie, die Zunahmen wiederholen Sie noch weitere 16 x, dh insgesamt 17 Mal (die 1. Zunahmen + noch 16 Mal), so haben Sie die 238 Maschen. Viel Spaß beim häkeln!
13.05.2022 - 09:14
![]() Marianne wrote:
Marianne wrote:
Klopt het dat er na het plaatsen van de 8 markeerders bij maat xl,tussen de middelste twee markeerders 23 st zijn aan de voorkant en tussen de middelste twee markeerders aan de achterkant 20 st zijn
11.01.2022 - 15:34DROPS Design answered:
Dag Marianne,
Op het achterpand zijn er 22 steken en op het voorpand zijn er 23 steken.
12.01.2022 - 09:42
![]() Marianne wrote:
Marianne wrote:
Klopt het dat er na het plaatsen van de 8 markeerders bij maat xl,tussen de middelste twee markeerders 23 st zijn aan de voorkant en tussen de middelste twee markeerders aan de achterkant 20 st zijn
11.01.2022 - 15:32
![]() Flamarion wrote:
Flamarion wrote:
Antwort ist falsch, Video passt nicht z. Anleitung. Auf dem Foto ist zu erkennen, daß i. d. Mitte des Pullis KEINE Maschen zugenommen sind, darum heißt es lt. Anleitung RAGLAN.Markierer habe ich lt. Anleitung korrekt gesetzt, 4 x 2 (mit je 2 Stäb. Abstand). Nächste Reihe = 4 x 2 Stäb. rechts der Marker zunehmen, in der nächsten Reihe links davon.Vergrößert sich d. Abstand innerhalb der Zunahmen oder bleiben immer die 2 Stäbchen Abstand (Raglanlinie)?Bitte Häkelschrift anfertigen.
08.02.2021 - 18:03DROPS Design answered:
Es werden nicht 2 Stb pro Markierer zugenommen, sondern stets nur 1 Stb. Die Anleitung wurde inzwischen umformuliert, da sie an dieser Stelle doppeldeutig war - das Video passt zur Anleitung, da hier auch nur jeweils 1 Stb zugenommen wird. Sie häkeln die Zunahmen jedes Mal in das Stb neben dem Markierer. Eine Raglanlinie gibt es streng genommen nicht, da die Maschenzahl nicht bei 2 Stb bleibt - die Passe wird dadurch nach und nach zur Rundpasse. Zur Kontrolle Ihrer Markierer: Sie müssten anfangs je 20-21-22-23-26-30 Stb für das Vorderteil und das Rückenteil haben und je 8-10-12-14-14-17 Stb für die Ärmel, dazwischen je 2 Stb. Gutes Gelingen!
09.02.2021 - 10:47
![]() Flamarion wrote:
Flamarion wrote:
Keine Anfängerin, komme ebenfalls mit den Zunahmen nicht klar, Antworten und Video hilft nicht weiter. Im Video wird nur jeweils 1 Zunahme links od. rechts erklärt, wie aber mit 2 Zunahmen? Wieviel einzelne Stäbchen müssen zwischen den beiden Zunahmen pro Zunahmestelle generell sein? ?? Hinweis -> Ein Häkeldiagramm wäre wesentlich hilfreicher, in dem mehrere Reihen Zunahmen dargestellt sind, statt mit Worten oder nicht wirklich passendem Video zu erklären.
08.02.2021 - 14:21DROPS Design answered:
Liebe Frau Flamarion, es wird bei der Passe nur 1 Masche bei jeder Markierung zugenommen, beim 1. Mal nehmen Sie an der rechten Seite jeder Markierer (= 8 Zunahmen), das nächste Mal, an der linken Seite jeder Markierer (=8 Zunahmen) - Deutsche Anleitung muss hier korrigiert werden, danke für den Hinweis, dh es wird genau wie im Video zugenommen. Viel Spaß beim häkeln!
08.02.2021 - 15:30
|
||||||||||||||||||||||||||||
Lakeside#lakesidesweater |
||||||||||||||||||||||||||||
|
|
||||||||||||||||||||||||||||
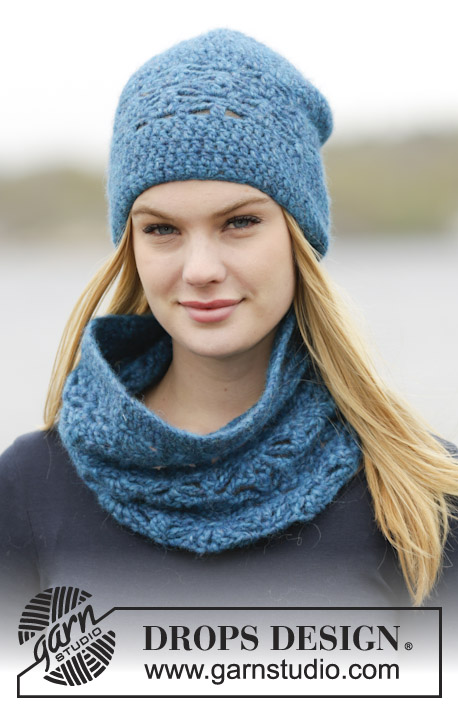
Crochet DROPS jumper with double crochet, lace pattern and round yoke, worked top down in ”Air”.
DROPS 164-31 |
||||||||||||||||||||||||||||
|
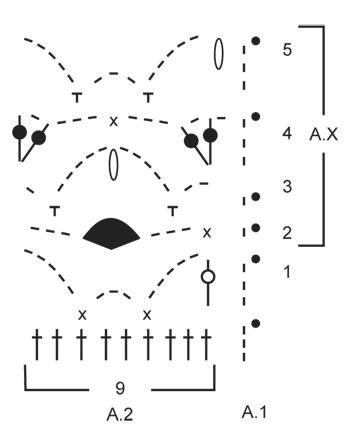
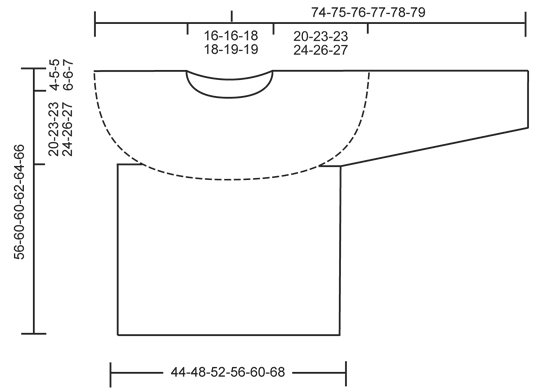
CROCHET INFO: Replace first sc at beg of every sc round with 1 ch. Finish every round with 1 sl st in ch from beg of round. Replace first dc at beg of every dc round with 3 ch. Finish round with 1 sl st in 3rd ch at beg of round. PATTERN: See diagrams A.1 and A.2. CROCHET 2 DC TOG (in dc): Work 1 dc in next dc but wait with last pull through, work 1 dc more in same dc, but on last pull through, pull through all sts on hook. CROCHET 2 DC TOG (around ch): Work 1 dc around the middle ch in dc-group but wait with last pull through, work 1 dc more around same ch, but on last pull through, pull through all sts on hook. DC-GROUP: Work a dc-group around ch-space as follows: Work * 1 dc, 1 ch *, repeat from *-* 2 more times around same ch-space, 1 dc around same ch-space. INCREASE TIP: Inc 1 dc by working 2 dc in 1 sc/dc. DECREASE TIP: Dec 1 dc at beg and end of round as follows: Work 1 dc (= 3 ch), * work 1 dc but wait with last pull through (= 2 sts on hook), then work next dc but on last pull through, pull yarn through all sts on hook *, repeat from *-* when 3 dc remain on round = 1 st dec on each side of marker. ---------------------------------------------------------- JUMPER: The piece is worked top down. Worked in the round, round beg mid back. YOKE: Work 66-69-75-82-84-90 loose ch on hook size 6 mm / J/10 with Air and form a ring with 1 sl st. Work first round as follows: ROUND 1: Work 1 ch - READ CROCHET INFO, work 1 sc in each of the first 1-4-2-1-3-1 ch, * skip ch 1, work 1 sc in each of the next 7 ch *, repeat from *-* 7-7-8-9-9-10 more times = 58-61-66-72-74-79 sc. ROUND 2: Work 1 dc in every sc while AT THE SAME TIME inc 6-8-8-9-12-23 dc evenly - READ INCREASE TIP = 64-69-74-81-86-102 dc. Now insert 8 markers in the piece for raglan inc without working sts. Insert 4 marker in each side from beg of round so that it is reversed from mid front: Insert a marker after 10-10-10-11-12-15 dc, insert next marker after 2 dc, then insert next marker after 8-10-12-14-14-17 dc, and finish with last marker after 2 dc. There are now 20-21-22-23-26-30 dc between the 2 middle markers towards front piece on jumper. Now continue with 1 dc in every dc, AT THE SAME TIME inc 1 dc on right side of each of the 8 markers. Then inc alternately on right and left side of every marker. Repeat inc every round 9-9-11-12-13-16 more times, and every other round 2-3-2-2-2-0 times = 160-173-186-201-214-238 dc on round. Piece measures approx. 20-23-23-24-26-27 cm / 8"-9"-9"-9½"-10¼"-10½". REMEMBER THE CROCHET GAUGE! On next round work as follows: Work 21-23-25-28-30-34 dc (= half back piece), 8 ch (under sleeve), skip 38-40-42-45-47-50 dc from previous row (= sleeve), 42-47-52-55-60-70 dc (= front piece), 8 ch (under sleeve), skip 38-40-42-45-47-50 dc from previous row (= sleeve) and 21-23-25-27-30-34 dc (= half back piece). Insert a marker, now measure piece from here! BODY: There are now 100-109-118-127-136-154 sts for body. NOW MEASURE THE PIECE FROM HERE. Work 1 round with 1 dc in every dc/ch. Then work PATTERN - see explanation above, as follows: NOTE: Work from 1st round in A.1-A.2. ROUND 1: Work 3 ch (= A.1) - remember crochet info. Then work A.2 as follows: * Work 2 dc TOG (in dc) - see explanation above, ch 5, skip 2 dc, 1 sc in next dc, ch 3, skip 2 dc, 1 sc in next dc, ch 5, skip 2 dc *, repeat from *-* 10-11-12-13-14-16 more times. Finish with 1 sl st in 3rd ch on round (= A.1). ROUND 2: Work ch 1, * work 1 sc in the 2 dc worked tog, ch 3, skip 1 ch-space, work 1 dc-GROUP - see explanation above, around next ch-space, ch 3, skip 1 ch-space *, repeat from *-* 10-11-12-13-14-16 more times. Finish with 1 sl st in 1st ch on round. ROUND 3: Work ch 1, * ch 2, 1 sc around next ch-space, ch 5, work 2 dc TOG (around ch-space) - see explanation above, ch 5, 1 sc around next ch after dc-group, 1 ch *, repeat from *-* 10-11-12-13-14-16 more times. Finish with 1 sl st in 1st ch on round. ROUND 4: Work ch 3, work (1 ch, 1 dc, ch 1, 1 dc) around first ch-space, ch 3, skip 1 ch-space, 1 sc in the 2 dc worked tog, ch 3, skip 1 ch-space, * (1 dc, ch 1, 1 dc, ch 1, 1 dc, ch 1, 1 dc) around next ch-space, ch 3, skip 1 ch-space, 1 sc in the 2 dc worked tog, ch 3, skip 1 ch-space *, repeat from *-* 9-10-11-12-13-15 more times, (1 dc, ch 1, 1 dc) around last ch-space. Finish with 1 sl st in 3rd ch on round. ROUND 5: Work ch 3, * work 2 dc TOG (around ch), ch 5, work 1 sc around ch-space after dc-group, ch 3, 1 sc around next ch-space, 5 ch *, repeat from *-* 10-11-12-13-14-16 more times. Finish with 1 sl st in 3rd ch on round. Continue like this and repeat A.X (= 2nd-5th round) until piece measures approx. 32 cm / 12½" in all sizes - adjust to finish after 2nd or 4th round in A.1-A.2. Piece measures 56-60-60-62-64-66 cm / 22"-23½"-23½"-24½"-25¼"-26" in total. SLEEVE: Sleeve is worked in the round, top down. NOW MEASURE THE PIECE FROM HERE. Insert a marker in the middle of the 8 ch worked under sleeve. Let marker follow in piece until finished measurements. Fasten yarn with 1 sl st in the 5th ch of the 8 ch worked in armhole on body. Work 3 ch (= 1 dc) continue with 1 dc in each of the next ch 3, 1 dc in each of the dc for sleeve and then 1 dc in the remaining 4 ch under sleeve = 46-48-50-53-55-58 dc - remember CROCHET INFO! Continue with 1 dc in every dc AT THE SAME TIME when piece measures approx. 4 cm / 1½" beg dec - READ DECREASE TIP. Repeat dec every 3rd-2nd-2nd-2nd-2nd-1st round 8-9-10-10-11-12 more times = 28-28-28-31-31-32 dc remain. When sleeve measures 46-44-44-43-42-40 cm / 18"-17¼"-17¼"-17"-16½"-15¾", sleeve is finished. Work the other sleeve the same way. ---------------------------------------------------------- Hat and neck warmer: See DROPS 164-32 or "Related patterns" in pattern on website. ---------------------------------------------------------- |
||||||||||||||||||||||||||||
Diagram explanations |
||||||||||||||||||||||||||||
|
||||||||||||||||||||||||||||
 |
||||||||||||||||||||||||||||
 |
||||||||||||||||||||||||||||
Have you finished this pattern?Tag your pictures with #dropspattern #lakesidesweater or submit them to the #dropsfan gallery. Do you need help with this pattern?You'll find 14 tutorial videos, a Comments/Questions area and more by visiting the pattern on garnstudio.com. © 1982-2026 DROPS Design A/S. We reserve all rights. This document, including all its sub-sections, has copyrights. Read more about what you can do with our patterns at the bottom of each pattern on our site. |
||||||||||||||||||||||||||||


With over 40 years in knitting and crochet design, DROPS Design offers one of the most extensive collections of free patterns on the internet - translated to 17 languages. As of today we count 324 catalogs and 12290 patterns - 12280 of which are translated into English (US/in).
We work hard to bring you the best knitting and crochet have to offer, inspiration and advice as well as great quality yarns at incredible prices! Would you like to use our patterns for other than personal use? You can read what you are allowed to do in the Copyright text at the bottom of all our patterns. Happy crafting!
Post a comment to pattern DROPS 164-31
We would love to hear what you have to say about this pattern!
If you want to leave a question, please make sure you select the correct category in the form below, to speed up the answering process. Required fields are marked *.