
Popular categories
Looking for a yarn?


Comments / Questions (112)
![]() Peter Ackers wrote:
Peter Ackers wrote:
Unless I'm reading section wrong, "Now bind off for armholes at beg of every row in each side as follows: bind off 3 sts 1 time, 2 sts 0-0-1-2-3-4 times and 1 st 1-2-2-3-3-3 times = 39-41-43-43-45-47 sts" or the pattern is wrong somehow. From 85 sts currently on the needle, this decrease only drops to 65 sts, not 47. Have been knitting a long time and this is confusing lol
09.08.2019 - 17:07DROPS Design answered:
Dear Peter, before binding off for the armholes for size XXXL you've 75 sts on needles. You've to bind off the sts at both sides as follows: 3 sts each side, 2 sts each side for 4 times and 1 st each side for 3 times, so 6+16+6= 28 sts decreased. 75-28 = 47 sts. Happy knitting!
09.08.2019 - 18:11
![]() Peter Ackers wrote:
Peter Ackers wrote:
What are the changes on the corrections page. Love the design.
22.07.2019 - 10:17DROPS Design answered:
Hi Peter, if we get a report of a potential error, we will review the pattern and make the correction if necessary. This will be done normally within 7 to 10 working days. If no correction is made, it means that we weren't able to find any error/mistake. The pattern itself is corrected as well. Kind regards
22.07.2019 - 19:25
![]() Véronique wrote:
Véronique wrote:
Bonjour, J’aimerai tricoter ce modèle par contre, j’aimerai que le col ferme jusqu’en haut, surtout pour l’hiver. Comment puis-je faire pour rajouter 3 rangées de boutons au-dessus des 3 déjà prévues ? Merci de votre retour. Cordialement.
11.02.2019 - 18:55DROPS Design answered:
Bonjour Véronique, commencez par exemple par le devant gauche avant le devant droit, et marquez les emplacements des boutons/boutonnières prévues avec des épingles, pour trouver l'emplacement idéal des autres boutons que vous souhaitez ajouter. Il sera ainsi plus simple de prévoir les boutonnières sur le devant droit là où vous les souhaitez. Bon tricot!
12.02.2019 - 08:42
![]() Emilie Cote wrote:
Emilie Cote wrote:
Bonjour, de combien de balle de laine ai-je besoin pour tricoter ce modèle dans le format moyen? Merci
06.01.2019 - 18:57DROPS Design answered:
Bonjour Mme Cote, vous trouverez les quantités requises pour chaque taille, au poids, sous l'en-tête du modèle, soit 1050 g en taille M / 50 g la pelote DROPS Eskimo = 21 pelotes Eskimo en taille M. Bon tricot!
07.01.2019 - 11:36
![]() Sylvia wrote:
Sylvia wrote:
Hallo, ich habe eine Frage zur Länge von Vorder- und Rückenteil. Es heißt: das Gestrick wird sich im Verhältnis zu den Maßen in der Maßskizze um ca. 10 cm in der Länge aushängen. Bedeutet dass, dass ich 10 cm in der Länge weniger stricke (liegend gemessen) als auf der Skizze angegeben? Somit wäre der Armausschnitt in Größe S bei 75 cm (5 cm kraus rechts + 70 cm) und nicht erst bei 85 cm (5 cm kraus rechts + 80 cm)? Vielen Dank
04.12.2018 - 12:39DROPS Design answered:
Liebe Sylvia, messen Sie alle Teilen flach = das sind dieselben Massen, die Sie in der Maßskizze finden. Beim Tragen wird dann die Jacke ca 10 m länger wegen Gewicht der Wolle. Viel Spaß beim stricken!
04.12.2018 - 13:55
![]() Petra wrote:
Petra wrote:
Alles perfekt anhand der tollen Anleitung und der sehr netten Betreuung bei Fragen, herzlichen Dank!
17.11.2018 - 22:46
![]() Petra wrote:
Petra wrote:
Der Halsausschnitt vorne bei den Teilen sieht etwas merkwürdig aus. Ich lege 11 M ab, dann direkt, also nach den 11 M den Ausschnitt beginnen mit der Abnahme, die in der Anleitung steht und später die 11M normal abk.?
06.11.2018 - 09:24DROPS Design answered:
Liebe Petra, beim rechten Vorderteil stricken Sie die ersten 11 M dann diese Maschen stilllegen (= so brauchen Sie nicht den Faden abzuschneiden), die Reihe bis zur Ende stricken, wenden und die Rückreihe stricken. Dann wird es am Anfang jeder Hinreihe abgekettet (= 2 M 1x und 1 M 2-3 x) - beim linken Vorderteil werden diese Maschen am Anfang der Rückreihe stillgelegt/abgekettet. Die stillgelgten Maschen werden später fur die Kaputze aufgefasst. Viel Spaß beim stricken!
06.11.2018 - 09:35
![]() Petra wrote:
Petra wrote:
Hallo, ich habe es gerade gesehen. Die 18M sind in den 42 schon enthalten. :-)
18.10.2018 - 11:07
![]() Petra wrote:
Petra wrote:
Hallo, ich habe eine Frage zum Vorderteil: Bei Gr M müsste ich demnach einmal 42 M aufnehmen und dann noch einmal 18M= 60M. Das scheint mir etwas viel für eine Seite. Oder beziehen sich die 42 bzw. 60M auf beide Teile und ich muss nur 30 pro Seite aufnehmen? Danke im Voraus!
18.10.2018 - 11:03DROPS Design answered:
Liebe Petra, in der Größe M schlagen Sie 42 M. an, dann stricken Sie: A.1 uber die 18 ersten Maschen und 24 Maschen kraus rechts = 18+24= 42 M. Viel Spaß beim stricken!
18.10.2018 - 12:52
![]() Lotta wrote:
Lotta wrote:
Liebes Garnstudio-Team, Ich habe die Jacke abgefangen, allerdings Rücken- under Vorderteile direkt zusammen gestrickt. Nach rund 35cm habe ich in Größe S jetzt schon 6 von 19 Knäueln verarbeitet und frage mich, ob der Materialverbrauch deutlich höher liegt als angegeben. Gibt es damit schon Erfahrung? Vielen Dank im Voraus!!
17.10.2018 - 23:31DROPS Design answered:
Liebe Lotta, sollte Ihre Maschenprobe in der Breite und in der Höhe stimmen, dann sollten die 950 g Eskimo reichen. Viel Spaß beim stricken!
18.10.2018 - 09:40
|
|||||||||||||
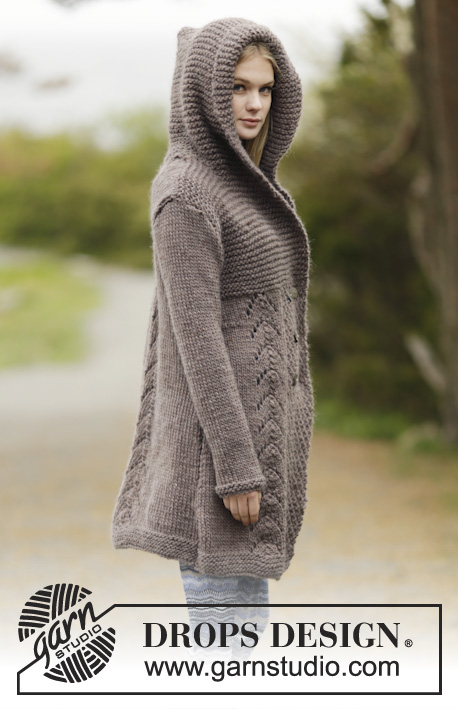
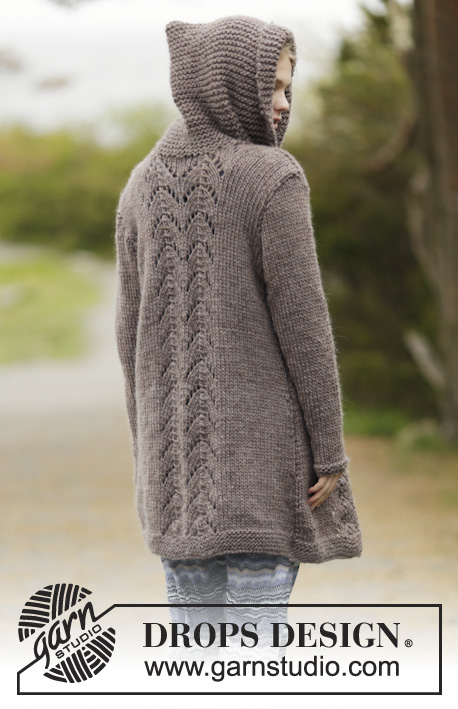
Into The Woods#intothewoodsjacket |
|||||||||||||
 |
 |
||||||||||||
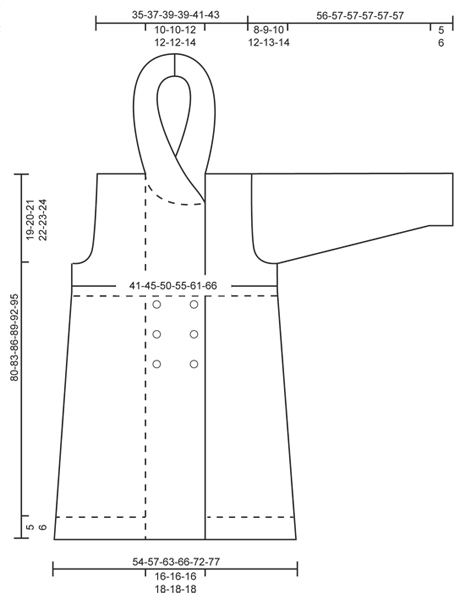
Knitted DROPS jacket in garter st, double seed st and lace pattern with hood in ”Snow”. Size: S - XXXL.
DROPS 164-1 |
|||||||||||||
|
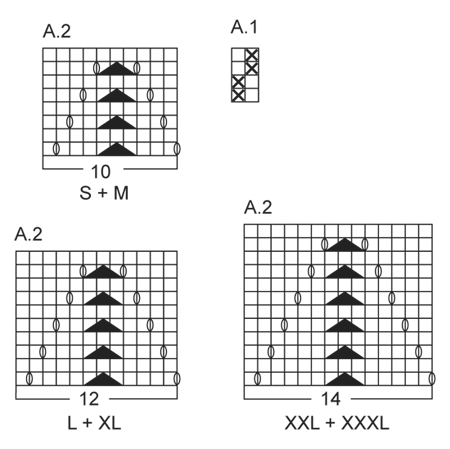
GARTER ST (back and forth): K all rows. 1 ridge = K2 rows. PATTERN: See diagram A.1 and A.2 (choose diagram for correct size). The diagrams show all rows in pattern seen from RS. DECREASE TIP: All dec are done from RS! Dec inside 1 st K and 1 edge st in garter st. Dec as follows when 2 sts remain before 1 K st and 1 edge st in garter st: K 2 tog. Dec as follows after 1 sts in garter st and 1 sts: Slip 1 st as if to K, K 1, psso. INCREASE TIP: All inc are done from RS. Inc inside 1 edge st in garter st and 1 K by making 1 YO. On next row P YO twisted to avoid holes. MEASURING TIP 1 (applies for body and back piece): To get the correct proportions on the jacket make all length measurements when work lies flat. Because of the weight of the yarn and the garter sts on the yoke the work will stretch approx. 10 cm / 4" in total length to what is shown on the schematic drawing. MEASURING TIP 2 (applies for sleeves): Because of the weight of the yarn make all length measurements while holding the piece up. BUTTONHOLES: Dec for 6 buttonholes on right front piece (from RS): Work 4 sts, bind off 2 sts for button hole, work 6-6-6-8-8-8 sts, cast of the next 2 sts for buttonhole = 2 buttonholes on same row (4 sts remain on band). On next row cast on 2 new sts over the bind off sts. Dec for buttonholes when piece measures: SIZE S: 36, 45, 54 cm / 14¼", 17¾", 21¼" SIZE M: 38, 47, 56 cm / 15", 18½", 22" SIZE L: 40, 49, 58 cm / 15¾", 19¼", 22¾" SIZE XL: 42, 51, 60 cm / 16½", 20", 23½" SIZE XXL: 44, 53, 62 cm / 17¼", 21", 24½" SIZE XXXL: 46, 55, 64 cm / 18", 21½", 25¼" NOTE: Approx. 1 cm / ½" remains after last buttonhole before working in garter st over all sts. (on band). ---------------------------------------------------------- BACK PIECE: The piece is worked back and forth on circular needle because of no of sts. Cast on 61-65-71-75-81-87 sts (includes 1 edge st in each side) on circular needle size 7 mm / US 10.75 with Snow. Work in GARTER ST - see explanation above, for 5-5-5-6-6-6 cm / 2"-2"-2"-2⅜"-2⅜"-2⅜" (1st row = RS). Switch to circular needle size 8 mm / US 11 and work next row from RS as follows: 1 edge st in garter st, 20-22-23-25-26-29 sts in stockinette st, work pattern according to diagram A.2 2 times in total (choose diagram for correct size = 2 repetitions of 10-10-12-12-14-14 sts), work in stockinette st until 1 st remains on row and finish with 1 edge st in garter st. Continue like this with stockinette st, pattern and 1 edge st in garter st in each side. REMEMBER THE KNITTING GAUGE When piece measures 8-8-8-10-10-10 cm / 3"-3"-3"-4"-4"-4", dec 1 st in each side - READ DECREASE TIP (= 2 sts dec) and MEASURING TIP 1. Repeat dec in each side every 7-7-8-10-10-10 cm / 2¾"-2¾"-3"-4"-4"-4" a total of 7-7-7-6-6-6 times = 47-51-57-63-69-75 sts. Continue to work until piece measures 61-63-65-67-69-71 cm / 24"-24¾"-25½"-26⅜"-27⅛"-28". Now bind off for armholes at beg of every row in each side as follows: bind off 3 sts 1 time, 2 sts 0-0-1-2-3-4 times and 1 st 1-2-2-3-3-3 times = 39-41-43-43-45-47 sts. When piece measures 78-81-84-87-90-93 cm / 30¾"-32"-33"-34¼"-35½"-36½", bind off the middle 9-9-11-11-11-13 sts for neck and finish each shoulder separately. Continue to bind off 1 st on next row from neck = 14-15-15-15-16-16 sts remain on the shoulder. Loosely bind off all sts when piece measures 80-83-86-89-92-95 cm / 31½"-32¾"-33⅞"-35"-36¼"-37⅜". Repeat on the other shoulder. RIGHT FRONT PIECE: Worked back and forth on circular needle. Cast on 40-42-44-48-52-54 sts (includes 1 edge st in the side and 18-18-18-20-20-20 band sts towards mid front) on circular needle size 7 mm / US 10.75 with Snow. Work first row as follows from RS: Work A.1 over the first 18-18-18-20-20-20 sts (= band), then work in garter st over the remaining 22-24-26-28-32-34 sts. Continue with A.1 over band and garter st over the remaining sts for 5-5-5-6-6-6 cm / 2"-2"-2"-2⅜"-2⅜"-2⅜". Switch to circular needle size 8 mm / US 11 and work next row from RS as follows: A.1 over the first 18-18-18-20-20-20 sts as before, 2 sts in stockinette st, work A.2 (choose diagram for correct size = 1 repetition of 10-10-12-12-14-14 sts), work in stockinette st until 1 st remains on row and finish with 1 edge st in garter st. Continue like this with stockinette st, pattern and 1 edge st in garter st towards the side. When piece measures 8-8-8-10-10-10 cm / 3"-3"-3"-4"-4"-4", dec in the side as on back piece. Repeat dec 7-7-7-6-6-6 times in total = 33-35-37-42-46-48 sts. AT THE SAME TIME when piece measures 36-38-40-42-44-46 cm / 14¼"-15"-15¾"-16½"-17¼"-18", dec for BUTTONHOLES - see explanation above. When piece measures 55-57-59-61-63-65 cm / 21⅝"-22½"-23¼"-24"-24¾"-25½" - REMEMBER MEASURING TIP 1, work in garter st over all sts (also over the 18-18-18-20-20-20 band sts) until finished measurements. AT THE SAME TIME when piece measures 61-63-65-67-69-71 cm / 24"-24¾"-25½"-26⅜"-27⅛"-28", bind off for armhole at beg of every row from the side as on back piece = 29-30-30-32-34-34 sts on needle. When piece measures 74-77-80-82-85-88 cm / 29"-30½"-31½"-32¼"-33½"-34½", slip the outermost 11-11-11-12-13-13 sts towards mid front on 1 stitch holder for neck (work them before slipping them on stitch holder to avoid cutting the yarn). Continue to bind off for neck at beg of every row from neck as follows: bind off 2 sts 1 time and then 1 st 2-2-2-3-3-3 times in total = 14-15-15-15-16-16 sts remain on shoulder. Loosely bind off all sts when piece measures 80-83-86-89-92-95 cm / 31½"-32¾"-33⅞"-35"-36¼"-37⅜". LEFT FRONT PIECE: Cast on and work as right front piece but reversed. NOTE: Beg A.2 as follows from RS: Work 1 edge st in garter st, work in stockinette st until 29-29-31-33-35-35 sts remain on row, work pattern according to diagram A.2 (choose diagram for correct size = 1 repetition of 10-10-12-12-14-14 sts), work 1 st in stockinette st and continue A.1 over the remaining 18-18-18-20-20-20 sts (= band). Do not dec for buttonholes on left front piece. ASSEMBLY: Sew the shoulder seams. HOOD: Pick up approx. 46 to 58 sts around the neck (includes sts on stitch holders at the front) on circular needle size 8 mm / US 11 with Snow. K 1 row from WS while inc evenly to 66-68-70-72-74-76 sts - do not inc over bands. Then work in garter st back and forth over all sts until hood measures approx. 32-33-34-35-36-37 cm / 12½"-13½"-13⅜"-13¾"-14¼"-14½". Bind off. Fold the hood double and sew tog at the top with grafting/kitchener sts. SLEEVE: Worked back and forth on circular needle. Cast on 26-28-30-30-34-34 (includes 1 edge st in each side) on circular needle size 7 mm / US 10.75 with Snow. Work 2 ridges. Switch to circular needle size 8 mm / US 11 and work in stockinette st with 1 edge st in garter st in each side. When piece measures 8-8-8-8-10-12 cm / 3"-3"-3"-3"-4"-4¾", inc 1 st in each side - READ INCREASE TIP (= 2 sts inc) and MEASURING TIP 2. Repeat inc every 7½-6-6-5-4½-3½ cm / 2⅞"-2⅜"-2⅜"-2"-1¾"-1¼" 6-7-7-8-8-9 times in total = 38-42-44-46-50-52 sts. When piece measures 48-48-47-45-44-43 cm / 19"-19"-18½"-17¾"-17¼"-17" (NOTE: Shorter measurements in the larger sizes because of longer sleeve cap and wider shoulders), bind off for sleeve cap at beg of every row in each side as follows: bind off 3 sts 1 time, 2 sts 1-2-2-2-2-2 time and 1 st 2-2-3-3-3-3 times. Then bind off 2 sts at beg of every row in each side until piece measures approx. 55-56-56-56-56-56 cm / 21½"-22"-22"-22"-22"-22", then bind off 3 sts 1 time in each side. Bind off the remaining sts, piece measures approx. 56-57-57-57-57-57 cm / 22"-22½"-22½"-22½"-22½"-22½". Make another sleeve. ASSEMBLY: Sew in the sleeves inside 1 edge st. Sew underarm and side seams in one inside 1 edge st. Sew the buttons on to left front piece. |
|||||||||||||
Diagram explanations |
|||||||||||||
|
|||||||||||||
 |
|||||||||||||
 |
|||||||||||||
Have you finished this pattern?Tag your pictures with #dropspattern #intothewoodsjacket or submit them to the #dropsfan gallery. Do you need help with this pattern?You'll find 27 tutorial videos, a Comments/Questions area and more by visiting the pattern on garnstudio.com. © 1982-2026 DROPS Design A/S. We reserve all rights. This document, including all its sub-sections, has copyrights. Read more about what you can do with our patterns at the bottom of each pattern on our site. |
|||||||||||||


With over 40 years in knitting and crochet design, DROPS Design offers one of the most extensive collections of free patterns on the internet - translated to 17 languages. As of today we count 324 catalogs and 12290 patterns - 12280 of which are translated into English (US/in).
We work hard to bring you the best knitting and crochet have to offer, inspiration and advice as well as great quality yarns at incredible prices! Would you like to use our patterns for other than personal use? You can read what you are allowed to do in the Copyright text at the bottom of all our patterns. Happy crafting!
Post a comment to pattern DROPS 164-1
We would love to hear what you have to say about this pattern!
If you want to leave a question, please make sure you select the correct category in the form below, to speed up the answering process. Required fields are marked *.