
Popular categories
Looking for a yarn?


Comments / Questions (64)
![]() Pia Fischer wrote:
Pia Fischer wrote:
Når man skal strikke diagrammerne, skal man så starte på billedet for neden eller oppefra
30.03.2026 - 11:11DROPS Design answered:
Hi Pia, you start working the diagram from the bottom, from the right bottom corner. See the lesson DROPS HERE. Happy knitting!
30.03.2026 - 12:20
![]() Janine wrote:
Janine wrote:
Bei einer Gesamtlänge von 28-29-34 (37-40-44) cm an beiden Seiten des Kleides 2 Krausrippen (= 4 Rd kraus re) über die mittleren 10-10-12 (12-14-14) M str (d.h. je 5-5-6 (6-7-7) M beidseitig jedes Markierers) – BITTE BEACHTEN: die übrigen M glatt re str. Ich verstehe den Teil mit der Häkelkante nicht. Ich habe keine Krausrippe. Was habe ich falsch gemacht?
15.08.2025 - 05:50DROPS Design answered:
Liebe Janine, wie beschrieben haben Sie 2 Krausrippen (4 Rd kraus re) über die mittleren 10 bis 14 Maschen beidseitig für die Armlöcher, und dann später die mittleren 6 bis 10 Maschen abgkettet, diese Maschen sind die Krausrippen unter Armloch + in die 36-56 Maschen vom Ärmel. Viel Spaß beim Stricken!
15.08.2025 - 07:57
![]() Kimberly Hill wrote:
Kimberly Hill wrote:
I'm a novice crocheter, so I have a question regarding the crochet edge. After I do the first SC, do I chain immediately from that stitch (without inserting the hook into the next available stitch)? And then DC into the first chain worked (the one closest to the SC), effectively crocheting a SC, 3 chains, and a DC into the same space?
24.10.2024 - 04:21DROPS Design answered:
Dear Mrs Hill, correct crochet µ3 chains just after the first single crochet, then work 1 double crochet in the 1st of these 3 chains (the closest to the sc = the 3rd chain from hook), skip approx. 2-3 sts and work 1 sc in next stitch, then repeat from *. See also in this video how to crochetg such an edge (we skip 1 st in the video, skip 2-3 sts for the edge for this pattern). Happy crocheting!
24.10.2024 - 10:14
![]() Cyndi wrote:
Cyndi wrote:
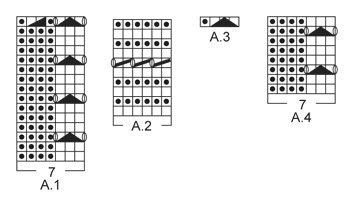
Instructions for A1 row 3 does not indicate yarn overs as explained in question in English back in 2016. Please correct pattern
28.09.2024 - 05:27DROPS Design answered:
Dear Cindy, yarn overs are shown under 3rd symbol, so work Row 3 in A.1 as follows: YO, slip 2 sts as if to K tog, K 1, pass the 2 slipped sts over, YO, P4. Happy knitting!
30.09.2024 - 10:34
![]() Mindy Paskell-Mede wrote:
Mindy Paskell-Mede wrote:
I am about to begin the yoke. The yarn will be cut, and the instruction is to start at mid-back and "knit over" stitches on the back piece. Is that the same as "pick up and knit", as is often done for collars? Thank you.
19.01.2024 - 22:45DROPS Design answered:
Dear Mrs Paskell-Mede, correct on first row on yoke you will work the stitches, so pick up and knit the stitches from body. Happy knitting!
22.01.2024 - 08:14
![]() Janice Leach wrote:
Janice Leach wrote:
How do you do this dress l try to do it and it is not working for me at all
09.06.2022 - 23:15DROPS Design answered:
Dear Mrs Leach, maybe you can try to explain us which part you have issues with? You can also bring your work to your store (or send them a picture per mail) so that they can see what you did and help you. And you can also ask other knitters in our DROPS Workshop showing them a picture of your work. Happy knitting!
10.06.2022 - 08:57
![]() Estelle wrote:
Estelle wrote:
Bonjour Je ne comprends pas bien pour le modèle 3 ans : A 40 cm de hauteur, il faut faire les côtes mousse sur 14m de part et d'autre de chaque marqueur. Mais comme le 1er marqueur correspond aussi au début du rang, les 7m à gauche et les 7m à droite de ce marqueur seront donc séparées par un rang? Cela ne risque pas de se voir et de faire un décalage ? Ou bien je me trompe? En vous remerciant pour tout votre travail très apprécié !
19.05.2022 - 11:53DROPS Design answered:
Bonjour Estelle, effectivement, vous tricotez la bordure point mousse de chaque côté du début et de la fin du tour (1er marqueur/côté), tirez légèrement le fil lorsque vous tricotez les mailles envers des côtes mousse à la transition entre 2 rangs peut vous aider à rendre la démarcation un peu moins visible, ensuite, ces mailles sont juste sous le bras et seront peu visibles. Bon tricot!
19.05.2022 - 16:33
![]() Lis Frandsen wrote:
Lis Frandsen wrote:
Jeg bliver nødt til at henvise til mit tidligere spørgsmål vedr diagram A1 - little Hedda. Jeg er stadig i tvivl efter dit svar: ‘Hej Lis, husk omslaget på hver side af de masker du strikker sammen i A.1 - god fornøjelse!’ Jeg kan ikke se at der i opskriften nævnes omslag på hver side af maskerne, der er strikket sammen. Er det en fejl, at der ikke står noget om det i beskrivelsen af pind 3 i diagram A1.
02.02.2022 - 11:47
![]() Lis Frandsen wrote:
Lis Frandsen wrote:
Little Hedda på rundpind. Diagram A1. 1. pind = 3 ret 4 vrang 2. pind = 3 ret 4 vrang 3. pind = tag 2 m løs af p som om de skulle strikkes ret sammen, 1 ret, løft de 2 løse masker over Hvis jeg trækker de to masker over retmasken, så bliver de 3 masker jo til 1. Dvs at mønsterrapporten kun består af 5 masker i stedet for 7. Hvad misforstår jeg.
27.01.2022 - 21:57DROPS Design answered:
Hej Lis, husk omslaget på hver side af de masker du strikker sammen i A.1 - god fornøjelse!
28.01.2022 - 15:10
![]() Lissi wrote:
Lissi wrote:
Midterstykke til sløjfe står de strik 4 retstrik er det pinde eller cm
09.04.2021 - 21:25DROPS Design answered:
Hej Lissi, du skal strikke 4 (5) retriller = 8 (10) pinde retstrik :)
12.04.2021 - 14:47
|
|||||||||||||||||||
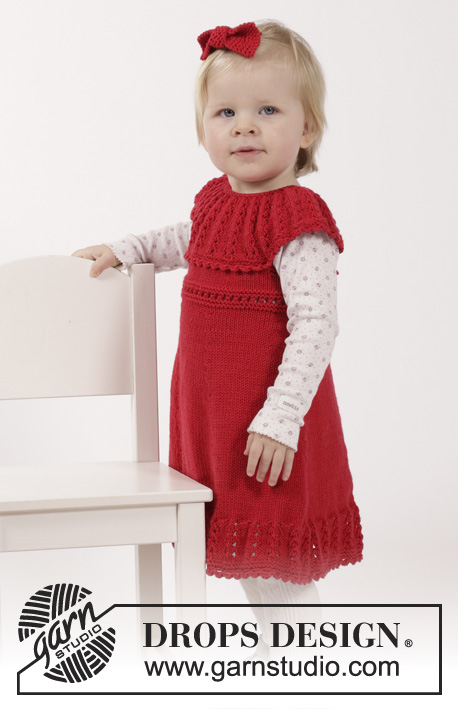
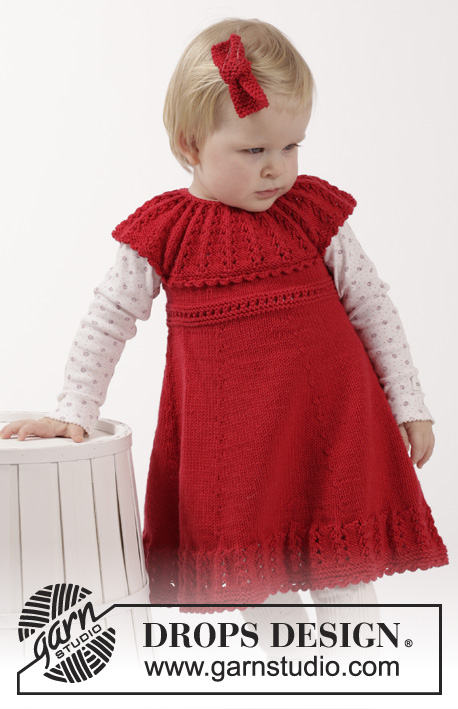
Little Hedda#littleheddadress |
|||||||||||||||||||
 |
 |
||||||||||||||||||
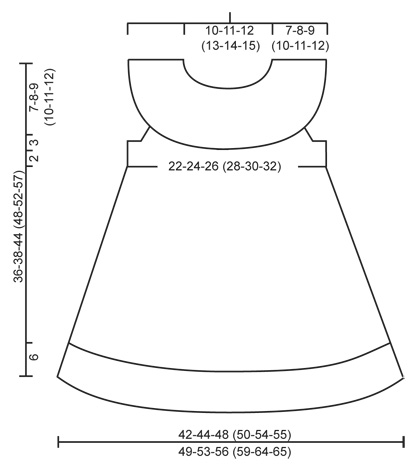
Knitted dress with lace edge and round yoke plus hair bow in garter st in DROPS Cotton Merino. For baby and children in sizes 1 month - 6 years.
DROPS Children 26-14 |
|||||||||||||||||||
|
GARTER ST (worked in the round): * K 1 round and P 1 round *, repeat from *-*. 1 ridge = 2 rounds. GARTER ST (back and forth): K all rows. 1 ridge = K2 rows. PATTERN: See diagrams A.1 to A.4. The diagrams show all rows in pattern seen from RS. DECREASE TIP: Dec as follows after 1st, 2nd, 4th and 5th marker: Slip 1 st as if to K, K 1, psso (= 1 st dec). Dec as follows before 3rd, 4th, 6th and 1st marker: Beg 2 sts before marker, K 2 sts tog (= 1 st dec). ---------------------------------------------------------- DRESS: Worked in the round on circular needle from bottom up. Cast on 217-231-245 (259-280-287) sts on circular needle size 3.5 mm / US 4 with Cotton Merino. Work 2 ridges in GARTER ST in the round - see explanation above. K 1 round, then continue pattern in the round according to diagram A.1. When A.1 has been worked 1 time vertically, 186-198-210 (222-240-246) sts remain on needle and piece measures approx. 6 cm / 2⅜". K 1 round while AT THE SAME TIME dec 2-4-0 (2-4-2) sts evenly = 184-194-210 (220-236-244) sts. Now insert 6 markers in the piece as follows: Insert 1st marker at beg of round (= side), 2nd marker after 27-29-32 (33-35-37) sts, 3rd marker after another 38-39-41 (44-48-48) sts, 4th marker after another 27-29-32 (33-35-37) sts (= side), 5th marker after another 27-29-32 (33-35-37) sts, 6th marker after another 38-39-41 (44-48-48) sts (27-29-32 (33-35-37) sts remain on round after last marker). Work in stockinette st and move the markers upwards when working. REMEMBER THE KNITTING GAUGE When piece measures 8 cm / 3⅛", dec 1 st on each side of 1st and 4th marker, dec 1 st after 2nd and 5th marker and 1 st before 3rd and 6th marker – READ DECREASE TIP (= 8 sts dec). Repeat dec every 1½-1½-2 (2-2-2½) cm / ½"-½"-¾" (¾"-¾"-⅞") 11-11-12 (12-13-13) times in total = 96-106-114 (124-132-140) sts. Remove the 6 markers and insert 1 new marker at beg of round and 1 marker after 48-53-57 (62-66-70) sts (= sides). When piece measures 24-25-30 (33-36-40) cm / 9½"-9¾"-11¾" (13"-14¼"-15¾") (dec should now be done), work pattern in the round according to diagram A.2. When A.2 has been worked 1 time vertically, work in stockinette st in the round again. When piece measures 28-29-34 (37-40-44) cm / 11"-11½"-13½" (14½"-15¾"-17¼"), work 2 ridges in garter st over the middle 10-10-12 (12-14-14) sts in each side (i.e. over 5-5-6 (6-7-7) sts on each side of both markers – NOTE: Work the other sts in stockinette st as before). On next round after the 2 ridges, bind off the middle 6-6-8 (8-10-10) sts in each side for armholes (i.e. 3-3-4 (4-5-5) sts on each side of both markers) = 42-47-49 (54-56-60) sts remain on front and back piece. Cut the yarn. YOKE: Insert 1 marker – NOW MEASURE PIECE FROM HERE. Beg mid back and K over sts on half back piece, cast on 36-38-44 (46-50-56) sts over one armhole, K over front piece, cast on 36-38-44 (46-50-56) sts over the other armhole and K until mid back again = 156-170-186 (200-212-232) sts. Now work piece back and forth on circular needle from mid back as follows: K 3 rows while AT THE SAME TIME on 1st row (= WS) dec 2-2-4 (4-2-8) sts evenly = 154-168-182 (196-210-224) sts. Work next row as follows from RS: 2 edge sts in garter st, work pattern according to diagram A.4 until 5 sts remain, finish with the first 3 sts in A.4 and 2 edge sts in garter st. Continue pattern like this. AT THE SAME TIME when piece measures 3-4-5 (6-7-8) cm / 1"-1½"-2" (2½"-2¾"-3") from marker, dec all 4 P to 3 P by P the first 2 sts in every P-section tog. Repeat dec in every P-section when piece measures 5-6-7 (8-9-10) and 6-7-8 (9-10-11) cm / 2"-2½"-2¾" (3"-3½"-4") and 2 ½"-2¾"- 3" (3½"-4"-4½") = 91-99-107 (115-123-131) sts remain and there is only 1 P between every eyelet row. When piece measures approx. 7-8-9 (10-11-12) cm / 2¾"-3"-3½" (4"-4½"-4¾") – adjust so that next row is a row with holes, work A.3 from RS over all sts (continue 2 edge sts in garter st as before) = 47-51-55 (59-63-67) sts remain. NECK EDGE: Work 2 ridges back and forth over all sts and then LOOSELY bind off. ASSEMBLY: Crochet 2 buttonhole straps along left side on opening at the back. 1 buttonhole strap = work with hook size 3.5 mm/E/4 and Cotton Merino as follows: 1 sc in edge st at the top by neck, 4 ch and then 1 sl st in same st as sc was worked, fasten off. Work another strap in the middle along opening. Sew buttons on to the right side of opening. CROCHET EDGE: Work a finishing edge around the bottom of dress on hook size 3.5 mm/E/4 as follows: 1 ch in first st, * ch 3, 1 dc in 1st ch worked, skip 2-3 sts, 1 sc in next st *, repeat from *-* the entire round and finish with 1 sl st in 1st sc from beg of round. Fasten off. Work a similar edge at the bottom around yoke - i.e. work along bottom ridge on yoke and then along both sleeve edges. ---------------------------------------------------------- HAIR BOW: Numbers in ( ) applies to large bow. Cast on 10 (20) sts on needle size 3.5 mm / US 4 with Cotton Merino. Work in GARTER ST – see explanation above – back and forth until piece measures 8 (12) cm / 3" (4¾"), bind off. MIDDLE BAND: Cast on 10 (15) sts on needle size 3.5 mm / US 4 and knit 8 (10) rows. Bind off. Sew the short ends tog to form a ring. Pull the bow through the ring and fasten the two parts tog with a couple of stitches. Fasten bow with a silk ribbon or a hair pin with a couple of stitches. |
|||||||||||||||||||
Diagram explanations |
|||||||||||||||||||
|
|||||||||||||||||||
 |
|||||||||||||||||||
 |
|||||||||||||||||||
Have you finished this pattern?Tag your pictures with #dropspattern #littleheddadress or submit them to the #dropsfan gallery. Do you need help with this pattern?You'll find 27 tutorial videos, a Comments/Questions area and more by visiting the pattern on garnstudio.com. © 1982-2026 DROPS Design A/S. We reserve all rights. This document, including all its sub-sections, has copyrights. Read more about what you can do with our patterns at the bottom of each pattern on our site. |
|||||||||||||||||||


With over 40 years in knitting and crochet design, DROPS Design offers one of the most extensive collections of free patterns on the internet - translated to 17 languages. As of today we count 324 catalogs and 12290 patterns - 12280 of which are translated into English (US/in).
We work hard to bring you the best knitting and crochet have to offer, inspiration and advice as well as great quality yarns at incredible prices! Would you like to use our patterns for other than personal use? You can read what you are allowed to do in the Copyright text at the bottom of all our patterns. Happy crafting!
Post a comment to pattern DROPS Children 26-14
We would love to hear what you have to say about this pattern!
If you want to leave a question, please make sure you select the correct category in the form below, to speed up the answering process. Required fields are marked *.