
Looking for a yarn?


Comments / Questions (11)
![]() Sylvia Wetz wrote:
Sylvia Wetz wrote:
Bonjour, j\'aimerais tricoter ce joli bonnet de lutin, mais je ne comprends pas ce que veut dire :\r\n\" glisser 3 m au début de chaque rang sur un arrêt de mailles (tricoter les mailles avant). Continuer en jersey, en glissant tous les rangs 3 m sur un arrêt de mailles. \"\r\nJe veux, par la même occasion, vous remercier pour votre excellent site et votre générosité ! Rare, F A N T A S T I Q U E !!! Merci merci merci ❤️ Sylvia
12.12.2022 - 10:59DROPS Design answered:
Bonjour Sylvia et merci, vous allez tricoter ainsi, vu sur l'endroit: *tricotez les 3 premières mailles et glissez-les en attente, tricotez les mailles restantes du rang, tournez, tricotez les 3 premières mailles et glissez-les en attente, tricotez les mailles restantes, tournez* (vous avez 3 m en attente de chaque côté), répétez ces 2 rangs jusqu'à ce qu'il y ait 30-33-33-39-39 m en attente de chaque côté, il reste alors 5-5-9-5-5 m sur l'aiguille. Coupez le fil, remettez toutes les mailles sur l'aiguille et tricotez 1 rang endroit sur l'endroit avant de rabattre. Bon tricot!
12.12.2022 - 16:05
![]() Christine wrote:
Christine wrote:
Bonjour, J'aimerai tricoter ce joli modèle "petit lutin" n° 26-17 et sur les explication je ne trouve nulle part le dessin des diagramme pour le point fantaisie. Où les trouver svp ? Merci d'avance Cordialement
04.10.2021 - 15:54DROPS Design answered:
Bonjour Christine, vous trouverez le diagramme A.1 correspondant à ce modèle en bas de page, sous la légende. Bon tricot!
05.10.2021 - 06:54
![]() Anna Sharp wrote:
Anna Sharp wrote:
What is the Edge St that is used in the bonnet? The pattern says See Explanation Above but I’m unable to find it the instruction. Thanks
07.07.2019 - 06:47DROPS Design answered:
Dear Anna, the bonnet starts with a K1, P1 rib pattern, and an edge stitch on both sides, which are knitted in garted stitch (knitted in every row). Happy Knitting!
07.07.2019 - 17:15
![]() Ana wrote:
Ana wrote:
Se puede obtener el patrón del pantalón pero con agujas rectas? Muchas gracias
07.01.2019 - 22:49DROPS Design answered:
Hola Ana. No hacemos patrones personalizados.
03.02.2019 - 18:45Paulina Fernández wrote:
Muchas gracias equipo Drops por responder tan pronto. Terminé la labor y quedó estupendo!! Buena semana!!
16.04.2018 - 19:58Paulina Fernández wrote:
Hola equipo Drops. Estoy tejiendo el gorro y no entiendo como es la parte de ir juntando los tres (3) puntos en aguja auxiliar al inicio de cada vuelta: ¿Son en todas las vueltas (derecho y revés),? Cómo se le da la forma en punta, no se hacen disminuciones? Y al finalizar el tejido, cuando tengo que cortar el hilo, si también tejo los puntos centrales junto a los del gancho auxiliar, cuál es la finalidad de separarlos antes? Estaré atenta a su respuesta. Gracias.
16.04.2018 - 02:46DROPS Design answered:
Ver la respuesta abajo
17.04.2018 - 08:11Paulina Fernández wrote:
Hola equipo Drops. Estoy tejiendo el gorro y no entiendo como es la parte de ir juntando los tres (3) puntos en aguja auxiliar al inicio de cada vuelta: ¿Son en todas las vueltas (derecho y revés),? Cómo se le da la forma en punta, no se hacen disminuciones? Y al finalizar el tejido, cuando tengo que cortar el hilo, si también tejo los puntos centrales junto a los del gancho auxiliar, cuál es la finalidad de separarlos antes? Estaré atenta a su respuesta. Gracias.
15.04.2018 - 13:59DROPS Design answered:
Hola Paulina, el método de deslizar los puntos a una aguja auxiliar en vez de cerrarlos para disminuir es un método para dar forma curvada a una labor, al igual que las filas acortadas y las disminuciones. Se trabaja por el lado derecho en un extremo y por el lado revés en el otro extremo.
15.04.2018 - 20:20
![]() Sara Tome wrote:
Sara Tome wrote:
I'm sorry but I'm not understanding how to start the jumpsuit... Can you please let me know what part of the text comes first? Thank you very much
26.02.2018 - 20:57DROPS Design answered:
Dear Mrs Tome, start reading with PLAYSUIT, working first BACK PIECE, then FRONT PIECE, then BODY slipping all sts from back and front piece together on the same circular needle, then finish front piece separately. Happy knitting!
27.02.2018 - 08:44
![]() Narda Van Leeuwen wrote:
Narda Van Leeuwen wrote:
Beste Drops design, ik heb een vraag over de laatste zin van de ronding in het achterpand: 'Keer het werk en brei recht terug tot het begin van de nld (= de zijkant).' Moet je hier ook rekening houden met gaatjes bij de keerpunten? En je eindigt dan bij de linker zijkant van het achterpand, toch?
26.10.2016 - 11:34DROPS Design answered:
Hoi Narda. Als je vindt dat je gaatjes te groot zijn bij de keerpunten, dan kan je eventueel een st opnemen van de overgang en deze samenbreien met de eerstvolgende st om de gaatjes kleiner te maken. En je breit aan het eind terug naar het begin van de nld (markeerder linker zijkant).
26.10.2016 - 12:31
![]() Ida wrote:
Ida wrote:
Hei! ER det mulig å strikke denne i et reint babyullgarn i stedet for blandinggsgarnet Merino Cotton? Jeg skal strikke den største størrelsen. Mvh Ida
18.02.2016 - 09:33DROPS Design answered:
Hej. Denna är stickad i ett garn ur garngrupp B så du kan byta ut garnet mot ett annat i samma garngrupp, läs mer om detta här. Lycka till!
19.02.2016 - 13:50
|
||||||||||||||||
Petit Lutin#petitlutinonesie |
||||||||||||||||
 |
 |
|||||||||||||||
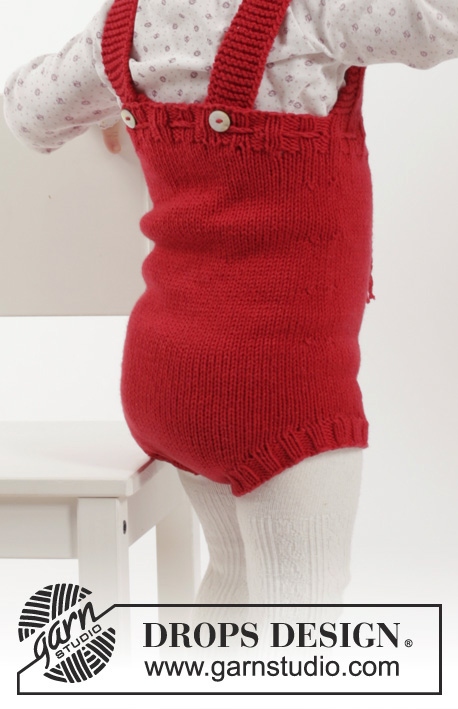
Set of knitted baby jumpsuit, socks and bonnet / Santa hat in DROPS Cotton Merino. Size 1-18 months
DROPS Children 26-17 |
||||||||||||||||
|
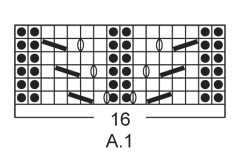
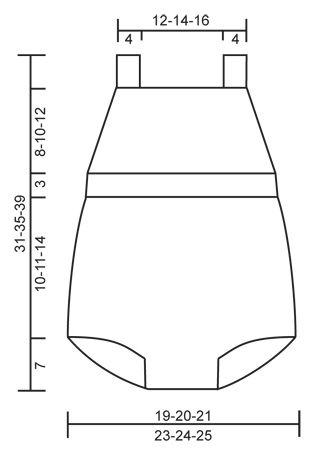
PLAY SUIT: DECREASE TIP-1: Work until 3 sts remain before marker and dec as follows: K 2 tog, K 2 (marker is between these 2 sts), slip 1 st as if to K, K 1, psso. DECREASE TIP-2: All dec are done from RS! Dec as follows after 3 edge sts in garter st: Slip 1 st as if to K, K 1, psso. Dec as follows before 3 edge sts in garter st: Beg 2 sts before 3 edge sts and K 2 tog. GARTER ST (back and forth): K all rows. 1 ridge = K2 rows. PATTERN: See diagram A.1. The diagrams show all rows in pattern seen from RS. ---------------------------------------------------------- PLAY SUIT: Piece is worked back and forth in 2 parts, bottom up, up to after leg opening. Then work piece in the round before dividing at the waist and finishing front piece back and forth on needle. BACK PIECE: Cast on 14-16-18 sts on circular needle size 3.5 mm / US 4 with Cotton Merino and working stockinette st back and forth. AT THE SAME TIME cast on 2 new sts at the end of every row 9 times in total in each side = 50-52-54 sts on needle and piece measures approx. 6 cm / 2⅜". Put piece aside and work front piece. FRONT PIECE: Cast on 14-16-18 sts on circular needle size 3.5 mm / US 4 with Cotton Merino and working stockinette st back and forth for 5 cm / 2". Now cast on 6 new sts at the end of every row 3 times in total in each side = 50-52-54 sts on needle and piece measures approx. 7 cm / 2¾". BODY: Slip sts from front and back piece on to same circular needle = 100-104-108 sts. Insert 1 marker in each side (= 50-52-54 sts between markers) - NOW MEASURE PIECE FROM HERE. Work in stockinette st in the round - beg of round = the side. When piece measures 2-3-5 cm / ¾"-1"-2", dec 1 st on each side of both markers - READ DECREASE TIP 1 (= 4 sts dec). Repeat dec every 2 cm / ¾" 4 times in total = 84-88-92 sts. When piece measures 10-11-14 cm / 4"-4½"-5½" from markers (piece measures approx. 17-18-21 cm / 6¾"-7"-8¼" from cast-on edge), work an elevation at the back as follows: K as before over the first 42-44-46 sts, i.e. until 2nd marker (= front piece – NOTE: Do not work elevation over these sts), K until 5 sts remain before marker at beg of round, turn and P until 5 sts remain until marker in the other side, turn piece. K until 10 sts remain before marker, turn piece and P until 10 sts remain before marker in the other side, turn piece. K until 15 sts remain before marker, turn piece and P until 15 sts remain before marker in the other side. Turn piece and K back to beg of round (= the side). Switch to circular needle size 3 mm / US 2.5 and K 1 round over all sts AT THE SAME TIME adjust no of sts to 80-88-96 - NOTE: To avoid holes at every turn pick up loop between 2 sts and K twisted tog with next st on needle. Then work rib as follows: K 1, * P 2, K 2 *, repeat from *-* until 3 sts remain on round and finish with P 2 and K 1. When rib measures 1½ cm / ½", work an lace edge as follows: K 1, * P 2 tog, 1 YO, K 2 *, repeat from *-* until 3 sts remain on round, finish with P 2 tog, 1 YO and K 1. Work until 1 round remain before rib measures 3 cm / 1". Work next round as follows: Work rib over the first 40-44-48 sts (= front piece), LOOSELY bind off the next 40-44-48 sts with K over K and P over P (= back piece). FRONT PIECE: Insert 1 marker – NOW MEASURE PIECE FROM HERE. Switch to circular needle size 3.5 mm / US 4 and work first row from RS as follows: 3 edge sts in GARTER ST - see explanation above, 9-11-13 sts in stockinette st, pattern according to A.1 (= 16 sts), 9-11-13 sts in stockinette st, 3 edge sts in GARTER ST. Continue pattern like this back and forth. AT THE SAME TIME when piece measures 1-0-0 cm / ⅜"-0"-0", dec 1 st in each side - READ DECREASE TIP 2. Repeat dec every 2nd-4th-6th row 7-7-6 times in total = 26-30-36 sts remain on needle. When piece measures 7-9-11 cm / 2¾"-3½"-4½" from marker (adjust so that next row is from RS), work 3 ridges back and forth over all sts. Work next row as follows from RS: K 8 and slip these sts on 1 stitch holder for shoulder strap, bind off the next 10-14-20 sts and K the last 8 sts (= shoulder strap). SHOULDER STRAP: Continue in garter st back and forth until shoulder strap measures approx. 18-20 cm / 7"-8" (or desired length). Bind off and repeat in the other side. ASSEMBLY: RIB EDGE: Pick up from RS approx. 50 to 56 sts along one opening for leg on circular needle size 3 mm / US 2.5 with Cotton Merino. P 1 row from WS while AT THE SAME TIME inc evenly to 58-62-66 sts. Then work rib K 2/P 2 back and forth with 1 edge st in garter st in each side. When edge measures 2 cm / ¾", loosely bind off with K over K and P over P. Repeat along the other leg. Sew opening between legs inside 1 edge st - -i.e. sew tog one rib edge, then sew seam between leg openings and then the other rib edge. Fasten a button at the bottom on each shoulder strap. Use holes in eyelet row on rib to button. TIES: Cut 2 lengths Cotton Merino yarn of approx. 3 metres/3.2 yds each. Twine the strands tog until they resist, fold the string double so that it twines again. Make a knot at each end. Beg mid front and thread tie up and down through eyelet row on rib in waist. ---------------------------------------------------------- BONNET: Worked back and forth on needle. Cast on 75-81-85 (91-91) sts (includes 1 edge st in each side) on circular needle size 3 mm / US 2.5 with Cotton Merino. P 1 row from WS, then work rib (= K 1/P 1) with 1 edge st in garter st - SEE EXPLANATION ABOVE - and K 1 inside edge st in each side (seen from RS). When piece measures 3 cm / 1", work 1 row in stockinette st while AT THE SAME TIME dec 10-10-10 (8-8) sts evenly = 65-71-75 (83-83) sts. Switch to circular needle size 3.5 mm / US 4 and work in stockinette st with 1 edge st in garter st in each side. REMEMBER THE KNITTING GAUGE When piece measures 11-12-13 (14-15) cm / 4⅜"-4¾"-5⅛" (5½"-6"), slip 3 sts at beg of every row on a stitch holder (work sts first). Continue in stockinette st, on every row slip 3 new sts on stitch holder. Continue like this until there are 30-33-33-39-39 sts on the stitch holders in each side (= 5-5-9-5-5 sts on needle). Cut the yarn and slip all sts back on needle. K 1 row from RS over all sts, on next row bind off. Piece measures approx. 19-20-21-24-25 cm / 7½"-8"-8¼" (9½"-9¾"). ASSEMBLY: Graft bonnet together mid back with kitchener st. Pick up from RS approx. 44-60 sts along the bottom edge on bonnet on circular needle size 3.5 mm / US 4. P 1 row from WS while inc evenly to 55-59-65-69-75 sts. Work 2 rows in stockinette st with 1 st in garter st in each side. Work next row as follows (from RS): K 1, * K 2 tog, 1 YO *, repeat from *-* until 2 sts remain, K these sts. Then work 3 rows in stockinette st with 1 st in garter st in each side, then bind off. Fold edge double towards WS at the eyelet row and fasten. TIES: Cut 3 lengths Cotton Merino of approx. 2 metres/2.2 yds, twine them tightly tog, fold them double and they will twine again, tie a knot in each end. Thread the string through the folded edge. SOCKS: ---------------------------------------------------------- PATTERN: See diagram A.1. DECREASE TIP: Dec as follows before marker: Beg 2 sts before marker and K 2 tog. Dec as follows after marker: Slip 1 st as if to K, K 1, psso. HEEL DECREASE: Row 1 (= from RS): Work until 5-5-5 (5-5-5) sts remain, slip next st as if to K, K 1, psso, turn piece. Row 2 (= from WS): Work until 5-5-5 (5-5-5) sts remain, slip next st as if to P, P 1, psso, turn piece. Row 3: Work until 4-4-4 (4-4-4) sts remain, slip next st as if to K, K 1, psso, turn piece. Row 4: Work until 4-4-4 (4-4-4) sts remain, slip next st as if to P, P 1, psso, turn piece. Continue dec like this with 1 st less before every dec until 8-8-10 (10-12-12) sts remain on needle. ---------------------------------------------------------- SOCKS: Worked in the round on double pointed needles. Cast on 36-36-40 (40-44-44) sts on double pointed needles size 3 mm / US 2.5 with Cotton Merino and work rib K 2/P 2 for 2-2-2 (3-3-3) cm / 3/4-¾"-¾" (1"-1"-1"). Insert 1 marker at beg of round (= mid back). Work next round as follows: 10-10-12 (12-14-14 ) sts in stockinette st, work pattern according to diagram A.1 (= 16 sts) and 10-10-12 (12-14-14) sts in stockinette st. Continue pattern like this. AT THE SAME TIME when piece measures 3-3-4 (4-5-6) cm / 1"-1"-1½" (1½"-2"-2½"), dec 2 sts mid back - SEE DECREASE TIP. Repeat dec every 4-4-3 (3-3-3) cm / 1½"-1½"-1" (1"-1"-1") a total of 2-2-3 (3-4-4) times = 32-32-34 (34-36-36) sts. When piece measures 9-10-12 (13-16-19) cm / 3½"-4"-4¾" (5"-6¼"-7½"), keep the middle 16-16-18 (18-20-20) sts mid back on needle for heel and slip the middle 16 sts on 1 stitch holder (= mid on top of foot). Work in stockinette st back and forth over heel sts for 3-3½-4 (4½-5-5) cm / 1"-1¼"-1½" (1¾"-2"-2"). Insert 1 marker in middle of piece. Then work HEEL DECREASE - see explanation above! Then pick up 7-8-9 (10-11-11) sts on each side of heel and slip sts from stitch holder back on needle = 38-40-44 (46-50-50) sts on needle. Continue in the round in stockinette and A.1 over the middle sts on top of foot as before - AT THE SAME TIME dec on each side of the 16 sts on top of foot as follows: K the last 2 sts before the 16 sts tog and K the first 2 sts after the 16 sts twisted tog. Dec every other round 6-6-7 (7-7-7) times in total = 26-28-30 (32-36-36) sts. Continue to work until piece measures approx. 8-9-9½ (10½-11½-13) cm / 3"-3½"-3¾" (4¼"-1½"-5") from marker on heel (approx. 2-2-2½ (2½-3½-4) cm / ¾"-¾"-⅞" (7/8"-1¼"-1½") remain). Insert 1 marker in each side so that there are 13-14-15 (16-18-18) sts on both upper foot and under foot. Then dec for toes on each side of both markers - READ DECREASE TIP. Dec every other row: 2-2-3 (3-5-6) times and then every row: 3-3-3 (3-2-1) times = 6-8-6 (8-8-8) sts remain. Cut the yarn and pull it through the remaining sts, tighten tog and fasten. Sock measures approx. 10-11-12 (13-15-18) cm / 4"-4½"-4¾" (5"-6"-7"). Knit another sock. |
||||||||||||||||
Diagram explanations |
||||||||||||||||
|
||||||||||||||||
|
||||||||||||||||
|
||||||||||||||||
Have you finished this pattern?Tag your pictures with #dropspattern #petitlutinonesie or submit them to the #dropsfan gallery. Do you need help with this pattern?You'll find 36 tutorial videos, a Comments/Questions area and more by visiting the pattern on garnstudio.com. © 1982-2025 DROPS Design A/S. We reserve all rights. This document, including all its sub-sections, has copyrights. Read more about what you can do with our patterns at the bottom of each pattern on our site. |
||||||||||||||||


With over 40 years in knitting and crochet design, DROPS Design offers one of the most extensive collections of free patterns on the internet - translated to 17 languages. As of today we count 314 catalogs and 11821 patterns - 11811 of which are translated into English (US/in).
We work hard to bring you the best knitting and crochet have to offer, inspiration and advice as well as great quality yarns at incredible prices! Would you like to use our patterns for other than personal use? You can read what you are allowed to do in the Copyright text at the bottom of all our patterns. Happy crafting!
Post a comment to pattern DROPS Children 26-17
We would love to hear what you have to say about this pattern!
If you want to leave a question, please make sure you select the correct category in the form below, to speed up the answering process. Required fields are marked *.