
Popular categories
Looking for a yarn?


Comments / Questions (35)
![]() Couder Annette wrote:
Couder Annette wrote:
Bonjour, je me demande s'il y a une erreur ou pas dans l'explication à la fin des manches: "rabattre 3m de chaque côté de chaque marqueur." Y a t il vraiment deux marqueurs pour la fin et il faudrait donc rabattre 12m en tout? Ou bien faut il rabattre 6m: 3 de chaque côté du marqueur qui indique le début des tours et qui est présent depuis le début de la manche? Merci beaucoup de votre réponse!
24.11.2014 - 17:56DROPS Design answered:
Bonjour Mme Couder, il fallait en effet lire "de chaque côté du marqueur" pour les manches, on n'a qu'un seul marqueur: on rabat les 3 premières m du tour, on tricote les mailles suivantes jusqu'à ce qu'il reste 3 m, on rabat les 3 dernières m et on met en attente. Bon tricot!
25.11.2014 - 10:02Ourania Katsogianni wrote:
Good evening. My son got amazed by this pullover and asked me to knit it. I begun to study your pattern. You say about the sleeve to knit 2 rows but in your photo the sleeve begins with the K4 P4 rib and not 2 rows. Am I understanding something wrong? Is there any other photo of the pullover in order to see the neckband? Best regards
20.11.2014 - 13:20DROPS Design answered:
Dear Mrs Katsogianni, sleeves start with 2 K rounds (they will make a small rolled edge) then continue ribbing K4/P4. For neck edge, you pick up sts from st holder, then pick up sts around the neckline to get 60-72 sts, then work in st st adjusting number of sts to 48-54 sts (see size). Bind off all sts loosely after 4 rounds st st. Happy knitting!
20.11.2014 - 13:58
![]() Constanza wrote:
Constanza wrote:
Hola! No entiendo muy bien la indicación para el raglán. ¿Hay alguna diferencia entre el brazo izquierdo y el derecho o las disminuciones se hacen igual? ¿Qué quiere decir "por el lado derecho"y "por el lado revés" en "Tips para disminución (para el raglán)" si se supone que estoy tejiendo en redondo y que las disminuciones se hacen en vueltas alternas? Muchas gracias por la ayuda.
08.09.2014 - 03:56DROPS Design answered:
Hola Constanza. Están haciendo las correcciones en la traducción. Las diferentes maneras de trabajar el raglán dependen de los diferentes tipos de lana, es decir con Eskimo las dism para el raglán se trabajan por el LD de la labor (en redondo) con Highlander las dism se trabajan por el LR de labor( en redondo)
09.09.2014 - 10:22
![]() Sabrina wrote:
Sabrina wrote:
Hallo Ich habe eine Frage. Rumpfteil Nach 12 cm, auf beiden Seiten der Markierungsfäden je 1 M. aufnehmen .... 12cm inkl. Bündchen oder 12cm ab dem Bündchen? Lieben Gruß
10.01.2014 - 08:14DROPS Design answered:
Liebe Sabrina, es ist die Gesamthöhe gemeint.
10.01.2014 - 09:48
![]() Hélène wrote:
Hélène wrote:
Bonjour, Comme tous les modèles que je tricote en eskimo ou andes, celui-ci s'est pas mal agrandi au lavage. Pourtant je tricote avec une tension normale, et je lave à la main, à froid, je roule et presse un peu dans une serviette et fais sécher à plat. Est-ce normal? Auriez-vous un conseil à me donner ? J'ai tricoté aussi le bonnet homme 0-819 en andes et les chaussettes 0-713 en eskimo : les deux sont devenus beaucoup trop grand après lavage. Merci.
23.11.2013 - 17:05DROPS Design answered:
Bonjour Hélène, vous trouverez ici des conseils sur l'entretien de vos lainages, n'hésitez pas à contacter votre magasin DROPS qui peut vous aider. Bon tricot!
25.11.2013 - 08:58
![]() Carole wrote:
Carole wrote:
Bonjour, pour le raglan je suis en difficulté....Les explications du modéle (4m avant le marqueur,glisser 1 m à l'end,passer la maille glissée par dessus ,4 m end-marqueur au milieu;2 m ensemble...) sur la vidéo d'aide c'est dans l'autre sens(d'abord les 2 m ensemble puis les la maille glissée..;) de plus pourquoi les explications sont données avec"sur l'endroit" puis "sur l'envers" je tricote enEskimo et en circulaire donc c'est toujours en endroit,non?
18.11.2013 - 21:42DROPS Design answered:
Bonjour Carole, en fonction du résultat souhaité, on fait les diminutions différemment, la vidéo montre la technique mais il faut toujours suivre les explications du modèle. Quand on a mis les mailles de l'encolure en attente, on continue en allers et retours, et donc les diminutions du raglan seront faites sur l'envers. Bon tricot!
19.11.2013 - 09:24
![]() Tanja wrote:
Tanja wrote:
Hallo, ich habe eine Frage, zum Abketten für das Raglan. Es wird zwischen der linken und der rechten Seite unterschieden? Meint man da den rechten und den linken Ärmel? Wenn ich auf den Pulli drauf schau oder wenn ich ihn an hab? Oder meint man mit links und rechts, ob ich gerade linke oder rechte Reihen stricke? Da ich allerdings nur jede zweite Runde fürs Raglan abketten soll würde es dann ja eh nur in den rechten Reihen sein... Bitte um Hilfe. Danke
13.07.2013 - 15:48DROPS Design answered:
Liebe Tanja, der Raglan wird ja bis zum Halsausschnitt in Runden gestrickt. Mit rechte und linke Seite war Vorder- und Rückseite gemeint. Die Anleitung ist an diesen Stellen jetzt etwas besser formuliert.
14.07.2013 - 08:20
![]() Annelie wrote:
Annelie wrote:
Hej! Jag håller på att sticka denna tröja i stlk L i Eskimo men jag är lite fundersam på armarna,dom blir ganska smala.Ska det verkligen vara samma maskantal som stlk till 12/14 år?Sen blir det ett stort hopp till XL.Har gjort ärmarna redan men skulle hellre vilja ha typ 28 maskor. Mvh Annelie
03.11.2012 - 16:49
![]() Drops Design France wrote:
Drops Design France wrote:
Bonjour Bidule, l'échantillon se tricote avec les aiguilles 8 ou la taille adéquate pour obtenir 11 m x 15 rangs en jersey = 10 x 10 cm. Bon tricot !
10.02.2012 - 20:37
![]() Bidule wrote:
Bidule wrote:
Bonjour, l'échantillon est-il fait avec les aiguilles 7 ou les aiguilles 8 ? merci
10.02.2012 - 14:45
|
|
Nils |
|
|
|
|
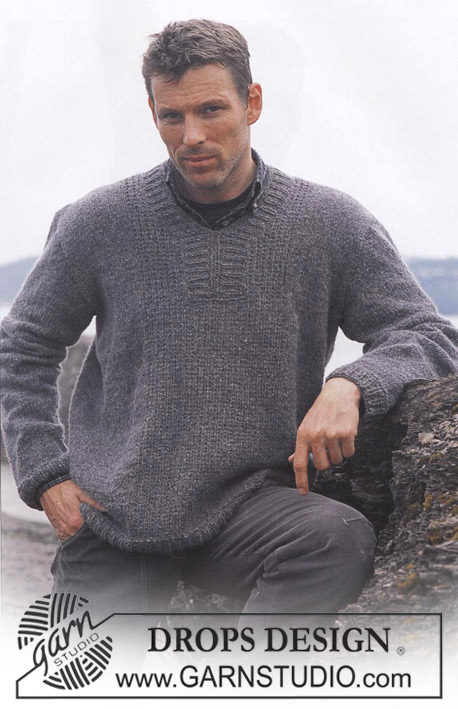
Set of knitted sweater with raglan, scarf with English rib and crocheted cap, for men, in DROPS Snow.
DROPS 85-3 |
|
|
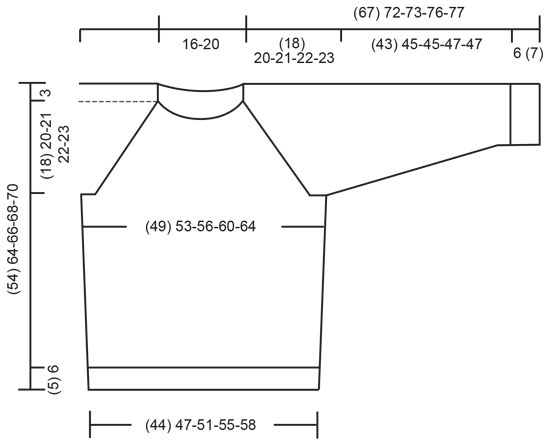
PULLOVER: Gauge: 11 sts x 15 rows on larger needles in stockinette st = 10 x 10 cm. Rib: *K 4, P 4*, repeat from *-*. Decreasing tips (for raglan): From right side: Dec 1 st as follows in each transition between sleeve and front/back (start 4 sts before the marker): Sl 1 as if to knit, K 1, psso, K 4 (the marker is in the middle of these 4 sts), K 2 tog.From wrong side: Start 4 sts before the marker, P 2 tog, P 4, P 2 tog, twisting sts (if this is too difficult, sl 2, return to left needle, twisting each, then P 2 tog). Raglan tips: If your row gauge is not accurate, your armhole will not be the correct length. If your gauge is too tight, the armhole will be too short. You can correct for this by knitting extra rows without decreasing. BODY Cast on 96-104-112-120-128 sts on smaller circular needles with Snow; join and place a marker at the join. Knit rib – see instructions above. When the piece measures 5-6-6-6-6 cm change to larger circular needles and stockinette st. Put a second marker at side = 48-52-56-60-64 sts between markers. When the piece measures 12 cm inc 1 st on each side of each marker every 6-10-10-10-10 cm a total of 3 times = (108) 116-124-132-140 sts. When the piece measures 33-41-42-43-44 cm bind off 6 sts at each side for armhole (= 3 sts each side of each marker) = 48-52-56-60-64 sts on Front and Back. Lay piece aside and knit the sleeves. Sleeve: Cast on 24-24-24-32-32 sts on smaller double-pointed needles; join and place a marker at the join. K 2 rows, then knit rib for 6-7-7-7-7 cm. Change to larger double pointed needles and stockinette st. When the piece measures 10-9-9-12-12 cm inc 1 st each side of marker every 5-4.5-4-5.5-5 cm a total of 8-10-11-8-9 times = 40-44-46-48-50 sts. When the piece measures 49-52-52-54-54 cm bind off 3 sts each side of marker = 34-38-40-42-44 sts. Lay piece aside and knit a second sleeve. Yoke: Put the sleeves in on the same circular needles as Body where you bound off for armholes = 164-180-192-204-216 sts. Put a marker in each transition between sleeve and front/ back = 4 markers. Knit 2-1-1-0-0 rows and then begin raglan shaping. Read the entire next section before knitting: Raglan shaping: Read raglan tips above. Dec 1 st inside 2 sts each side of marker – see Decreasing tips above: every other row 13-15-16-17-18 times. Neck: When the piece measures 48-57-59-61-63 cm put the center front 8-8-10-12-14 sts on a st holder and work kback and forth on needles. Then bind off at each neck edge every other row: 2 sts 1 time and 1 st 1 time. After all raglan and neck shaping is complete 46-46-48-50-52 sts remain. Neckband: Pick up approx. 14-20-20-20-20 sts (incl. sts from st holder) on front neck and put all sts on smaller double-pointed needles = approx. 60-72-72-72-72 sts. P 1 right side row, then knit 4 rows stockinette st (= rolled edge), decreasing evenly distributed to 48-48-50-52-54 sts on the 1st row. Bind off – to make the edge roll nicely, K 2 sts in approx every 5th st at the same time as binding off. Assembly: Sew opening under the sleeve. SCARF: English rib: Row 1 (wrong side): K 1 (edge st knit in garter st), *K 1, yo, sl 1 as if to purl*, repeat *-* to last 2 sts, K 2. Row 2 (right side): K 1 (edge st knit in garter st), *yo, sl 1 as if to purl, K tog the next st and yo from previous row*, repeat *-* to last 2 sts, yo, sl 1 as if to purl, K 1 (edge st knit in garter st). Row 3 (wrong side): K 1 (edge st), *K tog the next st and yo from previous row, yo, sl 1 as if to purl*, repeat *-* to last 2 sts + yo from previous row, K tog the next st and yo, K 1. Repeat rows 2 and 3 over all sts. Scarf: Loosely cast on 13 sts and knit English rib – see instructions above. Bind off when the piece measures approx. 150 cm. CAP: Crochet tip: At the beginning of each row, ch 3 replaces 1 dc. Cap: Ch 10. Row 1: start in 4th ch from hook and crochet 1 dc in each st = 8 dc on row, turn the work. Row 2: ch 3 (= 1 dc), crochet 1 dc in each dc (= 8 dc), turn the work. Continue until the piece measures approx. 50 cm (or to desired length – the headband should fit snugly around head). Join ends (this is the back), cut yarn and fasten. Visor: Crochet a visor over the center 8 rows along front edge of headband as follows: Row 1: crochet 2 dc in each row = 16 dc, turn the work. Row 2: ch 2, skip over 2 dc, 1 sc in each dc to last 2 dc (= 12 sc), ch 2, sl st in last dc, turn the work. Row 3: ch 2, skip over 2 sc, 1 sc in each sc to last 2 sc (= 8 sc), ch 2, sl st in last sc. Cut yarn and fasten. |
|
 |
|
Have you finished this pattern?Tag your pictures with #dropspattern or submit them to the #dropsfan gallery. Do you need help with this pattern?You'll find 30 tutorial videos, a Comments/Questions area and more by visiting the pattern on garnstudio.com. © 1982-2026 DROPS Design A/S. We reserve all rights. This document, including all its sub-sections, has copyrights. Read more about what you can do with our patterns at the bottom of each pattern on our site. |


With over 40 years in knitting and crochet design, DROPS Design offers one of the most extensive collections of free patterns on the internet - translated to 17 languages. As of today we count 324 catalogs and 12290 patterns - 12280 of which are translated into English (US/in).
We work hard to bring you the best knitting and crochet have to offer, inspiration and advice as well as great quality yarns at incredible prices! Would you like to use our patterns for other than personal use? You can read what you are allowed to do in the Copyright text at the bottom of all our patterns. Happy crafting!
Post a comment to pattern DROPS 85-3
We would love to hear what you have to say about this pattern!
If you want to leave a question, please make sure you select the correct category in the form below, to speed up the answering process. Required fields are marked *.