
Popular categories
Looking for a yarn?


Comments / Questions (35)
![]() Evo wrote:
Evo wrote:
Hoeveel steken moeten er staan op het voor & achterpand samen, voor men aan de mouwen begint? Er staat : 52st (maat M), maar dit is het aantal na 1x meerderen en afkanten. En hoeveel steken in totaal voor de mouwen? Er staat 38st (idem als panden). Dit zijn 128 st samen, maar bij pas staat : zet alles op 1 rondbreinaald = 180 steken... Grtjs, Evo
03.04.2017 - 14:46DROPS Design answered:
Hoi Evo, In maat S/M staan er 104 steken op het voor- en achterpand samen voordat je aan de mouw begint. Je zet eerst namelijk 104 steken in totaal op, omdat je elke keer 4 steken meerdert aan beide zijden van beide markeerdraden (= de zijnaden), meerder je in totaal 12 steken en kom je op een totaal van 116. Vervolgens kan in elke zijnad weer 6 steken af (= oksel, zeg maar) en kom je weer op een totaal van 104 steken voor voor- en achterpand. Bij de mouw zet je 24 steken op, meerder je in totaal 20 steken en kan je bij de oksel 6 steken af, dit brengt je op een totaal van 38 steken. 104 st (panden) + 2 maal 38 st = totaal 180 steken als je aan de pas begint.
03.04.2017 - 17:16
![]() Isabelle wrote:
Isabelle wrote:
Bonjour et merci de votre réponse. J'ai une autre question : quand on parle de "mailles centrales" pour l'encolure, on parle de "mailles centrales" au milieu d'un des deux coté ? Est-ce des deux côtés ? Merci par avance.
10.02.2017 - 22:54DROPS Design answered:
Bonjour Isabelle, on va mettre les mailles du milieu devant en attente pour l'encolure et continuer ensuite en allers et retours à partir du milieu devant (= après les mailles en attente). Bon tricot!
13.02.2017 - 09:35
![]() Evo wrote:
Evo wrote:
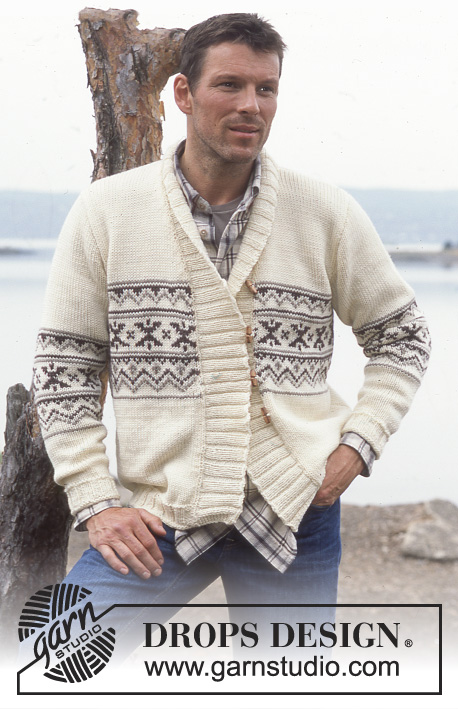
Hallo, ik zou graag de Nils trui breien, maar zowel bij de foto in oranje Eskimo als in het blauw, zit de kraag verstopt onder een sjaal... Bij beide tekeningen van het patroon staan de kragen niet getekend. Bestaan er andere foto's of tekeningen van deze modellen, of komt de kraag ook voor in een ander model trui, want met de beschrijving, heb ik geen idee hoe het er moet uitzien. Groetjes, evo
02.02.2017 - 14:34DROPS Design answered:
Hoi Evo. Ik kan helaas hier niet mee helpen. Wij hebben geen foto's hiervan.
02.02.2017 - 14:55
![]() Zazalulu wrote:
Zazalulu wrote:
Bonjour, je pense qu'il manque un mot dans la phrase "Placer un marqueur sur de chaque côté", du coup je ne comprends pas trop. De plus pour l'encolure il y a du jersey par dessus les côtes ? Merci pour votre réponse.
27.01.2017 - 22:58DROPS Design answered:
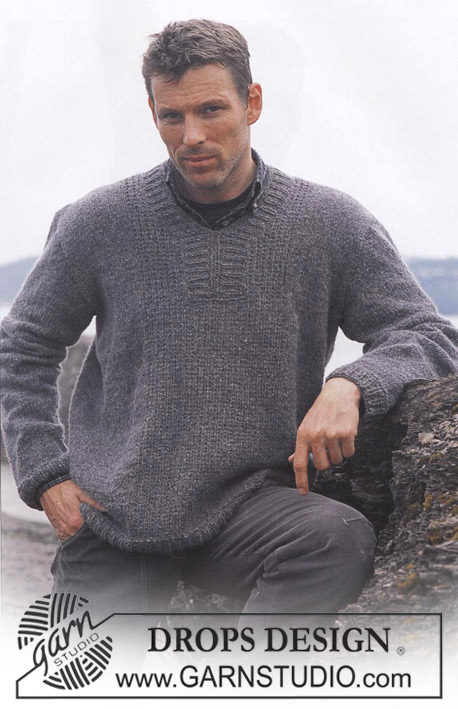
Bonjour Zazalulu, on place simplement un marqueur de chaque côté (= côtés du pull). Le col est en 2 versions: soit bordure roulottée en jersey (pull orange = celui en photo), soit une bordure en côtes repliée en double (modèle bleu). Bon tricot!
30.01.2017 - 10:41
![]() Amalie Bornø wrote:
Amalie Bornø wrote:
Jeg strikket denne genseren i str. L, men denne ble nok en M dame genser istede. Jeg har fulgt oppskriften til punkt og prikke og har samme strikkefasthet som oppskriften sier.
23.01.2017 - 11:28DROPS Design answered:
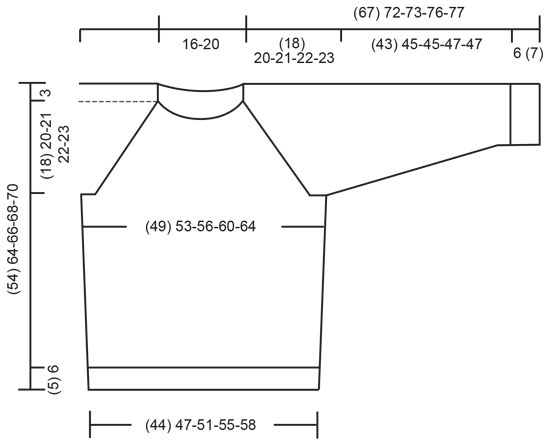
Hej Amalie. Ok, men maalene stemmer overens med det som staar i maalskitsen nederst? Det er en god ide at tjekke den först, saa man er sikker paa hvilken str man skal vaelge - og med den rette strikkefasthed, skulle maalene ogsaa stemme med dem i skitsen.
23.01.2017 - 12:10Irina wrote:
Hello! I need to know what size on the picture? Thank you
05.12.2016 - 09:14DROPS Design answered:
Dear Irina, size on the picture is size S/M - but to find out the size to work, compare the measurement in chart to a similar garment to find out the matching size - read more about sizing here. Happy knitting!
05.12.2016 - 10:10
![]() Agnès wrote:
Agnès wrote:
Bonjour, Je ne comprends pas à quel pull bleu se réfère les explications du modèle, car je ne vois qu'un pull orange ? Par ailleurs, pourriez vous m'expliquer quelle est la finition de l'encolure car elle est cachée par l'écharpe, et je ne parviens pas à imaginer meme avec les explications. Merci pour vos réponses
29.05.2016 - 19:04DROPS Design answered:
Bonjour Agnès, vous trouverez la version bleue du pull ici - le pull orange se termine par un col roulotté en jersey et le pull bleu par 12 cm de côtes replié en double (6 cm de col). Bon tricot!
30.05.2016 - 10:04
![]() Mickaro wrote:
Mickaro wrote:
Bonjour, comme Carole je suis en difficulté avec le raglan... en effet en circulaire , je reste sur l'endroit et en aller-retour si les diminutions doivent être faites 1 tour sur 2, on peut continuer à les faire sur l'endroit, non? merci pour votre réponse!
05.04.2016 - 16:33DROPS Design answered:
Bonjour Mme Mickaro, les diminutions du raglan se font tous les 2 tours effectivement (1 tour avec dim, 1 tour sans dim) - on tricote soit en jersey end (version Eskimo), soit en jersey env (version highlander), en fonction il faudra ajuster. Bon tricot!
05.04.2016 - 17:52
![]() Simon Runsten wrote:
Simon Runsten wrote:
Hej! Jag undrar över storleken. Jag är en vuxen man som vanligtvis har medium i mina kläder. Bör jag ha medium även här, eller large? Finns det kanske några måttangivelser annat än den skiss som fanns längs ned? Tack på förhand, Simon
16.01.2015 - 14:30DROPS Design answered:
Hej Simon. Nederst paa mönstret er der en maalskitse med alle maal i cm per störrelse. Du kan sammenligne med dine egne og vaelge den rette störrelse.
29.01.2015 - 17:01
![]() Nadine wrote:
Nadine wrote:
Can someone help explain the neck shaping instructions a bit better? i can't make heads or tails of the pattern's instructions... and the photo in the pattern is covered up with a scarf. thanks!
07.01.2015 - 07:38DROPS Design answered:
Dear Nadine, slip first the middle 8-14 sts (see size) for neck front on a st holder, then continue working back and forth while at the same time, bind off at the beg of each row each side (both from WS and from RS) 2 sts 1 time and 1 st 1 time (remember raglan dec). Happy knitting!
07.01.2015 - 10:46
|
|
Nils |
|
|
|
|
Set of knitted sweater with raglan, scarf with English rib and crocheted cap, for men, in DROPS Snow.
DROPS 85-3 |
|
|
PULLOVER: Gauge: 11 sts x 15 rows on larger needles in stockinette st = 10 x 10 cm. Rib: *K 4, P 4*, repeat from *-*. Decreasing tips (for raglan): From right side: Dec 1 st as follows in each transition between sleeve and front/back (start 4 sts before the marker): Sl 1 as if to knit, K 1, psso, K 4 (the marker is in the middle of these 4 sts), K 2 tog.From wrong side: Start 4 sts before the marker, P 2 tog, P 4, P 2 tog, twisting sts (if this is too difficult, sl 2, return to left needle, twisting each, then P 2 tog). Raglan tips: If your row gauge is not accurate, your armhole will not be the correct length. If your gauge is too tight, the armhole will be too short. You can correct for this by knitting extra rows without decreasing. BODY Cast on 96-104-112-120-128 sts on smaller circular needles with Snow; join and place a marker at the join. Knit rib – see instructions above. When the piece measures 5-6-6-6-6 cm change to larger circular needles and stockinette st. Put a second marker at side = 48-52-56-60-64 sts between markers. When the piece measures 12 cm inc 1 st on each side of each marker every 6-10-10-10-10 cm a total of 3 times = (108) 116-124-132-140 sts. When the piece measures 33-41-42-43-44 cm bind off 6 sts at each side for armhole (= 3 sts each side of each marker) = 48-52-56-60-64 sts on Front and Back. Lay piece aside and knit the sleeves. Sleeve: Cast on 24-24-24-32-32 sts on smaller double-pointed needles; join and place a marker at the join. K 2 rows, then knit rib for 6-7-7-7-7 cm. Change to larger double pointed needles and stockinette st. When the piece measures 10-9-9-12-12 cm inc 1 st each side of marker every 5-4.5-4-5.5-5 cm a total of 8-10-11-8-9 times = 40-44-46-48-50 sts. When the piece measures 49-52-52-54-54 cm bind off 3 sts each side of marker = 34-38-40-42-44 sts. Lay piece aside and knit a second sleeve. Yoke: Put the sleeves in on the same circular needles as Body where you bound off for armholes = 164-180-192-204-216 sts. Put a marker in each transition between sleeve and front/ back = 4 markers. Knit 2-1-1-0-0 rows and then begin raglan shaping. Read the entire next section before knitting: Raglan shaping: Read raglan tips above. Dec 1 st inside 2 sts each side of marker – see Decreasing tips above: every other row 13-15-16-17-18 times. Neck: When the piece measures 48-57-59-61-63 cm put the center front 8-8-10-12-14 sts on a st holder and work kback and forth on needles. Then bind off at each neck edge every other row: 2 sts 1 time and 1 st 1 time. After all raglan and neck shaping is complete 46-46-48-50-52 sts remain. Neckband: Pick up approx. 14-20-20-20-20 sts (incl. sts from st holder) on front neck and put all sts on smaller double-pointed needles = approx. 60-72-72-72-72 sts. P 1 right side row, then knit 4 rows stockinette st (= rolled edge), decreasing evenly distributed to 48-48-50-52-54 sts on the 1st row. Bind off – to make the edge roll nicely, K 2 sts in approx every 5th st at the same time as binding off. Assembly: Sew opening under the sleeve. SCARF: English rib: Row 1 (wrong side): K 1 (edge st knit in garter st), *K 1, yo, sl 1 as if to purl*, repeat *-* to last 2 sts, K 2. Row 2 (right side): K 1 (edge st knit in garter st), *yo, sl 1 as if to purl, K tog the next st and yo from previous row*, repeat *-* to last 2 sts, yo, sl 1 as if to purl, K 1 (edge st knit in garter st). Row 3 (wrong side): K 1 (edge st), *K tog the next st and yo from previous row, yo, sl 1 as if to purl*, repeat *-* to last 2 sts + yo from previous row, K tog the next st and yo, K 1. Repeat rows 2 and 3 over all sts. Scarf: Loosely cast on 13 sts and knit English rib – see instructions above. Bind off when the piece measures approx. 150 cm. CAP: Crochet tip: At the beginning of each row, ch 3 replaces 1 dc. Cap: Ch 10. Row 1: start in 4th ch from hook and crochet 1 dc in each st = 8 dc on row, turn the work. Row 2: ch 3 (= 1 dc), crochet 1 dc in each dc (= 8 dc), turn the work. Continue until the piece measures approx. 50 cm (or to desired length – the headband should fit snugly around head). Join ends (this is the back), cut yarn and fasten. Visor: Crochet a visor over the center 8 rows along front edge of headband as follows: Row 1: crochet 2 dc in each row = 16 dc, turn the work. Row 2: ch 2, skip over 2 dc, 1 sc in each dc to last 2 dc (= 12 sc), ch 2, sl st in last dc, turn the work. Row 3: ch 2, skip over 2 sc, 1 sc in each sc to last 2 sc (= 8 sc), ch 2, sl st in last sc. Cut yarn and fasten. |
|
 |
|
Have you finished this pattern?Tag your pictures with #dropspattern or submit them to the #dropsfan gallery. Do you need help with this pattern?You'll find 30 tutorial videos, a Comments/Questions area and more by visiting the pattern on garnstudio.com. © 1982-2026 DROPS Design A/S. We reserve all rights. This document, including all its sub-sections, has copyrights. Read more about what you can do with our patterns at the bottom of each pattern on our site. |


With over 40 years in knitting and crochet design, DROPS Design offers one of the most extensive collections of free patterns on the internet - translated to 17 languages. As of today we count 324 catalogs and 12290 patterns - 12280 of which are translated into English (US/in).
We work hard to bring you the best knitting and crochet have to offer, inspiration and advice as well as great quality yarns at incredible prices! Would you like to use our patterns for other than personal use? You can read what you are allowed to do in the Copyright text at the bottom of all our patterns. Happy crafting!
Post a comment to pattern DROPS 85-3
We would love to hear what you have to say about this pattern!
If you want to leave a question, please make sure you select the correct category in the form below, to speed up the answering process. Required fields are marked *.