
Popular categories
Looking for a yarn?


Comments / Questions (57)
![]() Ludmilla wrote:
Ludmilla wrote:
Bonjour, Ne faut-il pas répéter le rang 7 après le rang 14 dans M1 afin d'avoir la symétrie du motif?
28.03.2025 - 20:57DROPS Design answered:
Bonjour Ludmilla, possible oui effectivement, je transmets à nos stylistes pour qu'elles vérifient le diagramme. Merci pour votre retour. Bon tricot!
31.03.2025 - 07:50
![]() Monika wrote:
Monika wrote:
Strikker Cool Solace M. Skjønner ikke ermehull felling. «Fell annen hver pinne 2 masker innenfor de 2 ytterste maskene som strikkes i rille“. Det blir jo et hull hvor jeg felte og så skal jeg strikke 2masker i rille. Snur jeg og strikker 2m i rille kommer jo «hullet» med de felte maskene igjen.
28.03.2025 - 18:51DROPS Design answered:
Hei Monika, Du feller til ermehull ved å strikke 2 masker rett sammen (ikke felle av), etter de 2 masker i rillestrikk. Da får du ikke hull. God fornøyelse!
31.03.2025 - 06:47
![]() Jette wrote:
Jette wrote:
Hej Hvor er det man skal strikke perlestrik?
13.03.2025 - 11:46DROPS Design answered:
Hej Jette, det gør du nede ved monteringen :)
14.03.2025 - 14:17
![]() Karla Kranewitz wrote:
Karla Kranewitz wrote:
Bei Anschlag von 195 M, d.h. 193 M + 2 Randmaschen geht der Rapport von 12 M nicht auf? Auch bei den anderen Angaben zum Maschenanschlag ist das gleiche Problem. Habe ich einen Denkfehler?
07.03.2025 - 15:54DROPS Design answered:
Liebe Frau Kranewitz, so stricken Sie die 195 Maschen: 1 Randmasche, 16 Mal die 12 Maschen Muster, dann stricken Sie die erste Masche vom Muster damit das Muster symmetrisch wird, und 1 Randmasche = 1+(16x12)+1+1=195. Viel Spaß beim Stricken!
10.03.2025 - 07:45
![]() Marion wrote:
Marion wrote:
In der Strickschrift fehlen nach dem 1. Raport (wenn man ihn wiederholt) die Reihen 7 und 8. Ohne sie stimmt das Muster aus meiner Sicht nicht.
02.03.2025 - 20:47
![]() Jacqui Gordon wrote:
Jacqui Gordon wrote:
Sorry to come back with another question! I'm new to knitting from a chart. This may be obvious but I just want to check! Am I repeating rows 3 to 14 until work measures 19cm. After 19cm, repeat M1-M2 etc? Many thanks in advance.
31.10.2024 - 13:45DROPS Design answered:
Dear Mrs Gordon, you repeat the whole M.1 in height until piece measures 19 cm, ie when the mark to M.1 is done, go back to the first row and repeat from the beg - adjust so that M.1 is done in height. Now work diagram M.2 (not M.1 anymore), and when M.2 is done, repeat from the first row in M.2. Happy knitting!
31.10.2024 - 15:56
![]() Jacqui wrote:
Jacqui wrote:
Hi There. I've just started your Cool Solace waistcoat and I've never followed a diagram before. All seems OK though. The only thing is that from the diagram, it says 'K'. Is this after I've worked my 1 edge stitch? Thank you.
14.08.2024 - 10:31DROPS Design answered:
Hi Jacqui, Yes, you begin the pattern/diagram after the 1 edge stitch at the beginning of the row and finish the row with the other edge stitch. Happy knitting!
15.08.2024 - 06:46
![]() AnnSofi Skoglund wrote:
AnnSofi Skoglund wrote:
Jag undrar om jag tolkat mönstret rätt att den i grunden är i rätstickning? På bilden ser det ut som slätstickning.
06.08.2024 - 11:12DROPS Design answered:
Hej AnnSofi mønsteret er ifølge diagrammet slätstickning imellem hulmønsteret :)
06.08.2024 - 15:26
![]() Pia Anderberg wrote:
Pia Anderberg wrote:
Har ni möjligtvis ett program som skulle kunna omvandla mönstret till denna vackra väst till stl XXXL? Tack
31.03.2024 - 13:42DROPS Design answered:
Hei Pia. Det har vi dessverre ikke. Du kan evnt. prøve å regne det selv ut utifra strikkefastheten som er oppgitt. mvh DROPS Design
02.04.2024 - 08:50
![]() Inger Englund wrote:
Inger Englund wrote:
Hej! Jag är inte så bra på mönster men jag har en fråga ska man i mönster 1. göra ett omslag i slutet av varvet och ett när man ska börja på ett nytt vara. MVH / Inger Hoppas att ni förstår frågan
05.08.2023 - 17:51DROPS Design answered:
Hej Inger, du börjar diagrammet i hörnet till höger med 1rm, 1omsl, lyft 1m,1rm,drag den lyfta m över, 2rm, 2rm tills, 1oms, 3rm,2rm tills, 1oms :)
10.08.2023 - 14:03
|
|||||||||||||
Cool Solace |
|||||||||||||
|
|
|||||||||||||
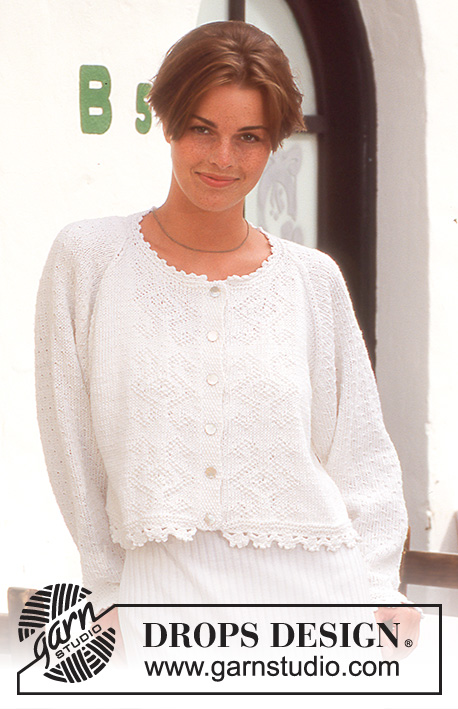
DROPS Top in Muskat with lace pattern
DROPS 46-8 |
|||||||||||||
|
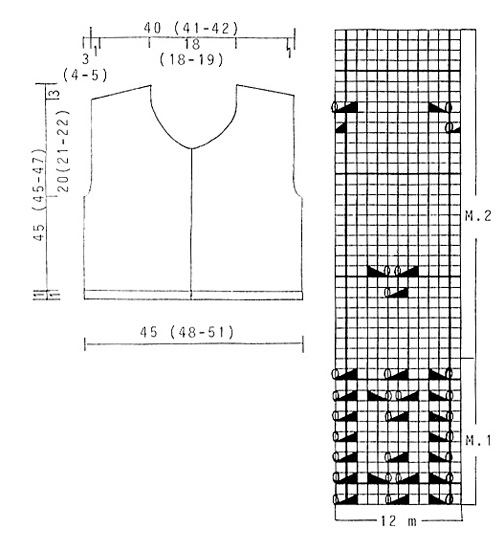
Pattern: See diagram (1 diagram = 1 pattern repeat). The diagrams are seen from the RS. Seed stitch: 1st row: K1, P1. 2nd row: K over P and P over K. Repeat 1st and 2nd row. Body: Work back and forth on circular needles. Cast on 183 (195-207) sts on circular needle sizes 4 mm/US 6 with gray and K2 rows. Then work chart M.1 with 1 edge st on each side mid front not included in pattern. Remember knitting gauge. When piece measures 19 (19-19) cm / 7½"-7½"-7½" – stop after a full repeat of M.1 – work M.2 with 1 edge st on each side mid front. At the same time when piece measures 22 (21-22) cm / 8¾"-8¼"-8¾" work next row as follows: 44 (47-50) sts front piece, bind off 4 sts for armhole, 87 (93-99) sts back piece, bind off 4 sts for armhole, 44 (47-50) sts front piece. Complete each piece separately. Front piece: = 44 (47-50) sts. Work 2 outermost sts towards armhole in garter st. Continuing bind off for armhole on every other row 2 sts 2 (2-3) times, 1 st 1 (3-3) time = 39 (40-41) sts. When piece measures 29 (29-31) cm bind off for neck on every other row: 4 (4-5) sts 1 times, 3 sts 2 times, 2 sts 1 times, 1 st 5 times and then on every 4th row: 1 st 2 times. At the same time when piece measures 42 (42-44) cm bind off for shoulders from armhole towards neckline on every other row: 5 (6-6) sts 1 time, 5 (5-5) sts 3 times. After bind off at neckline and shoulder is finished bind off remaining sts. Piece measures approx 45 (45-47) cm / 17¾"-17¾"-18½". Back piece: = 87 (93-99) sts. Continuing bind off for armhole like front piece = 77 (79-81) sts. When piece measures 42 (42-44) cm bind off for shoulder from armhole at neckline on every other row: 5 (6-6) sts 1 times, 5 (5-5) sts 3 times. At the same time when piece measures 43 (43-45) cm bind off middle 33 (33-35) sts for neck and work each side separately. Bind off 2 sts to shape the neckline on next row. After dec for neckline and shoulder bind off remaining sts. Piece measures approx 45 (45-47) cm / 17¾"-17¾"-18½". Assembly: Sew shoulder seam. Pick up approx 66-72 sts along left front piece on circular needle size 2.5 mm / US 1.5 with gray and work 2.5 cm/1" seed stitch back and forth on needle, bind off. Repeat along right front piece, but after 1 cm / ½" work 5 buttonholes evenly on row - 1 buttonhole = bind off 2 sts and cast on 2 new sts over bound off sts on next row. Pick up approx 126-130 sts round neckline on double pointed needles size 2.5 mm / US 1.5 with gray and K2 rows back and forth on needle, bind off. Now crochet an edge along bottom edge of body and around neckline with white and crochet hook size 3.5 mm/E/4as follows: 1 sc, * ch 3, 1 dc in first ch, skip 2 sts and crochet 1 sc in next st *, repeat from *-*. Continuing, crochet a row of sc (approx 95 sc) with gray and crochet hook size 3.5 mm/E/4 around armholes change to white and crochet an edge like bottom edge of body and neck. Sew in buttons. |
|||||||||||||
Diagram explanations |
|||||||||||||
|
|||||||||||||
 |
|||||||||||||
Have you finished this pattern?Tag your pictures with #dropspattern or submit them to the #dropsfan gallery. Do you need help with this pattern?You'll find 23 tutorial videos, a Comments/Questions area and more by visiting the pattern on garnstudio.com. © 1982-2026 DROPS Design A/S. We reserve all rights. This document, including all its sub-sections, has copyrights. Read more about what you can do with our patterns at the bottom of each pattern on our site. |
|||||||||||||


With over 40 years in knitting and crochet design, DROPS Design offers one of the most extensive collections of free patterns on the internet - translated to 17 languages. As of today we count 324 catalogs and 12290 patterns - 12280 of which are translated into English (US/in).
We work hard to bring you the best knitting and crochet have to offer, inspiration and advice as well as great quality yarns at incredible prices! Would you like to use our patterns for other than personal use? You can read what you are allowed to do in the Copyright text at the bottom of all our patterns. Happy crafting!
Post a comment to pattern DROPS 46-8
We would love to hear what you have to say about this pattern!
If you want to leave a question, please make sure you select the correct category in the form below, to speed up the answering process. Required fields are marked *.