
Popular categories
Looking for a yarn?


Comments / Questions (15)
![]() Samuel Ericson Budiaman wrote:
Samuel Ericson Budiaman wrote:
Hi. Really love this design. Im currently making it and im just starting the yoke part but im having a bit of trouble. Im not sure if i should yarn over again when i purl where you wrote *yarn over, slip stitch purlwise, purl 1*. Should I yarn over again when I do the purl?
05.04.2025 - 17:13DROPS Design answered:
Dear Samuel, yes, that's correct. The English rib, on its first row, is worked as a repeat of: 1 yarn over, 1 slipped stitch and 1 worked stitch. In the next round you will work the yarn over together with the slipped stitch, so you need to have one yarn over for each slipped stitch. Happy knitting!
06.04.2025 - 20:07
![]() Jeibbiej wrote:
Jeibbiej wrote:
I am new in knitting. In A.1 yoke (XXL) instruction, it says that it should end with 192 stitches. But I end up with 288. Am I right to assume that the yarn-over and slip is counted as one. If i did this, I would end up with 192. That is, 288 / 3 [for 1 yarn-over, 1 slip, 1 knit/purl] = 96; 96 * 2 [for 1 yarn over and slip, 1 knit/purl] = 192).
15.01.2025 - 07:15DROPS Design answered:
Dear Jeibbiej, you start A.1 with 8 sts and when A.1 is done there are 24 sts in each A.1 x 8 repeats = 192 stitches. (Yarn over and slipped stitches are both counted as 1 stitch throughout the English rib pattern). Happy knitting!
15.01.2025 - 09:19
![]() Christina Friberg wrote:
Christina Friberg wrote:
Hej! Hur stickar man varvet efter ökningar på varv 10 på diagram A 1. När man stickar runt med diagram börjar man ju från höger till vänster hela tiden men då stämmer inte detta mönster. Då får man ju 2 omslag i rad el tänker jag helt fel? Mvh Christina
06.12.2024 - 20:50DROPS Design answered:
Hej Christina, jo du skal fortsætte mønsteret (så du ikke får 2 omslag i rad) :)
11.12.2024 - 12:23
![]() Christina Friberg wrote:
Christina Friberg wrote:
Hej! Nu har jag försökt sticka patentstickningens början 5 ggr men får inte ihop diagrammet med varvet över övningarna. Var kan man få hjälp med detta?
06.12.2024 - 20:36
![]() Carol wrote:
Carol wrote:
Is there a similar pattern knitted bottom up? I am trying to reverse this pattern which is very tricky and it is hard to find a chunky men’s jumper knitted bottom up on circular needles. Appreciate any help. Thanks. Carol
11.11.2024 - 11:39DROPS Design answered:
Hi Carol, If you search for "Jumpers for men bottom up" at the top of the page (magnifying glass - search symbol) will all such patterns come up. Hope you find a pattern you like. Kind regards, Drops Team.
11.11.2024 - 11:51
![]() Nybegynder wrote:
Nybegynder wrote:
Hej Drops Jeg vil gerne vide om jeg kan bytte Air ud med Snow. Jeg har brugt jeres omregner, men bliver forvirret når det ikke står som en muglighed, da trøjens anbefalede pind størrelse er en pind 8. Jeg vil gerne spørge om det er på grund af at det er patentstrik eller strikkefastheden der er med til at gøre forskellen. Jeg vil også spørge om det er mugligt at strikke halsen sammen til at starte med ligesom på nogle af jeres andre trøjer? KH
22.10.2024 - 11:50DROPS Design answered:
Hej. Nej du kan dessvärre ikke bytte Air ud med Snow eftersom Snow är ett mycket tjockare garn. Du börjar med att strikke DOBBELT HALSKANT och sedan fortsätter du med BÆRESTYKKE. Mvh DROPS Design
23.10.2024 - 14:20
![]() Marta wrote:
Marta wrote:
Buongiorno, ho provato a fare il campione con i ferri da 4.5 ma per ottenere 10 cm devo usare 20 maglie, non 10. Per l'altezza invece va nene, 30 ferri fanno 10 cm. Potreste verificare se magari c'è un errore nella descrizione di come fare il campione ? Nemmeno usando i ferri da 8 mm con 10 maglie si arriva a 10 cm. Fatemi sapere, Grazie Marta
17.09.2024 - 22:21DROPS Design answered:
Buonasera Marta, al momento non sono riportati errori nel campione: deve lavorare con il numero di ferri che le permette di ottenere 10 maglie in 10 cm a coste inglesi. Buon lavoro!
17.09.2024 - 23:14
![]() Andrea wrote:
Andrea wrote:
In the instructions I don't find the fold and stitch for the double neck. Am I missing something in the pattern?
23.06.2024 - 17:04DROPS Design answered:
Dear Andrea, the folding is explained at the very end, in the ASSEMBLY. You can also check that the double neck you worked was 13 cm long, while the neck in the chart is only 6 cm. So you fold it double, more or less, towards the WS and sew it. Happy knitting!
23.06.2024 - 19:39
![]() Susanne wrote:
Susanne wrote:
Hallo, meine Maschenprobe mit Drops Air im Patentmuster mit Nadeln 7mm sieht prima aus, aber der Kragen in der angegebenen Maschenzahl (90 für XXXL) im Rippenmuster wird viel zu weit. Ich habe auch hierfür eine dünnere Nadel genommen (4mm statt 4,5mm), aber trotzdem werden es statt der angegebeben einfachen Breite von 22 cm eher so 25 cm. Auf dem Foto sieht man, dass der Kragen nicht eng anliegen soll, aber es kommt mir totzdem viel vor. Gibt es da Erfahrungswerte?
01.02.2024 - 10:19DROPS Design answered:
Liebe Susanne,, am Anfang braucht man mehr Maschen für den Hals, da ma Rippenmuster strickt, und das Bündchen zieht die Arbeit zusammen. Die 22 cm sind die Breite für den Hals, wenn der Pullover flach liegt. Die gesamte Maschenanzahl zählt auch beide Schulter (vorne und hinten). Sollte Ihre Maschenprobe stimmen, dann sollten Sie die richtigen Maßnahmen bekommenViel Spaß beim stricken!
01.02.2024 - 15:42
![]() Rhianna wrote:
Rhianna wrote:
Hi, I’ve tried knitting this pattern up in drops air on 8mm needles but it created a see through mesh material. Following the suggestions in the other comments I’ve now tried knitting this up on 5mm needles but the measurements are completely wrong and way too tight. I honestly can’t figure out how to get the correct gauge for this pattern. Could there be a mistake with the suggested yarn? I am wondering if this should be knitted with drops wish instead?
07.08.2023 - 22:23DROPS Design answered:
Dear Rhianna, the number of stitches and of rows for 10 cm are more important than the needle size, make sure you get 10 stitches x 30 rows in English Rib = 10 x 10 cm to get the finished measurements. Read more about tension here. Happy knitting!
08.08.2023 - 09:18
|
||||||||||||||||
Rocky Ridges#rockyridgessweater |
||||||||||||||||
 |
 |
|||||||||||||||
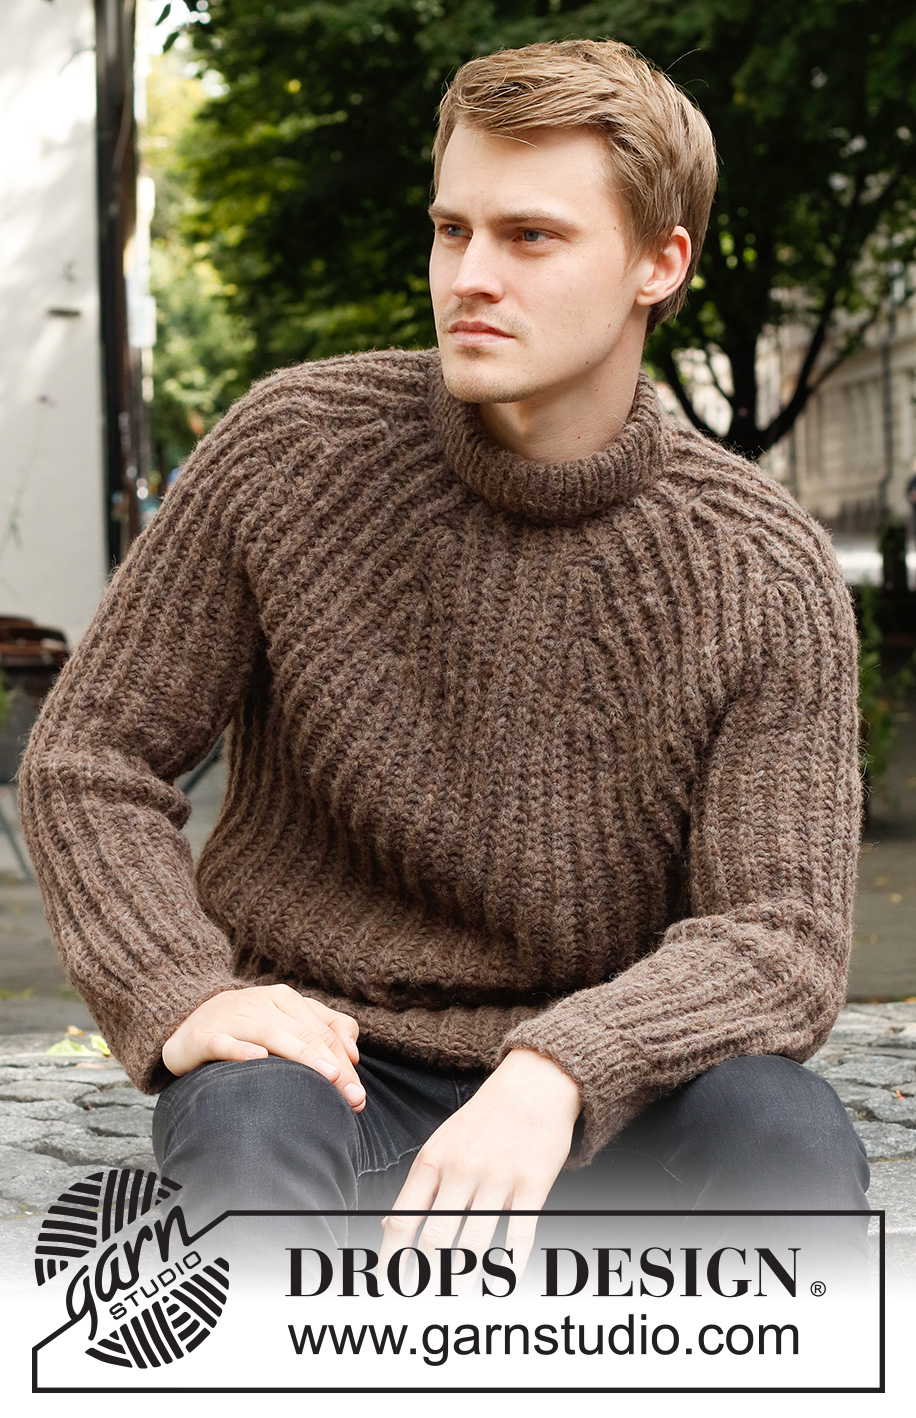
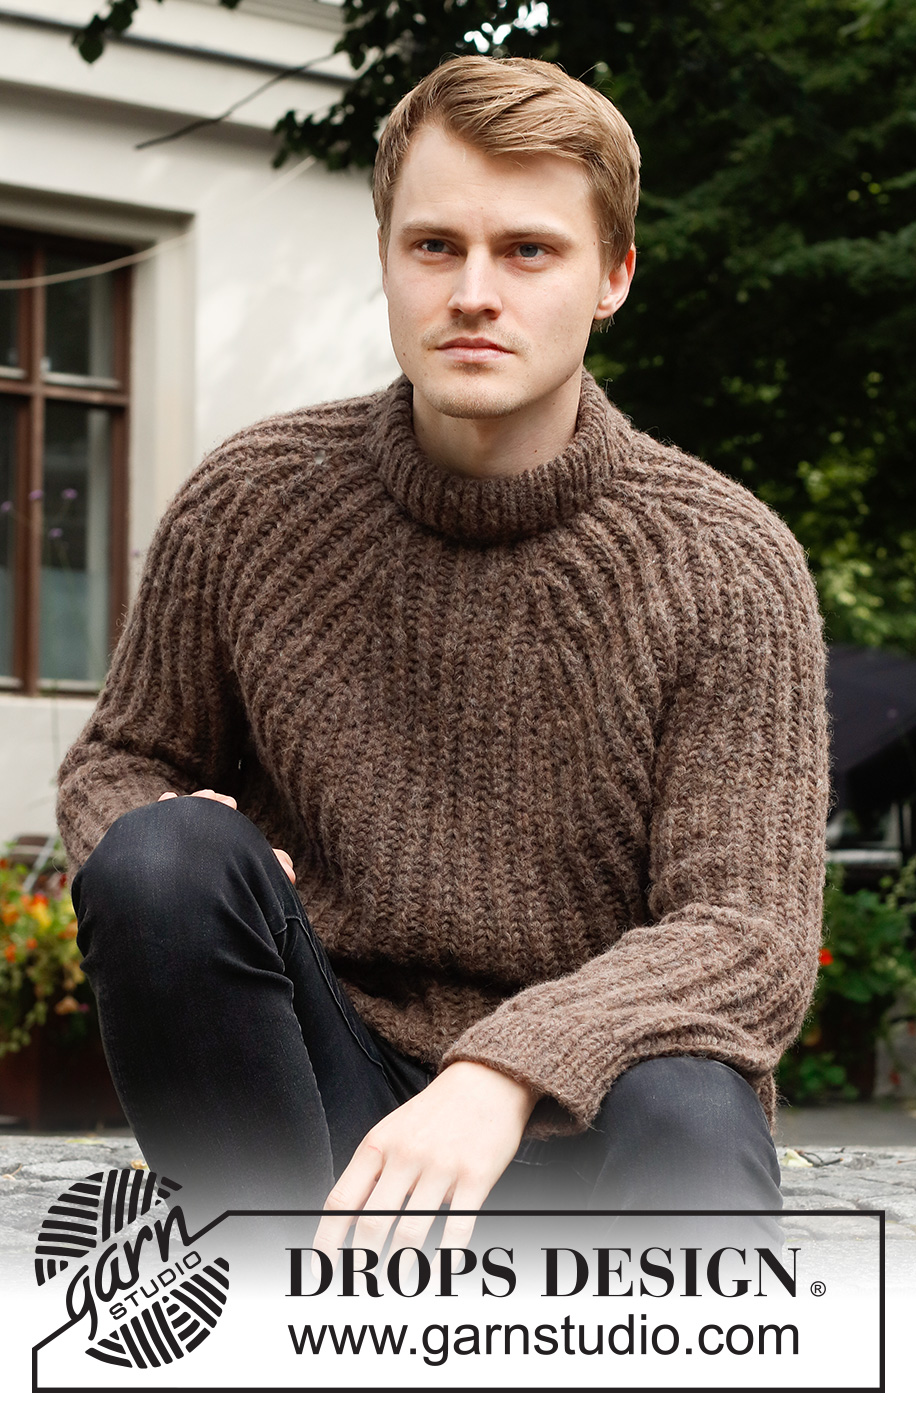
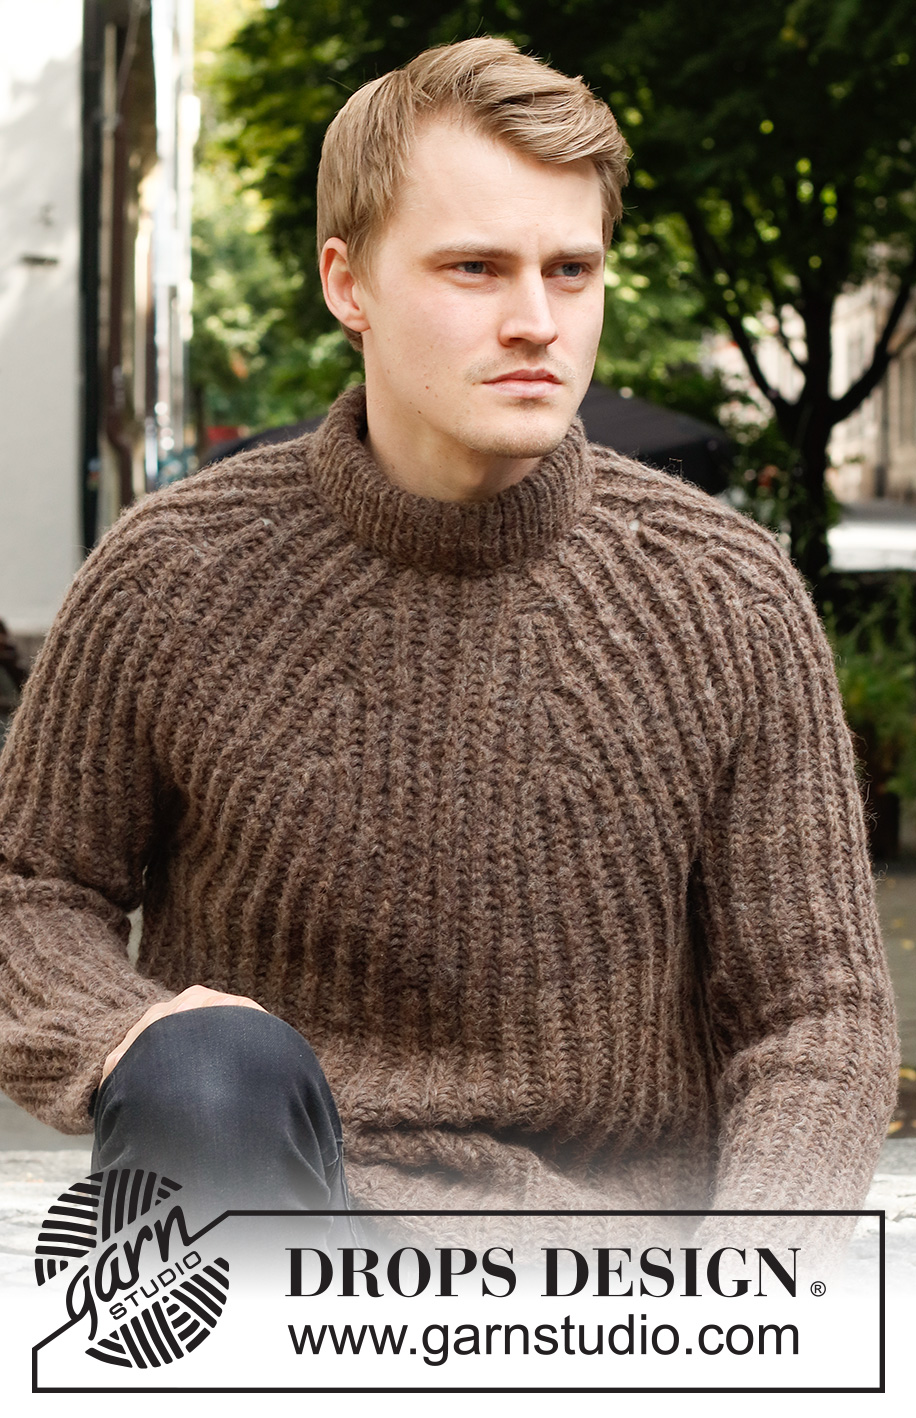
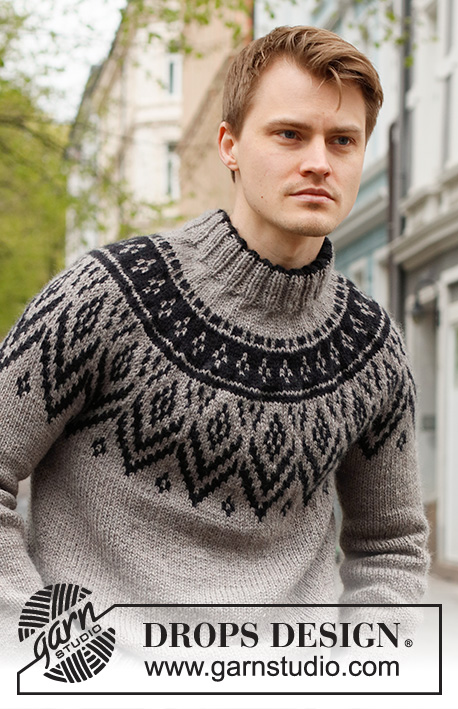
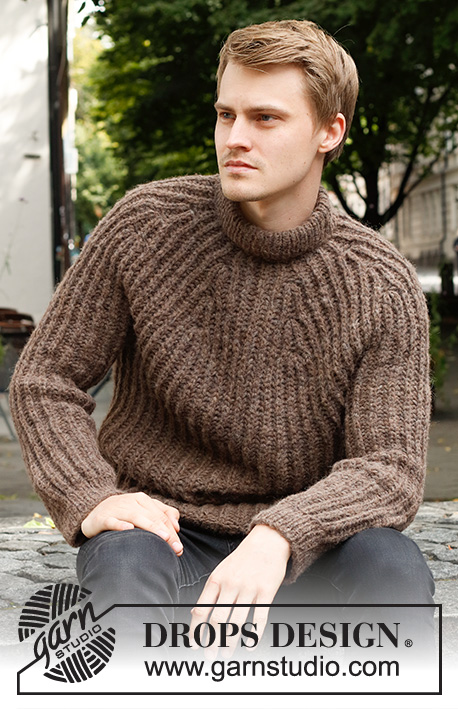
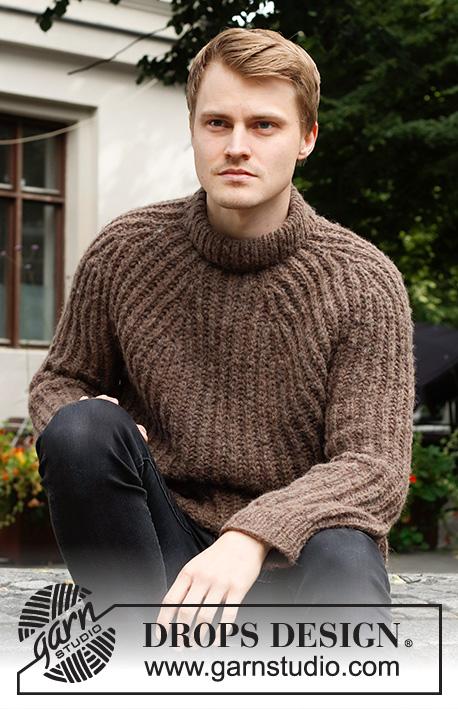
Knitted sweater for men in DROPS Air. The piece is worked top down with round yoke, English rib and double neck. Sizes S - XXXL.
DROPS 224-18 |
||||||||||||||||
|
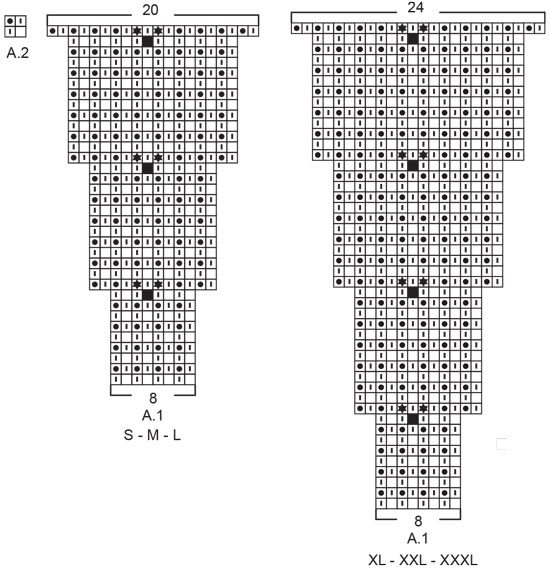
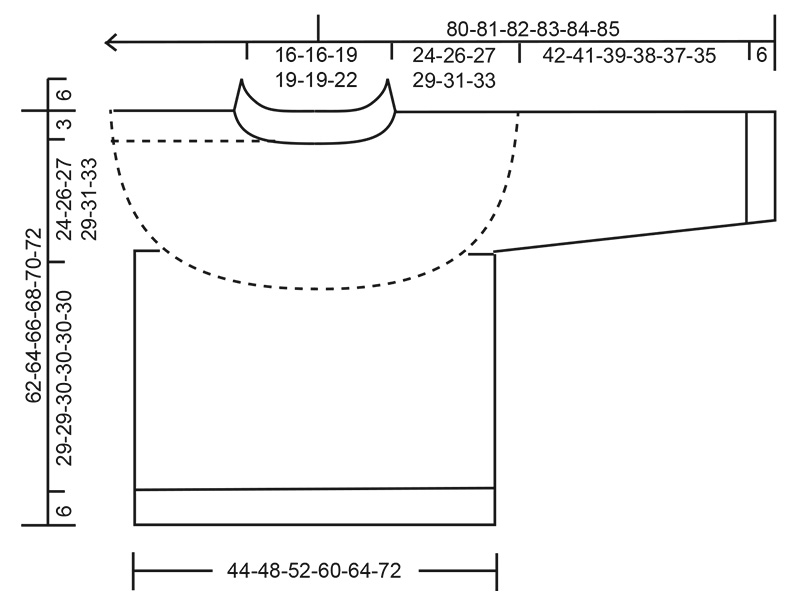
------------------------------------------------------- EXPLANATIONS FOR THE PATTERN: ------------------------------------------------------- PATTERN: See diagrams A.1 and A.2. Choose diagram for your size (applies to A.1). INCREASE/DECREASE TIP (evenly spaced): To work out how to increase/decrease evenly, count the total number of stitches on needle (e.g. 70 stitches) and divide by the number of increases/decreases to be made (e.g. 14) = 5. In this example, increase by making 1 yarn over after each 5th stitch. On the next round work the yarn overs twisted to avoid holes. When decreasing knit together each 4th and 5th stitch. KNITTING TIP (stitch-numbers): When counting the number of stitches, yarn overs are not counted as separate stitches. DECREASE TIP (for sleeves in sizes L, XL, XXL and XXXL): Decrease alternately before and after the marker thread. Decrease 2 stitches at the end of the round: Work until there are 4 stitches left before the marker thread, slip the first stitch and yarn over as if to knit together, knit 2 together (1 purl + stitch and yarn over), then pass the slipped stitch and yarn-over over the knitted together stitches, purl together the stitch and yarn over (= 2 stitches decreased). Decrease 2 stitches at the beginning of the round: Slip the first stitch and yarn over as if to knit together, purl 1, pass the slipped stitch and yarn-over over the purled stitch, slip the stitch back onto the left needle, pass the stitch and yarn-over over the stitch which was placed back onto the left needle, then slip the remaining stitch onto the right needle (= 2 stitches decreased). BINDING-OFF TIP: To avoid the bind-off edge being tight you can bind off with a larger size needle. If the edge is still tight, make 1 yarn over after approx. each 4th stitch at the same time as binding off; the yarn overs are bind off as normal stitches. ------------------------------------------------------- START THE PIECE HERE: ------------------------------------------------------- SWEATER – SHORT OVERVIEW OF THE PIECE: The neck and yoke are worked in the round with circular needle, top down – beginning of round = mid-front. The yoke is divided for the body and sleeves and the body continued in the round. The sleeves are worked in the round with short circular needle/double pointed needles, top down. The sweater can be used inside-out and back-to-front, so make sure you fasten the strands neatly. DOUBLE NECK: Cast on 70-70-80-80-80-90 stitches with circular needle size 8 MM = US 11 and DROPS Air. Change to circular needle size 4.5 MM = US 7 (doing this avoids a tight cast-on edge). Knit 1 round. Then work rib (knit 1, purl 1) for 13 cm = 5⅛". Knit 1 round where you decrease 14-14-16-16-16-18 stitches evenly spaced – read INCREASE/DECREASE TIP = 56-56-64-64-64-72 stitches. Insert a marker at the beginning of the round = mid-front. THE YOKE IS MEASURED FROM HERE! YOKE: Change to circular needle size 8 MM = US 11. Work the next round as follows: * Make 1 yarn over, slip 1 stitch as if to purl, purl 1 *, work from *-* to end of round. Read KNITTING TIP! Now work A.1 (English rib) over all stitches (= 7-7-8-8-8-9 repeats of 8 stitches). REMEMBER THE KNITTING GAUGE! When A.1 has been completed in height there are 140-140-160-192-192-216 stitches and the yoke measures approx. 12-12-12-16-16-16 cm = 4¾"-4¾"-4¾"-6¼"-6¼"-6¼" from the marker. Work A.2 onwards until the yoke measures 24-26-27-29-31-33 cm = 9½"-10¼"-10⅝"-11⅜"-12¼"-13" from the marker. Now divide the yoke for the body and sleeves as follows: Work the first 20-20-22-28-28-32 stitches as before (= half front piece), place the next 30-30-36-40-40-44 stitches on 1 thread for the sleeve, cast on 4-8-8-4-8-8 stitches (= in side under sleeve), work the next 40-40-44-56-56-64 stitches (= back piece), place the next 30-30-36-40-40-44 stitches on 1 thread for the sleeve, cast on 4-8-8-4-8-8 stitches (= in side under sleeve), work the last 20-20-22-28-28-32 stitches (= half front piece). The body and sleeves are finished separately. THE PIECE IS NOW MEASURED FROM HERE! BODY: = 88-96-104-120-128-144 stitches. Continue with A.2 - the 4-8-8-4-8-8 stitches under the sleeves are worked into the pattern, i.e. on the first round they are knitted/purled without yarn overs. When the piece measures 29-29-30-30-30-30 cm = 11⅜"-11⅜"-11¾"-11¾"-11¾"-11¾" from the division (or to desired length; there is approx 6 cm = 2⅜" left), change to circular needle size 4.5 MM = US 7 and increase as follows: Work together the English rib stitches and their respective yarn overs. * Knit 1, 1 yarn over *, work from *-* for the whole round = 176-192-208-240-256-288 stitches. Work rib (knit 1, purl 1) for 6 cm = 2⅜". Bind off with knit over knit and purl over purl – read BINDING-OFF TIP. The sweater measures approx. 62-64-66-68-70-72 cm = 24⅜"-25¼"-26"-26¾"-27½"-28⅜" from the shoulder down. SLEEVES: Place the 30-30-36-40-40-44 stitches from the thread on the one side of the piece on double pointed needles/short circular needle size 8 MM = US 11 and knit up 1 stitch in each of the 4-8-8-4-8-8 stitches cast on under the sleeve = 34-38-44-44-48-52 stitches. Insert a marker thread in the middle of the 4-8-8-4-8-8 stitches under the sleeve. Allow the thread to follow your work onwards; it will be used when decreasing under the sleeve. Start at the marker thread and continue A.2 in the round – the 4-8-8-4-8-8 stitches under the sleeves are worked into the pattern, i.e. on the first round they are knitted/purled without yarn overs. AT THE SAME TIME when the sleeve measures 6 cm = 2⅜", decrease 2 stitches under the sleeve (applies only to sizes L, XL, XXL and XXXL) – read DECREASE TIP. Decrease like this every 2 cm = ¾" a total of 0-0-2-1-2-2 times = 34-38-40-42-44-48 stitches. Continue working until the piece measures 42-41-39-38-37-35 cm = 16½"-16⅛"-15¼"-15"-14½"-13¾" from the division (or to desired length; there is approx. 6 cm = 2⅜" left – NOTE: Shorter measurements in larger sizes due to wider neck and longer yoke). Change to double pointed needles size 4.5 MM = US 7 and knit 1 round where you increase 6-8-8-8-8-10 stitches evenly spaced (the yarn overs in the pattern are worked together with their respective stitches) = 40-46-48-50-52-58 stitches. Work rib (knit 1, purl 1) for 6 cm = 2⅜". Bind off with knit over knit and purl over purl – remember BINDING-OFF TIP. Work the other sleeve in the same way. ASSEMBLY: Fold the neck double to the inside and sew down. To avoid the neck being tight and rolling outwards, it is important that the seam is elastic. |
||||||||||||||||
Diagram explanations |
||||||||||||||||
|
||||||||||||||||
 |
||||||||||||||||
 |
||||||||||||||||
Have you finished this pattern?Tag your pictures with #dropspattern #rockyridgessweater or submit them to the #dropsfan gallery. Do you need help with this pattern?You'll find 24 tutorial videos, a Comments/Questions area and more by visiting the pattern on garnstudio.com. © 1982-2026 DROPS Design A/S. We reserve all rights. This document, including all its sub-sections, has copyrights. Read more about what you can do with our patterns at the bottom of each pattern on our site. |
||||||||||||||||


With over 40 years in knitting and crochet design, DROPS Design offers one of the most extensive collections of free patterns on the internet - translated to 17 languages. As of today we count 324 catalogs and 12290 patterns - 12280 of which are translated into English (US/in).
We work hard to bring you the best knitting and crochet have to offer, inspiration and advice as well as great quality yarns at incredible prices! Would you like to use our patterns for other than personal use? You can read what you are allowed to do in the Copyright text at the bottom of all our patterns. Happy crafting!
Post a comment to pattern DROPS 224-18
We would love to hear what you have to say about this pattern!
If you want to leave a question, please make sure you select the correct category in the form below, to speed up the answering process. Required fields are marked *.