DROPS Alpaca
DROPS Alpaca
100% Alpaca
from 4.85 $ /50g
Get the yarn to make this pattern from 33.95$.

The yarn cost is calculated from the pattern’s smallest size and the yarn’s cheapest product type. Looking for an even better price? You might find it on the DROPS Deals!

DROPS SS24

Flaming Mountain

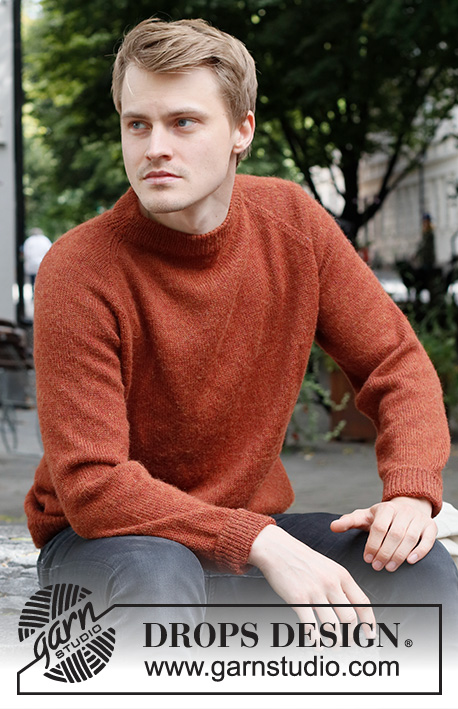
Knitted sweater for men in DROPS Alpaca. The piece is worked top down, with raglan and double neck. Sizes S - XXXL.

DROPS 224-17
DROPS Design: Pattern no z-950
Yarn group A
-------------------------------------------------------

SIZES:
S - M - L - XL - XXL – XXXL

Finished measurements:
Chest measurements: 96-104-112-122-132-146 cm = 37¾"-41"-44"-48"-52"-57⅜"
Full length: 62-64-66-68-70-72 cm = 24⅜"-25¼"-26"-26¾"-27½"-28⅜"
All measurements in charts are in cm.

MATERIALS:
DROPS ALPACA from Garnstudio (belongs to yarn group A)
350-400-450-500-500-550 g color 9025, hazelnut

NEEDLES:
DROPS CIRCULAR NEEDLE SIZE 3 MM = US 2.5: Length 40 cm = 16" and 80 cm = 32".
DROPS CIRCULAR NEEDLE SIZE 2.5 MM = US 1.5: Length 40 cm = 16" and 80 cm = 32".
DROPS DOUBLE POINTED NEEDLES SIZE 3 MM = US 2.5.
DROPS DOUBLE POINTED NEEDLES SIZE 2.5 MM = US 1.5.
The technique MAGIC LOOP can be used – you then only need circular needle of 80 cm = 32" in each size.

KNITTING GAUGE:
24 stitches in width and 32 rows in height with stockinette stitch = 10 x 10 cm = 4" x 4".
NOTE: Needle size is only a guide. If you get too many stitches on 10 cm = 4", change to a larger needle size. If you get too few stitches on 10 cm = 4", change to a smaller needle size.

-------------------------------------------------------

Alternative Yarn – See how to change yarns here
Yarn Groups A to F – Use the same pattern and change the yarn here
Yarn usage using an alternative yarn – Use our yarn converter here

-------------------------------------------------------

DROPS Alpaca
DROPS Alpaca
100% Alpaca
from 4.85 $ /50g
Get the yarn to make this pattern from 33.95$.

The yarn cost is calculated from the pattern’s smallest size and the yarn’s cheapest product type. Looking for an even better price? You might find it on the DROPS Deals!

Pattern instructions

NOTE: This pattern is written in American English. All measurements in charts are in cm. For conversion from inches to cm - click here. There are different terms for crocheting in American and British English. If this pattern includes crochet, click for "crochet terms" here. For this pattern in British English, please click here.
-------------------------------------------------------

EXPLANATIONS FOR THE PATTERN:

-------------------------------------------------------

INCREASE/DECREASE TIP (evenly spaced):
To work out how to increase/decrease evenly, count the total number of stitches on needle (e.g. 136 stitches), and divide by the number of increases/decreases to be made (e.g. 20) = 6.8. In this example, increase by making 1 yarn over after each 7th stitch. On the next round work the yarn overs twisted to avoid holes. When decreasing, alternately knit together each each 6th and 7th stitch.

RAGLAN:
Increase 1 stitch on each side of the marker threads in the transitions between body and sleeves as follows: Work until there is 1 stitch left before the marker thread, 1 yarn over, knit 2 (marker thread sits between these 2 stitches), 1 yarn over (= 2 stitches increased). On the next round knit the yarn overs twisted to avoid holes. Then work the new stitches in stockinette stitch. A total of 8 stitches increased on each increase-round.

DECREASE TIP (for body and sleeves):
Decrease 1 stitch on either side of the marker as follows: Work until there are 3 stitches left before the marker, knit 2 together, knit 2 (marker thread sits between these 2 stitches), slip 1 stitch as if to knit, knit 1 and pass the slipped stitch over the knitted stitch.

BINDING-OFF TIP:
To avoid the bind-off edge being tight you can bind off with a larger size needle. If the edge is still tight, make 1 yarn over after approx. each 4th stitch at the same time as binding off; the yarn overs are bind off as normal stitches.

-------------------------------------------------------

START THE PIECE HERE:

-------------------------------------------------------

SWEATER – SHORT OVERVIEW OF THE PIECE:
The neck and yoke are worked in the round with circular needle, top down. The yoke is divided for the body and sleeves and the body is continued in the round with circular needle. The sleeves are worked with double pointed needles/short circular needle, top down.

DOUBLE NECK:
Cast on 136-136-144-152-152-160 stitches with circular needle size 3 MM = US 2.5 and DROPS Alpaca. Change to circular needle size 2.5 MM = US 1.5 and work rib in the round (knit 1, purl 1) for 8 to 9 cm = 3⅛" to 3½". Change to circular needle size 3 MM = US 2.5. Knit 1 round and decrease 20-16-20-20-16-16 stitches evenly spaced - read INCREASE/DECREASE TIP = 116-120-124-132-136-144 stitches. Insert 1 marker at the beginning of the round; the yoke is measured from this marker!

YOKE:
Insert 4 marker threads, without working the stitches, as follows (start of round = mid-back):
Count 22-23-24-26-27-29 stitches (= half back piece), insert marker thread-1 here.
Count 14 stitches (= sleeve), insert marker thread-2 here.
Count 44-46-48-52-54-58 stitches (= front piece), insert marker thread-3 here.
Count 14 stitches (= sleeve), insert marker thread-4 here. There are 22-23-24-26-27-29 stitches left (= half back piece).
REMEMBER THE KNITTING GAUGE!
Continue with stockinette stitch, AT THE SAME TIME, on the first round, start to increase to RAGLAN – read description above. Increase like this every other round a total of 28-33-36-39-43-48 times = 340-384-412-444-480-528 stitches.
Continue with stockinette stitch until the yoke measures 23-25-26-28-30-32 cm = 9"-9¾"-10¼"-11"-11¾"-12½" from the marker on the neck.
Now divide for the body and sleeves on the next round as follows:
Work the first 52-57-61-67-73-82 stitches (= half back piece), place the next 66-78-84-88-94-100 stitches on a thread for the sleeve, cast on 10-10-12-12-12 stitches (= in side under sleeve), work 104-114-122-134-146-164 stitches (= front piece), place the next 66-78-84-88-94-100 stitches on a thread for the sleeve, cast on 10-10-12-12-12 stitches (= in side under sleeve), work the last 52-57-61-67-73-82 stitches (= half back piece). You have now worked 2-1-1-2-3-5 stitches on each side of both sleeves into the front/back pieces.
The body and sleeves are finished separately. Remove the marker threads.
THE PIECE IS NOW MEASURED FROM HERE!

BODY:
= 228-248-268-292-316-352 stitches. Insert a marker in the middle of the new stitches under each sleeve. Continue with stockinette stitch in the round for 2 cm = ¾". Decrease 1 stitch on each side of both markers - read DECREASE TIP. Decrease like this every 8-4-5-5-8-5 cm = 3⅛"-1½"-2"-2"-3⅛"-2" a total of 3-6-5-5-3-5 times = 216-224-248-272-304-332 stitches. Continue working until the piece measures 32-32-33-33-33-33 cm = 12½"-12½"-13"-13"-13"-13" from the division (approx. 4 cm = 1½" left to finished length; try the sweater on and work to desired length). Change to circular needle size 2.5 MM = US 1.5 and knit 1 round where you increase 18-18-20-22-26-28 stitches evenly spaced - remember INCREASE/DECREASE TIP = 234-242-268-294-330-360 stitches. Work rib (knit 1, purl 1) for 4 cm = 1½". Bind off with knit over knit and purl over purl - read BINDING-OFF TIP! The sweater measures approx. 62-64-66-68-70-72 cm = 24⅜"-25¼"-26"-26¾"-27½"-28⅜" from the shoulder down.

SLEEVES:
Place the 66-78-84-88-94-100 stitches from the thread on the one side of the piece on double pointed needles/short circular needle size 3 MM = US 2.5 and knit up 1 stitch in each of the 10-10-12-12-12-12 stitches cast on under the sleeve = 76-88-96-100-106-112 stitches. Insert a marker thread in the middle of the new stitches under the sleeve.
Work stockinette stitch in the round for 2-2-3-2-4-2 cm = ¾"-¾"-1⅛"-¾"-1½"-¾". Now decrease 1 stitch on each side of the marker – read DECREASE TIP. Decrease like this every 4½-3-2-2-1½-1½ cm = 1⅝"-1⅛"-¾"-¾"-½"-½" a total of 9-13-17-18-20-21 times = 58-62-62-64-66-70 stitches.
Work until the sleeve measures 42-41-40-38-37-35 cm = 16½"-16⅛"-15¾"-15"-14½"-13¾" from the division (approx. 4 cm = 1½" left to finished length; try the sweater on and work to desired length).
Change to double pointed needles size 2.5 MM = US 1.5 and knit 1 round where you increase 4 stitches evenly spaced = 62-66-66-68-70-74 stitches. Work rib (knit 1, purl 1) for 4 cm = 1½". Bind off with knit over knit and purl over purl - remember BINDING-OFF TIP! Work the other sleeve in the same way.

ASSEMBLY:
Fold the neck double to the inside and sew down. To avoid the neck being tight and rolling outwards, it is important that the seam is elastic.

This pattern has been corrected.

Updated online: 18.10.2023
DOUBLE NECK: Cast on 136-136-144-152-152-160 stitches with circular needle size 3 MM = US 2.5 and DROPS Alpaca. Change to circular needle size 2.5 MM = US 1.5 and work rib in the round (knit 1, purl 1) for 8 to 9 cm = 3 1/8"-3 1/2". Change to circular needle size 3 MM = US 2.5. Knit 1 round and decrease 20-16-20-20-16-16 stitches evenly spaced - read INCREASE/DECREASE TIP = 116-120-124-132-136-144 stitches...

Diagram

All measurements in charts are in cm.

diagram measurements

Each of our patterns has specific tutorial videos to help you.

Do you have a question? See a list of frequently asked questions (FAQ)

Knitting tension is what determines the final measurements of your work, and is usually measured per 10 x 10 cm. It is provided like so: number of stitches in width x number of rows in height - eg: 19 stitches x 26 rows = 10 x 10 cm.

The knitting tension is very individual; some people knit/crochet loosely while others work tightly. You adjust the knitting tension with the needle size, which is why the suggested needle size only serve as a guide! You need to adjust this (up or down) to ensure that YOUR knitting tension matches the knitting tension provided in the pattern. If you work with a different knitting tension than provided you will have a different yarn consumption, and your work will have different measurements than what the pattern suggests.

The knitting tension also determines which yarns can replace each other. As long as you achieve the same knitting tension you can replace one yarn with another.

See DROPS lesson: How to measure your tension/gauge

See DROPS video: How to make a gauge tension swatch

The required amount of yarn is provided in grams, eg: 450 g. To calculate how many balls you’ll need you first need to know how many grams are in 1 ball (25g, 50g or 100g). This information is available if you click on the individual yarn quality on our pages. Divide the amount required with the amount of each ball. For example, if each ball is 50g (the most common amount), the calculation will be as follows: 450 / 50 = 9 balls.

The important thing when changing from one yarn to another is that the knitting/crochet tension remains the same. This is so that the measurements of the finished piece will be the same as on the sketch provided. It is easier to achieve the same knitting tension using yarns from the same yarn group. It is also possible to work with multiple strands of a thinner yarn to achieve the knitting tension of a thicker one. Please try our yarn converter. We recommend you to always work a test swatch.

Please NOTE: when changing yarn the garment might have a different look and feel to the garment in the photo, due to individual properties and qualities of each yarn.

See DROPS lesson: Can I use a different yarn than the one mentioned in the pattern?

All our yarns are categorised into yarn groups (from A to F) according to thickness and knitting tension – group A contains the thinnest yarns and group F the thickest. This makes it easier for you to find alternative yarns to our patterns, should you wish to switch yarn. All yarns within the same group have a similar knitting tension and can easily replace each other. However, different yarn qualities have different structures and properties which will give the finished work a unique look and feel.

Click here for an overview of the yarns in each yarn group

At the top of all our patterns you’ll find a link to our yarn converter, which is a helpful tool should you wish to use a different yarn than suggested. By filling in the yarn quality you wish to replace, the amount (in your size) and number of strands, the converter will present good alternative yarns with the same knitting tension. Additionally it will tell you how much you’ll require in the new qualities and whether you’ll need to work with multiple strands. Most skeins are 50g (some are 25g or 100g).

If the pattern is worked with multiple colours, every colour will have to be converted separately. Similarly, if the pattern is worked with several strands of different yarns (for example 1 strand Alpaca and 1 strand Kid-Silk) you will have to find alternatives for each, individually.

Click here to see our yarn converter

Since different yarns have different qualities and textures we have chosen to keep the original yarn in our patterns. However, you can easily find options among our available qualities by using our yarn converter, or simply pick a yarn from the same yarn group.

It is possible that some retailers still have discontinued yarns in stock, or that someone has a few skeins at home that they would like to find patterns for.

The yarn converter will provide both alternative yarn as well as required amount in the new quality.

If you think it's hard to decide what size to make, it can be a good idea to measure a garment you own already and like the size of. Then you can pick the size by comparing those measures with the ones available in the pattern's size chart.

You'll find the size chart at the bottom of the pattern.

See DROPS lesson: How to read size chart

The needle size provided in the pattern serves only as a guide, the important thing is to follow the knitting tension. And since knitting tension is very individual, you will have to adjust the needle size to ensure that YOUR tension is the same as in the pattern – maybe you’ll have to adjust 1, or even 2 needle sizes, up or down to achieve the correct tension. For this, we recommend that you work test swatches.

Should you work with a different knitting tension than the one provided, the measurements of the finished garment might deviate from the measurement sketch.

See DROPS lesson: How to measure your tension/gauge

See DROPS video: How to make a gauge tension swatch

Working a garment top-down provides more flexibility and room for personal adjustment. For example it is easier to try the garment on while working, as well as making adjustments to length of yoke and shoulder caps.

The instructions are carefully explaining every step, in the correct order. Diagrams are adjusted to the knitting direction and are worked as usual.

The diagram depicts all rows/rounds, and every stitch seen from the right side. It is read from bottom to top, from right to left. 1 square = 1 stitch.

When working back and forth, every other row is worked from the right side and every other row is worked from the wrong side. When working from the wrong side, the diagram will have to be worked reversed: from left to right, knit stitches are purled, purl stitches are knit etc.

When working in the round every round is worked from the right side and the diagram are worked from right to left on all rounds.

See DROPS lesson: How to read knitting diagrams

The diagram depicts all rows/rounds, and every stitch seen from the right side. It is worked from bottom to top, from right to left.

When working back and forth every other row is worked from the right side: from right to left and every other row is worked from the wrong side: from left to right.

When working in the round, every row in the diagram are worked from the right side, from right to left.

When working a circular diagram you start in the middle and work your way outwards, counter clockwise, row by row.

The rows usually start with a given number of chain stitches (equivalent to the height of the following stitch), this will either be depicted in the diagram or explained in the pattern.

See DROPS lesson: How to read crochet diagrams

Instructions for working several diagrams after each other on the same row/round, will often be written like so: “work A.1, A.2, A.3 a total of 0-0-2-3-4 times". This means you work A.1 once, then A.2 is worked once, and A.3 is repeated (in width) the number of times provided for your size – in this case like so: S = 0 times, M = 0 times, L=2 times, XL= 3 times and XXL = 4 times.

The diagrams are worked as usual: begin with the first row in A.1, then work the first row in A.2 etc.

See DROPS lesson: How to read knitting diagrams

See DROPS lesson: How to read crochet diagrams

The total width of the garment (from wrist-to-wrist) will be larger in the larger sizes, despite the actual sleeves being shorter. The larger sizes have longer sleeve caps and wider shoulders, so there will be a good fit in all sizes.

The measurement sketch/schematic drawing provides information regarding the full length of the garment. If it’s a jumper or a jacket the length is measured from the highest point on the shoulder (usually closest to the neckline), and straight down to the bottom of the garment. It is NOT measured from the tip of shoulder. Similarly, the length of yoke is measured from the highest point on the shoulder and down to where yoke is split into body and sleeves.

See DROPS lesson: How to read a schematic drawing

Diagrams are often repeated on the round or in height. 1 repeat is the diagram the way it appears in the pattern. If it says to work 5 repeats of A.1 in the round, then you work A.1 a total of 5 times after/next to each other in the round. If it says to work 2 repeats of A.1 vertically/in height you work the entire diagram once, then begin again at the start and work the entire diagram one more time.

Chain stitches are slightly narrower than other stitches and to avoid working the cast-on edge too tight, we simply chain more stitches to begin with. The stitch count will be adjusted on the following row to fit the pattern and measurement sketch.

The rib edge is more elastic and will contract slightly compared to, for example, stocking stitch. By increasing before the rib edge, you avoid a visible difference in width between the rib edge and the rest of the body.

It’s very easy to cast off too tightly, and by making yarn overs while casting off (and simultaneously casting these off) you avoid a too tight cast off edge.

See DROPS video: How to bind off with yarn overs (yo)

To achieve an even increase (or decrease) you can increase on, for example: every 3rd and 4th row alternately, like so: work 2 rows and increase on the 3rd row, work 3 rows and increase on the 4th. Repeat this until the increase is complete.

See DROPS lesson: Increase or decrease 1 st on every 3rd and 4th row alternately

Should you prefer to work in the round instead of back and forth, you may of course adjust the pattern. You’ll need to add steeks mid-front (usually 5 stitches), and follow the instructions. When you would normally turn and work from the wrong side, simply work across the steek and continue in the round. At the end you’ll cut the piece open, pick up stitches to work bands, and cover the cut edges.

See DROPS video: How to knit steeks and cut open

Should you prefer to work back and forth instead of in the round, you may of course adjust the pattern so you work the pieces separately and then assemble them at the end. Divide the stitches for the body in 2, add 1 edge stitch in each side (for sewing) and work the front and back pieces separately.

See DROPS lesson: Can I adapt a pattern for circular needles into straight needles?

Pattern repeats can vary slightly in the different sizes, in order to get the correct proportions. If you’re not working the exact same size as the garment in the photo, yours might deviate slightly. This has been carefully developed and adjusted so that the complete impression of the garment is the same in all sizes.

Make sure to follow instructions and diagrams for your size!

If you have found a pattern you like which is available in women’s size it’s not very difficult to convert it to men’s size. The biggest difference will be the length of sleeves and body. Start working on the women size that you think would fit across the chest. The additional length will be worked right before you cast off for the armhole/sleeve cap. If the pattern is worked top-down you can add the length right after the armhole or before the first decrease on sleeve.

Regarding additional yarn amount, this will depend on how much length you add, but it is better with a skein too many than too few.

All yarns will have excess fibres (from production) that might come off as lint or shedding. Brushed yarns (ie hairier yarns) have more of these loose, excess fibres, causing more shedding.

Shedding also depends on what is worn under or over the garment, and whether this pulls at the yarn fibres. It’s therefore not possible to guarantee that there will be no shedding

Below are some tips on how to get the best result when working with hairier yarns:

1. When the garment is finished (before you wash it) shake it vigorously so the looser hairs come off. NOTE: do NOT use a lint roller, brush or any method that pulls at the yarn.

2. Place the garment in a plastic bag and put it in your freezer - the temperature will cause the fibres to become less attached to each other, and excess fibres will come off easier.

3. Leave in the freezer for a few hours before taking it out and shaking it again.

4. Wash the garment according to the instructions on the yarn label.

Pilling is a natural process that happens to even the most exclusive of fibers. It's a natural sign of wear and tear that is hard to avoid, and that is most visible in high friction areas of your garment like a sweater's arms and cuffs.

You can make your garment look as new by removing the pilling, using a fabric comb or a pill/lint remover.

Still can't find the answer you need? Then scroll down and leave your question so one of our experts can try to help you. This will be done normally within 5 to 10 working days.
In the meantime, you can read the questions and answers that others have left to this pattern or join the DROPS Workshop on Facebook to get help from fellow knitters/crocheters!

You might also like...

Flaming Mountain

Kayelyn, United States

Flaming Mountain

Betina, Sweden

Flaming Mountain

Heather, United States

Post a comment to pattern DROPS 224-17

We would love to hear what you have to say about this pattern!

If you want to leave a question, please make sure you select the correct category in the form below, to speed up the answering process. Required fields are marked *.

Comments / Questions (30)

country flag Alexandra wrote:

I think there are sizing issues with this design. According to the established sizes, the sleeves are shorter, as is the body.

24.02.2024 - 19:53

DROPS Design answered:

Dear Alexandra, the sleeves are shorter in the larger sizes because the yoke is longer, but the whole piece will be longer in the larger sizes - see measurement chart. Happy knitting!

26.02.2024 - 14:48

country flag Annika Karlsson wrote:

Hej, jag stickar tröjan i storlek XL och märker att I mönstret så har man vänt på ordningen i storlekarna när det gäller längden på ärmen. Så i storlek S står det att ärmen är 42 cm och i storlek XL är den 38 cm. Detta kan inte stämma.

03.12.2023 - 11:02

DROPS Design answered:

Hei Annika. Jo, målene stemmer. Det er kortere mål i de større størrelsene pga bredere skuldervidde og lengre ermetopp. mvh DROPS Design

04.12.2023 - 10:32

country flag Marion wrote:

Bonjour, J’adore vos patrons qui tombent souvent très juste. Cependant, j’ai toujours un doute a l’étape de l’échantillon : est-ce qu’il est censé être tricoté avec l’aiguille la plus grosse (celle du corps du pull) ou avec la plus petite (celle des côtes)? Je penche pour la première solution mais comme mon échantillon ne correspond jamais, cela me perturbe un peu. Merci d’avance pour votre réponse, et merci pour les patrons!

27.11.2023 - 20:58

DROPS Design answered:

Bonjour Marion, utilisez les aiguilles qui permettront de tricoter le point concerné /décrit dans l'échantillon, ici, en jersey avec les aiguilles 3. N'hésitez pas à laver/bloquer votre échantillon pour vérifier vos mesures, parfois cette technique peut aider. Bon tricot!

28.11.2023 - 09:07

country flag Emma-Jane wrote:

The XL size still states on the sleeve to decrease every 21 and a half cm even though you have confirmed it should read every 2 cm. You really should correct this for others who don't see your correction in the comments/questions here.

31.10.2023 - 19:42

country flag Emma-Jane wrote:

The sleeve for the fourth/XL size states you decrease every 21.5cm a total of 18 times! This makes the sleeve just short of 4 metres long! Decrease like this every 41⁄2-3-2-211⁄2-11⁄2 cm a total of 9-13-17-18-20-21 times = 58-62-62-64-66-70 stitches. I am so fed up of the number of mistakes on this pattern, especially as someone who rights patterns themself.

31.10.2023 - 13:27

DROPS Design answered:

Dear Emma-Jane, in XL = 4th size you start decreasing after 2 cm then repeat these decreases on every 2 cm 17 more times (= 18 times in total); the last decrease will be worked when sleeve measures 36 cm (2 cm before ribbing edge); and you had 100 sts - 2 sts decreased a total of 18 times = 64 sts remain. Hope it can help. Happy knitting!

31.10.2023 - 16:27

country flag Anne wrote:

Bonjour, Je tricoté le modèle taille XXL. Pour les diminutions de manche , je dois diminuer de 1 maille de chaque côté du marqueur tous les combien de cm svp? Merci

23.09.2023 - 11:06

DROPS Design answered:

Bonjour Anne, en XXL vous devez diminuer tous les 1½ - le tiret entre la taille précédente et celle-ci a été ajouté pour que ce soit plus clair, merci pour votre retour. Bonne continuation!

25.09.2023 - 08:35

country flag Richard wrote:

J'aurais bien aimé une explication sur les pulls hommes avec un rehausse au niveau du col. Dommage c'est plus confortable. Merci

18.04.2023 - 20:43

DROPS Design answered:

Bonjour Richard, dans cette vidéo, nous montrons comment tricoter des rangs raccourcis pour un pull raglan tricoté de haut en bas; cette technique pourra peut-être vous inspirer. Bon tricot!

19.04.2023 - 07:51

country flag Bets De Burgemeester wrote:

Voor de dubbele hals wordt de laatste naald recht gebreid (en geminderd), daarna moet voor de pas verder gegaan worden met de tricotsteek (en vermeerderen). Ik brei op rondbreinaalden. Betekent dit dat ik verder moet gaan met recht breien? (Steeds recht breien geeft een tricotsteek op rondbreinaalden). Of is er voor rondbreinaalden een andere manier om na een rechte naald door te gaan met tricotsteek?

05.03.2023 - 17:53

DROPS Design answered:

Dag Bets,

Als je in de rondte breit, brei je inderdaad de tricotsteken steeds recht (aan de goede kant)

08.03.2023 - 12:54

country flag Willie wrote:

Goedenavond, ik ben begonnen om de trui te breien. Voor de PAS heb ik voor de raglan elke naald 8 steken gemeerderd. Want klopt het dat dat bedoeld wordt met: iedere andere naald? Of had ik dat iedere 2e naald moeten? doen? Ik hoor graag wat juist is. Met vriendelijke groet, Willie

12.02.2023 - 18:10

DROPS Design answered:

Dag Willie,

Nee, met iedere andere naald wordt om de naald bedoeld, dus de ene naald wel en de andere naald niet.

12.02.2023 - 18:38

country flag Janne Povey wrote:

Jeg mener at der er 2 fejl i opskriften. 1 Strikkefasthed der står Får du for mange masker på 10 cm . Skift til tykkere pinde. Får du for få masker skift til tyndere pinde. Jeg mener at der er byttet om det skulle have været modsat. 2 Sæt ærmemasker på en tråd og slå 10-10 12-12-12 kun nævnt 5 størrelser Opskriften er på 6 størrelser så der mangler en. Det samme gælder i den anden side under ærmet. Hae ellers været glad for mange af jeres opskrifter.

29.01.2023 - 22:57